Medicham Best Tera Raid Build
◓ Starter Tera Raid: 7☆ Torterra (03/13~03/19)!
✬ Pokemon HOME Dex Completion Shiny Rewards:
┗ Meloetta | Manaphy | Enamorus | Keldeo | Meltan
▶︎ Share codes and team up for Blueberry Quests!
▶︎ Game8 Tera Raid Damage Calculator | Game8 Discord
★ The DLC Epilogue is now available! ▶︎ How to Start
The best Medicham Tera Raid Build in Pokemon Scarlet and Violet (SV) has the Pure Power ability while holding Bright Powder. Read on to learn what the best Medicham Tera Raid Build is and how to use it.
| Medicham - Related Guides | |
|---|---|
List of Contents
Best Medicham Tera Raid Build
Tera Raid Support: Skill Swap Medicham
| Best Medicham Tera Builds | |||
|---|---|---|---|
EV Spread, Ability, Held Item and Moveset
 Medicham Medicham  
 |
Tera Type | Nature | ||||
|---|---|---|---|---|---|---|
|
|
Impish (↑Def, ↓Sp.Atk) |
|||||
| EV Spread | ||||||
| HP: 252 |
Def: 252 |
Spe: 4 |
||||
| Ability | Moveset | |||||
| Pure Power | ・
Skill Swap
・ Force Palm ・ Reflect ・ Recover |
|||||
| Held Item | ||||||
|
|
||||||
Summary
This Medicham build is best used in duo teams with any physical attacker or a Body Press user. Despite calculating the Pokemon's Defense stat in its damage, Pure Power doubles the effective damage of Body Press when used.
Corviknight is a great partner for Medicham since it boasts a high Defense stat and benefits greatly from the extra boost to their Body Press once Medicham uses Skill Swap to pass its Ability to them.
Other physical attackers that are great partners for Medicham for the Raid Boss's 7-Star Raid and can benefit from Pure Power include Tinkaton, Lucario, and Decidueye.
Best Tera Type
Fighting Tera Type is best for this build to give it STAB on its Fighting-type moves. An Impish Nature is necessary to give it as much physical bulk to withstand the Raid Boss's attacks.
EV Spread Explanation
Max out Medicham's HP and Def EVs to give it as much physical bulk as possible, while adding the remaining EVs into Speed.
For this build, giving it a Bright Powder lowers the Raid Boss's accuracy when targeting Medicham by 10% which is useful against moves with shaky accuracy like Rock Slide and Stone Edge.
Tera Raid Strategy
| Medicham Tera Raid Turn-by-Turn Counter Strategy | |
|---|---|
| Turn 1 | Use Reflect to double Medicham and its teammate's Defense for five turns. |
| Turns 2~3 | Use Force Palm three times to build Tera Orb charge and potentially paralyze the Raid Boss. Note: Even if Medicham faints, it will still retain its Tera Orb Charge. |
| Turn 4 | Once Medicham's partner has enough boosts, use Skill Swap to pass Pure Power. |
| Turns 5~6 | Re-apply Reflect on the field and use Recover to heal. |
| Turn 7 | When the Raid Boss nullifies Abilities, use Skill Swap again to pass Pure Power to your partner Pokemon. |
| Turn 8+ | Terastallize into a Fighting-type and use boosted Force Palm to help break the Raid Boss's shield. |
Start the battle by using Reflect to double Medicham and its teammate's Defense for 5 turns. Next, use Force Palm three times to build up Tera Orb charge and potentially paralyze the Raid Boss. Take note that even if Medicham faints, it will still retain its Tera Orb charge.
Once Medicham's partner has enough boosts, use Skill Swap to pass Pure Power. Next, re-apply Reflect on the field and use Recover to heal damage. When the Raid Boss nullifies the effects of Abilities, use Skill Swap again to pass Pure Power to your partner.
Finally, terastallize into a Fighting-type and use boosted Force Palm to help your partner break the Raid Boss's shield and finish off the battle, while also using Recover to heal damage.
Effective Counter Against Ice, Normal, Rock, Dark, and Steel Tera Raids
| Super Effective (2x) |


|
|---|---|
| Not Very Effective (x0.5) |


|
| No Effect (x0) |

|
This Fighting Tera Raid Build is an effective counter to Ice, Normal, Rock, Dark and Steel Tera Raids.
If the Tera Raid Boss is usually a Flying, Ghost, or Fairy-type outside of Terastallization, perhaps use a different build as Medicham will be weak to these Types.
Type Chart: All Matchups and Effectiveness
Physical Fighting Reversal Medicham
| Best Medicham Tera Builds | |||
|---|---|---|---|
EV Spread, Ability, Held Item and Moveset
Medicham

|
Tera Type | Nature | ||||
|---|---|---|---|---|---|---|
|
|
Adamant (↑Atk, ↓Sp.Atk) |
|||||
| EV Spread | ||||||
| HP: 252 |
Atk: 252 |
Def: 4 |
||||
| Ability | Moveset | |||||
| Pure Power | ・
Drain Punch
・ Bulk Up ・ Recover ・ Reversal |
|||||
| Held Item | ||||||
|
|
||||||
Summary
Medicham can function as an effective counter for fast Rock Tera Pokemon due to its key resistances. Keep in mind that since Medicham lacks a notable boosting move, it can't solo higher level raids but is a great choice to bring in a raid with other players.
The best Ability for Medicham is Pure Power which doubles its effective Attack stat.
Best Tera Type
Fighting Tera Type is best for this build to give it STAB on its Fighting-type moves. An Adamant Nature is necessary so that it deals as much damage as possible with full EV investment.
EV Spread Explanation
Tera Raid EV spreads should lean towards bulky offense to help with survivability. Max out your HP and Atk EVs, while adding the remaining EVs into Defense. Give it a Shell Bell so that Medicham restores HP when dealing damage.
Tera Raid Strategy
| Medicham Tera Raid Turn-by-Turn Counter Strategy | |
|---|---|
| Turn 1~3 | Use Drain Punch three times to build up Tera Orb Charge. Note: Even if Medicham faints, it will still retain its Tera Orb charge. |
| Turn 3~5 | Use Bulk Up three times to raise Medicham's Attack and Defense by three stages. Note: Make sure to use Bulk Up after the Raid Boss resets all stat changes. |
| Turns 6+ | Once you have enough Tera Orb Charge, terastallize into a Fighting-type and use boosted Reversal to deal damage to the Raid Boss's shield and finish the battle. |
Start the battle by using Drain Punch three times to deal damage and build up Tera Orb Charge. Take note that even if Medicham faints, it will still retain its Tera Orb Charge.
Once the Raid Boss resets all stat changes, use Bulk Up three times to raise Medicham's Attack and Defense by three stages, using Recover to heal off damage during the Raid Boss's shield phase.
Once you have enough charge and boosts, terastallize into a a Fighting-type and use boosted Reversal to damage the Raid Boss's shield. This move deals more damage the lower Medicham's health is. If Medicham's health is more than 33%, use boosted Drain Punch instead.
Effective Counter Against Ice, Normal, Rock, Dark, and Steel Tera Raids
| Super Effective (2x) |
|
|---|---|
| Not Very Effective (x0.5) |
|
| No Effect (x0) |
|
This Fighting Tera Raid Build is an effective counter to Ice, Normal, Rock, Dark and Steel Tera Raids.
If the Tera Raid Boss is usually a Flying, Ghost, or Fairy-type outside of Terastallization, perhaps use a different build as Medicham will be weak to these Types.
Type Chart: All Matchups and Effectiveness
Skill Swap Support Raid Build
| Best Medicham Tera Builds | |||
|---|---|---|---|
EV Spread, Ability, Held Item and Moveset
|
Medicham
|
Tera Type | Nature | ||||
|---|---|---|---|---|---|---|
|
|
Adamant (↑Atk, ↓Sp.Atk) |
|||||
| EV Spread | ||||||
| HP: 252 |
Sp.Def: 252 |
Spe: 4 |
||||
| Ability | Moveset | |||||
| Pure Power | ・ Skill Swap | |||||
| Held Item | ||||||
|
|
||||||
Summary
This one-shot strategy is credited to Nommable123 from Reddit.
This is a dedicated Medicham build for an OHKO team strategy. Medicham is meant to pass its Ability Pure Power to Paldean Tauros for it to be able to deal as much damage as possible even after getting a +6 Attack boost.
Medicham will be holding a Focus Sash for this build in order to survive getting one-shot.
EV Spread Explanation
Tera Raid EV spreads should lean towards HP and Special Defense. Max out your 252 HP and Special Defense EVs, while adding the remaining EVs into Speed.
Tera Raid Strategy
| Pure Power Tauros Counter Strategy for Tera Raids | ||||
|---|---|---|---|---|
| Turns | 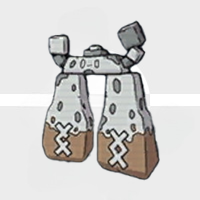 Sun + PowerSpot Sun + PowerSpot |
 Anger Point Activation Anger Point Activation |
 Physical Attacker Physical Attacker |
 Skill Swap User Skill Swap User |
| #1 | Sunny Day |
Flower Trick
(Paldean Tauros) |
Flare Blitz | Skill Swap |
At the start of the raid, Stonjourner uses Sunny Day for Paldean Tauros, with Meowscarada using Flower Trick on Paldean Tauros to trigger its Anger Point.
Medicham will then use Skill Swap to give Pure Power to the +6 Attack Tauros, who then uses Choice Banded Flare Blitz in Sun to KO the raid Pokemon.
How to Make Best Medicham Tera Raid Build
| How to Make Best Medicham Tera Raid Build |
|---|
|
|
Catch Medicham at South Province (Area Six)
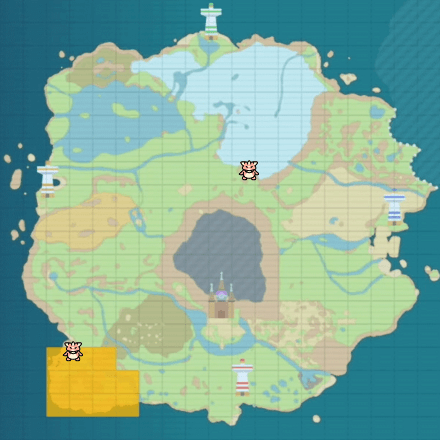
You can catch a Medicham with a Fighting Tera Type at South Province (Area Six).
Make sure to bring a Pokemon that has False Swipe and can inflict a status effect to make it easier to catch.
Use Tera Shards to Change Tera Type
If the Medicham build you are following requires it to have a different Tera type, you will need to have 50 Tera Shards of the type you need, and bring it to Medali to have your Pokemon's Tera Type changed.
Use Adamant Mint to Change Its Nature

If it has a different nature, you can use an Adamant Mint to change its nature to Adamant.
The easiest way to get this is by buying it from the Chansey Supply shop at Mesagoza for ₽20,000.
How to Change a Pokemon's Nature
EV Train Medicham's Stats
EV train Medicham according to the build's EV spread using Vitamins or the traditional way with Power Items and battling Pokemon with the right EV yield.
Physical Medicham
If you have the money for it, you can just buy 26 Protein (for Atk), 26 HP Up (for HP), and 1 Iron (for Def). All of these items can be bought at a Chansey Supply shop and it will cost you ₽530,000 in total.
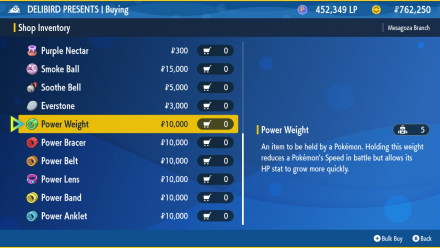
Alternatively, you can use Power Items that you can buy at a Delibird Presents shop for ₽10,000 each. Have your Pokemon hold the respective Power Item while defeating the Pokemon listed below.
| Held Item | Number of Pokemon to Defeat | Defeat Any of These Pokemon |
|---|---|---|
|
(For HP EVs) |
28 in Total (To get 252 HP EVs) |
・Azurill ・Lechonk ・Paldean Wooper Location: South of Los Platos |
|
(For Attack EVs) |
28 in Total (To get 24 Attack EVs) |
・Shinx ・Growlithe ・Yungoos ・Nymble Location: South Province (Area 3) |
|
(For Defense EVs) |
1 in Total (To get 4 Defense EVs) |
・Tarountula Location: South of Lost Platos |
Duo Support Medicham
If you have the money for it, you can just buy 26 HP Up (for HP), 26 Iron for (Def), and 1 Carbos (for Speed). All of these items can be bought at a Chansey Supply shop and it will cost you ₽530,000 in total.
Alternatively, you can use Power Items that you can buy at a Delibird Presents shop for ₽10,000 each. Have your Pokemon hold the respective Power Item while defeating the Pokemon listed below.
| Held Item | Number of Pokemon to Defeat | Defeat Any of These Pokemon |
|---|---|---|
|
(For HP EVs) |
28 in Total (To get 252 HP EVs) |
・Azurill ・Lechonk ・Paldean Wooper Location: South of Los Platos |
|
(For Defense EVs) |
28 in Total (To get 252 Defense EVs) |
・Tarountula Location: South of Lost Platos |
|
(For Speed EVs) |
1 in Total (To get 4 Speed EVs) |
・Rookidee Location: South Province (Area 3) |
Team Support Medicham
If you have the money for it, you can just buy 26 HP Up (for HP), 26 Zinc for (Sp. Def), and 1 Carbos (for Speed). All of these items can be bought at a Chansey Supply shop and it will cost you ₽530,000 in total.
Alternatively, you can use Power Items that you can buy at a Delibird Presents shop for ₽10,000 each. Have your Pokemon hold the respective Power Item while defeating the Pokemon listed below.
| Held Item | Number of Pokemon to Defeat | Defeat Any of These Pokemon |
|---|---|---|
|
(For HP EVs) |
28 in Total (To get 252 HP EVs) |
・Azurill ・Lechonk ・Paldean Wooper Location: South of Los Platos |
|
(For Special Defense EVs) |
28 in Total (To get 252 Special Defense EVs) |
・Hoppip ・Swablu Location: South Province (Area 1) |
|
(For Speed EVs) |
1 in Total (To get 4 Speed EVs) |
・Rookidee Location: South Province (Area 3) |
Hyper Train at Montenevera

After EV training it, head to Montenevera and talk to the man with an Abomasnow near the Pokemon Center. He will hyper train your Pokemon using Bottle Caps.
A Bottle Cap can be bought at the Delibird Presents shops for ₽20,000 after getting 6 Gym Badges. 1 Bottle Cap is needed for each stat that will be maxed out.
Hyper Training: How to Increase IVs
Level Up to 100
Next, level it up to 100 to maximize its stats. The easiest way to do this is by farming Exp candies from Tera Raid Battles.
How to Level Up Fast: EXP Farming Guide
Give Medicham a Held Item
Learn how to find the recommended held item and price from the table below!
| Item Name | Location | Price |
|---|---|---|
| Cascarrafa Delibird Presents | ₽30,000 | |
| Mesagoza Delibird Presents | ₽50,000 | |
| Levincia Delibird Presents | ₽20,000 |
Delibird Presents Locations and All Items
Medicham Tera Raid Moveset Guide
Learn Moves Through Level Up
The table below includes all the moves Medicham learns through level up needed for our recommended builds. Choose the moves depending on the build you are trying to make.
| Level | Move | Type |
|---|---|---|
| 17 | Force Palm |
|
| 47 | Recover |
|
You can have Medicham remember moves by going to the "Moves and Stats" menu and pressing A.
Get Other Moves From TMs
The table below includes all the moves Medicham learns from TMs needed for our recommended builds. Choose the moves depending on the build you are trying to make.
| TM / Move Name | How to Get Materials |
|---|---|
| TM064 Bulk Up |
 At the top of the winding hill northeast of Cortondo in South Province (Area Two). Required League Points: 3000 LP Required Pokemon Materials: ・Makuhita Sweat x3 ・Axew Scales x3 |
| TM073 Drain Punch |
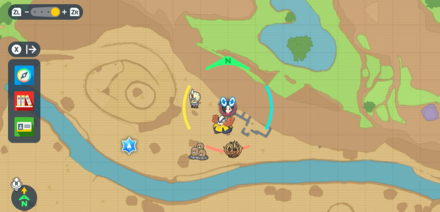
 Located on the second level of the watch tower south of Artazon. Required League Points: 8000 LP Required Pokemon Materials: ・Croagunk Poison x5 ・Mankey Fur x3 ・Crabrawler Shell x3 |
| TM074 Reflect |
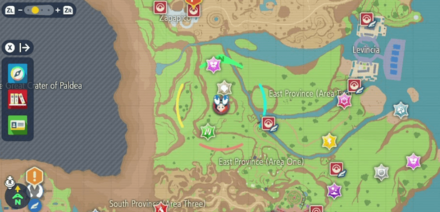
 Inside the scaffolding on the northern side of East Province (Area Three). Required League Points: 800 LP Required Pokemon Materials: ・Drowzee Fur x3 ・Flittle Down x3 |
| TM098 Skill Swap |
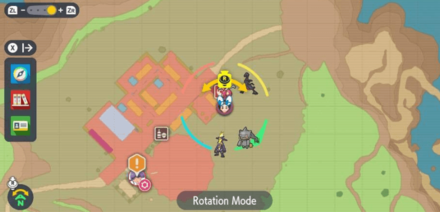 Behind the Pokemon Center in front of the entrance to Alfornada. Required League Points: 3000 LP Required Pokemon Materials: ・Girafarig Fur x3 ・Flittle Down x3 |
| TM134 Reversal |
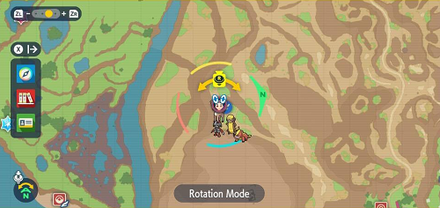
 Found on top of the terrain near the river of East Province Area Two. Required League Points: 3000 LP Required Pokemon Materials: ・Falinks Sweat x3 ・Heracross Claw x3 ・Mankey Fur x3 |
Pokemon Scarlet and Violet Related Guides

Tera Raid Guides
Tera Raid Battle Mechanics Explained
Tera Raid Level Guides
How to Increase Tera Raid Star Level
Tera Raid Boss Guides
| Tera Raid Boss Guides | ||
|---|---|---|
5 and 6-Star Tera Raid Boss Guides
Raid Event Boss Strategies
 5☆ Walking Wake
 7☆ Decidueye
 7☆ Samurott
 7☆ Typhlosion
 7☆ Meowscarada
 7☆ Skeledirge
 7☆ Quaquaval
Tera Raid Builds
Indigo Disk Raid Builds
| All Indigo Disk Raid Builds |
|---|
Teal Mask Raid Builds
| All Teal Mask Raid Builds |
|---|
Pokemon HOME Raid Builds
| All Pokemon HOME Raid Builds |
|---|
Paradox Pokemon Raid Builds
| All Paradox Pokemon Raid Builds |
|---|
Base Game Raid Builds
| All Base Game Tera Raid Builds |
|---|
Best Pokemon for Tera Raid Battles
Tera Raid Counters Per Tera Type
| Best Pokemon For Raids Per Tera Type | |||||
|---|---|---|---|---|---|
 Grass Grass |
 Water Water |
 Fire Fire |
 Electric Electric |
 Ice Ice |
 Fighting Fighting |
 Ground Ground |
 Poison Poison |
 Flying Flying |
 Psychic Psychic |
 Bug Bug |
 Rock Rock |
 Ghost Ghost |
 Dragon Dragon |
 Dark Dark |
 Steel Steel |
 Fairy Fairy |
 Normal Normal |
Comment
Author

Medicham Best Tera Raid Build
Rankings
Gaming News

![Monster Hunter Stories 3 Review [First Impressions] | Simply Rejuvenating](https://img.game8.co/4438641/2a31b7702bd70e78ec8efd24661dacda.jpeg/show)


![Monster Hunter Stories 3 Review [First Impressions] | Simply Rejuvenating](https://img.game8.co/4438641/2a31b7702bd70e78ec8efd24661dacda.jpeg/thumb)
Popular Games

Genshin Impact Walkthrough & Guides Wiki
Umamusume: Pretty Derby Walkthrough & Guides Wiki
Pokemon Pokopia Walkthrough & Guides Wiki
Honkai: Star Rail Walkthrough & Guides Wiki
Monster Hunter Stories 3: Twisted Reflection Walkthrough & Guides Wiki
Arknights: Endfield Walkthrough & Guides Wiki
Wuthering Waves Walkthrough & Guides Wiki
Zenless Zone Zero Walkthrough & Guides Wiki
Pokemon TCG Pocket (PTCGP) Strategies & Guides Wiki
Monster Hunter Wilds Walkthrough & Guides Wiki


Recommended Games
Diablo 4: Vessel of Hatred Walkthrough & Guides Wiki
Cyberpunk 2077: Ultimate Edition Walkthrough & Guides Wiki
Fire Emblem Heroes (FEH) Walkthrough & Guides Wiki
Yu-Gi-Oh! Master Duel Walkthrough & Guides Wiki
Super Smash Bros. Ultimate Walkthrough & Guides Wiki
Pokemon Brilliant Diamond and Shining Pearl (BDSP) Walkthrough & Guides Wiki
Elden Ring Shadow of the Erdtree Walkthrough & Guides Wiki
Monster Hunter World Walkthrough & Guides Wiki
The Legend of Zelda: Tears of the Kingdom Walkthrough & Guides Wiki
Persona 3 Reload Walkthrough & Guides Wiki


All rights reserved
©2022 Pokémon. TM, ®Nintendo.
The copyrights of videos of games used in our content and other intellectual property rights belong to the provider of the game.
The contents we provide on this site were created personally by members of the Game8 editorial department.
We refuse the right to reuse or repost content taken without our permission such as data or images to other sites.