This survey will take about 1 minute.
Your answers will help us to improve our website.
Starfield Shattered Space
Persuasion Guide - How to Build Persuasion Meter

Persuasion in Starfield allows you to avoid conflict or win over people to your side with a simple dialogue mini-game. Read on for more info on what persuasion does, the odds for success for each choice, color, and point value, and how to build the persuasion meter!
List of Contents
How to Build Persuasion Meter
| How the Persuasion Meter Works |
|---|
|
|
Fill Up Meter Within Number of Turns

In order to successfully persuade someone, you must fill up the Persuasion meter with all 6 required bars. This meter contains a set number of nodes that must be filled up in white within the set number of turns given to you.
You Can Never Lose On a Success
Whenever your final choice ends in a success, you will get another turn for free. This can happen multiple times in a row, as long as you don't have any more failures, which will immediately end your negotiation.
The Higher the Value, the Faster the Meter Fills Up
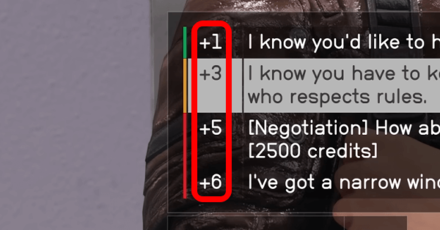
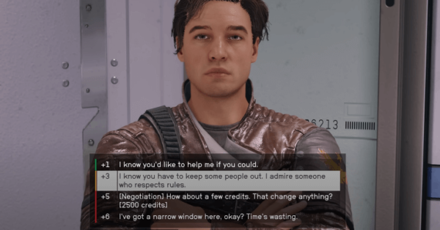
The number values next to the colors indicate how many nodes on the persuasion meter will be filled up. You must carefully do the math on how many nodes you can fill up, taking into account both the difficulty and number of turns you have left.
Rarely, Succeed Instantly with a Critical Success
Sometimes, when doing a Persuasion check, you'll suddenly succeed even without filling up the entire bar by achieving a Critical Success. Based on our testing, this has about a 2.5% chance of occurring. This can occur even on your first choice with a Green 1-point option, so higher-risk options don't seem to be connected. You'll just have to get lucky!
Take Persuasion Difficulty Into Consideration
| Color | Meaning | |
|---|---|---|
Green 1/2 pts. |
High probability of persuasion success (~65% base for 1 point, ~47% for 2 points) |
|
Yellow 3/4 pts. |
Medium probability of persuasion success (~40% base) |
|
Red 5 pts. |
Low probability of persuasion success (~30% base) |
|
There are three colored bars before each choice that indicates the difficulty of the dialogue option. Choices in green may have a very high chance of success but will fill up less nodes on the persuasion meter. Red choices, on the other hand, can quickly fill up the meter but may straight up fail, wasting a whole turn.
Game8 tested the Persuasion check with Sheila Holbrooke during the Breaking the Bank quest 40 times and found the above estimations for success probability of each result without any boosts. Note that Green options yielding 2 points have a lower success rate than Green options yielding 1 point, so the 2-pointers do come with higher risk despite being the same color. (We were unable to confirm if this is true for the Yellow options due to a small sample size of 4-point Yellows)
Add Points to Social Skills
Your Social skills may come in handy when persuading other people. Invest in these skills and you might have an easier time getting your persuasion checks to succeed.
In particular, Persuasion, Negotiation, Diplomacy, Intimidation, and Manipulation can open up new options in Persuasion dialogue trees.
Backgrounds Add More Dialogue Options
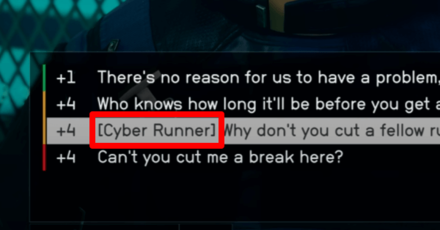
The Background you choose at the character creation screen can have an effect later on, as certain dialogue options will open up to you. For example, being a Beast Hunter may make it easier for you to persuade someone who deals with beasts, and so on.
Best Persuasion Choices
There are No Choices which Always Succeed or Always Fail
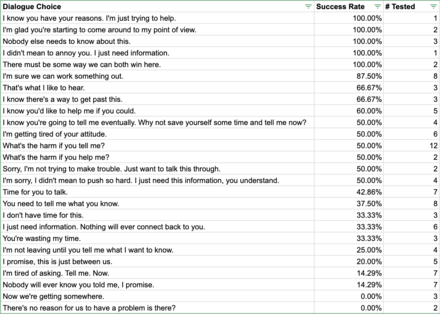
On comparing the results of Persuasion checks with Sheila Holbrooke 40 times, there were no dialogue options which consistently always succeed or fail. The more times a single dialogue option is tested, the more it gravitates toward the 40-60% success range with variation depending on the Point value, implying that there isn't a correlation between the written text and the result.
Note that this test excluded special dialogue options specific to a Background or gained from a Skill. It's likely that these options do have a higher chance of a better result, and we may test this separately in the future.
Not a Huge Difference Between Point Combinations
| Choice | Est. Chance of Success |
|---|---|
| Succeeding 6 out of 8 times with Green 1pt. choices | 43.30% |
| Succeeding 3 out of 5 times with Green 2pt. choices | 45.00% |
| Succeeding 2 out of 4 times with Yellow 3pt. choices | 51.70% |
| Succeeding 1 of 2 times with Red 5pt. choices and 1 of 2 times with a Green 1pt. choice | 45.36% |
| Succeeding 1 out of 2 times with a Yellow 4pt. choice and 1 out of 2 times with a Green 2pt. choice | 45.84% |
| Probability of succeeding once with a G-1 choice, 1 out of 2 times with a G-2 choice, and 1 out of 2 times with a O-3 choice | 29.90% |
We took our estimated odds for each color and point level, and estimated the probability of success with several possible choice combinations. Overall, we found that choosing only the Yellow 3pt. choices has the best odds, but it really doesn't make a massive difference since the success rates are adjusted to match the point values.
Not Actually Worth It To Use Less Risky Options on the Last Turn
It seems logical to say that since you cannot lose unless you Fail a Persuasion check when you only have one turn left, it's better to take risky options earlier on when you have multiple turns remaining and stick to options with a higher chance of success on your final roll. However, based on our current estimations, this strategy doesn't actually seem to be more effective.
Let's say it's your last turn and you need 3 points, and your options are a +1 or a +3. Yes, you are more likely to succeed on the +1 which will keep you in the game, but that will not change the fact that you need to continue getting more successes. If two more +1 options appear on the next two turns, you'll need to get Successes on those as well.
- Odds of getting Success on one 3-point choice: 1*0.3684 = ~36.84%
- Odds of getting Success on three 1-point choices in a row: 1*0.6522*0.6522*0.6522 = ~27.74%
It's true that having more turns will increase your chance of getting a Critical Success increase; however, because Critical Successes are very rare (about 2.5% chance), it's questionable whether this makes up for the decreased odds overall.
What is Persuasion?
Peaceful Means to Resolve Conflict
Persuading characters is a way to peacefully avoid conflict, and is done via a dialogue mini-game, where you must choose certain dialogue options that they would like to hear.
By persuading characters in the game, you will be able to get them on your side, or let them give you access to a certain area, or even avoid a bloody battle altogether.
Starfield Related Guides

All Tips and Tricks
Comment
Author
Persuasion Guide - How to Build Persuasion Meter
Please participate in our site
improvement survey
03/2026
improvement survey
03/2026
Would you assist in
improving Game8's site?
improving Game8's site?

×
We are listening to our users' valuable opinions and discussing how to act on them.
The information collected through this survey will be used for the purpose of improving our services. In addition, the information will only be disclosed a part of a statistic in a format that will not allow identification of personal information.
Begin Survey
Not Now
×
Please rate each item regarding Game8.co's Advertisements.
Amount of Ads
Very Dissatisfied
Somewhat Dissatisfied
Fine
Somewhat Satisfied
Highly Satisfied
Placement of Ads
Timing of Ad Display
Ad Loading Speed
Safeness of Ads
Content of Ads
×
Please rate each item regarding Game8.co's Quality of Articles.
Amount of information
Very Dissatisfied
Somewhat Dissatisfied
Fine
Somewhat Satisfied
Highly Satisfied
Frequency of updates
Speed of new information
Accuracy of articles
Understandibility of articles
Readability of sentences
×
Please rate each item regarding Game8.co's Usability of the Site.
Ease of finding information
Very Dissatisfied
Somewhat Dissatisfied
Fine
Somewhat Satisfied
Highly Satisfied
Loading Speed
Use of Color
Font Size
Visibility of Images
Easy to Understand Layout
×
Please rate each item regarding Game8.co's Message Boards, Comments.
Ease of Writing
Very Dissatisfied
Somewhat Dissatisfied
Fine
Somewhat Satisfied
Highly Satisfied
Readability
Ease in Finding Information
Comment Quality
Comment Quantity
Admin Response
×
Please rate each item regarding Game8.co's Site's new design.
Please rate our site's new design
Very Dissatisfied
Somewhat Dissatisfied
Fine
Somewhat Satisfied
Highly Satisfied
Do you think that the website's design change makes the site easier to use?
Has the new design made it easier for you to find information on the site?
Has the new design improved the overall visual appeal of the site?
How would you rate your overall satisfaction with the new design of the site?
×
How likely are you to recommend Game8 to someone you know?
Very Unlikely
0
1
2
3
4
5
6
7
8
9
10
Very Likely
If you have other opinions regarding potential improvement to the website, please share them with us. We would appreciate your honest opinion.
Note: This is a free response section, so you can proceed without entering anything.
Note: Please be sure not to enter any kind of personal information into your response.
Note: Please be sure not to enter any kind of personal information into your response.
×
Thank You
×
Thank you for participating in our survey! Your answers will help us to improve the quality of our website and services.
We hope you continue to make use of Game8.
We hope you continue to make use of Game8.
Close
Rankings
- We could not find the message board you were looking for.
Gaming News


![Monster Hunter Stories 3 Review [First Impressions] | Simply Rejuvenating](https://img.game8.co/4438641/2a31b7702bd70e78ec8efd24661dacda.jpeg/thumb)
Popular Games

Genshin Impact Walkthrough & Guides Wiki
Honkai: Star Rail Walkthrough & Guides Wiki
Umamusume: Pretty Derby Walkthrough & Guides Wiki
Pokemon Pokopia Walkthrough & Guides Wiki
Resident Evil Requiem (RE9) Walkthrough & Guides Wiki
Monster Hunter Wilds Walkthrough & Guides Wiki
Wuthering Waves Walkthrough & Guides Wiki
Arknights: Endfield Walkthrough & Guides Wiki
Pokemon FireRed and LeafGreen (FRLG) Walkthrough & Guides Wiki
Pokemon TCG Pocket (PTCGP) Strategies & Guides Wiki


Recommended Games
Diablo 4: Vessel of Hatred Walkthrough & Guides Wiki
Cyberpunk 2077: Ultimate Edition Walkthrough & Guides Wiki
Fire Emblem Heroes (FEH) Walkthrough & Guides Wiki
Yu-Gi-Oh! Master Duel Walkthrough & Guides Wiki
Super Smash Bros. Ultimate Walkthrough & Guides Wiki
Pokemon Brilliant Diamond and Shining Pearl (BDSP) Walkthrough & Guides Wiki
Elden Ring Shadow of the Erdtree Walkthrough & Guides Wiki
Monster Hunter World Walkthrough & Guides Wiki
The Legend of Zelda: Tears of the Kingdom Walkthrough & Guides Wiki
Persona 3 Reload Walkthrough & Guides Wiki


All rights reserved
© 2023 Bethesda Softworks LLC, a ZeniMax Media company. Trademarks belong to their respective owners. All Rights Reserved.
The copyrights of videos of games used in our content and other intellectual property rights belong to the provider of the game.
The contents we provide on this site were created personally by members of the Game8 editorial department.
We refuse the right to reuse or repost content taken without our permission such as data or images to other sites.