Sunbreak Garangolm: Weakness and Drops
★ All Title Updates now available for ALL PLATFORMS!
┗ Title Update 4 | Title Update 5 | Bonus Update
┗ Check out all our Best Builds For Every Weapon!
┗ TU4 Monsters: Velkhana | Risen C.G. Valstrax
┗ TU5 Monsters: Amatsu | Risen Shagaru Magala
┗ Bonus Update Monster: Primordial Malzeno

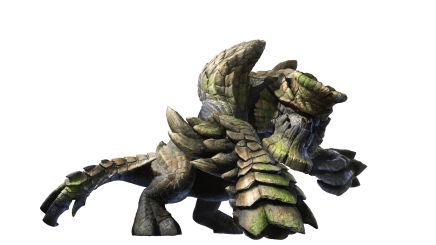
This is a hunting guide for Garangolm, a Large Monster in Monster Hunter Rise (MH Rise) and the Sunbreak DLC. Read on to learn Garangolm's weaknesses, forgeable weapons, forgeable armor, drops, and attack patterns for Master Rank!
 Garangolm Guide Garangolm Guide
|
 Garangolm Weapons Garangolm Weapons
|
 Garangolm Armor Garangolm Armor
|
List of Contents
Garangolm Weakness and Notes
| Garangolm ガランゴルム |
|||
|---|---|---|---|
 |
|||
| Type | Fanged Beast | ||
| Threat Level | 6/10 | Rampage Type | ー |
| Major Weakness | Other Weakness | ||
| Blight / Elemental Damage | Abnormal Status | ー | |
| Characteristics | |||
| A monster characterized by its massive and rigid body. Garangolm are generally placid, living in regions with fertile soil. Thier sap-like fluids can promote plant growth, forging a symbiotic relationshipo with flora that grows on their bodies. They can also use that sap to harden plants or the surrounding soil, outfitting their bodies and enhancing their attacks. | |||
How to Unlock Garangolm
Clear 2 M★2 Key Quests After Provoking an Anjanath's Wrath

| Quest Name | Monster/Unlock |
|---|---|
| A Rocky Rampage |
|
| Unlock Conditions: Complete two M★2 Key Quests after finishing the Quest "Provoking an Anjanath's Wrath" |
Garangolm is the target of the Urgent Quest that unlocks MR 3. You can get the quest by finishing two M★2 Key Quests after completing Provoking an Anjanath's Wrath.
MR Grinding Guide:
How to Get from MR 6 to MR 100 Fast
Garangolm Weakness and Resistance
Garangolm Weapon Damage Breakdown
| Part | |||
|---|---|---|---|
| Head | 50 | 45 | 35 |
| Torso | 35 | 35 | 15 |
| Left Arm | 45 | 50 | 45 |
| Right Arm | 45 | 50 | 45 |
| Hind Leg | 25 | 25 | 20 |
| Tail | 40 | 40 | 30 |
| Overall | 40 | 41 | 32 |
Garangolm Elemental Weakness Breakdown
| Part | |||||
|---|---|---|---|---|---|
| Head | 8 | 0 | 10 | 5 | 0 |
| Torso | 8 | 0 | 10 | 5 | 0 |
| Left Arm | 8 | 0 | 10 | 5 | 0 |
| Right Arm | 8 | 0 | 10 | 5 | 0 |
| Hind Leg | 8 | 0 | 10 | 5 | 0 |
| Tail | 8 | 0 | 10 | 5 | 0 |
| Overall | 8 | 0 | 10 | 5 | 0 |
Higher numbers indicate higher potential damage to the monster.
Garangolm Hunting Tips

Garangolm will reinforce their arms by covering them in elements. When their arms are in this state, continuously attacking the elemental covering will eventually break it off, toppling the beast. Focus your assault on their arms as soon as they're covered!
Status Effect Vulnerabilities
| Poison | Stun | Paralysis | Sleep |
|---|---|---|---|
| ★ | ★ | ★ | ★ |
| Blast | Exhaust | Fireblight | Waterblight |
| ★★ | -- | ★★ | ★ |
| Thunderblight | Iceblight | ||
| ★★ | ★ | ||
If an ailment has more stars it means that it has better effectiveness.
Item Vulnerabilities
| Pitfall Trap | Shock Trap | Flash Bomb |
|---|---|---|
| ◯ | ◯ | ◯ |
| Sonic Bomb | Meat Effects | Dung Bomb |
| ✕ | ✕ | ◯ |
◯ = Vulnerable; ✕ = Fully Resistant; ▲ = Situational
Kinsect Extracts
| Monster Part | Extract |
|---|---|
| Head |
|
| Torso |
|
| Left Arm |
|
| Right Arm |
|
| Hind Leg |
|
| Tail |
|
| Overall | — |
Red = Attack Increase, White = Movement Boost, Orange = Anti-knockback When Attacking
Garangolm Locations and Quests
Garangolm Habitat
| Map | Starting Area | Visited Areas | Rest Area |
|---|---|---|---|
 Flooded Forest Flooded Forest
|
9 / 11 / 13 | 1 / 6 / 8 / 9 / 10 / 11 / 12 / 13 | 13 |
 Citadel Citadel
|
2 / 11 / 13 | 1 / 2 / 3 / 4 / 5 / 10 / 11 / 13 | 11 |
 Forlorn Arena Forlorn Arena
|
- | - | - |
Garangolm Quest Appearances
| Quest Type | Lvl | Quest Name |
|---|---|---|
| Anomaly Quest | A★4 | Anomaly Research: Garangolm |
| Arena Quest | M★3 | MR Arena 03 |
| Event Quest | M★3 | Minor Inconveniences |
| Event Quest | M★3 | Another Grand Gesture |
| Follower Quest | M★3 | A Tough Lesson |
| Hub Quest | M★3 | A Tale of Two Titans (Key Quest) |
| Hub Quest | M★3 | Garangolm Gone Mad |
| Support Survey | M★3 | Operation Garangolm |
| Urgent Hub Quest | M★3 | A Rocky Rampage |
| Hub Quest | M★4 | Spooky Citadel!? (Key Quest) |
| Hub Quest | M★4 | Citadel Security |
| Hub Quest | M★4 | Thousand Cuts, Totally Crushed |
| Hub Quest | M★4 | Quit Spooking My Lunch! |
| Support Survey | M★5 | Operation Double Garangolm |
| Event Quest | M★6 | Hazard: GRRRRRangolm! |
| Hub Quest | M★6 | Monster Mash |
| No Quest in This Rank |
| No Quest in This Rank |
How to Beat Garangolm
Stay Near Garangolm

Garangolm has a plethora of ranged attacks that can easily reach far away Hunters. We suggest keeping near Garangolm to avoid those moves. Gotta be careful though cause Garangolm is so huge, it sometimes block the camera!
Aim for The Arms When It Has Elemental Rocks!

As the battle rages on and Garangolm enrages, it will punch the ground with extreme force to cover its fist with rocks. These rocks give Garangolm blast attacks and water attacks - one for each fist.
During this time, try attacking the fist until it breaks down - like how we do it for Goss Harag's blades. This will topple down Garangolm and gives you a big attack window.
Breaking Body Parts Gives It Access to Death Combos

Garangolm is probably one of the unique monster that gets stronger as you wear them down. At the later stages of the battle, when you have most likely broken Garangolm's head or arms, it will not only imbue rocks on its fists but on its head as well.
This gives Garangolm access to death combos that can easily cart any unsuspecting Hunter. Always keep a wirebug ready so you can Wirefall out of these combos when necessary.
Bring Nulberries

Garangolm mostly deal Blast and Waterblight, both can be mitigated quite easily. Just roll thrice to get rid of Blast and eat a Nulberry to cure Waterblight.
Nulberry Location: How to Get and Effects
Garangolm Attacks and Moves
| Name | Description |
|---|---|
| Brute Swing | A quick arm attack that can deal damage and throw a Hunter away. |
| Tail Sweep | A quick tail sweep attack usually done when the Hunter is behind Garangolm. |
| Body Slam | Garangolm uses its powerful legs to throw itself up and slam its body with extreme force. |
| Triple Rock Hurl | Garangolm throws three boulders towards the Hunter that travels in a fan. |
| Boulder Toss | Garangolm grabs a huge chunk of the Earth and throws it towards the Hunter. |
| Gorilla Chin Charge | Garangolm uses its rigid chin to mow anything that is unfortunate enough to be on its way. |
| Elemental Slam | Garangolm uses both of its elementally-infused arms to deal both Blastblight and Waterblight. |
| Rocket Jump | Garangolm uses its magma-infused arm to propel itself into a projectile, landing on unsuspecting victims. It usually follows the move with a one-arm elemental slam. |
| Rocky Head Death Combos | Strong, cart-inducing combos that Garangolm can access after the Hunter breaks its head or arms. |
Brute Swing
| Brute Swing Attack Information |
|---|
 Brute Swing: Garangolm swings its hands, attempting to smash any hunter in its way. This move is very quick but does not deal much damage. Just try to avoid this one at all cost by rolling backwards. |
Tail Sweep
| Tail Sweep Attack Information |
|---|
 Tail Sweep: Garangolm will quickly spin around and use its mighty tail to sweep away Hunters staying behind it. Try staying in front of Garangolm to avoid this move. Besides, Garangolm's weak spots are mostly around its arms and head so it's counterproductive to stay on its behind. |
Body Slam
| Body Slam Attack Information |
|---|
 Body Slam: Garangolm leaps and slams its massive weight onto the ground. This move usually happens when you've overstayed your welcome near Garangolm's underbelly. It does not deal damage during the initial jump, only when it lands so either counterattack or roll away. |
Triple Rock Hurl
| Triple Rock Hurl Attack Information |
|---|
 Triple Rock Throws: Garangolm digs up three huge rocks with its arms and hurls all of them towards the Hunter. The rocks travel in a fan, similar to Tigrex's rock throws. It is extremely hard to avoid this move because the rocks' hitboxes are pretty huge. You can either counterattack or use emergency evade to avoid the rocks. |
Boulder Toss
| Boulder Toss Attack Information |
|---|
 Boulder Toss: Garangolm lifts a massive boulder from the ground and throws it at its foe. The boulder targets your last position as Garangolm was about to throw the boulder. Simple wiredash away or towards Garangolm for free hits. |
Gorilla Chin Charge
| Gorilla Chin Charge Attack Information |
|---|
 Gorilla Chin Charge: Garangolm plants its chin on the ground and charges forward, shoving away anyone in its path. Pretty easy to avoid as this move travels at a straight line. Just roll sideways! |
Elemental Slam
| Elemental Slam Attack Information |
|---|
 Elemental Slam: When enraged, Garangolm can use both of its magma and moss-infused hands to slam at the ground and deal elemental damage. Only happens when both of its arms are infused so you know what to expect it. Evade to the side if you're able as usually Garangolm moves forward to land another slam. |
Rocket Jump
| Rocket Jump Attack Information |
|---|
 Rocket Jump: Garangolm uses its magma-infused hand to propel itself in the air. It is then followed up by a quick arm slam from wither its magma or moss-filled hands. This is a really quick maneuver that only happens when you're far away from Garangolm. Try to be wary of this to not get surprised. |
Rocky Head Death Combos
Garangolm will gain access to death combos as soon as it has the ability to cover its broken head with rocks. Be careful to not get hit of them as they can send you back to camp!
| Rocky Head Death Combos |
|---|
 Rocky Head Slam: Garangolm will go near the Hunter then slam its head with full force. The first slam will incapacitate the Hunter, with the second one instantly carting them. The first hit will not cart the Hunter if they have enough defense so try wirefalling away afterwards. Failing to do so will cart you immediately. |
 Gorilla Clap: Garangolm will use its head to throw the Hunter upwards. As the Hunter is falling down, Garangolm will time a mighty clap to finish off the Hunter. Avoid this attack at all costs but if you're caught by the initial throw attack, wirefall away to save you from the final clap attack. |
Tacky Photo Request
Take Picture of Garangolm's Elemental Arms

A request to take a picture of Garangolm's elemental arms will be given to the Hunter by Fran the Stalwart. The request is called Tacky Photo.
To finish the request, you have to take a picture of the arms right after it has been imbued by lava or moss rocks. If Garangolm is in the strong arm state for a while, the request would not finish.
Garangolm Materials and Drops
Master Rank Garangolm Materials
Garangolm Dropped Materials
Master Rank
|
|
Monster Hunter Rise Related Links
All Garangolm Guides
| All Garangolm Related Articles | ||
|---|---|---|
 Garangolm Guide Garangolm Guide
|
 Garangolm Weapons Garangolm Weapons
|
 Garangolm Armor Garangolm Armor
|
Sunbreak Monsters
| Sunbreak Monster Lists | ||
|---|---|---|
| Sunbreak Monsters List | Monster Subspecies List | Sunbreak Small Monsters List |
Large Monsters
| Sunbreak Large Monsters | |||||
|---|---|---|---|---|---|
 Daimyo Hermitaur Daimyo Hermitaur |
 Blood Orange Bishaten Blood Orange Bishaten |
 Garangolm Garangolm |
 Aurora Somnacanth Aurora Somnacanth |
||
 Shogun Ceanataur Shogun Ceanataur |
 Lunagaron Lunagaron |
 Astalos Astalos |
 Seregios Seregios |
||
 Magma Almudron Magma Almudron |
 Gore Magala Gore Magala |
 Espinas Espinas |
 Pyre Rakna-Kadaki Pyre Rakna-Kadaki |
||
 Malzeno Malzeno |
 Shagaru Magala Shagaru Magala |
||||
MR6+ Large Monsters
| MR6+ Monsters | |||||
|---|---|---|---|---|---|
 Gaismagorm Gaismagorm(MR6) |
 Furious Rajang Furious Rajang(MR50) |
 Scorned Magnamalo Scorned Magnamalo(MR100) |
|||
Title Update 1 Monsters
| Sunbreak Title Update 1 Monsters | |||
|---|---|---|---|
 Seething Bazelgeuse Seething Bazelgeuse |
 Silver Rathalos Silver Rathalos |
 Gold Rathian Gold Rathian |
 Lucent Nargacuga Lucent Nargacuga |
Title Update 2 Monsters
| Sunbreak Title Update 2 Monsters | ||
|---|---|---|
 Flaming Espinas Flaming Espinas |
 Risen Chameleos Risen Chameleos |
 Violet Mizutsune Violet Mizutsune |
Title Update 3 Monsters
| Sunbreak Title Update 3 Monsters | ||
|---|---|---|
 Chaotic Gore Magala Chaotic Gore Magala |
 Risen Kushala Daora Risen Kushala Daora |
 Risen Teostra Risen Teostra |
Title Update 4 Monsters
| Sunbreak Title Update 4 Monsters | |
|---|---|
 Velkhana Velkhana |
 Risen Crimson Glow Valstrax Risen Crimson Glow Valstrax |
Title Update 5 Monsters
| Sunbreak Title Update 5 Monsters | |
|---|---|
 Amatsu Amatsu |
 Risen Shagaru Magala Risen Shagaru Magala |
Small Monsters
| Sunbreak Small Monsters | |||||
|---|---|---|---|---|---|
 Boggi Boggi |
 Ceanataur Ceanataur |
 Gowngoat Gowngoat |
|||
 Hermitaur Hermitaur |
 Hornetaur Hornetaur |
 Pyrantula Pyrantula |
 Vespoid Vespoid |
 Velociprey Velociprey |
|
Other Large Monsters
Elder Dragons
| Elder Dragons | |||||
|---|---|---|---|---|---|
 Narwa the Allmother Narwa the Allmother |
|||||
 Wind Serpent Ibushi Wind Serpent Ibushi |
 Thunder Serpent Narwa Thunder Serpent Narwa |
 Crimson Glow Valstrax Crimson Glow Valstrax |
|||
 Chameleos Chameleos |
 Kushala Daora Kushala Daora |
 Teostra Teostra |
|||
Apex Monsters
| Apex Monsters | ||
|---|---|---|
 Apex Arzuros Apex Arzuros |
 Apex Rathian Apex Rathian |
 Apex Mizutsune Apex Mizutsune |
 Apex Rathalos Apex Rathalos |
 Apex Diablos Apex Diablos |
 Apex Zinogre Apex Zinogre |
Other Small Monsters
Comment
He has also utlimate move, which after it he will lost all elemental covers
Author
Sunbreak Garangolm: Weakness and Drops
improvement survey
03/2026
improving Game8's site?

Your answers will help us to improve our website.
Note: Please be sure not to enter any kind of personal information into your response.

We hope you continue to make use of Game8.
Rankings
- We could not find the message board you were looking for.
Gaming News
Popular Games

Genshin Impact Walkthrough & Guides Wiki

Honkai: Star Rail Walkthrough & Guides Wiki

Umamusume: Pretty Derby Walkthrough & Guides Wiki

Pokemon Pokopia Walkthrough & Guides Wiki

Resident Evil Requiem (RE9) Walkthrough & Guides Wiki

Monster Hunter Wilds Walkthrough & Guides Wiki

Wuthering Waves Walkthrough & Guides Wiki

Arknights: Endfield Walkthrough & Guides Wiki

Pokemon FireRed and LeafGreen (FRLG) Walkthrough & Guides Wiki

Pokemon TCG Pocket (PTCGP) Strategies & Guides Wiki
Recommended Games

Fire Emblem Heroes (FEH) Walkthrough & Guides Wiki

Diablo 4: Vessel of Hatred Walkthrough & Guides Wiki

Yu-Gi-Oh! Master Duel Walkthrough & Guides Wiki

Super Smash Bros. Ultimate Walkthrough & Guides Wiki

Pokemon Brilliant Diamond and Shining Pearl (BDSP) Walkthrough & Guides Wiki

Elden Ring Shadow of the Erdtree Walkthrough & Guides Wiki

Monster Hunter World Walkthrough & Guides Wiki

The Legend of Zelda: Tears of the Kingdom Walkthrough & Guides Wiki

Persona 3 Reload Walkthrough & Guides Wiki

Cyberpunk 2077: Ultimate Edition Walkthrough & Guides Wiki
All rights reserved
©CAPCOM CO., LTD. ALL RIGHTS RESERVED.
The copyrights of videos of games used in our content and other intellectual property rights belong to the provider of the game.
The contents we provide on this site were created personally by members of the Game8 editorial department.
We refuse the right to reuse or repost content taken without our permission such as data or images to other sites.

 Great Izuchi
 Arzuros
 Great Baggi
 Lagombi
 Aknosom
 Tetranadon
 Kulu-Ya-Ku
 Barroth
 Great Wroggi
 Royal Ludroth
 Khezu
Khezu Bishaten
 Somnacanth
 Barioth
 Rathian
 Tobi-Kadachi
 Volvidon
 Basarios
 Pukei-Pukei
 Magnamalo
 Nargacuga
 Zinogre
 Anjanath
 Mizutsune
 Rathalos
 Almudron
 Goss Harag
 Tigrex
 Diablos
 Jyuratodus
 Rajang
 Rakna-Kadaki
 Bazelgeuse
 Altaroth
 Anteka
 Baggi
Baggi Bnahabra
 Bombadgy
 Bullfango
 Delex
Delex Felyne
 Gajau
Gajau Gargwa
 Izuchi
 Jaggi
Jaggi Jaggia
 Jagras
 Kelbi
Kelbi Kestodon
 Ludroth
 Melynx
 Popo
Popo Rachnoid
 Remobra
 Rhenoplos
 Slagtoth
 Uroktor
 Wroggi
 Zamite


![Slay the Spire 2 Review [Early Access] | Still the Deckbuilder to Beat](https://img.game8.co/4433115/44e19e1fb0b4755466b9e516ec7ffb1e.png/thumb)

![Resident Evil Village Review [Switch 2] | Almost Flawless Port](https://img.game8.co/4432790/e1859f64830960ce4248d898f8cd38d9.jpeg/thumb)


This one: https://www.youtube.com/watch?v=faGMy2_pHzI