Sunbreak Dual Blades Guide: Combos, Controls and Moveset
★ All Title Updates now available for ALL PLATFORMS!
┗ Title Update 4 | Title Update 5 | Bonus Update
┗ Check out all our Best Builds For Every Weapon!
┗ TU4 Monsters: Velkhana | Risen C.G. Valstrax
┗ TU5 Monsters: Amatsu | Risen Shagaru Magala
┗ Bonus Update Monster: Primordial Malzeno
This is a guide to the Dual Blades, a weapon in Monster Hunter Rise: Sunbreak (MH Rise). Read on to learn about new Dual Blades controls and combos, how to use Dual Blades demon and archdemon modes, the Dual Blades' spinning move as well as details on Dual Blades Switch Skills.
| All Dual Blades Guides | ||
|---|---|---|
 Trees & Full List Trees & Full List |
 How to Use How to Use |
 Best Builds Best Builds |
List of Contents
Dual Blades Balance Changes
Update 15.0
| Dual Blades Balance Changes and Fixes (Update 15.0) |
|---|
| ・ Increased the power and elemental correction value for the Dual Blades' Demon Flurry Rush and Lunging Strike. ・Increased the elemental correction value for the Dual Blades' Slide Slash Combo. |
Basically a minor buff for the Dual Blades. This already powerful weapon received another update that bumps up its power even more.
Update 13.0
| Dual Blades Balance Changes and Fixes (Update 13.0) |
|---|
| ・ Adjusted all of the following weapon actions: ・ Spiral Slash attack power and elemental scaling are slightly increased. ・An issue has been fixed where hellfire from Hellfireblight would stay on the player instead of transferring to the ground after using Spiral Slash too close to the target monster. ・Fixed an issue where the correct voice lines would not play when using Spiral Slash. ・Fixed an issure where the skill Intrepid Heart would not properly activate if you were hit right after the Dual Blades' Shrouded Vault move animation finishes. |
With the boost to Spiral Slash, we should expect to see more value in its use and potential damage output from its attack power and elemental scaling with their respective damage-boosting decorations.
Update 10.0
| Dual Blades Balance Changes and Fixes (Update 10.0) |
|---|
| ・ Adjusted all of the following weapon actions: ・ Demon Flurry Rush (1st Spin - Left and Right): Attack power slightly increased ・ Demon Flurry Rush (2nd Spin - Left and Right): Attack power slightly increased ・ Demon Flurry Rush Finisher (Left and Right): Attack power slightly increased; Elemental scaling increased; Status effect scaling increased ・ Blade Dance (Demon Mode - 10th Hit): Attack power slightly increased ・ Blade Dance (Demon Mode - 11th Hit): Attack power slightly increased ・ Blade Dance (Demon Mode - 12th Hit): Attack power slightly increased ・ Archdemon Mode: Elemental scaling has been increased. ・ Demon Mode: Made it easier to enter Archdemon Mode. ・ Feral Demon Mode: Made it easier to enter Archdemon Mode. ・ Added combos that chain from exiting Demon Mode and into Silkbind Attacks. ・ Demon Mode and Feral Demon Mode: Fixed a bug where the game would treat you as being in an unsheathed state during bubbleblight slipping animations. |
Dual Blades has been pretty balanced even in Base MHRise so we don't expect it to change so much in Sunbreak. However, the increase in power makes Dual Blades more comfortable to use in Master Rank - keeping its reputation as the most offensive weapon in the game.
Dual Blades New Sunbreak Attack and Moves
Official Dual Blades Preview Video
Silkbind Attack: Spiral Slash
Spiral Slash is a new Silkbind Attack for the Dual Blades added in Sunbreak. This move launches the users towards their target, unleashing a multi-hit drilling attack perfect for inflicting elemental and status effects.
Spiral Slash can also be used in mid-air, improving the Dual Blades' offensive gap-closing capabilities even further.
Switch Skill: Slide Slash Combo

Slide Slash Combo is a new Switch Skill for the Dual Blades added in Sunbreak.
This move allows the user to move and attack while dodging. If incorporated with attack combos, it is possible to perform a flurry of attacks that are difficult to defend against.
Silkbind Attack: Ironshine Silk
Not introduced in any trailer, Ironshine Silk is an additional Silkbind Attack added to the Sunbreak Expansion. This aims to mitigate the Dual Blades' long standing problem - sharpness management.
While under the effects of Ironshine Silk, all evasion attacks (like Shrouded Vault) would restore sharpness. What more, activating the skill sharpens the weapon a little bit so it can be used as a quick sharpness management tool!
Monster Hunter Rise: Sunbreak
Release Date and New Monsters
How Good Are the Dual Blades?
Tier List Ranking
| MHRise Ranking | → | Sunbreak Ranking |
|---|---|---|
(S - A - B) 3 Level Tier |
(SS - S - A) 3 Level Tier |
The Dual Blades is great in the Sunbreak expansion and even better when the First Title Update rolled out. What more, the current elemental damage meta benefitted the Dual Blades greatly as it can dish out no-holds-barred damage from all angles.
Dual Blades Strengths
High Elemental Damage and Multiple Hits
Dual Blades have high elemental damage compared to other weapons. Hunters that prepare themselves with Dual Blades of the correct element are greatly rewarded.
Also, the rate of hits which can be executed with Dual Blades is unmatched by any other weapon.
Great Mobility

Dual Blades' attack animations do not take too long, so you can dodge whenever you need to. Demon Mode also turns the dodge into a quick dash.
The Dual Blades' great mobility will allow you to easily target a monster's weak point to get the upper hand.
Increased DPS in Demon and Archdemon Modes
Dual Blades gives you access to Demon Mode and Archdemon Mode. Demon Mode has a stronger moveset and a better evade. It also builds up the Archdemon gauge which allows you to keep your DPS up without using Demon mode.
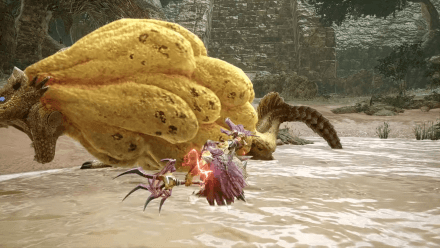
Strong Against Big Monsters
The Dual Blades is capable of dishing massive damage rapidly. Its ability to weave in and out of fights is also unparalleled. Against a large monster, it becomes easy to choose a part you wish to break which can allow you to pile damage.
Furthermore, the Dual Blades' spinning attack also deals more damage the more hits it can do and it will be able to do it the larger the enemy.
Dual Blades Weaknesses
Loses Sharpness Quickly
Because of its high attack speed, Dual Blades lose sharpness quicker than other weapons. It is highly suggested to use skills that reduce sharpness consumption or sharpness increasing skills to alleviate this problem.
High Stamina Consumption
Demon Mode can consume a lot of stamina very quickly, so getting skills that lessen stamina consumption like Constitution will be very useful to Dual Blades users.
Very Short Reach
Dual Blades is one of the weapons that have the shortest reach. Monster parts that are higher up like the head and the tail might often be out of reach for Dual Blades users.
Dual Blades Controls
Basic Controls
| Controls | Action | |
|---|---|---|
| PC |
PS |
Double Slash |
| Switch |
Xbox |
|
| PC |
PS |
Double Slash Return Stroke |
| Switch |
Xbox |
|
| PC |
PS |
Circle Slash |
| Switch |
Xbox |
|
| PC |
PS |
Lunging Strike |
| Switch |
Xbox |
|
| PC |
PS |
Roundslash |
| Switch |
Xbox |
|
| PC |
PS |
Demon Mode |
| Switch |
Xbox |
|
| PC Middle Click + Left Click |
PS L2 + Triangle |
Silkbind Attack: Piercing Bind |
| Switch zL + X |
Xbox LT + Y |
|
| PC Middle Click + Right Click |
PS L2 + Circle |
Silkbind Attack: Shrouded Vault |
| Switch zL + A |
Xbox LT + B |
|
Demon Mode Controls
| Controls | Action | |
|---|---|---|
| PC |
PS |
Demon Fangs |
| Switch |
Xbox |
|
| PC |
PS |
Twofold Demon Slash |
| Switch |
Xbox |
|
| PC |
PS |
Sixfold Demon Slash |
| Switch |
Xbox |
|
| PC |
PS |
Left/Right Roundslash |
| Switch |
Xbox |
|
| PC |
PS |
Demon Flurry Rush (Spinning Move) |
| Switch |
Xbox |
|
| PC |
PS |
Demon Mode Cancel |
| Switch |
Xbox |
|
| PC Left Click + Right Click |
PS Triangle + Circle |
Blade Dance (Demon Mode) |
| Switch X + A |
Xbox Y + B |
|
| PC Demon Mode (midair or ledge) + |
PS Demon Mode (midair or ledge) + |
Midair Spinning Blade Dance |
| Switch Demon Mode (midair or ledge) + |
Xbox Demon Mode (midair or ledge) + |
|
Archdemon Mode Controls
| Controls | Action | |
|---|---|---|
| PC |
PS |
Demon Fangs |
| Switch |
Xbox |
|
| PC |
PS |
Demon Flurry Rush (Spinning Move) |
| Switch |
Xbox |
|
| PC Left Click + Right Click |
PS Triangle + Circle |
Demon Flurry I (Press agan for II and III) |
| Switch X + A |
Xbox Y + B |
|
Useful Combos
| Basic Combo | ||
|---|---|---|
| Double Slash | Double Slash Return Stroke | Circle Slash |
| Demon Mode Combo | |||
|---|---|---|---|
| Demon Fangs | Twofold Demn Slash | Sixfold Demon Slash | Blade Dance |
| Stationary Combo | |||
|---|---|---|---|
| Chop | Side Slash | Lateral Slash | Return Stroke |
| Archdemon Mode Combo | ||
|---|---|---|
| Demon Flurry I | Demon Flurry II | Demon Flurry III |
Dual Blades Silkbind Attacks
Spiral Slash
| Switch Controls | zL + X |
|---|---|
| PC Controls | Middle Click + Left Click |
| PS Controls | L2 + Triangle |
| Xbox Controls | LT + Y |
The new Spiral Slash Silkbind Attack can be used in the Sunbreak demo and replaces either Piercing Bind or Tower Vault. The user launches themselves spiraling forwards, either from the ground or while in midair.
If the user comes in contact with a monster, the move is executed and repeatedly hits the target with a chance of knocking them out.
This move costs one Wirebug charge and has a medium recovery speed.
Shrouded Vault
| Switch Controls | zL + A |
|---|---|
| PC Controls | Middle Click + Right Click |
| PS Controls | L2 + Circle |
| Xbox Controls | LT + B |
Shrouded Vault is a Silkbind Attack that sends the Dual Blades user forward, then does a spinning attack when hit. It's also a Countering move. When you take a hit when moving, you'll both avoid the attack and execute a counterstrike.
Piercing Bind
| Switch Controls | zL + X |
|---|---|
| PC Controls | Middle Click + Left Click |
| PS Controls | L2 + Triangle |
| Xbox Controls | LT + Y |
The hunter thrusts an explosive Kunai into the monster. When that body part is attacked again, it will inflict additional blows. After some time has passed, the Kunai will explode, dealing additional damage based on the number of attacks dealt to that body part.
Ironshine Silk
| Switch Controls | zL + A |
|---|---|
| PC Controls | Middle Click + Right Click |
| PS Controls | L2 + Circle |
| Xbox Controls | LT + B |
A silkbind attack that aims to mitigate the Dual Blades' long standing problem - sharpness management. While under the effects of Ironshine Silk, all evasion attacks (like Shrouded Vault) would restore sharpness. What more, activating the skill sharpens the weapon a little bit so it can be used as a quick sharpness management tool!
Tower Vault
| Switch Controls | zL + X |
|---|---|
| PC Controls | Middle Click + Left Click |
| PS Controls | L2 + Triangle |
| Xbox Controls | LT + Y |
Flings the Wirebug and the hunter up in the air. Interestingly, this “attack” does no damage. However, it allows for movement through the air with the weapon drawn.
As movement actions such as the Wiredash cannot be executed with the weapon drawn, this looks to be a powerful tool for maneuvering in close combat.
Dual Blades Switch Skills
Switch Skills are unlocked with different conditions as you progress in the game. Base game MHRise provides Hunters with three (3) slots of Switch Skills, with the Sunbreak expansion adding two (2) more.
Note: Skills in red are exclusive to the Sunbreak expansion.
| Skill Slot | Switch Skill Choices |
|---|---|
| 1 | ・ Demon Flurry Rush ・ Demon Flight |
| 2 | ・ Demon Mode ・ Feral Demon Mode |
| 3 | ・ Roundslash Combo ・ Slide Slash Combo |
| 4 | ・ Piercing Bind ・ Tower Vault ・ Spiral Slash |
| 5 | ・ Shrouded Vault ・ Ironshine Silk |
Switch Skills Guide: How to Unlock Switch Skills
Demon Flight
| Switched With | |
|---|---|
| Demon Flurry Rush | |
| Description | |
| An attack performed by slamming down both blades. A successful hit vaults you into the air, slicing your target as you spin upwards. Effective against monsters with weakpoints high above.. | |
| Controls | |
| While in Demon Mode, press
Draw attack while in Archdemon Mode. Press A, Right Click, Triangle, or B while in Archdemon Mode. While in Demon Mode, press, press A, Right Click, Triangle, or B |
|
This replaces the Demon Flurry Rush with an Aerial attack. This does not work well with Piercing Bind because it moves the hunter too far from the Piercing Bind point so if your playstyle revolves around Piercing Bind, use Demon Flurry Rush instead. If your playstyle revolves around aerial combat, we suggest using Demon Flight!
Feral Demon Mode
| Switched With | |
|---|---|
| Demon Mode | |
| Description | |
| A more offensive version of Demon mode. You switch to an attack-focused stance, dealing slashing attacks when dodging. | |
| Controls | |
| To enter Feral Demon Mode, press
To enter Feral Demon Mode, press zR, MB4, L2, or LT |
|
This just improves Demon Mode by adding an attack every time you dash/evade. Since Dual Blades is a highly offensive weapon, we suggest using this as soon as you unlock it.
Don't Use Feral Demon Mode to Charge
| Demon Mode | Feral Demon Mode |
|---|---|
 |
 |
Comparison was made by executing the same combo (Sixfold Demon Slash) with both meters starting from zero.
It is easier to charge the Archdemon mode meter when using Demon Mode instead of Feral Demon Mode. Only use Feral Demon Mode for maintaining the archdemon gauge!
Tower Vault
| Switched With | |
|---|---|
| Piercing Bind | |
| Description | |
| Launches a Wirebug upwards and pulls you into the air. Does not deal any damage but allows you to execute aerial combos with the Dual Blades. Wirebug Gauge Recovery Speed: Fast Wirebug Cost: 1 |
Controls |
This Silkbind Attack does not even have any damaging move. It only propels the hunter upwards, opening up aerial attack opportunities.
We suggest not getting this at all and just stick to Piercing Bind - the DPS is just too good. If you want to incorporate easy aerial attacks into your combo, use Demon Flight instead.
Slide Slash Combo
| Switched With | |
|---|---|
| Roundslash Combo | |
| Description | |
| Allows Hunters to attack while evading! The distance is also pretty huge so it's a great reposition tool. | Controls |
Use →
Use Use →
Use →
Note: If there is no directional input, Left Slide Slash is performed by default. |
|
A more evasive maneuver than the Roundslash Combo, this allows you to reposition mid combo and evade monster attacks. Great for monsters that are more mobile.
Spiral Slash
| Switched With | |
|---|---|
| Piercing Bind | |
| Description | |
| A silkbind attack that launches you spiraling forward. Once your attack connects, your body acts as a drill as your blades bore into your target's flesh. You can also perform Spiral Slash while midair. Wirebug Gauge Recovery Speed: Medium Wirebug Cost: 1 |
Controls |
An aggressive attack that shoves the Hunter's body like a corkscrew, dealing multiple instances of damage in a short period of time. This goes well with Dual Blades' innate ability to apply status and element!
Ironshine Silk
| Switched With | |
|---|---|
| Shrouded Vault | |
| Description | |
| Evading just in time before an attack hits will sharpen your weapon. Works well with Shrouded Vault, and all other evasion moves. Effect lasts for 45s. Wirebug Gauge Recovery Speed: Fast Wirebug Cost: 1 |
|
| Controls | |
A silkbind attack that aims to mitigate the Dual Blades' long standing problem - sharpness management. While under the effects of Ironshine Silk, all evasion attacks (like Shrouded Vault) would restore sharpness. What more, activating the skill sharpens the weapon a little bit so it can be used as a quick sharpness management tool!
Dual Blades Attacks and Moves
Demon Mode
| Switch Controls | |
|---|---|
| PC Controls | |
| PS Controls | |
| Xbox Controls |
While in Demon Mode, your attack combo, movement, and evasion will change, and you'll become immune to knockback. While in Demon Mode, your Stamina Gauge will deplete, and you'll revert to normal when it runs out or you leave Demon Mode.
Your Hunter will glow red while in Demon Mode.
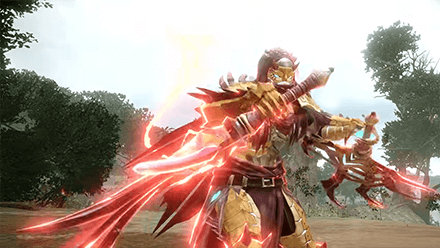
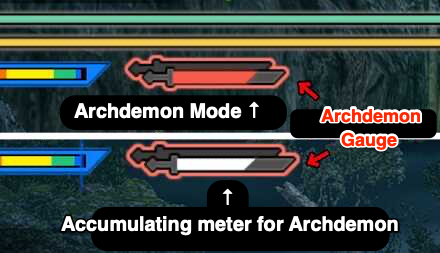
Archdemon Mode
| All Controls | Automatically gained after exiting Demon Mode and the Archdemon Gauge is full/hasn't depleted yet after being full. |
|---|
Archdemon Mode is a buffed version of your normal state unlocked by filling the Archdemon gauge. The Archdemon gauge can be built up by attacking enemies while in Demon mode. It allows you to execute the moveset unlocked in Demon mode while not consuming stamina. Depleting the Archdemon gauge will exit it.
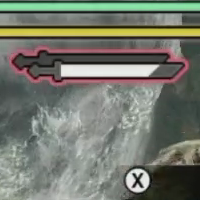
A red flame will appear on your Dual Blades when you are in Archdemon Mode.
| Archdemon Mode Flame Effect |
|---|
 |
Midair Spinning Blade Dance
| Switch Controls | In Demon Mode while near a ledge, |
|---|---|
| PC Controls | In Demon Mode while near a ledge, |
| PS Controls | In Demon Mode while near a ledge, |
| Xbox Controls | In Demon Mode while near a ledge, |
In Demon Mode or Archdemon Mode, this move will be executed automatically upon pressing B, Space, X, or A when near a ledge.
It might seem like an underwhelming move but hitting it at a monster will cause the attack to spin until the hunter reaches the monster's opposite end. Use it at a good angle to make every hit count!
You can also execute a Spinning Blade Dance Finisher by pressing either attack button while midair or right after landing.
Blade Dance
| Switch Controls | While in Demon Mode, A + X |
|---|---|
| PC Controls | While in Demon Mode, Right Click + Left Click |
| PS Controls | While in Demon Mode, Circle + Triangle |
| Xbox Controls | While in Demon Mode, B + Y |
The Dual Blades' signature move is returning to Monster Hunter Rise! It's a move that locks you in place but in return, allows you to deal massive damage.
While the individual hit may not seem much, totalling the damage can allow an optimized build to deal roughly the same damage as a Great Sword's True Charge Slash.
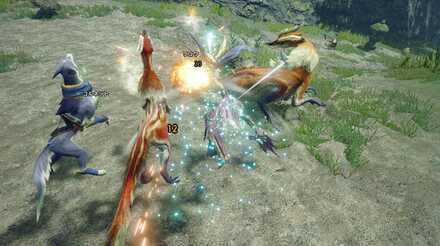
Demon Flurry Rush (Spin Attack)

| Switch Controls | While in Demon / Archdemon Mode, |
|---|---|
| PC Controls | While in Demon / Archdemon Mode, |
| PS Controls | While in Demon / Archdemon Mode, |
| Xbox Controls | While in Demon / Archdemon Mode, |
This might be the most recognizable Dual Blades attack by everyone. This propels the Hunter forward while spinning which deals a lot of hits to the target. Take note, you can only execute this move when in Demon or Archdemon Mode.
Recommended Combos For the Dual Blades
High Damage Silkbind Combo

| Switch Controls | zR + A → zL + X → A (x2) → X + A |
|---|---|
| PC Controls | MB4 + Right Click → Middle Click + Left Click → Right Click (x2) → Left Click + Right Click |
| PS Controls | R2 + Circle → L2 + Triangle → Circle (x2) → Triangle + Circle |
| Xbox Controls | RT + B → LT + Y → B (x2) → Y + B |
This is a high damage combo that uses the added damage from Piercing Bind. It is suggested that you execute this combo whenever the monster is down to maximize your damage output!
No Wirebug High Damage Combo
Demon Dance Combo

| Switch Controls | zR → A → X + A |
|---|---|
| PC Controls | MB4 → Right Click → Left Click + Right Click |
| PS Controls | R2 → Circle → Triangle + Circle |
| Xbox Controls | RT → B → Y + B |
This combo is used when your Wirebug gauge is in cooldown and you need good damage dealing combo. This is not as good as the Piercing Bind infused combo but it gets the job done!
Roundslash Loop Combo
| Switch Controls | X (x2) → Left Stick + X ... |
|---|---|
| PC Controls | Left Click (x2) → Directional Button + Left Click ... |
| PS Controls | Triangle (x2) → Left Stick + Triangle ... |
| Xbox Controls | Y (x2) → Left Stick + Y ... |
A non-Wirebug combo that uses either a Left or Right Roundslash loop. Since the time between loops is short, you can adjust based on the movements of the monster.
High Mobility Bread-and-Butter Combo

| Switch Controls | A → X (x3 ) → A |
|---|---|
| PC Controls | Right Click → Left Click (x3 ) → Right Click |
| PS Controls | Circle → Triangle (x3 ) → Circle |
| Xbox Controls | B → Y (x3 ) → B |
This is the usual combo you have to master to efficiently use the Dual Blades. It is useable at all times - in normal mode, demon mode, and archdemon mode. Master this one because you would use this combo more often than not!
On-Off Demon Mode Combo
| Switch Controls | A → zR then loop |
|---|---|
| PC Controls | Right Click → MB4 then loop |
| PS Controls | Circle → R2 then loop |
| Xbox Controls | B → RT then loop |
A combo that focuses on mobility. Since the attack windows in Demon Mode and Demon Mode Cancel is short, you can guarantee that your Archdemon Mode meter will fill up. Also, going in and out of Demon Mode saves stamina.
Tips on How to Use the Dual Blades
Demon Mode for Charging, Feral for Attacking
| Demon Mode | Feral Demon Mode |
|---|---|
|
|
Comparison was made by executing the same combo (Sixfold Demon Slash) with both meters starting from zero.
In Update 10.0, it is now easier to charge the Archdemon mode meter when using Demon Mode instead of Feral Demon Mode.
Whenever you need to charge your meter, swap to Demon Mode. If you're just maintaining and attacking, you can swap back to Feral Demon Mode to deal increased damage.
Take Advantage of Shrouded Vault

While Dual Blades usually does not have any defensive moves, Shrouded Vault brings a new countering option to the Dual Blades' paltry defenses. It's certainly a game-changer for the Dual Blades, so try to use it whenever you know the enemy is going to be attacking.
Use the Wiredash to Close Distance
With the Dual Blades' short reach, it can be hard to get a monster in melee range. The Wiredash can help close the distance on a monster before it knows what stabbed it.
Even if you don't use the Wiredash specifically, simply moving around with Wirebugs improves your mobility, making them a great pair that lends the Dual Blades increased potential compared to previous games.
Get Skills That Enhance Dodging and Stamina Management
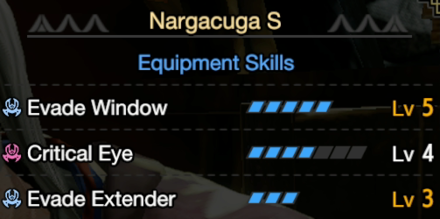
When Shrouded Vault is unavailable, you would want to enhance your evading with skills like Evade Window or Evade Extender. There are ways to increase Dual Blades' survivability when going toe-to-toe with monsters!
You may also put some stamina management skills like Stamina Surge or Constitution to further improve your mobility!
Dual Blades Builds and Best Equipment
Utilize Demon and Archdemon Modes
Demon Mode is a stamina-draining mode that gives you access to high damage combos. When you attack while on Demon Mode, you're going to accumulate Archdemon Gauge charge.
When that meter fills up, you're going to enter Archdemon Mode which gives you access to Demon Mode combos without the stamina drain. As a Dual Blades user, you must always strive to maintain Archdemon mode.
You know that you are in Archdemon Mode by the red Archdemon Gauge beside the weapon sharpness gauge. The meter will decrease over time or when you use Demon Flurries.
When the meter runs empty, you have to charge it again in Demon Mode. Subsequently, you may also charge while in Archdemon mode by entering Demon Mode and attacking.
Don't Spam The Piercing Bind SIlkbind Attack

The Piercing Bind is a powerful Silkbind attack that was added in Rise. It allows you to deal more damage the more times you hit the monster while they have the dagger lodged in them.
It, however, consumes one Wirebug which is needed to dodge attacks using the new Shrouded Vault move, so try to use it when you have an opening.
Use Shrouded Vault Instead of iFrame Dodges
Using iFrame Dodging without having Evade Window in your build is extremely hard to execute so we recommend using Shrouded Vaults for unavoidable attacks!
How to Avoid Attacks: iFrame Dodge Guide
Use Piercing Bind With Blade Dance in Demon / Archdemon Mode
Piercing Bind is a move that deals more damage the more times you hit the monster. It has a short duration so maximizing its damage via Demon Mode's attacks is the best way to maximize your DPS in Rise. Also, using Blade Dance together with Piercing Bind increases the overall DPS because Blade Dance hits a lot of times!
Dual Blades Known Bugs and Fixes
Update 3.5 Bug Fix

Update 3.5 brought on a nice bug fix for Dual Blades, related to the Silkbind Attack: Shrouded Vault. Previously, Dual Blades players were prevented from performing the Shrouded Vault in their chosen direction if performed too soon after activating Feral Demon Mode. This is fixed now!
Update 3.5: Ghosts 'n Goblins Resurrection Collaboration, DLC, and Patch Notes
Changes from MHW: Iceborne
Monster Hunter Rise (MH Rise) Related Guides

| Weapon Type Guides | ||
|---|---|---|
 Weapons and Weapon Types Weapons and Weapon Types |
 Weapon Type Tier List Weapon Type Tier List |
 Builds for Each Weapon Type Builds for Each Weapon Type |
Melee Weapon Guides
| Melee Weapons | ||
|---|---|---|
Guide | Weapon Tree |
Guide | Weapon Tree |
Guide | Weapon Tree |
Guide | Weapon Tree |
Guide | Weapon Tree |
Guide | Weapon Tree |
Guide | Weapon Tree |
Guide | Weapon Tree | Melodies |
Guide | Weapon Tree |
Guide | Weapon Tree |
Guide | Weapon Tree | Kinsects |
|
Ranged Weapon Guides
| Ranged Weapons | ||
|---|---|---|
Guide | Weapon Tree |
Guide | Weapon Tree |
Guide | Weapon Tree |
Comment
Archidemon : You get Demon combos w/o using stamina
Author

Sunbreak Dual Blades Guide: Combos, Controls and Moveset
Rankings
- We could not find the message board you were looking for.
Gaming News


![Monster Hunter Stories 3 Review [First Impressions] | Simply Rejuvenating](https://img.game8.co/4438641/2a31b7702bd70e78ec8efd24661dacda.jpeg/thumb)
Popular Games

Genshin Impact Walkthrough & Guides Wiki
Umamusume: Pretty Derby Walkthrough & Guides Wiki
Pokemon Pokopia Walkthrough & Guides Wiki
Honkai: Star Rail Walkthrough & Guides Wiki
Monster Hunter Stories 3: Twisted Reflection Walkthrough & Guides Wiki
Arknights: Endfield Walkthrough & Guides Wiki
Wuthering Waves Walkthrough & Guides Wiki
Zenless Zone Zero Walkthrough & Guides Wiki
Pokemon TCG Pocket (PTCGP) Strategies & Guides Wiki
Monster Hunter Wilds Walkthrough & Guides Wiki


Recommended Games
Diablo 4: Vessel of Hatred Walkthrough & Guides Wiki
Cyberpunk 2077: Ultimate Edition Walkthrough & Guides Wiki
Fire Emblem Heroes (FEH) Walkthrough & Guides Wiki
Yu-Gi-Oh! Master Duel Walkthrough & Guides Wiki
Super Smash Bros. Ultimate Walkthrough & Guides Wiki
Pokemon Brilliant Diamond and Shining Pearl (BDSP) Walkthrough & Guides Wiki
Elden Ring Shadow of the Erdtree Walkthrough & Guides Wiki
Monster Hunter World Walkthrough & Guides Wiki
The Legend of Zelda: Tears of the Kingdom Walkthrough & Guides Wiki
Persona 3 Reload Walkthrough & Guides Wiki


All rights reserved
©CAPCOM CO., LTD. ALL RIGHTS RESERVED.
The copyrights of videos of games used in our content and other intellectual property rights belong to the provider of the game.
The contents we provide on this site were created personally by members of the Game8 editorial department.
We refuse the right to reuse or repost content taken without our permission such as data or images to other sites.
Think demon modes attack set , but no reduction of stamina. IIRC it provides the same buffs as demon mode but not 100%, sorry bud just outa chemo and foggy. Don't wana give you wrong info. But it is the skill set of demon mode for sure.