Sunbreak Wyvern Riding | How to Mount and Ride Monsters
★ All Title Updates now available for ALL PLATFORMS!
┗ Title Update 4 | Title Update 5 | Bonus Update
┗ Check out all our Best Builds For Every Weapon!
┗ TU4 Monsters: Velkhana | Risen C.G. Valstrax
┗ TU5 Monsters: Amatsu | Risen Shagaru Magala
┗ Bonus Update Monster: Primordial Malzeno

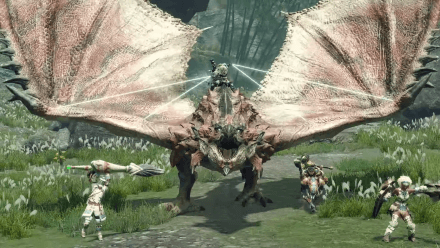
This is a guide on Wyvern Riding, a new mechanic introduced in Monster Hunter Rise (MH Rise). If you want a tutorial guide on how to ride monsters as well as the controls, read on!
List of Contents
What is Wyvern Riding?
New Mounting Mechanic
Wyvern Riding is a new mechanic introduced mechanic in Monster Hunter: Rise (MH Rise). Previously, mounting monsters were done by manually jumping on top of them.
This mechanic allows you to ride and control any large monster while on the ground without needing any further jumping input. This is used for toppling monsters by launching them into walls, or by using them to fight other large monsters in similar way to Turf Wars.
Completely Replaced Mounting
The mounting from past games has been completely replaced with Wyvern Riding. Not only will you be able to ride monsters this time, but you also have to control them as well. This introduces new opportunities in dealing large amounts of damage!
Topple Monsters by Riding Them
Wyvern Riding can be used to topple large monsters, either by launching them into walls three (3) times, or by launching them and letting them topple after a set distance.
Used to Fight Other Large Monsters
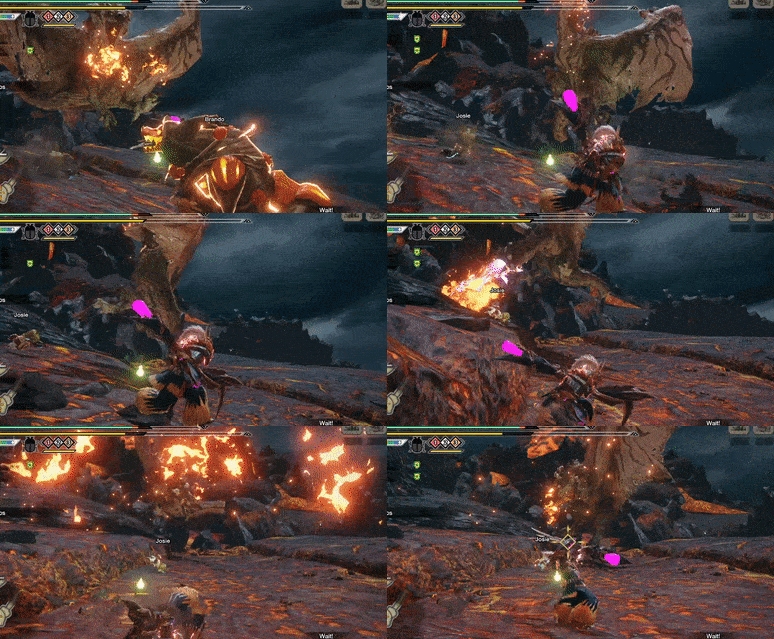
Large monsters can be ridden to battle against other monsters. Succeeding in this Wyvern Ride battle will cause the opponent to suffer heavy damage and be toppled.
During battle, hunters can also initiate another Wyvern Riding opportunity by launching the monster they are riding into another large monster.
Has A Time Limit

The Wyvern Rider Timer shows you how much time you have left riding a certain monster in the form of a clock. This timer changes color the closer you are to the riding expiration. When this runs out, you will be thrown away from the monster and will have to wait until it can be ridden again!
Getting hit by large monsters will shorten this timer. Make sure to use Emergency Evades, and either launch the monster enough into walls to cause it to topple, or to deal enough damage against a monster for filling up the Mounted Punisher gauge!
Steps in Wyvern Riding
| # | Description |
|---|---|
| 1 | Put the monster in a Mountable State using Silkbind, Wirebug, and Aerial Attacks. You may also launch monsters onto another monster to put the other monster in a mountable state. Damage numbers will have a blue shine whenever you are dealing mounting damage. Use Puppet Spiders to instantly put monsters in a mountable state. |
| 2 | During this state, you can now mount the monster through two ways, depending on your Buttons for Wyvern Riding settings in the Controls menu: by attacking the monster, or by pressing |
| 3 | If there is a monster nearby, attack the monster and fill the Wyvern Riding Gauge to execute a Mounted Punisher! |
| 4 | Launch monsters into walls or obstacles using the Don't forget that you can do this multiple times by |
| 5 | After launching the monster to a wall / obstacle, the monster will go down and will be open for free hits! |
How to Make Monsters Rideable
|
|

To ride monsters, you have to put them in a mountable state first. This can be accomplished in several ways: by using Silkbind and Wirebug Attacks consistently, Puppet Spiders, or having large monsters attack each other!
Take note, Wyvern Riding replaces the traditional mounting we know from the past games so consider these methods if you want to ride these monsters!
Use Silkbind, Wirebug, and Aerial Attacks

Using Silkbind Attacks, Wirebug Attacks, and Aerial Attacks consistently against a monster accumulates mounting damage onto a monster. When your Wirebugs are fully charged, always try to execute Silkbind attacks!
Also, a blue shine will appear behind the damage numbers whenever you deal mounting damage. Keep a look out for those!
List of Silkbind Attacks and How to Use
Use Puppet Spiders

Puppet Spiders are a type of Endemic Life that puts monsters in a mountable state instantly! Like the usual Endemic Life, they can be picked up around the map and will be stored like an item.
Puppet Spider Location: How to Get and Use Puppet Spiders
Make Monsters Fight Each Other

A monster attacking another monster will eventually wear it down to its mountable state! This could happen by either attacking another monster while riding on one or monsters wearing themselves out in a Turf War.
A turf war can be instigated by luring monsters to the same area. This can be done using certain endemic life like the Stinkmink or the Wailnard. Note that not all monsters will attack each other! Observe carefully whenever two monsters are present in the same area.
The losing monster will always be mountable after the turf war, so be alert for when you can ride!
Turf Wars: List of Monsters in Turf War
Wyvern Riding Not Working?

Requires Multiple Aerial or Silkbind Attacks
Putting monsters in the mountable state requires multiple aerial or Silkbind attack hits. You cannot wear them down by hitting them once. Repeatedly use aerial or Silkbind attacks such as the Hunting Horn's Earthshaker and the Bow's Aerial Aim to quickly enable Wyvern Riding.
Cannot Mount the Same Monster Twice Immediately
If you have just mounted a specific monster, you cannot mount it again after a short while. Based on our testing, a cooldown of 5 minutes is required before you can mount the same monster again.
The Arzuros in the Wyvern Riding Tutorial is Different
The Arzuros in Wyvern Riding tutorial is a bit different because it only requires 1 Wirebug or Silkbind attack hit before you can mount it.
This is intentional so you would not waste time trying to mount the monster. The wyvern riding threshold in the full game is increased to balance the game. Do not be confused if you are not mounting a monster after a single hit!
Wyvern Riding Tutorial
When you have successfully mounted the monster, know how to ride it! Here are all the things you need to know!
| Main Controls |
|---|
|
|
Move

| Action | Input | |
|---|---|---|
| Move | Switch | |
| Playstation | ||
| Xbox | ||
| PC | ||
While riding a monster, use the Left Analog Stick while holding the R Button for Switch.
Use the Left Analog Stick while holding the R1 Button for Playstation.
Move the monster around with the Left Stick while holding the Right Bumper for Xbox.
Use any of the following directional buttons W, A, S, and D, while holding the Shift Button for PC. You can take the monster anywhere on the map so ride to your heart's content!
Light Attack

| Action | Input | |
|---|---|---|
| Light Attack | Switch | |
| Playstation | ||
| Xbox | ||
| PC | ||
Execute a light attack by pressing the X Button for the Switch, the Triangle Button for Playstation, the Y Button for Xbox, and Left-click for PC.
Strong Attack

| Action | Input | |
|---|---|---|
| Strong Attack | Switch | |
| Playstation | ||
| Xbox | ||
| PC | ||
Execute a strong attack by pressing the A Button for the Switch, the Circle Button for Playstation, the B Button for Xbox, and Right-click for PC.
A strong attack is slower than a light attack but packs more punch. It is advisable to use this only when there is a huge attack window!
Evade

| Action | Input | |
|---|---|---|
| Evade | Switch | |
| Playstation | ||
| Xbox | ||
| PC | ||
| Emergency Evade Cost 1 Wirebug |
Switch | |
| Playstation | ||
| Xbox | ||
| PC | ||
You can evade by pressing the B Button for the Switch, the X Button for Playstation, the A Button for Xbox, and the Space Bar for PC.
You can execute an Emergency Evade when your monster is attacking or being hit at the cost of your Wirebug gauge.
Launching Monsters

| Action | Input | |
|---|---|---|
| Launch Monster | Switch | |
| Playstation | ||
| Xbox | ||
| PC | ||
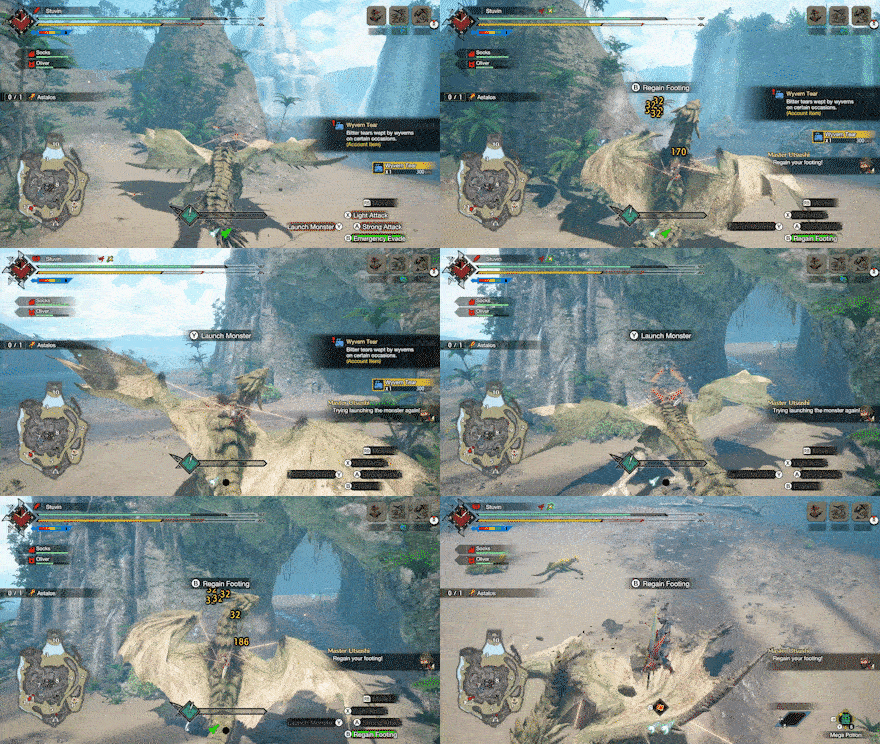
You can launch monsters onto a wall, an obstacle, or another monster by pressing the Y Button (Switch), Square Button (Playstation), X Button (Xbox), or C Button (PC). This costs one Wirebug per hit and this can be chained multiple times! This will cause you to dismount so keep this in mind!
To chain wall slams, press B Button (Switch), X Button (Playstation), A Button (Xbox), or the Space Bar (PC) to recover your grip onto the monster. Be careful though, the subsequent launches will be timed so try launching a monster in an area with opposing walls!
Also, launching the monster you are currently riding onto another monster will cause that monster to enter its mountable state!
Mounted Punisher

| Action | Input | |
|---|---|---|
| Mounted Punisher | Switch | |
| Playstation | ||
| Xbox | ||
| PC | ||
Filling up the Wyvern Riding Gauge enables you to execute the Mounted Punisher. This is more like a finishing move when you have successfully filled up the Wyvern Riding Gauge.
To fill up the Wyvern Riding Gauge, attack other monsters or evade before you get hit.
Best Monsters to Wyvern Ride
All monsters can be ridden but not all of them are very helpful with the monsters.
Additional damage is always helpful, but take note of other effects like status or blights that can be afflicted on other monsters through your monster's moves. Here are some that we suggest riding when they are in the locale!
Do take note that some monsters can have different attacks based on your left stick or directional buttons! These can be found in your Hunter's Notes.
| Monster | Wyvern Ride Merits |
|---|---|
 Rathalos Rathalos
|
Rathalos's Mounted Punisher deals both poison and Fireblight to an opposing monster. We highly suggest mounting Rathalos when he is in the locale! |
 Magnamalo Magnamalo
 Diablos Diablos
|
For pure raw damage Magnamalo and Diablos are great choices for Wyvern Riding. The blast attacks from the Malice wyvern deal so much damage against other monsters and Diablos' horns deal a huge amount of damage especially the strong attack. |
 Great Baggi Great Baggi
|
Great Baggi's Mounted Punisher puts the other monster to sleep, giving you the opportunity to deal massive damage via wake-up attacks. |
 Barioth Barioth
|
Barioth's Mounted Punisher procs Iceblight to an opposing monster, greatly reducing their movement speed. |
 Zinogre Zinogre
 Tobi-Kadachi Tobi-Kadachi
|
Zinogre's and Tobi-Kadachi's Mounted Punisher both proc Thunderblight to an opposing monster, making stuns more likely! |
 Mizutsune Mizutsune
|
Mizutsune's light attack can vary between a normal bite attack and a water beam attack. A water beam attack is also possible and will proc Waterblight. There is no definite way to make Mizutsune choose the water beam attack but with our testing, it does the water beam light attack more when used from a distance. |
 Seregios Seregios
|
Seregios has quick Strong aerial attacks, especially its diving kicks, that deal decent damage to monster. |
 Rajang Rajang
|
For pure raw damage, Rajang and its variant Furious Rajang are one the best picks for making quick work of other monsters through its fast light and heavy attacks. Among its heavy attacks, it can spam its laser beam, which is a good all-around ranged attack with a quick startup. |
 Bazelgeuse Bazelgeuse
|
For fun explosive action, Bazelgeuse and its Seething variant have ranged moves with generous reach such as the spreading of explosive projectiles. When spammed, this is a quick way to fill up the Mounted Punisher. |
 Crimson Glow Valstrax Crimson Glow Valstrax
|
Valstrax has moves with long reach, since it primarily uses its wings for attacking. It is very capable of making quick work of other monsters at range with quick stabs and fast charges, ending with an aerial Mounted Punisher or a laser. |
Wyvern Riding Tips and Tricks
Learn the Ropes by Doing the Learning to Ride
Quest

The Learning to Ride quest is a Training Quest, one of few quests that you can take which helps with learning the fundamentals of gameplay.
In this quest, you will learn all that you need to know to Wyvern Ride, including the usage of Puppet Spiders.
Use Large Barrel Bombs While Airborne
| 1 | Put the Monster in a Mountable State |
|---|---|
| 2 | Place additional bombs near the monster (optional) |
| 3 | Fly over the head using Wirebugs and throw a Large Barrel Bomb (or Mega Barrel Bomb) while airborne |
| 4 | Press |
If you have bombs in your inventory and there is a mountable monster in front of you, you might want to maximize the damage you deal before mounting by throwing a bomb while airborne.
This makes sure that the single-hit attack damage is maximized! If you have time, you may even lay down bombs before going airborne to add more boom to your attack!
Throw bombs by equipping them in your Item Selector, going airborne using Wirebugs, and pressing your Use Item button to throw the bomb downward.
Recover Health or Sharpen Weapons Before Mounting

After putting a monster in a mountable state, the monster will not move for about 10 seconds.
Maximize this time by recovering your health, sharpening your weapons, or crafting items before you deal that single-hit to commence Wyvern Riding!
Attack While it is Mountable
If your Wyvern Riding settings are set to ride only when your weapon is sheathed, you can continue damaging the monster normally.
During this state, the monster will not be able to do anything until it has recovered, or it has been ridden (treat it like it is stunned). You can take the time to deal enough damage before riding the monster!
Learn How to Dodge Cancel

After using a weak or strong attack, if you still have Wirebugs in your gauge, you can use Emergency Evade after an attack to cancel the remaining attack animation and follow-up with another attack!
This is great for speeding up the charging time of your Wyvern Riding gauge for quickly executing the Mounted Punisher. However, you can save your evasions for surviving and flinching attacking monsters. Time these carefully!
Use Emergency Evade to Get Up!
While Wyvern Riding, there is a possibility for your monster to go down because of another monster's attack. When this happens, use emergency evade to stand up again!
Hunter Health When Wyvern Riding
Hunter health is not usually affected by any monster physical attacks during a Wyvern Ride.
However, you are not exactly fully immune to damage while Wyvern Riding. The status effect Poison can still drain your health and cart you during a Wyvern Ride.
Use Evade to Counter Another Monster's Attack

You can also use Emergency Evade to counter another monster's attack. This involves colliding into a monster with an Evade during its attack animation.
When successfully evading into a monster attack, your monster also nullifies that attack's damage and knockback. This means you can evade into projectiles, including lasers.
Make sure to time this carefully while the monster is attacking. Otherwise, your monster will be punished. Use this counter opportunity to stagger and deal damage to other large mnonsters!
Launch a Monster Into Another Monster
When there is another monster in the area, we suggest launching the monster you are riding onto another monster. This places the attacked monster into a mountable state, allowing you or other hunters to initiate a Wyvern Ride!
Of course, be aware if the other monster has been mounted already! You cannot mount the same monster again. You have to wait for about 5 minutes!
Launch Monsters into Walls or Obstacles

| Input | |||
|---|---|---|---|
| Switch | Playstation | Xbox | PC |
Press the following buttons when in front of a wall/obstacle to slam the monster. Take note that you can do this multiple times as long as you have wirebug charges by pressing your evade button after every successful wall slam.
Not only does this deal big damage, but it also restrains the monster using ironsilk threads that greatly reduce its movements!
Wyvern Ride into Starburst Bugs

In Master Rank, you can launch monsters into Starburst Bugs to deal additional damage!
Depending on the color, this Endemic Life can also cause elemental blights on the monsters. Look out for these during a hunt!
How to Get and Use Starburst Bugs
Use Mounted Punisher When the Riding Gauge is Almost Out!

When the Riding Gauge fills up, this allows you to execute a Mounted Punisher. At the end of this move, your hunter will be launched away from the monster's back.
With this in mind, it is more efficient to execute Mounted Punisher when the gauge is almost out. This allows you to dish a hit or two against the other monster!
Use Monster Attacks That Causes Blights or Status

Normal attacks during Wyvern Riding are oftened oriented towards physical damage. But some moves allow for afflicting other large monsters with blights and status effects.
Some attacks from mounted monsters, like Rathalos's Fire or Great Baggi's Sleep Mounted Punisher, deal blights or status effects. Use this effectively against other monsters!
Abnormal Status and Elemental Blight Guide
Palamute Silkbinders Can Help Get Mounts

Palamute Silkbinders can be helping in dealing mounting damage get large monsters into a mountable state for Wyvern Riding.
Consider having this on your Palamute if you are looking for another way to get mounts on weapons that do not use much of jumps and Silkbinds with mounting damage.
Take Advantage of Mounted State with a Party

While the monster is under the state of Wyvern Riding by another hunter (which may be a follower or another player), damage towards the monster will be significantly reduced.
You can use this time instead to prepare traps, use items, or sharpen your weapon before the monster's mounted state ends.
Monster Hunter Rise Related Guides
Author
Sunbreak Wyvern Riding | How to Mount and Ride Monsters
improvement survey
03/2026
improving Game8's site?

Your answers will help us to improve our website.
Note: Please be sure not to enter any kind of personal information into your response.

We hope you continue to make use of Game8.
Rankings
- We could not find the message board you were looking for.
Gaming News
Popular Games

Genshin Impact Walkthrough & Guides Wiki

Honkai: Star Rail Walkthrough & Guides Wiki

Umamusume: Pretty Derby Walkthrough & Guides Wiki

Pokemon Pokopia Walkthrough & Guides Wiki

Resident Evil Requiem (RE9) Walkthrough & Guides Wiki

Monster Hunter Wilds Walkthrough & Guides Wiki

Wuthering Waves Walkthrough & Guides Wiki

Arknights: Endfield Walkthrough & Guides Wiki

Pokemon FireRed and LeafGreen (FRLG) Walkthrough & Guides Wiki

Pokemon TCG Pocket (PTCGP) Strategies & Guides Wiki
Recommended Games

Diablo 4: Vessel of Hatred Walkthrough & Guides Wiki

Cyberpunk 2077: Ultimate Edition Walkthrough & Guides Wiki

Fire Emblem Heroes (FEH) Walkthrough & Guides Wiki

Yu-Gi-Oh! Master Duel Walkthrough & Guides Wiki

Super Smash Bros. Ultimate Walkthrough & Guides Wiki

Pokemon Brilliant Diamond and Shining Pearl (BDSP) Walkthrough & Guides Wiki

Elden Ring Shadow of the Erdtree Walkthrough & Guides Wiki

Monster Hunter World Walkthrough & Guides Wiki

The Legend of Zelda: Tears of the Kingdom Walkthrough & Guides Wiki

Persona 3 Reload Walkthrough & Guides Wiki
All rights reserved
©CAPCOM CO., LTD. ALL RIGHTS RESERVED.
The copyrights of videos of games used in our content and other intellectual property rights belong to the provider of the game.
The contents we provide on this site were created personally by members of the Game8 editorial department.
We refuse the right to reuse or repost content taken without our permission such as data or images to other sites.


![Monster Hunter Stories 3 Review [First Impressions] | Simply Rejuvenating](https://img.game8.co/4438641/2a31b7702bd70e78ec8efd24661dacda.jpeg/thumb)


You can also launch one monster into ANOTHER monster, and ride the monster you rammed. you can only do this once per monster so make sure to dish out as much DPS as you can!