Sunbreak Flaming Espinas: Weakness and Drops
★ All Title Updates now available for ALL PLATFORMS!
┗ Title Update 4 | Title Update 5 | Bonus Update
┗ Check out all our Best Builds For Every Weapon!
┗ TU4 Monsters: Velkhana | Risen C.G. Valstrax
┗ TU5 Monsters: Amatsu | Risen Shagaru Magala
┗ Bonus Update Monster: Primordial Malzeno

This is a hunting guide for Flaming Espinas, a Large Monster in Monster Hunter Rise (MH Rise): Sunbreak. Read on to learn what we know about Flaming Espinas' weakness, element, blights, and armor so far!
 Flaming Espinas Guide Flaming Espinas Guide
|
 Espinas Guide Espinas Guide
|
 Flaming Espinas Weapons Flaming Espinas Weapons
|
 Flaming Espinas Armor Flaming Espinas Armor
|
List of Contents
Flaming Espinas Weakness and Notes
| Flaming Espinas |
|||
|---|---|---|---|
 |
|||
| Type | Flying Wyvern | Previous Games | MHF2, MHO |
| Threat Level | 9/10 | Rampage Type | ー |
| Major Weakness | Other Weakness | ||
| Blight / Elemental Damage | Abnormal Status | ||
| Characteristics | |||
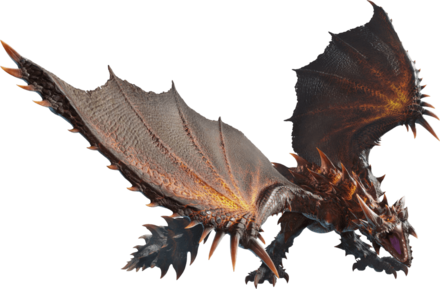
| An Espinas subspecies with a slightly more muted body color. The boldness of the standard Espinas remains: run-of-the-mill attacks won't rouse Flaming Espinas from their slumber. Their breath attack contains a powerful poison, and a dense acid that deteriorates armor. Take this attack head-on, and you won't stand a chance... | |||
How to Unlock Flaming Espinas
Reach MR 10

| Quest Name | Monster/Unlock |
|---|---|
| What Sleeps in the Tower |
|
| Unlock Conditions: Reach MR10 |
To hunt Flaming Espinas after downloading Sunbreak's Title Update 2, you need to raise your MR to 10.
Speak to Doctor Tadori and to Chichae the Quest Damsel to unlock What Sleeps in the Tower.
MR Grinding Guide:
How to Get from MR 6 to MR 100 Fast
Flaming Espinas Weakness and Resistance
Flaming Espinas Weapon Damage Breakdown
| Part | |||
|---|---|---|---|
| Head | 30 | 30 | 20 |
| Abdomen | 30 | 30 | 25 |
| Back | 20 | 20 | 15 |
| Wing | 23 | 23 | 20 |
| Leg | 38 | 38 | 40 |
| Tail | 28 | 25 | 20 |
| Overall | 29 | 28 | 24 |
Flaming Espinas Elemental Weakness Breakdown
| Part | |||||
|---|---|---|---|---|---|
| Head | 0 | 15 | 10 | 5 | 10 |
| Abdomen | 0 | 15 | 10 | 5 | 10 |
| Back | 0 | 10 | 5 | 0 | 5 |
| Wing | 0 | 10 | 10 | 0 | 5 |
| Leg | 0 | 15 | 10 | 5 | 10 |
| Tail | 0 | 10 | 5 | 0 | 5 |
| Overall | 0 | 13 | 9 | 3 | 8 |
Higher numbers indicate higher potential damage to the monster.
Flaming Espinas Hunting Tips

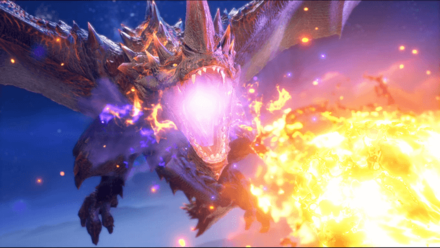
Beware when Flaming Espinas stand up and spread their wings; they'll begin building up power to unleash a massive fireball attack with a wide area of effect. When they start charging up, escape to a safe distance. The fireball's explosive effects lower defense, so bring along items like Adamant Seeds to give it a boost.
Status Effect Vulnerabilities
| Poison | Stun | Paralysis | Sleep |
|---|---|---|---|
| -- | ★ | ★ | ★ |
| Blast | Exhaust | Fireblight | Waterblight |
| ★★ | ★ | ★ | ★★ |
| Thunderblight | Iceblight | ||
| ★ | ★ | ||
If an ailment has more stars it means that it has better effectiveness.
Item Vulnerabilities
| Pitfall Trap | Shock Trap | Flash Bomb |
|---|---|---|
| ◯ | ◯ | ◯ |
| Sonic Bomb | Meat Effects | Dung Bomb |
| ✕ | ✕ | ◯ |
◯ = Vulnerable; ✕ = Fully Resistant; ▲ = Situational
Kinsect Extracts
| Monster Part | Extract |
|---|---|
| Head |
|
| Abdomen |
|
| Back |
|
| Wing |
|
| Leg |
|
| Tail |
|
| Overall | — |
Red = Attack Increase, White = Movement Boost, Orange = Anti-knockback When Attacking
Espinas Subspecies

In Monster Hunter Frontier Season 2, Flaming Espinas did not have an official name. Back then, it was only called Espinas Subspecies or Brown Espinas. And now that it's appearing in Sunbreak in Title Update 2, it finally has an official name!
Flaming Espinas Locations and Quests
Flaming Espinas Habitat
| Map | Starting Area | Visited Areas | Rest Area |
|---|---|---|---|
 Forlorn Arena Forlorn Arena
|
- | - | - |
 Citadel Citadel
|
2 / 7 / 10 | 2 / 5 / 7 / 8 / 10 / 13 | 7 |
Flaming Espinas Quest Appearances
| Quest Type | Lvl | Quest Name |
|---|---|---|
| Anomaly Quest | A★7 | Anomaly Research: Flaming Espinas |
| Event Quest | M★6 | Hazard: Legendary Strike |
| Hub Quest | M★6 | Advanced: Toxic Trio |
| Hub Quest | M★6 | Advanced: Espinaptime |
| Hub Quest | M★6 | Advanced: Eternal Flame |
| Support Survey | M★6 | Operation Flaming Espinas |
| Urgent Hub Quest | M★6 | What Sleeps in the Tower |
| No Quest in This Rank |
| No Quest in This Rank |
How to Beat Flaming Espinas
| Flaming Espinas Tips | ||
|---|---|---|
|
|
Will Always Start Off Sleeping
Flaming Espinas, much alike its normal variant, will always be asleep at the start of every hunt. Exploit this mechanic by maximizing the wake up slap multiplier (2x) and start strong.
We suggest using Mega Barrel Bombs or use your weapon's big damage attack to wake it up like the Great Sword's True Charged Slash or the Hunting Horn's Sonic Bloom Silkbind Attack.
Mind Its Attack Range
It may be easy to underestimate Flaming Espinas' attack range due to its size, but its fireball attacks and the explosion caused by these can reach far away. If you need to heal or use an item, make sure to create some distance away from the monster to be safe!
Use Items to Remove Defense Debuff
Flaming Espinas' fireball attack not only causes fireblight and poison, but can also deal Defense Down, which can put you in grave danger given how aggressive Flaming Espinas is.
If affected with Defense Down, you can use items such as Adamant Seed, Armorskin, or Mega Armorskin to remove the defense debuff.
Status Boost, Abnormal Status, and
Elemental Blight Guide
Stay Away from Smog
Flaming Espinas' fireball attacks will explode and leave a trail of smog which will inflict fireblight and poison if you pass through it. You might end up recovering from being poisoned only to get it again if you roll towards the smog cloud, so watch out where you roll!
Flaming Espinas Attacks and Moves
| Name | Description |
|---|---|
| Body Slam | Flaming Espinas leaps upwards and smashes its body to the ground. |
| Tail Slam | Flaming Espinas smashes its tail like a club. |
| Spin Attack | Flaming Espinas spins around. |
| Horn Attacks | Flaming Espinas can use its sturdy horns to launch hunters away. |
| Chomp to Tail Combo | Espinas' signature snappy combo, now used by its flaming variant. |
| Explosive Fireball Attacks | Flaming Espinas can launch fireballs inflict fireblight, poison, and Defense Down. |
| Fiery Swerving Chomp | A new take on Espinas' chomp, now with flames! |
| Fiery Finale DANGER |
Flaming Espinas charges its flaming breath and releases it in an all-consuming attack. |
Body Slam
| Body Slam Attack Information |
|---|
| Body Slam: Flaming Espinas jumps up and throws its entire weight towards a hunter twice. This attack is quick, but can be dodged with a quick Wirebug away from the area. |
Tail Slam
| Tail Slam Attack Information |
|---|
| Tail Slam: Flaming Espinas raises its spike-filled tail and slams it down to the ground. If you spot Flaming Espinas raising its tail, run away from it to avoid getting pounded! |
Spin Attack
| Spin Attack Information |
|---|
| Spin Attack: Flaming Espinas readies itself and quickly rotates twice. It will take a step back before executing this attack, which give hunters in the way a chance to escape. |
Horn Attacks
Flaming Espinas can utilize its protruding horns to take a hurtful jab at any hunter standing in its way.
| Horn Attack Variations |
|---|
| Horn Rush Flaming Espinas steels itself and runs towards its target, charging forward using its horn. Simply dodge sideways to avoid getting trampled! |
| Horn Drag: Flaming Espinas drags its horns on the ground in an attempt to pulverize its target. Similar to Horn Rush, dodge sideways to avoid this attack! |
Chomp to Tail Combo
| Chomp to Tail Combo Attack Information |
|---|
| Chomp to Tail Combo: Flaming Espinas attempts to bite a hunter and then swipes its poison-tipped tail. Anyone hit may get inflicted with fireblight or poison! |
Explosive Fireball Attacks
Flaming Espinas' fireballs gets a fierce upgrade, with the attack causing fireblight, poison, and Defense Down.
The attack also causes four small explosions which travel forward. A trail of smoggy clouds will linger on the ground which can cause fireblight and poison to whoever passes through it!
| Explosive Fireball Attack Variations |
|---|
| Single Fireball Attack: Flaming Espinas fires off a single fireball towards its target. As it will only spew one fireball, you can simply dodge sideways to avoid getting toasted. |
| Triple Fireball Attack: Flaming Espinas uses this attack more frequently. This attack follows a fork-like pattern in front of Flaming Espinas, which covers a wide area. Run away from the affected area and wait for the smog to dissipate before engaging again. |
| Grand Fireball: A special attack which can be used as a follow up after Fiery Finale. Flaming Espinas soars up in the sky to charge its fire breath and hurtles it downwards, causing a big explosion. Run away from the space in front of Flaming Espinas to avoid getting hit by this attack. |
Fiery Swerving Chomp
| Fiery Swerving Chomp Attack Information |
|---|
| Fiery Swerving Chomp: Flaming Espinas lunges at a target twice, attempting to bite it with its fiery mouth. Flaming Espinas will target anyone currently near it, so this attack can be avoided if you create some space between you and the monster. |
Fiery Finale
| Fiery Finale Attack Information |
|---|
| Fiery Finale: Flaming Espinas waddles around and charges up its fire breath inside its mouth before releasing it towards the ground to cause a massive explosion. This attack can easily wipe out everyone caught inside the explosion, so it is best to stay far away from Flaming Espinas while it charges this move. |
Flaming Espinas Materials and Drops
Master Rank Flaming Espinas Materials
| |
| |
| |
| |
Flaming Espinas Dropped Materials
Master Rank
|
|
Flaming Espinas Trailers
Exclusive Trailer
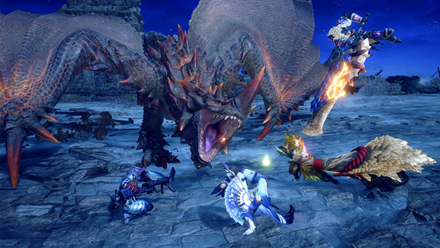
Flaming Espinas' appearance in Sunbreak was announced through his exclusive trailer, where it is fighting Teostra, Emperor of Flames, in the Forlorn Arena.
TGS 2022 Gameplay
Capcom shared with us a bigger sneak peak at Flaming Espinas' new moves with this video!
Monster Hunter Rise: Sunbreak Related Guides
All Flaming Espinas Guides
| All Flaming Espinas Related Articles | ||
|---|---|---|
 Flaming Espinas Guide Flaming Espinas Guide
|
 Flaming Espinas Weapons Flaming Espinas Weapons
|
 Flaming Espinas Armor Flaming Espinas Armor
|
Sunbreak Monsters
| Sunbreak Monster Lists | ||
|---|---|---|
| Sunbreak Monsters List | Monster Subspecies List | Sunbreak Small Monsters List |
Large Monsters
MR6+ Large Monsters
| MR6+ Monsters | |||||
|---|---|---|---|---|---|
 Gaismagorm Gaismagorm(MR6) |
 Furious Rajang Furious Rajang(MR50) |
 Scorned Magnamalo Scorned Magnamalo(MR100) |
|||
Title Update 1 Monsters
| Sunbreak Title Update 1 Monsters | |||
|---|---|---|---|
 Seething Bazelgeuse Seething Bazelgeuse |
 Silver Rathalos Silver Rathalos |
 Gold Rathian Gold Rathian |
 Lucent Nargacuga Lucent Nargacuga |
Title Update 2 Monsters
| Sunbreak Title Update 2 Monsters | ||
|---|---|---|
 Flaming Espinas Flaming Espinas |
 Risen Chameleos Risen Chameleos |
 Violet Mizutsune Violet Mizutsune |
Title Update 3 Monsters
| Sunbreak Title Update 3 Monsters | ||
|---|---|---|
 Chaotic Gore Magala Chaotic Gore Magala |
 Risen Kushala Daora Risen Kushala Daora |
 Risen Teostra Risen Teostra |
Title Update 4 Monsters
| Sunbreak Title Update 4 Monsters | |
|---|---|
 Velkhana Velkhana |
 Risen Crimson Glow Valstrax Risen Crimson Glow Valstrax |
Title Update 5 Monsters
| Sunbreak Title Update 5 Monsters | |
|---|---|
 Amatsu Amatsu |
 Risen Shagaru Magala Risen Shagaru Magala |
Small Monsters
| Sunbreak Small Monsters | |||||
|---|---|---|---|---|---|
 Boggi Boggi |
 Ceanataur Ceanataur |
 Gowngoat Gowngoat |
|||
 Hermitaur Hermitaur |
 Hornetaur Hornetaur |
 Pyrantula Pyrantula |
 Vespoid Vespoid |
 Velociprey Velociprey |
|
Other Large Monsters
Elder Dragons
| Elder Dragons | |||||
|---|---|---|---|---|---|
 Narwa the Allmother Narwa the Allmother |
|||||
 Wind Serpent Ibushi Wind Serpent Ibushi |
 Thunder Serpent Narwa Thunder Serpent Narwa |
 Crimson Glow Valstrax Crimson Glow Valstrax |
|||
 Chameleos Chameleos |
 Kushala Daora Kushala Daora |
 Teostra Teostra |
|||
Apex Monsters
| Apex Monsters | ||
|---|---|---|
 Apex Arzuros Apex Arzuros |
 Apex Rathian Apex Rathian |
 Apex Mizutsune Apex Mizutsune |
 Apex Rathalos Apex Rathalos |
 Apex Diablos Apex Diablos |
 Apex Zinogre Apex Zinogre |
Other Small Monsters
Author
Sunbreak Flaming Espinas: Weakness and Drops
improvement survey
03/2026
improving Game8's site?

Your answers will help us to improve our website.
Note: Please be sure not to enter any kind of personal information into your response.

We hope you continue to make use of Game8.
Rankings
- We could not find the message board you were looking for.
Gaming News
Popular Games

Genshin Impact Walkthrough & Guides Wiki

Honkai: Star Rail Walkthrough & Guides Wiki

Umamusume: Pretty Derby Walkthrough & Guides Wiki

Pokemon Pokopia Walkthrough & Guides Wiki

Resident Evil Requiem (RE9) Walkthrough & Guides Wiki

Monster Hunter Wilds Walkthrough & Guides Wiki

Wuthering Waves Walkthrough & Guides Wiki

Arknights: Endfield Walkthrough & Guides Wiki

Pokemon FireRed and LeafGreen (FRLG) Walkthrough & Guides Wiki

Pokemon TCG Pocket (PTCGP) Strategies & Guides Wiki
Recommended Games

Diablo 4: Vessel of Hatred Walkthrough & Guides Wiki

Cyberpunk 2077: Ultimate Edition Walkthrough & Guides Wiki

Fire Emblem Heroes (FEH) Walkthrough & Guides Wiki

Yu-Gi-Oh! Master Duel Walkthrough & Guides Wiki

Super Smash Bros. Ultimate Walkthrough & Guides Wiki

Pokemon Brilliant Diamond and Shining Pearl (BDSP) Walkthrough & Guides Wiki

Elden Ring Shadow of the Erdtree Walkthrough & Guides Wiki

Monster Hunter World Walkthrough & Guides Wiki

The Legend of Zelda: Tears of the Kingdom Walkthrough & Guides Wiki

Persona 3 Reload Walkthrough & Guides Wiki
All rights reserved
©CAPCOM CO., LTD. ALL RIGHTS RESERVED.
The copyrights of videos of games used in our content and other intellectual property rights belong to the provider of the game.
The contents we provide on this site were created personally by members of the Game8 editorial department.
We refuse the right to reuse or repost content taken without our permission such as data or images to other sites.

 Daimyo Hermitaur
 Blood Orange Bishaten
 Garangolm
 Aurora Somnacanth
 Shogun Ceanataur
 Lunagaron
 Astalos
 Seregios
 Magma Almudron
 Gore Magala
 Pyre Rakna-Kadaki
 Malzeno
 Shagaru Magala
 Great Izuchi
 Arzuros
 Great Baggi
 Lagombi
 Aknosom
 Tetranadon
 Kulu-Ya-Ku
 Barroth
 Great Wroggi
 Royal Ludroth
 Khezu
Khezu Bishaten
 Somnacanth
 Barioth
 Rathian
 Tobi-Kadachi
 Volvidon
 Basarios
 Pukei-Pukei
 Magnamalo
 Nargacuga
 Zinogre
 Anjanath
 Mizutsune
 Rathalos
 Almudron
 Goss Harag
 Tigrex
 Diablos
 Jyuratodus
 Rajang
 Rakna-Kadaki
 Bazelgeuse
 Altaroth
 Anteka
 Baggi
Baggi Bnahabra
 Bombadgy
 Bullfango
 Delex
Delex Felyne
 Gajau
Gajau Gargwa
 Izuchi
 Jaggi
Jaggi Jaggia
 Jagras
 Kelbi
Kelbi Kestodon
 Ludroth
 Melynx
 Popo
Popo Rachnoid
 Remobra
 Rhenoplos
 Slagtoth
 Uroktor
 Wroggi
 Zamite


![Monster Hunter Stories 3 Review [First Impressions] | Simply Rejuvenating](https://img.game8.co/4438641/2a31b7702bd70e78ec8efd24661dacda.jpeg/thumb)


