This survey will take about 1 minute.
Your answers will help us to improve our website.
Monster Hunter Rise: Sunbreak
Sunbreak Switch Axe Guide: Combos, Controls and Moveset
★ All Title Updates now available for ALL PLATFORMS!
┗ Title Update 4 | Title Update 5 | Bonus Update
┗ Check out all our Best Builds For Every Weapon!
┗ TU4 Monsters: Velkhana | Risen C.G. Valstrax
┗ TU5 Monsters: Amatsu | Risen Shagaru Magala
┗ Bonus Update Monster: Primordial Malzeno
This is a guide to the Switch Axe, a weapon in Monster Hunter Rise: Sunbreak (MH Rise). Read on to learn about new Switch Axe controls and combos, how to use Switch Axe discharge, Switch Axe Phials as well as details on Switch Axe Switch Skills.
| All Switch Axe Guides | ||
|---|---|---|
 Trees & Full List Trees & Full List |
 How to Use How to Use |
 Best Builds Best Builds |
List of Contents
Switch Axe Balance Changes
Update 10.0
| Switch Axe Balance Changes and Fixes (Update 10.0) |
|---|
| ・ Adjusted all of the following weapon actions: ・ Axe: Wide Sweep (Finisher 2nd Hit): Attack power slightly increased; Part damage slightly increased ・ Axe: Wide Sweep (Finisher 3rd Hit): Attack power increased; Part damage slightly increased ・ Axe: Wild Swing: Attack power now increases according to the number of attacks. ・ Axe: Heavy Slam: Reduced the number of Wild Swings required in order to combo from Wild Swing into Heavy Slam. ・ Axe: Heavy Slam: Part break and flinch multipliers have been added to the buff effects from Heavy Slam. ・ Compressed Finishing Discharge: The damage reaction from the explosion has been changed. ・ Axe: Rising Slash: The attack range has been increased. ・ Fixed a bug where the hit vibrations from landing a Forward Slash would not trigger after using Soaring Wyvern Blade in midair. ・ Fixed a bug where Axe: Side Slash would result as your draw attack directly after climbing a ledge with your weapon sheathed, regardless of your Switch Skill settings. ・ Fixed a bug where the Axe mode recovery animation for getting up from the ground would trigger instead of the Sword mode animation when recovering from certain types of reactions (extreme knockbacks, knockbacks you can't Wirefall from, and whirlwinds) in Sword mode. ・ Axe: Wild Swing: Fixed a bug where this couldn't be chained into other moves during certain timings if the Wild Swing was started from the left side and no repeat inputs were made. |
Though pretty short, Switch Axe actually received a quite significant overall increase in damage and firepower after the update.
With the obvious buff on attack power and part damage, it's even easier now to break monster parts - something the Switch Axe is known for.
Another buff is the introduction of a new counterattack silkbind: Elemental Burst Counter. Not only does this provide the Switch Axe with a much needed counterattack opportunity, it also fully charges the amp gauge instantly. This gives the spotlight to previously hard-to-charge phials like Power - enabling the Switch Axe to deal significant damage while being comfortable to use!
Switch Axe New Sunbreak Attack and Moves
Official Switch Axe Preview Video
Silkbind Attack: Elemental Burst Counter
Elemental Burst Counter is a new Silkbind Attack for the Switch Axe in Sunbreak. This move acts as a counter-attack that uses up the Switch Axe's energy and releases an Elemental Burst right after.
If you manage to land the burst right as a monster attacks, you'll be able to perform a Power Finisher and will automatically put your Switch Axe into an Amped State. Useful for Power Phial Switch Axes that takes forever to charge.
Can Be Used Against Monster Roars
As this move is a counter, it can be used to bypass monster roars and launch an attack instead of being deafened if used at the right time.
Switch Skill: 2-Staged Morph Slash Combo
2-Staged Morph Slash Combo is a new Switch Skill for the Switch Axe added in Sunbreak.
This two-staged combo is performed after Wild Swings wherein the weapon morphs into Sword Mode and into Axe Mode.
While under this combo, Sword Mode attacks are more powerful, while attacks in Axe Mode will fill the Switch Gauge faster.
Silkbind Attack: Wire Step
An evasion move that can be used to flank enemies. Use this to reposition and continue your combo from a safe place.
Monster Hunter Rise: Sunbreak
Release Date and New Monsters
How Good is the Switch Axe?
Tier List Ranking
| MHRise Ranking | → | Sunbreak Ranking |
|---|---|---|
(S - A - B) 3 Level Tier |
(SS - S - A) 3 Level Tier |
The Switch Axe improved a lot in the Sunbreak expansion with the addition of a counterattack Silkbind move that not only parries attacks but also instantly charges the Amp gauge to full.
However, this proved to be unreliable and pretty clunky to time, so weaving in the Elemental Burst Counter in your playstyle would be a tall mountain to climb. What's more, the counter costing 2 wirebugs doesn't give too much of a leeway if you failed to execute the move successfully.
Switch Axe Strengths
|
|
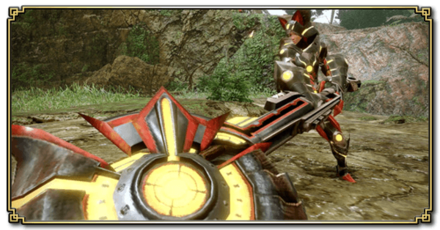
Element Discharge

An attack unique to the Switch Axe wherein you can make a high damage attack using a large portion of the energy stored in the Switch Gauge.
Sword Mode Superiority

The Sword in Sword Mode uses the effects of a Switch Axe's phial which makes the attacks harder to deflect. Oftentimes, the Sword Mode is used to target tough body parts.
Long Reach

In Axe Form, the Switch Axe has incredible reach. Even going so far as to hit enemies while they are up in the air.
Counter Option in Sunbreak

The Switch Axe has reeived its badly-needed counter move in Sunbreak, in the form of Elemental Burst Counter.
Switch Axe Weaknesses
|
|
Sword Mode Consumes Gauge and Can Throw You off if You're Not Mindful
Pay close attention to your switch gauge whenever you use your Sword since attacking in Sword Mode consumes the Switch Gauge. Always try to play for an element discharge.
Cannot Guard
The Switch Axe cannot guard hits. Added to this is your slower movement speed when using this weapon. It's also a weapon not blessed with any new counterattack move.
Low Mobility
Attacking with this weapon is mostly taking huge swings at an enemy monster, which carries you forward and makes use of the momentum you have while you are doing attack combos. Having Evade Extender and Evade Window would be huge.
Constantly Uses Wirebugs
With the arrival of Switch Skill Swap, the Switch Axe can now have access to offensive and defensive kits anytime.
This, however, requires constant use of Wirebugs, and there may be a moment where a hunter will run out of charges to use to evade attacks as it has been previously used to execute Silkbind Attacks.
Switch Axe Controls
Axe Controls
| Controls | Action | |
|---|---|---|
| PC |
PS |
Overhead Slash |
| Switch |
Xbox |
|
| PC Rapidly press |
PS Rapidly press |
Wild Swing |
| Switch Rapidly press |
Xbox Rapidly press |
|
| PC Left Click + Right Click |
PS Triangle + Circle |
Rising Slash |
| Switch X + A |
Xbox Y + B |
|
| PC Directional Button + Left Click |
PS Left Stick + Triangle |
Forward Slash |
| Switch Left Stick + X |
Xbox Left Stick + Y |
|
| PC |
PS |
Morph/Reload |
| Switch |
Xbox |
|
| PC Middle Click + Left Click |
PS L2 + Triangle |
Invincible Gambit |
| Switch zL + X |
Xbox LT + Y |
|
| PC Middle Click + Right Click |
PS L2 + Circle |
Switch Charger |
| Switch zL + A |
Xbox LT + B |
|
Sword Controls
| Controls | Action | |
|---|---|---|
| PC |
PS |
Overhead Slash |
| Switch |
Xbox |
|
| PC |
PS |
Double Slash |
| Switch |
Xbox |
|
| PC Left Click + Right Click |
PS Triangle + Circle |
Element Discharge |
| Switch X + A |
Xbox Y + B |
|
| PC |
PS |
Morph |
| Switch |
Xbox |
|
Useful Combos
| Endless Thrusting Combo | |||
|---|---|---|---|
| Cancel Thrust | High Thrust I | High Thrust II | Cancel Thrust |
| Axe: Basic Combo | |||
|---|---|---|---|
| Cancel Thrust | High Thrust I | High Thrust II | Cancel Thrust |
| Axe: Combo into Sword Mode | |||
|---|---|---|---|
| Axe: Wild Swing | Axe: Heavy Slam | Axe: Morph Rising Double Slash | Sword: Triple Slash |
| Rapidly press |
|||
| Rapidly press |
|||
| Rapidly press |
|||
| Rapidly press |
|||
| Sword: Combo During an Opening | |||
|---|---|---|---|
| X Slash Combo | A Slash Combo | Element Discharge | Element Discharge Finisher |
| Rapidly press |
|||
| Rapidly press |
|||
| Rapidly press |
|||
| Rapidly press |
|||
Switch Axe Silkbind Attacks
Official Switch Axe Preview Video
Switch Charger
| Switch Controls | zL + A |
|---|---|
| PC Controls | Middle Click + Right Click |
| PS Controls | L2 + Circle |
| Xbox Controls | LT + B |
You are launched forward with the help of a Wirebug as you quickly regenerate your Switch Gauge. This move also negates Switch Gauge usage for a short period of time so feel free to go ham in Sword Mode for a bit!
Invincible Gambit

| Switch Controls | zL + X |
|---|---|
| PC Controls | Middle Click + Left Click |
| PS Controls | L2 + Triangle |
| Xbox Controls | LT + Y |
Invincible Gambit is a forward dashing move consisting of three slashes that has knockback protection during its duration. Use this to tank hits without getting thrown off!
Soaring Wyvern Blade

| Switch Controls | zL + X |
|---|---|
| PC Controls | Middle Click + Left Click |
| PS Controls | L2 + Triangle |
| Xbox Controls | LT + Y |
The attacks lead with a slash upwards with the Wirebug, culminating in a targeted Forward Slash to a foe.
On top of that, landing the Forward Slash successfully also fills up the Activation Gauge and creates a large explosion.
Wire Step
| Switch Controls | zL + X |
|---|---|
| PC Controls | Middle Click + Left Click |
| PS Controls | L2 + Triangle |
| Xbox Controls | LT + Y |
An evasion move that can be used to flank enemies. Use this to reposition and continue your combo from a safe place.
Elemental Burst Counter
| Switch Controls | zL + A |
|---|---|
| PC Controls | Middle Click + Right Click |
| PS Controls | L2 + Circle |
| Xbox Controls | LT + B |
Elemental Burst Counter is a new Silkbind Attack for the Switch Axe in Sunbreak. This move acts as a counter-attack that uses up the Switch Axe's energy and releases an Elemental Burst right after.
If you manage to land the burst right as a monster attacks, you'll be able to perform a Power Finisher and will automatically put your Switch Axe into an Amped State. Useful for Power Phial Switch Axes that takes forever to charge.
Switch Axe Switch Skills
Switch Skills are unlocked with different conditions as you progress in the game. Base game MHRise provides Hunters with three (3) slots of Switch Skills, with the Sunbreak expansion adding two (2) more.
Note: Skills in red are exclusive to the Sunbreak expansion.
| Skill Slot | Switch Skill Choices |
|---|---|
| 1 | ・ Forward Slash ・ Forward Overhead Slash |
| 2 | ・ Finishing Discharge ・ Compressed Finishing Discharge |
| 3 | ・ Axe: Wide Sweep ・ 2-Staged Morph Slash Combo |
| 4 | ・ Invincible Gambit ・ Soaring Wyvern Blade ・ Wire Step |
| 5 | ・ Switch Charger ・ Elemental Burst Counter |
Switch Skills Guide: How to Unlock Switch Skills
Forward Overhead Slash

| Switched With | |
|---|---|
| Forward Slash | |
| Description | |
| A lunging attack performed by winding up the axe and smashing it down. Difficult to pull off but delivers good damage. A subsequent Sword Mode attack will turn into a Double Slash. | |
| Controls | |
| Switch PC PlayStation Xbox |
|
This changes your first Axe attack into an Overhead Slash which can hit monster parts high on the ground. The subsequent Sword Morph attack will also change to a Double Slash so there is no reason not to switch to this Skill when acquired.
Compressed Finishing Discharge

| Switched With | |
|---|---|
| Finishing Discharge | |
| Description | |
| Puts you in a knockdown-resistant state and delivers a swift strike accompanied by an elemental explosion. The Activation Gauge has no effect on this action. | |
| Controls | |
| Switch |
|
If you like integrating elemental explosions in your Switch Axe combos, use this Switch Skill. This also has a rocksteady effect so you won't have to worry about getting knocked back.
Soaring Wyvern Blade
| Switched With | |
|---|---|
| Invincible Gambit | |
| Description | |
| Launches you in the air while ending with a Forward Slash in midair. If Forward Slash connects, an explosion occurs. Wirebug Recovery Speed: Medium Wirebug Cost: 1 |
|
| Controls | |
| Switch After jumping up, press X to perform a Forward Slash. PC After jumping up, press Left Click to perform a Forward Slash. PS After jumping up, press Triangle to perform a Forward Slash. Xbox After jumping up, press Y to perform a Forward Slash. |
|
Using this one over Invincible Gambit is entirely by choice. Invincible Gambit has an innate Rocksteady effect that prevents knockback while dashing while Soaring Wyvern Blade deals immense damage! For general usage, we suggest going for Soaring Wyvern Blade.
2-Staged Morph Slash Combo
| Switched With | |
|---|---|
| Axe: Wide Sweep | |
| Description | |
| A two-stage attack that follows a Wild Swing. First stage morphs into Sword Mode, second stage morphs into Axe Mode. During this time, Sword Mode attacks are increased and Axe Mode attacks fill the Switch Gauge faster. | |
| Controls | |
| Switch Wild Swing →
Press
Press
PC Wild Swing →
Press
Press
PS Wild Swing →
Press
Press
Xbox Wild Swing →
Press
Press |
|
A more stationary version of the series of Axe Swings done after the Wild Swing. This makes sure your pinpoint accuracy is maintained while dishing damage.
What more, the sword part of this combo charges your amp gauge, making sure your Switch Gauge is properly managed during the fight! It's an alternative (and great way) to charge your amp gauge!
Wire Step
| Switched With | |
|---|---|
| Invincible Gambit | |
| Description | |
| An evasion technique that allows you to morph into Axe Mode while flanking the enemy. Highly effective for maneuvering while in Axe Mode. Wirebug Gauge Recovery Speed: Fast Wirebug Cost: 1 |
|
| Controls | |
| Switch After jumping up, press X to perform a Forward Slash. PC After jumping up, press Left Click to perform a Forward Slash. PlayStation After jumping up, press Triangle to perform a Forward Slash. Xbox After jumping up, press Y to perform a Forward Slash. |
|
An evasion move that can be used to flank enemies. Use this to reposition and continue your combo from a safe place.
Elemental Burst Counter
| Switched With | |
|---|---|
| Switch Charger | |
| Description | |
| Compresses switch gauge energy that can be released as an elemental burst. Initial activation drains the Switch Gauge. If timed right, can counter all monster attack and the Switch Axe would go into the amped state. Wirebug Gauge Recovery Speed: Fast Wirebug Cost: 2 |
|
| Controls | |
| Switch Press zR to execute the counter Elemental Burst. PC Press MB4 to execute the counter Elemental Burst. PlayStation Press R2 to execute the counter Elemental Burst. Xbox Press RT to execute the counter Elemental Burst. |
|
Elemental Burst Counter is a new Silkbind Attack for the Switch Axe in Sunbreak. This move acts as a counter-attack that uses up the Switch Axe's energy and releases an Elemental Burst right after.
If you manage to land the burst right as a monster attacks, you'll be able to perform a Power Finisher and will automatically put your Switch Axe into an Amped State. Useful for Power Phial Switch Axes that takes forever to charge.
Switch Axe Attacks and Moves
Wild Swing
| Switch Controls | Rapidly Press |
|---|---|
| PC Controls | Rapidly press |
| PS Controls | Rapidly Press |
| Xbox Controls | Rapidly Press |
Unlimited Wild Swing makes a return to Monster Hunter Rise. It's an unlimited slash attack that you can use until your stamina runs out. It doesn't deal the best damage but its DPS is good to use if Sword Form is unavailable and the monster gets downed.
Heavy Slam
| Switch Controls | After two or more Wild Swings, |
|---|---|
| PC Controls | After two or more Wild Swings, |
| PS Controls | After two or more Wild Swings, |
| Xbox Controls | After two or more Wild Swings, |
The follow-up move to Wild Swing also makes a triumphant return. It's a high damage move that powers up your Axe which makes it an ideal combo finisher for Wild Swing.
Fade Slash
| Switch Controls | After Heavy Slam, |
|---|---|
| PC Controls | After Heavy Slam, |
| Switch Controls | After Heavy Slam, |
| Switch Controls | After Heavy Slam, |
A follow-up move to the Heavy Slam finisher. It's an evasive attack that allows you to make a distance from your target. It can be pretty helpful if your stamina gets depleted by Wild Swing's stamina consumption.
Morph

| Switch Controls | |
|---|---|
| PC Controls | |
| PS Controls | |
| Xbox Controls |
Allows the Switch Axe to change to its alternate form. E.g. Axe to Sword and vice versa.
Reload
| Switch Controls | |
|---|---|
| PC Controls | |
| PS Controls | |
| Xbox Controls |
While in Axe Form, the hunter can execute a very lengthy reload to restore the Switch Gauge allowing the Switch Axe to morph to its Sword Form. This only happens when your Switch Gauge is below the line so you don't want to do this whenever your Switch Gauge runs out. Always recharge your Switch Gauge in Axe Mode!
Element Discharge
| Switch Controls | In Sword Form, |
|---|---|
| PC Controls | In Sword Form, |
| PS Controls | In Sword Form, |
| Xbox Controls | In Sword Form, |
While in Sword Form, you can use Elemental Discharge to unleash a strong attack with a strong finisher. You will be unable to move during this period so only use it against monsters that are vulnerable or those that are not actively targeting you.
Zero Sum Elemental Discharge

| Switch Controls | In Sword Form and with max gauge, |
|---|---|
| PC Controls | In Sword Form and with max gauge, |
| PS Controls | In Sword Form and with max gauge, |
| Xbox Controls | In Sword Form and with max gauge, |
If you manage to max out the Sword Gauge while in Sword Form, the Elemental Discharge move will immediately latch you onto the monster. This is called a Zero Sum Elemental Discharge.
Zero Sum Discharge Is Harder to Execute
With the removal of the Clutch Claw and mantles, executing the Zero Sum Discharge is now harder. It is now a prerequisite to identify the monster's attack patterns to know if their attack can cancel your Zero Sum Elemental Discharge. While the Invincibility Gambit makes it easy to do, it's an overall nerf compared to Monster Hunter World.
Switch Axe Phial Types and Progression

Phials are special features of the Switch Axe that changes how damage is dealt and maximized. One can also have the chance to inflict a status effect.
Keep an eye out for what phial type a Switch Axe uses by checking out the Equipment Info carefully in every weapon of its tree.
Each different phial types has different effects. Make sure to decide on which one to take depending on what you will hunt!
| Phial | Effect |
|---|---|
| Elemental Phial | Increase the elemental damage a weapon does. The Switch Axe must have a natural element of element/status effect for this to be effective. |
| Dragon Phial | Gives an amount of Dragon Element. |
| Power Phial | Boosts the raw damage of the Switch Axe. |
| Paralysis Phial | Adds a paralysis effect. |
| Exhaust Phial | Allows the Switch Axe to drain monsters' stamina with certain attacks. This will make the monster more prone to exhaustion and increase the chances of stunning them. |
Switch Axe Tree: List of All Switch Axes
Recommended Switch Axe Combos
Standard Sword Mode Combo Loop for General Use
| Switch Controls | In Sword Form, A → X → A → X... |
|---|---|
| PC Controls | In Sword Form, Right Click → Left Click → Right Click → Left Click... |
| PS Controls | In Sword Form, Circle → Triangle → Circle → Triangle... |
| Xbox Controls | In Sword Form, B → Y → B → Y... |
This is a combo that you can easily do anytime. It's also versatile and can flow easily into other combos.
It's recommended to start with Double Slash at the start rather than the end, as it is quite slow and leaves you open to attacks.
High Damage Combo For When the Monster is Down

| Switch Controls | In Sword Form, A → zR axe form → zR sword form → A... |
|---|---|
| PC Controls | In Sword Form, Right click → MB4 axe form → MB4 sword form → Right Click... |
| PS Controls | In Sword Form, Circle → R2 axe form → R2 sword form → Circle... |
| Xbox Controls | In Sword Form, B → RT axe form → RT sword form → B... |
When you down the monster but you're not in the Amped State, this is a combo that utilizes two Double Slashes with two Morphs in between. You can also use the Element Discharge after a Double Slash.
Quick Element Discharge Combo

| Switch Controls | In Sword Form, A → X + A → Down + X → (zL + A) |
|---|---|
| PC Controls | In Sword Form, Right Click → Left Click + Right CLick → S + Left Click → (Middle Click + Right Click) |
| PS Controls | In Sword Form, Circle → Triangle + Circle → Down + Triangle → (L2 + Circle) |
| Xbox Controls | In Sword Form, B → Y + B → Down + Y → (LT + B) |
With this combo, you can hit a fast Element Discharge from a Double Slash. This is useful for monsters with hard skin.
A downside of this combo is that it quickly consumes your Switch Axe Gauge, but you can easily recover it with a Switch Charger.
Heavy Slam Combo

| Switch Controls | ||
|---|---|---|
| In Sword Form, A → zR → A (x2) → X → (zR) |
In Axe Form, A (x2) → X → zR → A → (zR) |
|
| PC Controls | ||
| In Sword Form, Right Click → MB4 → Right Click (x2) → Left Click → (MB4) |
In Axe Form, Right Click (x2) → Left Click → MB4 → Right Click → (MB4) |
|
| PS Controls | ||
| In Sword Form, Circle → R2 → Circle (x2) → Triangle → (R2) |
In Axe Form, Circle (x2) → Triangle → R2 → Circle → (R2) |
|
| Xbox Controls | ||
| In Sword Form, B → RT → B (x2) → Y → (RT) |
In Axe Form, B (x2) → Y → RT → B → (RT) |
|
This combo is useful when neither the Power Axe mode nor the Amped State is active. You easily can boost your damage with the Heavy Slam.
Tips on How to Use the Switch Axe
Keep Attacking!
Switch Axe requires that you attack all the time to keep all the gauges at full. The basic combo is to accumulate various Switch Axe gauges by continuously attacking the monster. Once you stop attacking, the gauge will cease to accumulate and even lose its charges.
Learn How to Use the Switch Axe Gauge
| Description | |
|---|---|
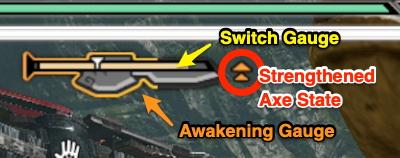
| Switch Gauge | This gauge is needed to be maintained above the line to allow transformation to Sword Mode. If the accumulated charge goes below the line, you won't be able to transform to Sword Mode unless you charge by attacking or reloading. |
| Awakening Gauge | When accumulated to maximum, Sword Mode attacks will start to discharge Phials. Attack in Sword Mode to activate. The gauge will disappear over time. |
| Strengthened Axe State | An icon that indicates that Axe Mode will charge the Awakening Gauge faster. It is also easier to flinch monsters in this state. Do this by executing a Wild Swing thrice (A x3, Right Click x3, Circle x3, or B x3) then pressing X, Left Click, Triangle, or Y to do an Overhead Slam. This will disappear after around 1 minute or when you fill up the Awakening Gauge. |
Learn the Different Phial Types
Like in Monster Hunter World, Switch Axes in MH Rise have different Phial Types that are unleashed when you reach the Awakening state of the Switch Axe. Each phial has its effects so know how and when to use them in hunts!
Master the Art of Switching
| Axe Mode | Sword Mode |
|---|---|
 |
 |
The Switch Axe can be switched between Sword Mode and Axe Mode with both modes coexisting perfectly with each other.
Axe Mode charges the gauge that allows you to switch to Sword Mode. Sword Mode charges the Awakening gauge to put phial attacks on both modes. Knowing this basic gameplay loop can get you started with using the Switch Axe.
In addition, you can put Rapid Morph in your builds to make switching attacks smooth like butter!
Switch Axe Builds and Best Equipment
Utilize Invincible Gambit or Soaring Wyvern Blade

Since you cannot guard with the Switch Axe, you are better off releasing an unrelenting flurry of blows against a monster. With the help of the new silkbind attack called Invincible Gambit, you are immune to flinches and knockbacks. Essentially making you a force of nature to be reckoned with.
If you are DPS-heavy, we suggest getting Soaring Wyvern Blade! This attack imbues phials on your downward dash while also dashing across in the air. Not to mention, it looks very cool too!
Use Elemental Discharges

You enter an Amped State once you land enough hits with the Sword Mode, which in turn also fills up your Switch Axe gauge. You can release a high damage blow in exchange for a large portion of energy.
Aim for Zero Sum Discharge

This is Switch Axe's most damaging move where you attack a monster and unload all your phial charges. As a Switch Axe user, you should always aim for this whenever an opportunity arises. This also provides Super Armor in MH Rise which won't throw you off whenever you use it so just go ahead and do it!
Changes from MHW: Iceborne
Monster Hunter Rise (MH Rise) Related Guides

| Weapon Type Guides | ||
|---|---|---|
 Weapons and Weapon Types Weapons and Weapon Types |
 Weapon Type Tier List Weapon Type Tier List |
 Builds for Each Weapon Type Builds for Each Weapon Type |
Melee Weapon Guides
| Melee Weapons | ||
|---|---|---|
Guide | Weapon Tree |
Guide | Weapon Tree |
Guide | Weapon Tree |
Guide | Weapon Tree |
Guide | Weapon Tree |
Guide | Weapon Tree |
Guide | Weapon Tree |
Guide | Weapon Tree | Melodies |
Guide | Weapon Tree |
Guide | Weapon Tree |
Guide | Weapon Tree | Kinsects |
|
Ranged Weapon Guides
| Ranged Weapons | ||
|---|---|---|
Guide | Weapon Tree |
Guide | Weapon Tree |
Guide | Weapon Tree |
Comment
1  Anonymous about 4 years
Whoever wrote this needs to figure out the difference between "it's" and "its".
Author

Sunbreak Switch Axe Guide: Combos, Controls and Moveset
Please participate in our site
improvement survey
03/2026
improvement survey
03/2026
Would you assist in
improving Game8's site?
improving Game8's site?

×
We are listening to our users' valuable opinions and discussing how to act on them.
The information collected through this survey will be used for the purpose of improving our services. In addition, the information will only be disclosed a part of a statistic in a format that will not allow identification of personal information.
Begin Survey
Not Now
×
Please rate each item regarding Game8.co's Advertisements.
Amount of Ads
Very Dissatisfied
Somewhat Dissatisfied
Fine
Somewhat Satisfied
Highly Satisfied
Placement of Ads
Timing of Ad Display
Ad Loading Speed
Safeness of Ads
Content of Ads
×
Please rate each item regarding Game8.co's Quality of Articles.
Amount of information
Very Dissatisfied
Somewhat Dissatisfied
Fine
Somewhat Satisfied
Highly Satisfied
Frequency of updates
Speed of new information
Accuracy of articles
Understandibility of articles
Readability of sentences
×
Please rate each item regarding Game8.co's Usability of the Site.
Ease of finding information
Very Dissatisfied
Somewhat Dissatisfied
Fine
Somewhat Satisfied
Highly Satisfied
Loading Speed
Use of Color
Font Size
Visibility of Images
Easy to Understand Layout
×
Please rate each item regarding Game8.co's Message Boards, Comments.
Ease of Writing
Very Dissatisfied
Somewhat Dissatisfied
Fine
Somewhat Satisfied
Highly Satisfied
Readability
Ease in Finding Information
Comment Quality
Comment Quantity
Admin Response
×
Please rate each item regarding Game8.co's Site's new design.
Please rate our site's new design
Very Dissatisfied
Somewhat Dissatisfied
Fine
Somewhat Satisfied
Highly Satisfied
Do you think that the website's design change makes the site easier to use?
Has the new design made it easier for you to find information on the site?
Has the new design improved the overall visual appeal of the site?
How would you rate your overall satisfaction with the new design of the site?
×
How likely are you to recommend Game8 to someone you know?
Very Unlikely
0
1
2
3
4
5
6
7
8
9
10
Very Likely
If you have other opinions regarding potential improvement to the website, please share them with us. We would appreciate your honest opinion.
Note: This is a free response section, so you can proceed without entering anything.
Note: Please be sure not to enter any kind of personal information into your response.
Note: Please be sure not to enter any kind of personal information into your response.
×
Thank You
×
Thank you for participating in our survey! Your answers will help us to improve the quality of our website and services.
We hope you continue to make use of Game8.
We hope you continue to make use of Game8.
Close
Rankings
- We could not find the message board you were looking for.
Gaming News


![Monster Hunter Stories 3 Review [First Impressions] | Simply Rejuvenating](https://img.game8.co/4438641/2a31b7702bd70e78ec8efd24661dacda.jpeg/thumb)
Popular Games

Genshin Impact Walkthrough & Guides Wiki
Honkai: Star Rail Walkthrough & Guides Wiki
Umamusume: Pretty Derby Walkthrough & Guides Wiki
Pokemon Pokopia Walkthrough & Guides Wiki
Resident Evil Requiem (RE9) Walkthrough & Guides Wiki
Monster Hunter Wilds Walkthrough & Guides Wiki
Wuthering Waves Walkthrough & Guides Wiki
Arknights: Endfield Walkthrough & Guides Wiki
Pokemon FireRed and LeafGreen (FRLG) Walkthrough & Guides Wiki
Pokemon TCG Pocket (PTCGP) Strategies & Guides Wiki


Recommended Games
Diablo 4: Vessel of Hatred Walkthrough & Guides Wiki
Cyberpunk 2077: Ultimate Edition Walkthrough & Guides Wiki
Fire Emblem Heroes (FEH) Walkthrough & Guides Wiki
Yu-Gi-Oh! Master Duel Walkthrough & Guides Wiki
Super Smash Bros. Ultimate Walkthrough & Guides Wiki
Pokemon Brilliant Diamond and Shining Pearl (BDSP) Walkthrough & Guides Wiki
Elden Ring Shadow of the Erdtree Walkthrough & Guides Wiki
Monster Hunter World Walkthrough & Guides Wiki
The Legend of Zelda: Tears of the Kingdom Walkthrough & Guides Wiki
Persona 3 Reload Walkthrough & Guides Wiki


All rights reserved
©CAPCOM CO., LTD. ALL RIGHTS RESERVED.
The copyrights of videos of games used in our content and other intellectual property rights belong to the provider of the game.
The contents we provide on this site were created personally by members of the Game8 editorial department.
We refuse the right to reuse or repost content taken without our permission such as data or images to other sites.
Oh stfu