This survey will take about 1 minute.
Your answers will help us to improve our website.
Monster Hunter Rise: Sunbreak
Sunbreak Charge Blade Guide: Combos, Controls and Moveset
★ All Title Updates now available for ALL PLATFORMS!
┗ Title Update 4 | Title Update 5 | Bonus Update
┗ Check out all our Best Builds For Every Weapon!
┗ TU4 Monsters: Velkhana | Risen C.G. Valstrax
┗ TU5 Monsters: Amatsu | Risen Shagaru Magala
┗ Bonus Update Monster: Primordial Malzeno
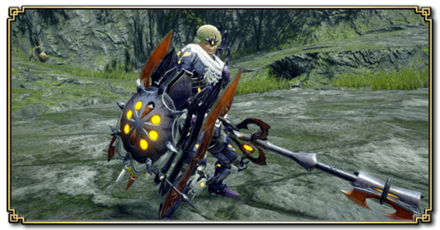
This is a guide to the Charge Blade, a weapon in Monster Hunter Rise: Sunbreak (MH Rise). Read on to learn about new Charge Blade controls and combos, how to elementally boost the Shield and the Sword, how to use the Savage Axe-like Switch Skill, as well as details on other Charge Blade Switch Skills.
| All Charge Blade Guides | ||
|---|---|---|
 Trees & Full List Trees & Full List |
 How to Use How to Use |
 Best Builds Best Builds |
List of Contents
Charge Blade Balance Changes
Update 10.0
| Charge Blade Balance Changes and Fixes (Update 10.0) |
|---|
| ・ Adjusted all of the following weapon actions: ・ [Morph Slash] ・ Axe: Ultra Element Discharge (Elemental Phial Explosion): Attack power slightly increased; Elemental scaling increased ・ Axe: Ultra Element Discharge (Impact Phial Explosion): Attack power slightly increased ・ [Counter Morph Slash] ・ Axe: Ultra Element Discharge (Elemental Phial Explosion): Attack power slightly increased; Elemental scaling increased ・ Axe: Ultra Element Discharge (Impact Phial Explosion): Attack power slightly increased ・ Added combos that chain from small and medium guard reactions. ・ Axe: Ultra Element Discharge: The height of the phial explosion's hit detection has been increased. ・ The window of time available for entering combo commands after a Forward Dodge in Sword mode was moved earlier, making it easier to chain it into other attacks. ・ The phial charge failure animation will no longer trigger when performing a Charge action (e.g., for a Condensed Element Slash) after charging a phial from a zero phial state in Sword mode. ・ Sword Boost Mode now lasts longer. ・ Axe: Amped Element Discharge: It is now easier to chain from Element Boost into the preparatory action for an Amped Element Discharge. ・ Sword: Shield Thrust: It is now easier to chain this into Charged Double Slash combos. ・ Fixed a bug where the hit detection for the downward axe attack in the Midair Ultra Element Discharge was slightly slower when you had phials charged compared to when you didn't have any phials charged, when performing the Discharge directly before hitting the ground. ・ Axe: Amped Element Discharge: Made it more difficult for this attack not to connect during frame drops (due to shortness of the hit detection time window). ・ Fixed a bug where the Sword mode recovery animation for getting up from the ground would trigger instead of the Axe mode animation when recovering from certain types of reactions (extreme knockbacks, non-recoverable knockbacks, and whirlwinds) in Axe mode. ・ Fixed a bug where the blinking effect on the HUD would sometimes look displaced when your energy is overcharged. |
Charge Blade received some buffs across the board and the update fixed the weird SAED hitzone that caused pain to all Charge Blade users in base Rise. It also boosted the power of Elemental Phials, making them more viable than ever.
Besides Ready Stance, which gives Charge Blade user a really huge guard-counter opening, all the additional Switch Skills in the Sunbreak expansion proved to be lacking and so there isn't much change for this weapon - gameplay-wise.
Charge Blade New Sunbreak Attacks and Moves
Official Charge Blade Preview Video
Silkbind Attack: Ready Stance

This Silkbind Attack binds the axe and sword together. When hit by an attack while in this stance, it lowers your guard reaction, allowing you to easily chain sword and axe attacks. This is also one of the few ways to guard in Axe mode.
You can chain an attack even without blocking anything. The type of attack you can execute after the guard depends on the input and the amount of knockback taken. Guarding against a heavy knockback attack can be followed up with an Amped Element Discharge.
Switch Skill: Phial Follow-up: Firing Pin

Unlike the regular Phial Follow-up, this Switch Skill has the elemental energy build up on the target instead of in your weapon. This means less elemental energy is generated for your phials. You can apply multiple lumps of elemental energy on monsters with an Element Boosted Sword or with a Shield Thrust using an Element Boosted Shield.
You can detonate the built-up energy in Axe Mode, and doing so will extend the duration of the Elemental Boost.
Silkbind Attack: Air Dash
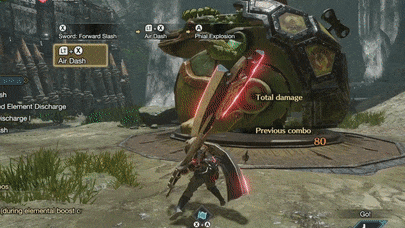
This Silkbind attack provides Hunters with quick aerial maneuvers that can be used to be aggressive or defensive. It can be followed up with a Jumping Slash or Phial Explosion, both giving advantages in different situations.
Monster Hunter Rise: Sunbreak
Release Date and New Monsters
How Good is the Charge Blade?
Tier List Ranking
| MHRise Ranking | → | Sunbreak Ranking |
|---|---|---|
(S - A - B) 3 Level Tier |
(SS - S - A) 3 Level Tier |
The changes with Charge Blade in Sunbreak offered great alternative playstyles for this really technical weapon. The new switch skills and the addition of the Burst armor skill made playing the Condensed Spinning Slash playstyle as viable as the Elemental Discharge playstyle - giving the Charge Blade more flexibility. Elemental damage is also great with the Charge Blade when using SAEDs, but requires proper knowledge of positioning to avoid missing often.
Charge Blade Strengths
Element Discharges Are Very Powerful
The Charge Blade's power is all on the element discharges. The phials can also vary between an Impact or Element Phial, each with different uses. The Charge Blade is very flexible!
Easy Switch Between Sword and Axe
In Sword Mode, the hunter has good mobility and can guard with a shield. In Axe Mode, the hunter has poor mobility but greater damage. Charge Blade users can easily switch between the two!
Guard Points Between Attacks
Charge Blades have guard frames called Guard Points. When a monster hits you during a Guard Point, you can immediately execute an Element Discharge!
Can Stun Using Impact Phials
Using Charge Blades with Impact Phials is a good way to stun monsters, as long as you are hitting them on the head.
Charge Blade Weaknesses
Most Complicated Weapon in the Game
This weapon is the most complicated in the game. There are a lot of technicalities to this weapon, so it is not beginner-friendly. A deep understanding of the underlying mechanics is required!
Long Attack Animations
The Charge Blade has very long attack animations that are sometimes difficult to time. For example, Super Amped Elemental Discharges / Ultra Element Discharges have a long wind-up animation before hitting the monster!
Charge Blade Controls
Sword Controls
| Controls | Action | |
|---|---|---|
| PC |
PS |
Weak Slash |
| Switch |
Xbox |
|
| PC Left Click + Right Click |
PS Triangle + Circle |
Forward Slash |
| Switch X + A |
Xbox Y + B |
|
| PC During a combo, Directional Keys + Right Click |
PS During a combo, Left Stick + Circle |
Fade Slash |
| Switch During a combo, Left Stick + A |
Xbox During a combo, Left Stick + B |
|
| PC MB4 + Left Click |
PS R2 + Triangle |
Morph Slash |
| Switch zR + X |
Xbox RT + Y |
|
| PC MB4 + Right Click |
PS R2 + Circle |
Charge |
| Switch zR + A |
Xbox RT + B |
|
| PC |
PS |
Guard |
| Switch |
Xbox |
|
| PC Hold |
PS Hold |
Charged Double Slash |
| Switch Hold |
Xbox Hold |
|
| PC Middle Click + Left Click |
PS L2 + Triangle |
Morphing Advance |
| Switch zL + X |
Xbox LT + Y |
|
| PC Middle Click + Right Click |
PS L2 + Circle |
Counter Peak Performance |
| Switch zL + A |
Xbox LT + B |
|
Axe Controls
| Controls | Action | |
|---|---|---|
| PC |
PS |
Rising Slash |
| Switch |
Xbox |
|
| PC |
PS |
Element Discharge |
| Switch |
Xbox |
|
| PC Left Click + Right Click |
PS Triangle + Circle |
Amped Element Discharge |
| Switch X + A |
Xbox Y + B |
|
| PC |
PS |
Morph Slash |
| Switch |
Xbox |
|
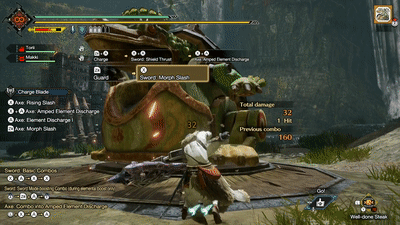
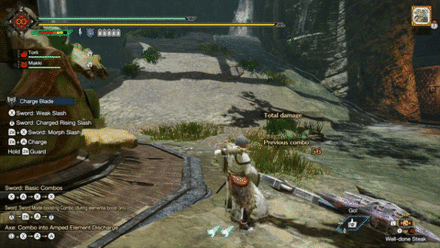
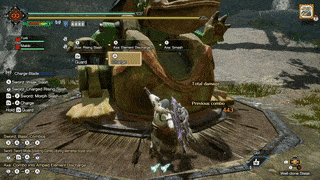
Useful Combos
| Sword: Basic Combo | |||
|---|---|---|---|
| Sword: Forward Slash | Sword: Return Stroke | Sword: Spinning Slash | |
| Elemental Roundslash Combo (Power Mode requires more than 1 phial) |
|||
|---|---|---|---|
| Sword: Charged Double Slash | Sword: Shield Thrust | Axe: Amped Element Discharge | Axe: Element Boost Spinning Slash |
| Hold |
|||
| Hold |
|||
| Hold |
|||
| Hold |
|||
| Sword: Sword Mode-boosting Combo (During Elemental Boost Only) |
|||
|---|---|---|---|
| Sword: Charged Double Slash | Charge | Sword: Condensed Element Slash | |
| Hold |
While charging, hold |
||
| Hold |
While charging, hold |
||
| Hold |
While charging, hold |
||
| Hold |
While charging, hold |
||
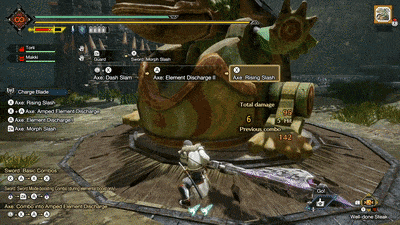
| Axe: Combo into Amped Element Discharge | |||
|---|---|---|---|
| Axe: Dash Slam | Axe: Element Discharge II | Axe: Amped Element Discharge | |
| Axe: Combos from Axe Mode into Element Discharge | |||
|---|---|---|---|
| Axe: Rising Slash | Axe: Element Discharge II | Axe: Rising Slash | Axe: Element Discharge II |
Charge Blade Silkbind Attacks
Morphing Advance
| Switch Controls | zL + X |
|---|---|
| PC Controls | Middle Click + Left Click |
| PS Controls | L2 + Triangle |
| Xbox Controls | LT + Y |
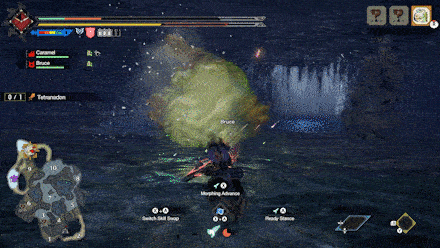
Morphing Advance is a Silkbind Attack where the hunter will dash in the input direction while morphing into Axe Mode. While dashing, your hunter will have knockback protection, so use this to close the gap between you and the monster efficiently! This uses one Wirebug and has fast Wirebug recovery speed.
You can follow up the Morphing Advance with a Spinning Slash, changing it back to Sword Mode. You can also perform an Axe: Element Discharge II to stay in Axe Mode or unleash an Amped Element Discharge.
Counter Peak Performance
| Switch Controls | zL + A |
|---|---|
| PC Controls | Middle Click + Right Click |
| PS Controls | L2 + Circle |
| Xbox Controls | LT + B |
This Silkbind Attack holds your hunter to the ground with threads. When hit by an attack, the Charge Blade phials will automatically be fully charged. You can even follow up by elementally boosting your sword with a Condensed Element Slash or finishing with an Amped Element Discharge! This costs one Wirebug to use and has medium Wirebug recovery speed.
Axe Hopper

| Switch Controls | zL + A |
|---|---|
| PC Controls | Middle Click + Right Click |
| PS Controls | L2 + Circle |
| Xbox Controls | LT + B |
This Silkbind Attack can be switched out with Counter Peak Performance and Ready Stance. It uses one Wirebug and has a medium Wirebug recovery speed.
The axe is raised overhead and then slammed down, launching the hunter into the air. The hunter can also attack while airborne with a Midair Element Discharge Slash with A or Right Click or an Ultra Element Discharge with X + A or Left Click + Right Click.
Ready Stance
| Switch Controls | zL + A |
|---|---|
| PC Controls | Middle Click + Right Click |
| PS Controls | L2 + Circle |
| Xbox Controls | LT + B |
This Silkbind Attack binds the axe and sword together to act as a powerful guard. When hit by an attack while in this stance, it lowers your guard reaction, allowing you to easily chain sword and axe attacks. It's also a way to guard while in Axe mode while remaining in Axe mode, making it suitable for Savage Axe users. It costs one Wirebug and has fast Wirebug recovery.
You can still follow up with an attack even if you don't block anything, and it will be treated as if you took minor knockback. The following are the moves you can follow up with after guarding:
| Controls | Action | |
|---|---|---|
| After Minor Knockback | ||
| PC |
PS |
Sword: Return Stroke |
| Switch |
Xbox |
|
| PC Directional Keys + Left Click |
PS Left Stick + Triangle |
Sword: Forward Slash |
| Switch Left Stick + X |
Xbox Left Stick + Y |
|
| PC |
PS |
Axe: Element Discharge II |
| Switch |
Xbox |
|
| PC Directional Keys + Right Click |
PS Left Stick + Circle |
Axe: Element Discharge I |
| Switch Left Stick + A |
Xbox Left Stick + B |
|
| PC MB4 |
PS R2 |
Morph Slash |
| Switch zR |
Xbox RT |
|
| After Major Knockback | ||
| PC |
PS |
Sword: Morph Slash |
| Switch |
Xbox |
|
| PC Left Click + Right Click |
PS Triangle + Circle |
Axe: Amped Element Discharge |
| Switch X + A |
Xbox Y + B |
|
Air Dash
| Switch Controls | zL + X |
|---|---|
| PC Controls | Middle Click + Left Click |
| PS Controls | L2 + Triangle |
| Xbox Controls | LT + Y |
This Silkbind attack provides Hunters with quick aerial maneuvers that can be used to be aggressive or defensive. It can be followed up with a Jumping Slash or Phial Explosion, both giving advantages in different situations.
Charge Blade Switch Skills and Best Setup
Switch Skills are unlocked with different conditions as you progress in the game. Base game MHRise provides Hunters with three (3) slots of Switch Skills, with the Sunbreak expansion adding two (2) more.
Note: Skills in red are exclusive to the Sunbreak expansion.
| Skill Slot | Switch Skill Choices |
|---|---|
| 1 | ・ Morph Slash ・ Counter Morph Slash |
| 2 | ・ Condensed Element Slash ・ Condensed Spinning Slash |
| 3 | ・ Phial Follow-Up ・ Phial Follow-Up: Firing Pin |
| 4 | ・ Counter Peak Performance ・ Axe Hopper ・ Ready Stance |
| 5 | ・ Morphing Advance ・ Air Dash |
Switch Skills Guide: How to Unlock Switch Skills
Condensed Spinning Slash

| Switched With | |
|---|---|
| Condensed Element Slash | |
| Description | |
| Activates the Element Regeneration system while charging. The shield rotates and acts as a spinning saw blade. Switches the weapon to Axe mode and turns energy into phials. | |
| Controls | |
| Switch Hold Release X at the right time
PC Hold Release Left click at the right time
PlayStation Hold Release Triangle at the right time
Xbox Hold Release Y at the right time |
|
To activated the Condensed Spinning Slash (CSS) or Savage Axe, charge your weapon and hold the attack button until the shield starts spinning. Once the Charge Blade shield is spinning, it can be released and swung onto an enemy. Hold the attack button whenever it hits the enemy to deal multiple hits. Good timing and positioning is crucial for this move so take note!
If you're not planning to use SAEDs often, this Switch Skill should be used immediately after acquiring it. This allows you to charge your phials while in Axe Mode! It greatly helps in maintaining phial charges while also dealing high damage in Axe Mode.
Counter Morph Slash

| Switched With | |
|---|---|
| Morph Slash | |
| Description | |
| A more defense-focused switching attack with a longer blocking effect. If successful, the follow-up Element Discharge Slash's damage increases. | |
| Controls | |
| In Sword Mode, In Axe Mode, In Sword mode: zR + X MB4 + Left Click R2 + Triangle RT + Y In Axe Mode: zR, MB4, R2, or RT |
|
This Switch Skill lengthens the Morphing Guard Point for the Charge Blade. If you're used to utilizing that specific Guard Point, we suggest getting this Switch Skill. If not, stick to Morph Slash because Counter Morph Slash can hinder the fast and fluid morphing combos of the Charge Blade.
Axe Hopper
| Switched With | |
|---|---|
| Counter Peak Performance | |
| Description | |
| Slam the Axe overhead, using recoil and Ironsilk to propel you to the air. While airborne, you can execute a Super Amped Elemental Discharge (SAED). Wirebug Recovery Speed: Medium Wirebug Cost: 1 |
|
| Controls | |
| Switch PC PlayStation Xbox |
|
Axe Hopper can give instant access to Super Amped Elemental Discharge (SAED). Though this is a very easy way to execute SAED, we don't recommend using this because the capability of Counter Peak Performance to charge your phials after blocking an attack is too good.
The DPS from this is not worth it compared to the sheer utility offered by Counter Peak Performance.
Phial Follow-up: Firing Pin
| Switched With | Controls |
|---|---|
| Phial Follow-up | Shield Thrust during Elemental Boost or sword attacks in Sword Boost Mode.
Continuing to attack will amplify the energy built up on your target |
| Description | |
| Lowers the pressure of elemental energy generated through Shield Thrust using Elemental Boost or sword attacks while in Sword Boost Mode. The elemental energy generated builds up on your target, but disappears over time. Can be detonated by any attack in Axe mode, and extending the time limit of the Elemental Boost. | |
Leaves a 'firing pin' on the monster that you need to hit at a later time to unlease huge damage. Consider using this Switch Skill if using SAEDs often as this is a source of additional damage.
Air Dash
| Switched With | |
|---|---|
| Morphing Advance | |
| Description | |
| Raises the Hunter up while whirling an axe then propels you away with Phial Explosion. Damage often leaves monsters mountable and you can control your fall direction to some degree. If no Phial explosion was triggered, you'll fall straight down. Wirebug Gauge Recovery Speed: Fast Wirebug Cost: 1 |
|
| Controls | |
| Switch PC PlayStation Xbox |
|
This Silkbind attack provides Hunters with quick aerial maneuvers that can be used to be aggressive or defensive. It can be followed up with a Jumping Slash or Phial Explosion, both giving advantages in different situations.
Ready Stance
| Switched With | |
|---|---|
| Counter Peak Performance | |
| Description | |
| Binds sword and shield with Ironsilk and enters a guard stance. After guarding, a heavy knockback leaves you in Sword Mode, and lowers your guard reaction so you're able to chain sword/axe attacks. Wirebug Gauge Recovery Speed: Fast Wirebug Cost: 1 |
|
| Controls | |
| Switch PC PlayStation Xbox |
|
This Silkbind attack puts the Hunter in a guarding position that will enable them to take on attacks with lower reaction time. Depending on the knockback, it can be chained with multiple attacks as well! Equip this Switch Skill if you're using the Condensed Spinning Slash, as it's the only way the guard in Axe Mode while retaining the boost.
Charge Blade Attacks and Moves
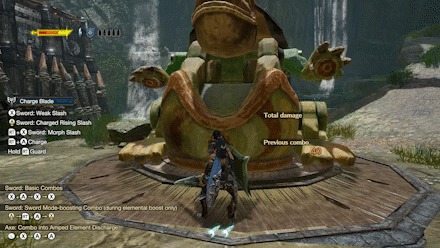
Sword: Weak Slash
| Switch Controls | In Sword Mode, |
|---|---|
| PC Controls | In Sword Mode, |
| PlayStation Controls | In Sword Mode, |
| Xbox Controls | In Sword Mode, |
| Basic Combos | Slash up by pressing X / Left Click / Triangle / Y again Hold A / Right Click / Circle / B for a charged attack Press zR + X / MB4 + Left Click / R2 + Triangle / RT + Y after to morph to Axe Mode |
A stationary slash attack that does not move the hunter. The very basic starting point for many combos.
Sword: Forward Slash
| Switch Controls | In Sword Mode, |
|---|---|
| PC Controls | In Sword Mode, |
| PlayStation Controls | In Sword Mode, |
| Xbox Controls | In Sword Mode, |
| Basic Combos | Slash up by pressing X / Left Click / Triangle / Y again Hold A / Right Click / Circle / B for a charged attack Press zR + X / MB4 + Left Click / R2 + Triangle / RT + Y after to morph to Axe Mode |
An advancing slash move while in Sword Mode. Useful when you need to close the gap between you and the monster. Forward Slash also functions as the sword draw attack.
Sword: Fade Slash

| Switch Controls | During a Sword Mode combo, |
|---|---|
| PC Controls | During a Sword Mode combo, |
| PlayStation Controls | During a Sword Mode combo, |
| Xbox Controls | During a Sword Mode combo, |
| Basic Combos | Hold A / Right Click / Circle / B for a charged attack Press X + A / Left Click + Right Click / Triangle + Circle / Y + B after to do a Shield Thrust Press zR + X / MB4 + Left Click / R2 + Triangle / RT + Y after to morph to Axe Mode |
This move can help with positioning by allowing you to move quickly after an attack. You can use it to line up your Amped Element Discharges. It has a Guard Point at the end as well.
Sword: Charged Double Slash
| Switch Controls | In Sword Mode, hold |
|---|---|
| PC Controls | In Sword Mode, hold |
| PlayStation Controls | In Sword Mode, hold |
| Xbox Controls | In Sword Mode, hold |
| Basic Combos | Press X / Left Click / Triangle / Y after to do a Spinning Slash Press X + A / Left Click + Right Click / Triangle + Circle / Y + B after to do a Shield Thrust Press zR + X / MB4 + Left Click / R2 + Triangle / RT + Y after to morph to Axe Mode |
A charged move that does two slashes when released at the right time. This is the most effective way to get phial charges. Failing to get the timing right will do a single-hit weaker Charged Rising Slash that doesn't charge the phials as much.
Axe: Smash

| Switch Controls | While sheathed, |
|---|---|
| PC Controls | While sheathed, |
| PlayStation Controls | While sheathed, |
| Xbox Controls | While sheathed, |
| Basic Combos | Press X / Left Click / Triangle / Y after to do a Rising Slash Press A / Right Click / Circle / B after to do an Element Discharge Press zR / MB4 / R2 / RT to morph into Sword Mode |
This move acts as the axe draw attack, allowing you to use axe attacks without having to morph from Sword Mode first.
Axe: Rising Slash
| Switch Controls | In Axe Mode, |
|---|---|
| PC Controls | In Axe Mode, |
| PlayStation Controls | In Axe Mode, |
| Xbox Controls | In Axe Mode, |
| Basic Combos | Press X / Left Click / Triangle / Y again to do an Overhead Slash Press A / Right Click / Circle / B after to do an Element Discharge Press zR / MB4 / R2 / RT to morph into Sword Mode |
A move in Axe Mode that swings the axe upward, hitting anything high above. Useful against flying monsters like Rathalos or monsters with an elevated head like Anjanath.
Axe: Element Discharge
| Switch Controls | In Axe Mode, |
|---|---|
| PC Controls | In Axe Mode, |
| PlayStation Controls | In Axe Mode, |
| Xbox Controls | In Axe Mode, |
| Basic Combos | Press X / Left Click / Triangle / Y to do a Rising Slash Press A / Right Click / Circle / B again for Element Discharge II Press X + A / Left Click + Right Click / Triangle + Circle / Y + B after for an Amped Element Discharge |
This move consumes one charged phial to imbue this swing of the axe with phial-boosted capabilities. Element Discharge I swings around once while Element Discharge II has two swings and a longer motion, so it's best to use the latter when there's an opening.
Elemental Boost
In Monster Hunter Rise (MH Rise), you can execute an Elemental Boost to put charged phials to your sword, boost the damage of your axe attacks, and improve your shield's guard capacity.
Elementally Boosting the Shield
| Switch Controls | After a Shield Thrust or Cancelling Amped Element Discharge, |
|---|---|
| PC Controls | After a Shield Thrust or Cancelling Amped Element Discharge, |
| PlayStation Controls | After a Shield Thrust or Cancelling Amped Element Discharge, |
| Xbox Controls | After a Shield Thrust or Cancelling Amped Element Discharge, |
Elementally boosting the shield gives you stronger axe attacks and can be done by cancelling the Amped Element Discharge animation with the Guard button. In addition, the boosted shield improves guarding ability and triggers small explosions when blocking attacks.
Having the Elemental Boost active also changes the Amped Element Discharge to the Super Amped Elemental Discharge (also known as the Ultra Element Discharge).
Elementally Boosting the Sword
| Switch Controls | Hold Hold X after Charging (zR + A) then release at the right time. |
|---|---|
| PC Controls | Hold Hold Left Click after Charging (MB4+ Right Click) then release at the right time. |
| PlayStation Controls | Hold Hold Triangle after Charging (R2 + Circle) then release at the right time. |
| Xbox Controls | Hold Hold Y after Charging (RT + B) then release at the right time. |
Take note: to do this attack, your shield must be elementally boosted, and Condensed Element Slash must be chosen as a Switch Skill. Elementally boosting the sword gives all its attacks the phial properties and prevents deflection.
Axe: Amped Element Discharge
| Sword Mode | |
|---|---|
| Switch Controls | X → X + A → X +A |
| PC Controls | Left Click → Left Click + Right Click → Left Click +Right Click |
| PlayStation Controls | Triangle → Triangle + Circle → Triangle + Circle |
| Xbox Controls | Y → Y + B → Y +B |
| Axe Mode | |
| Switch Controls | X + A |
| PC Controls | Left Click + Right Click |
| PlayStation Controls | Triangle + Circle |
| Xbox Controls | Y + B |
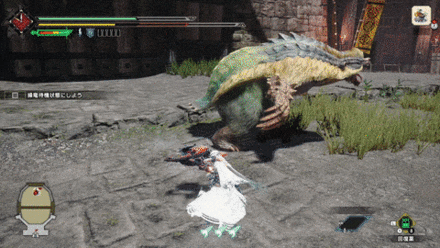
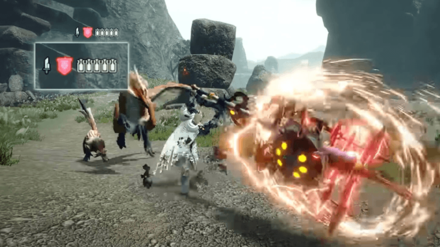
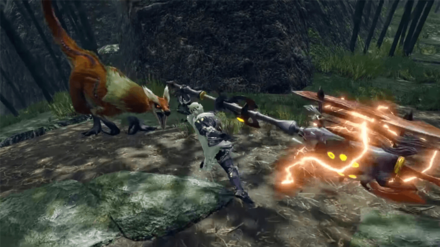
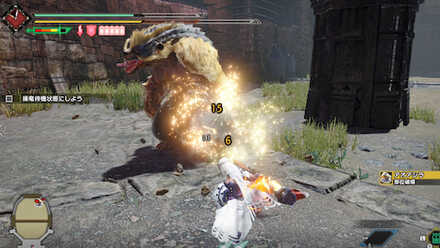
A very powerful move capable of hitting multiple times and depending on the phial type, can stun or deal more damage against monsters.
Axe: Super Amped Elemental Discharge /
Axe: Ultra Element Discharge
When the Charge Blade's Shield is elementally boosted, the Amped Element Discharge will convert to Super Amped Elemental Discharge (SAED), also known as Ultra Element Discharge (UED), which uses all of the phials stored. You'll know that the Super Amped Elemental Discharge is executed when the camera pans out and your hunter swings the axe in a huge circle.
You can cancel this into a normal Amped Element Discharge by inputting ↓ + X / S + Left Click / ↓ + Triangle / ↓ + Y at the start of the SAED motion. This is usually used to conserve phials when the monster's opening is not that huge.
Morph Slashes
Sword: Morph Slash

| Switch Controls | In Sword Mode, |
|---|---|
| PC Controls | In Sword Mode, |
| PlayStation Controls | In Sword Mode, |
| Xbox Controls | In Sword Mode, |
While in Sword Mode, make sure to charge your phials to unleash devastating Element Discharges against enemies. You can chain any of the other axe attacks after morphing, including the Amped Element Discharge.
Axe: Morph Slash
| Switch Controls | In Axe Mode, |
|---|---|
| PC Controls | In Axe Mode, |
| PlayStation Controls | In Axe Mode, |
| Xbox Controls | In Axe Mode, |
Your Axe Mode is your battle mode, but it leaves you extremely vulnerable. Unleash all your damage, then quickly morph back to Sword Mode to regain mobility and guarding capabilities. This attack can be chained from most axe moves.
Guard Points
| Start of Sword: Morph Slash | |
|---|---|
| Switch Controls | In Sword Mode, zR + X |
| PC Controls | In Sword Mode, MB4 + Left Click |
| PlayStation Controls | In Sword Mode, R2 + Triangle |
| Xbox Controls | In Sword Mode, RT + Y |
| After Sword: Spinning Slash | |
| Switch Controls | After Return Stroke or Charged Slash, X |
| PC Controls | After Return Stroke or Charged Slash, Left Click |
| PlayStation Controls | After Return Stroke or Charged Slash, Triangle |
| Xbox Controls | After Return Stroke or Charged Slash, Y |
| End of Sword: Fade Slash | |
| Switch Controls | During a Sword Mode combo, Left Stick + A |
| PC Controls | During a Sword Mode combo, Directional Button + Right Click |
| PlayStation Controls | During a Sword Mode combo, Left Stick + Circle |
| Xbox Controls | During a Sword Mode combo, Left Stick + B |
| Start of Axe: Smash (Axe Draw Attack) | |
| Switch Controls | While sheathed, zR + X |
| PC Controls | While sheathed, MB4 + Left Click |
| PlayStation Controls | While sheathed, R2 + Triangle |
| Xbox Controls | While sheathed, RT + Y |
| End of Axe: Morph Slash | |
| Switch Controls | While in Axe Mode, zR |
| PC Controls | While in Axe Mode, MB4 |
| PlayStation Controls | While in Axe Mode, R2 |
| Xbox Controls | While in Axe Mode, RT |
Guard Points refer to the guard that automatically blocks monster attacks when they attack you during specific periods of certain attacks, usually when your shield is directly in front of an attack. Note that this consumes the weapon's sharpness.
If your shield is charged, it will deal some phial or stun damage when successfully pulled off. You can even follow up with a Super Amped Elemental Discharge!
Recommended Combos for the Charge Blade
Red Phial Collection Combo
| Switch Controls | Hold
Hold A → X + A → Hold A → X |
|---|---|
| PC Controls | Hold
Hold Right Click → Left Click + Right Click → Hold Right Click → Left Click |
| PlayStation Controls | Hold
Hold Circle → Triangle + Circle → Hold Circle → Triangle |
| Xbox Controls | Hold
Hold B → Y + B → Hold B → Y |
With this combo, you can go straight to the red phials from uncharged phials. Once you've done this, you can go straight to Amped Element Discharge or Super Amped Elemental Discharge if your shield is elementally boosted.
Super Amped Elemental Discharge from Sword & Shield Mode

| Switch Controls | X → X + A (x2) |
|---|---|
| PC Controls | Left Click → Left Click + Right Click (x2) |
| PlayStation Controls | Triangle → Triangle + Circle |
| Xbox Controls | Y → Y + B |
With this combo, you can go into the Super Amped Elemental Discharge (SAED) from the Sword & Shield Mode. It takes a long time to set up, so make sure you do this when the monster is down.
Element Discharge Loop Combo
| Switch Controls | In Axe Mode, X → A → X → A ... |
|---|---|
| PC Controls | In Axe Mode, Left Click → Right Click → Left Click → Right Click ... |
| PlayStation Controls | In Axe Mode, Triangle → Circle → Triangle → Circle ... |
| Xbox Controls | In Axe Mode, Y → B → Y → B ... |
You can use this combo when you want to hit the head to inflict phial damage. For impact phials, you can chain stuns as well, so you can do this while a monster is down to prolong its downtime.
The Savage Axe Loop Combo
| Switch Controls | In Sword Mode, Charge(
Charge (zR + A) while in Sword Mode → hold X → hold A → hold X → hold A... |
|---|---|
| PC Controls | In Sword Mode, Charge(
Charge (MB4 + Right Click) while in Sword Mode → hold Left Click → hold Right Click → hold Left Click → hold Right Click... |
| PlayStation Controls | In Sword Mode, Charge(
Charge (R2 + Circle) while in Sword Mode → hold Triangle → hold Circle → hold Triangle → hold Circle... |
| Xbox Controls | In Sword Mode, Charge(
Charge (RT + B) while in Sword Mode → hold Y → hold B → hold Y → hold B... |
This combo utilizes the Savage Axe-like Switch Skill, Condensed Spinning Slash. If Savage Axe was your go-to Charge Blade move back in Monster Hunter World (MHW), then you'll see how great it looks in MH Rise. Condensed Spinning Slash attacks an area multiple times, realeasing a phial at the end, so when you're using an Impact Phial Charge Blade, stunning the monster is very likely.
Also, feel free to use this beside your allies because this does not throw them airborne!
Tips on How to Use the Charge Blade
|
|
Counterattack using Counter Peak Performance
The addition of the Counter Peak Performance gives the Charge Blade counterattack capabilities (besides the Guard Points). Use this Silkbind Attack when able because it can be chained into an Amped or Ultra Element Discharge!
Charge Phials in Sword Mode, Discharge in Axe Mode
Phials make Charge Blades a force to be reckoned with. Always take time to collect and charge phials during Sword Mode and discharge them in Axe Mode. This is the basic gameplay loop for the Charge Blade!
Overcharging Can Cause Swords to Bounce-Off
Whenever you attack with the Charge Blade in Sword Mode, you accumulate Sword Energy. These can then be charged into your phials and then transferred to your shield. If you charge with the Sword too much, your attacks will bounce off. Always charge the phials using depending on the number of phials you need.
Phial Charge Accumulation Colors
These are the different colors of the phials when your Charge Blade is building up energy. Do not let it reach the overcharged state because your attacks will bounce off.
 |
No Charge |
|---|---|
 |
3 Phials (5 with Load Shells) |
 |
5 Phials |
 |
Overcharged |
Transfer the Charge from the Blade to the Shield for Bonuses
| Switch Controls | Cancel an Amped Element Discharge with |
|---|---|
| PC Controls | Cancel an Amped Element Discharge with |
| PlayStation Controls | Cancel an Amped Element Discharge with |
| Xbox Controls | Cancel an Amped Element Discharge with |
When your phials are fully charged, take time to transfer the charges from the sword to the shield to elementally boost it. When your shield is charged, it improves the attack power of your axe attacks and your guarding!
In addition, when your shield is charged, you gain access to the Super Amped Elemental Discharge (SAED) which dishes out tons of damage!
Understand Phial Playstyles
The Charge Blade has two types of phials — Element and Impact, each with different ways of playing optimally. Element Phials are ideally centered around spamming SAEDs to maximize damage, so knowing how to fire these off quickly is important.
Impact Phials are more effective when they can stun monsters and focus on weakpoints, so a playstyle using the Condensed Spinning Slash and Ready Stance is best used with these.
Changes from MHW: Iceborne
Savage Axe is Now in the Condensed Spinning Slash Switch Skill
The Condensed Spinning Slash Switch Skill has the animation and movements of Savage Axe in MHW: Iceborne. You can charge phials while in Axe Mode with this Switch Skill, so if you liked using the Savage Axe in World, then you'll use this one all the time!
Monster Hunter Rise (MHRise) Related Guides

| Weapon Type Guides | ||
|---|---|---|
 Weapons and Weapon Types Weapons and Weapon Types |
 Weapon Type Tier List Weapon Type Tier List |
 Builds for Each Weapon Type Builds for Each Weapon Type |
Melee Weapon Guides
| Melee Weapons | ||
|---|---|---|
Guide | Weapon Tree |
Guide | Weapon Tree |
Guide | Weapon Tree |
Guide | Weapon Tree |
Guide | Weapon Tree |
Guide | Weapon Tree |
Guide | Weapon Tree |
Guide | Weapon Tree | Melodies |
Guide | Weapon Tree |
Guide | Weapon Tree |
Guide | Weapon Tree | Kinsects |
|
Ranged Weapon Guides
| Ranged Weapons | ||
|---|---|---|
Guide | Weapon Tree |
Guide | Weapon Tree |
Guide | Weapon Tree |
Author

Sunbreak Charge Blade Guide: Combos, Controls and Moveset
Please participate in our site
improvement survey
03/2026
improvement survey
03/2026
Would you assist in
improving Game8's site?
improving Game8's site?

×
We are listening to our users' valuable opinions and discussing how to act on them.
The information collected through this survey will be used for the purpose of improving our services. In addition, the information will only be disclosed a part of a statistic in a format that will not allow identification of personal information.
Begin Survey
Not Now
×
Please rate each item regarding Game8.co's Advertisements.
Amount of Ads
Very Dissatisfied
Somewhat Dissatisfied
Fine
Somewhat Satisfied
Highly Satisfied
Placement of Ads
Timing of Ad Display
Ad Loading Speed
Safeness of Ads
Content of Ads
×
Please rate each item regarding Game8.co's Quality of Articles.
Amount of information
Very Dissatisfied
Somewhat Dissatisfied
Fine
Somewhat Satisfied
Highly Satisfied
Frequency of updates
Speed of new information
Accuracy of articles
Understandibility of articles
Readability of sentences
×
Please rate each item regarding Game8.co's Usability of the Site.
Ease of finding information
Very Dissatisfied
Somewhat Dissatisfied
Fine
Somewhat Satisfied
Highly Satisfied
Loading Speed
Use of Color
Font Size
Visibility of Images
Easy to Understand Layout
×
Please rate each item regarding Game8.co's Message Boards, Comments.
Ease of Writing
Very Dissatisfied
Somewhat Dissatisfied
Fine
Somewhat Satisfied
Highly Satisfied
Readability
Ease in Finding Information
Comment Quality
Comment Quantity
Admin Response
×
Please rate each item regarding Game8.co's Site's new design.
Please rate our site's new design
Very Dissatisfied
Somewhat Dissatisfied
Fine
Somewhat Satisfied
Highly Satisfied
Do you think that the website's design change makes the site easier to use?
Has the new design made it easier for you to find information on the site?
Has the new design improved the overall visual appeal of the site?
How would you rate your overall satisfaction with the new design of the site?
×
How likely are you to recommend Game8 to someone you know?
Very Unlikely
0
1
2
3
4
5
6
7
8
9
10
Very Likely
If you have other opinions regarding potential improvement to the website, please share them with us. We would appreciate your honest opinion.
Note: This is a free response section, so you can proceed without entering anything.
Note: Please be sure not to enter any kind of personal information into your response.
Note: Please be sure not to enter any kind of personal information into your response.
×
Thank You
×
Thank you for participating in our survey! Your answers will help us to improve the quality of our website and services.
We hope you continue to make use of Game8.
We hope you continue to make use of Game8.
Close
Rankings
- We could not find the message board you were looking for.
Gaming News


![Monster Hunter Stories 3 Review [First Impressions] | Simply Rejuvenating](https://img.game8.co/4438641/2a31b7702bd70e78ec8efd24661dacda.jpeg/thumb)
Popular Games

Genshin Impact Walkthrough & Guides Wiki
Honkai: Star Rail Walkthrough & Guides Wiki
Umamusume: Pretty Derby Walkthrough & Guides Wiki
Pokemon Pokopia Walkthrough & Guides Wiki
Resident Evil Requiem (RE9) Walkthrough & Guides Wiki
Monster Hunter Wilds Walkthrough & Guides Wiki
Wuthering Waves Walkthrough & Guides Wiki
Arknights: Endfield Walkthrough & Guides Wiki
Pokemon FireRed and LeafGreen (FRLG) Walkthrough & Guides Wiki
Pokemon TCG Pocket (PTCGP) Strategies & Guides Wiki


Recommended Games
Diablo 4: Vessel of Hatred Walkthrough & Guides Wiki
Cyberpunk 2077: Ultimate Edition Walkthrough & Guides Wiki
Fire Emblem Heroes (FEH) Walkthrough & Guides Wiki
Yu-Gi-Oh! Master Duel Walkthrough & Guides Wiki
Super Smash Bros. Ultimate Walkthrough & Guides Wiki
Pokemon Brilliant Diamond and Shining Pearl (BDSP) Walkthrough & Guides Wiki
Elden Ring Shadow of the Erdtree Walkthrough & Guides Wiki
Monster Hunter World Walkthrough & Guides Wiki
The Legend of Zelda: Tears of the Kingdom Walkthrough & Guides Wiki
Persona 3 Reload Walkthrough & Guides Wiki


All rights reserved
©CAPCOM CO., LTD. ALL RIGHTS RESERVED.
The copyrights of videos of games used in our content and other intellectual property rights belong to the provider of the game.
The contents we provide on this site were created personally by members of the Game8 editorial department.
We refuse the right to reuse or repost content taken without our permission such as data or images to other sites.