This survey will take about 1 minute.
Your answers will help us to improve our website.
Monster Hunter Rise: Sunbreak
Sunbreak Zenny Farming Guide: How to Farm Money Fast
★ All Title Updates now available for ALL PLATFORMS!
┗ Title Update 4 | Title Update 5 | Bonus Update
┗ Check out all our Best Builds For Every Weapon!
┗ TU4 Monsters: Velkhana | Risen C.G. Valstrax
┗ TU5 Monsters: Amatsu | Risen Shagaru Magala
┗ Bonus Update Monster: Primordial Malzeno

Zenny, the money in Monster Hunter Rise (MH Rise), is something you can easily run out of. Thankfully, zenny is just as easy to farm back up! Learn how to farm money fast by reading on.
| How to Farm Money | |
|---|---|
 Farm Kamura Points Farm Kamura Points |
 Farm Zenny Farm Zenny |
List of Contents
Best Sunbreak Zenny Farming Method
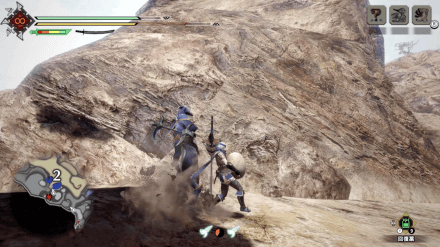
Cheering Ra Ra Rajang Event Quest

Sunbreak has three event quests that are some of the best ways to make money fast in Master Rank. The first is Daimyo and Pearls, which is good for those starting out in Sunbreak.
Cheering Ra Ra Rajang will be your go-to quest if you can consistently clear it in less than 10 minutes, making it more efficient than mining runs. It also doesn't require Upsurges, so this can be done anytime!
Ooooh Shiny...? is the latest Zenny farming quest. Its total number of eggs is worth slightly more on average, and it can be worth running if you can beat the Silver Rathalos faster than the Rajang in the arena.
Cheering Ra Ra Rajang Quest and Rewards
Sell All Reward Items

Cheering Ra Ra Rajang rewards Silver, Golden, and Platinum Eggs which can be sold for a tidy profit of around 630K Zenny on average. If you sell the other rewards as well, expect to earn between 700-800K Zenny per run. Getting lucky with Platinum Eggs can net you up to 1 million Zenny!
Lava Caverns Mining Method Still Viable

Farming Zenny in the Lava Caverns is still a good, low-risk way of making money fast in Sunbreak. With improvements like the Palamute Pouch and Sniff 'em Out, it's more convenient to mine ores for selling later. For a full 10 minute upsurge, expect to make around double of the High Rank method when going on Master Rank Expeditions with a Gathering Palico.
Best Zenny Farming Method
Lava Caverns Mining Outcrop Farming Route
By collecting Ore quickly and selling it at the Market, you can earn as much as 350-400K Zenny in a single run!
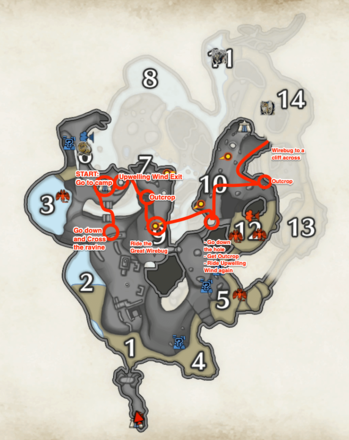
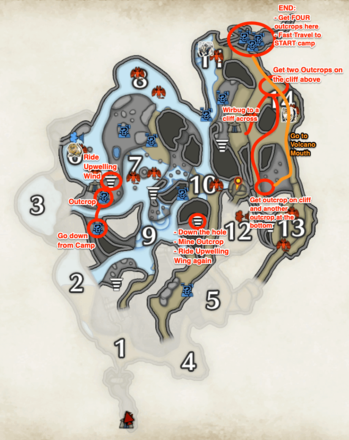
This is the mining route that we devised so you can get the most out of your run. Each trip on the route is around 4 minutes, and if you return from the Expedition within 5 minutes, the Mining Outcrop Upsurge will not change, so you can repeat this cycle indefinitely.
Check out a video of the Lava Caverns Route below!
| Preparing for Zenny Farming |
|---|
Before you start, we recommend you read our preparation steps to know how to maximize your results on the route.
| Lava Caverns Zenny Farming Route |
|
|---|---|
 |
 |
| Lava Caverns Zenny Farming Route |
|
|---|---|
| 1 | Fast Travel to Sub-camp 2 then turn right. You will see a cave opening and wiredash towards the first node. |
| 2 | Turn around out back and wiredash across the ravine. You will see an elevated rock formation with grass on top. Mine the second outcrop. |
| 3 | Go straight to the Upwelling Wind next to it and let is propel you upward. Ready your Wiredash while moving up because you need to Wiredash to get off the Upwelling Wind. |
| 4 | Go towards the Monster Fossil node and go across the ravine. You will see your third outcrop on the left. |
| 5 | Afterwards, Wiredash up the cliff and approach the Great Wirebug. Use it to get across. |
| 6 | When you get to the other side, approach the big hole to the right where you'll see the fourth outcrop on one of the cliff platforms. |
| 7 | Jump down and ride the Upwelling Wind again. Face your camera on your back and get ready to get off the Upwelling Wind using Wiredash. |
| 8 | Call out your Palamute and dash towards the fifth outcrop on the right. You will pass by several rock formation so you won't get lost. |
| 9 | Turn around, ride your Palamute, and continue on to the large hole near Sub-camp 1. You will need to target an elevated opening on the wall on top of Area 14 where the sixth and seventh outcrops are located. Use everything you got to reach this opening! |
| 10 | Next, ride your Palamute and go down the opening and go the road going to Area 12. When the rock formation on the left of the road ends, jump off your Palamute down to the eighth outcrop. |
| 11 | Go down the cliff on the left of the eighth outcrop and you'll be on top of the ninth outcrop. Ride your Palamute across to the other cliff and climb up until you're on the road connecting Area 14 and Area 13. |
| 12 | Ride your Palamute and cross Area 14 until you see a small opening on the right along the way to Area 11. You cannot miss this because there is a green spiribird in front of the hole the first time! Enter the opening and you will see an outcrop in the middle of a mushroom and plant node - this is your tenth outcrop. |
| 13 | Turn right and look up to see a hole in the wall. Line your Wiredash PERFECTLY to the hole then climb up! Follow the road and turn left - you will see your eleventh and twelfth outcrops. |
| 14 | Look right and wiredash up the hanging cliff. On the top you will see your thirteenth outcrop. |
| 15 | Continue on forward and wiredash across another cliff platform next to a lava waterfall. You will see your fourteenth outcrop here. After mining, Fast Travel to Sub-camp 2 immediately. |
| 16 | Once you reach Sub-camp 2, we suggest going in and out the tent to deposit all the ores you are carrying. This saves you from maxing out during the whole run. Repeat the route again afterwards. |
| 17 | [OPTIONAL] Slide down towards Area 3. Follow the two branches at the end of the cliff and go down to the left of it. Your fifteenth outcrop is waiting for you. Fast Travel back to Sub-camp 2 afterwards. |
Camp Guide: How to Unlock Sub-Camps
Wait for a Mining Outcrop Upsurge

It's essential to complete this route during a Mining Outcrops Upsurge, as this will increase the number of Ore yielded at each mining spot from 1 to 3. The Upsurge conditions for a map will reset with each Quest or after 10 minutes on an Expedition, so either clear a Quest and try again or wait for 10 minutes on the Lava Caverns Expedition for the Upsurge to reset.
Practice Completing the Route in 5 Minutes
We can take advantage of a specific feature of Quests with this run: if you return from a Quest within 5 minutes of starting it, the Upsurge conditions will not change, and you'll be able to start a new Expedition with the Mining Outcrops Upsurge still in place.
However, if you accidentally go over 5 minutes, you'll have to go to the trouble of waiting around for another, so time yourself on the route and if you happen to have a bad run, you're better off leaving without finishing the route than going over the time.
Equip the Guild Cross Set to Get Geologist Lv 3

At level 3, the Geologist Armor skill allows you to mine one extra time from Mining Outcrops. This helps immensely especially since the Zenny Farming route revolves around mining ores and selling them!
The easiest way to get Geologist Lv 3 is to equip the Guild Cross set, available for free through Add-On Content via Senri the Mailman. Just switch it in and you're ready to go!
Eat Skill-Boosting Dango to Prepare
| Dango | Skill & Effect | Unlock |
|---|---|---|
 Leg Day Leg Day
Activation Chance: 80% |
Dango Wall Runner: Decreases stamina depletion while wall running. |
Complete the ★3 Village Quest "Supply Run" |
 Pinea-full Pinea-full
Activation Chance: 80% |
Dango Glutton: Reduces stamina consumption for a certain period after eating. |
Reach ★3 Village or ★2 Gathering Hub |
 Raisin d'etre
* Raisin d'etre
*
Activation Chance: 90% |
Dango Harvester: Reduces the time between gathering point respawns. |
From the start |
Dango marked with * appear only as Daily Specials
How to Farm Zenny (Money)
| Zenny Farming Methods |
|---|
Sell Zenny Items

Some items are just meant to be sold. The uses of trade-in items are minimal and selling them off for cash is the most recommended method to use them. These items have a description that shows that the item has a high sell value. Take a look at your item box and sell off these items!
| Item | Selling Price | How to Obtain |
|---|---|---|
| 20,000z | Argosy (Rare Finds) HR8+ required |
|
| 10,000z | Argosy (Rare Finds) High Rank required |
|
| 1,000z | Argosy (Rare Finds) | |
| 100,000z | Additonal Reward for M5★+ Quests | |
| 20,000z | Additional Reward for M3★+ Quests Cohoot's Nest |
|
| 10,000z | Cohoot's Nest | |
| 1,000z | Cohoot's Nest |
Sell Ores
Ores are arguably the most time-efficient items you can farm and sell in Monster Hunter Rise and the Sunbreak DLC. Collecting these take significantly less time compared to bones and they sell for good chunk of zenny when sold in bulk.
Master Rank Ores
| Ore | How to Farm | Sell Price |
|---|---|---|
| All Maps | 2100 | |
| All Maps | 800 | |
| Shrine Ruins | 1200 | |
| Frost Islands | 1200 | |
| Sandy Plains | 1260 | |
| Flooded Forest | 3600 | |
| Citadel, Flooded Forest, Lava Caverns | 1000 | |
| Lava Caverns | 2700 | |
| Jungle | 1230 | |
| Citadel | 1420 |
Low and High Rank Ores
| Ore | How to Farm | Sell Price |
|---|---|---|
| All Maps | 160 | |
| All Maps | 480 | |
| All Maps (High Rank) | 680 | |
| Sandy Plains / Flooded Forest / Lava Caverns (High Rank) | 1020 | |
| Frost Islands | 130 | |
| Frost islands (High Rank) | 760 | |
| Flooded Forest | 1150 | |
| Flooded Forest (High Rank) | 2440 | |
| Lava Caverns | 860 | |
| Lava Caverns (High Rank) | 1720 |
Sell Extra Monster Materials
Another thing to consider is your surplus of Monster Materials from hunts! You definitely won't be needing 500 pieces of a specific monster part after all, so sell them to Kagero the Merchant whenever you're short of zenny!
Collect Account Items
Account Items are items that are automatically used after a quest and are converted to money and Kamura points. Always pick up account items when you have the chance (except for eggs as they greatly hinder your movement).
Farm Golden and Platinum Eggs

Doing the Gotta Hoard Fast! collab quest guarantees a Golden Egg if the quest is finished in under 2 minutes, giving you an S+ ranking. Do this quest on Multiplayer and it will be easy to beat that requirement.
Do the quest five times and in 10 minutes or less you will have five Golden Eggs. A single Golden Egg is priced at 20,000 zennies! Sell all five eggs and you have 100,000 zennies in just 10 minutes.
Credit goes to Coffee Goblin who shared us of this wonderful zenny farming tip.
Master Rank Event Quests

If you have Sunbreak, there are three event quests that drop plenty of Silver, Golden, and Platinum Eggs. Daimyo and Pearls is a fairly quick and easy quest that rewards 100,000z worth of eggs and materials while Cheering Ra Ra Rajang can net upwards of 700,000z per run. Ooooh Shiny...? is also viable, reaching 1,000,000z worth of items with some luck.
Farm the ★4 Village Quest, Third Wheel

Whenever there isn't a Mining Outcrops Upsurge in the Lava Caverns, you can also opt to do the ★4 Village Quest, Third Wheel. It features a fight against both an Arzuros and a Tetranadon in the Arena. You can clear it in about 5 minutes with Lvl 5 weapons. You can get about +5000z from selling all the rewards you get from it, on top of a 3000z reward money for completing the quest.
Village Quest Guide and List of Key Quests
How to Increase Zenny Farming Efficiency
| Farming Efficiency Tips |
|---|
Play Solo
While it may be tempting to join up with other players to complete quests. The reward you obtain will be divided into each player. If you have players and the total money is 10,000 zenny, each player will only receive 2,500. The difficulty of quests also scales up to the number of players so only team up with other hunters on difficult quests!
Eat the Dango Money Maker

The Dango Money Maker will increase the amount of money you obtain from the end of the quest by a huge 30%! It is available when the Wealthy Man daily special is active from the canteen so make sure to check it out daily!
Dango List: Effects and How to Unlock
Get Feather From Fortune Owl Whenever You Spot It

While it appears randomly, never ignore the Fortune Owl when you see it as it doubles your earned zenny at the end of the quest! A notification saying Lucky Life Found
should pop up on the right side of your screen whenever it appears on your screen.
How to Get and Use Fortune Owl
Don't Deliver Eggs!
While it may be tempting to start delivering eggs and other transport items for massive Kamura points and Zenny, the amount of time it takes to deliver one is just not optimal. Avoid going for deliveries if you wish to farm up money quickly.
How to Carry Eggs: Delivery Quest Guide
Monster Hunter Rise Related Guides

All Tips and Tricks
Comment
1  Coffee Goblin about 4 years
With the release of the Sonic the Hedgehog quest You now want to run the Low Rank event quest for Sonic Sub 2 minutes completion guarentees you a Golden Egg which is Whopping 20,000 Zenny (and takes under 2 minutes per run) for very very minimal work can make 100k in under 15 mins
Author

Sunbreak Zenny Farming Guide: How to Farm Money Fast
Please participate in our site
improvement survey
03/2026
improvement survey
03/2026
Would you assist in
improving Game8's site?
improving Game8's site?

×
We are listening to our users' valuable opinions and discussing how to act on them.
The information collected through this survey will be used for the purpose of improving our services. In addition, the information will only be disclosed a part of a statistic in a format that will not allow identification of personal information.
Begin Survey
Not Now
×
Please rate each item regarding Game8.co's Advertisements.
Amount of Ads
Very Dissatisfied
Somewhat Dissatisfied
Fine
Somewhat Satisfied
Highly Satisfied
Placement of Ads
Timing of Ad Display
Ad Loading Speed
Safeness of Ads
Content of Ads
×
Please rate each item regarding Game8.co's Quality of Articles.
Amount of information
Very Dissatisfied
Somewhat Dissatisfied
Fine
Somewhat Satisfied
Highly Satisfied
Frequency of updates
Speed of new information
Accuracy of articles
Understandibility of articles
Readability of sentences
×
Please rate each item regarding Game8.co's Usability of the Site.
Ease of finding information
Very Dissatisfied
Somewhat Dissatisfied
Fine
Somewhat Satisfied
Highly Satisfied
Loading Speed
Use of Color
Font Size
Visibility of Images
Easy to Understand Layout
×
Please rate each item regarding Game8.co's Message Boards, Comments.
Ease of Writing
Very Dissatisfied
Somewhat Dissatisfied
Fine
Somewhat Satisfied
Highly Satisfied
Readability
Ease in Finding Information
Comment Quality
Comment Quantity
Admin Response
×
Please rate each item regarding Game8.co's Site's new design.
Please rate our site's new design
Very Dissatisfied
Somewhat Dissatisfied
Fine
Somewhat Satisfied
Highly Satisfied
Do you think that the website's design change makes the site easier to use?
Has the new design made it easier for you to find information on the site?
Has the new design improved the overall visual appeal of the site?
How would you rate your overall satisfaction with the new design of the site?
×
How likely are you to recommend Game8 to someone you know?
Very Unlikely
0
1
2
3
4
5
6
7
8
9
10
Very Likely
If you have other opinions regarding potential improvement to the website, please share them with us. We would appreciate your honest opinion.
Note: This is a free response section, so you can proceed without entering anything.
Note: Please be sure not to enter any kind of personal information into your response.
Note: Please be sure not to enter any kind of personal information into your response.
×
Thank You
×
Thank you for participating in our survey! Your answers will help us to improve the quality of our website and services.
We hope you continue to make use of Game8.
We hope you continue to make use of Game8.
Close
Rankings
- We could not find the message board you were looking for.
Gaming News


![Monster Hunter Stories 3 Review [First Impressions] | Simply Rejuvenating](https://img.game8.co/4438641/2a31b7702bd70e78ec8efd24661dacda.jpeg/thumb)
Popular Games

Genshin Impact Walkthrough & Guides Wiki
Honkai: Star Rail Walkthrough & Guides Wiki
Umamusume: Pretty Derby Walkthrough & Guides Wiki
Pokemon Pokopia Walkthrough & Guides Wiki
Resident Evil Requiem (RE9) Walkthrough & Guides Wiki
Monster Hunter Wilds Walkthrough & Guides Wiki
Wuthering Waves Walkthrough & Guides Wiki
Arknights: Endfield Walkthrough & Guides Wiki
Pokemon FireRed and LeafGreen (FRLG) Walkthrough & Guides Wiki
Pokemon TCG Pocket (PTCGP) Strategies & Guides Wiki


Recommended Games
Diablo 4: Vessel of Hatred Walkthrough & Guides Wiki
Cyberpunk 2077: Ultimate Edition Walkthrough & Guides Wiki
Fire Emblem Heroes (FEH) Walkthrough & Guides Wiki
Yu-Gi-Oh! Master Duel Walkthrough & Guides Wiki
Super Smash Bros. Ultimate Walkthrough & Guides Wiki
Pokemon Brilliant Diamond and Shining Pearl (BDSP) Walkthrough & Guides Wiki
Elden Ring Shadow of the Erdtree Walkthrough & Guides Wiki
Monster Hunter World Walkthrough & Guides Wiki
The Legend of Zelda: Tears of the Kingdom Walkthrough & Guides Wiki
Persona 3 Reload Walkthrough & Guides Wiki


All rights reserved
©CAPCOM CO., LTD. ALL RIGHTS RESERVED.
The copyrights of videos of games used in our content and other intellectual property rights belong to the provider of the game.
The contents we provide on this site were created personally by members of the Game8 editorial department.
We refuse the right to reuse or repost content taken without our permission such as data or images to other sites.
This is a great tip, Coffee Goblin. We just checked and indeed doing the "Gotta Hoard Fast!" event quest guarantees a Golden Egg as a quest bonus if you get an S+ rankiing. Making it easier to farm zennies when doing this quest on multiplayer. Thank you for this awesome tip! We will update our guide above with this.