This survey will take about 1 minute.
Your answers will help us to improve our website.
Monster Hunter Rise: Sunbreak
Arena Quest 06 - Volvidon, Basarios, and Bazelgeuse: How to Get S Rank | Monster Hunter Rise
★ All Title Updates now available for ALL PLATFORMS!
┗ Title Update 4 | Title Update 5 | Bonus Update
┗ Check out all our Best Builds For Every Weapon!
┗ TU4 Monsters: Velkhana | Risen C.G. Valstrax
┗ TU5 Monsters: Amatsu | Risen Shagaru Magala
┗ Bonus Update Monster: Primordial Malzeno
This is a comprehensive guide on the Arena Quest 06 found in Monster Hunter Rise (MH Rise). Read on for a guide on how to beat Volvidon, Basarios, and Bazelgeuse in the Lava Caverns, how to get S Rank, armor and weapon loadouts, and more!
List of Contents
Arena Quest 06 Basic Information
| Slay a Volvidon, a Basarios, and a Bazelgeuse | |
|---|---|


|
|
| Locale | Arena |
| Time Limit | 50 min. |
| Avaliable Weapons | |
Rank Clear Times
| S Rank | 9 min |
|---|---|
| A Rank | 15 min |
| B Rank | 50 min |
Arena Quest 06 Rewards
Target Rewards
Quest Rewards
Coming soon!
| Rewards | Drop Rate |
|---|---|
| Ace Hunter Coin | - |
| Bazelgeuse Coin | - |
Weapons and Armor Sets
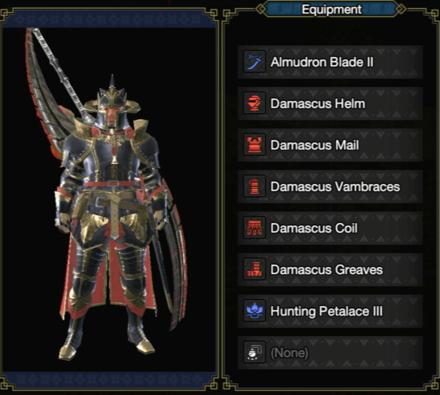
Long Sword
| Weapon | Armor | Items | |
|---|---|---|---|
| Almudron Blade II | ・Damascus Helm ・Damascus Mail ・Damascus Vambraces ・Damascus Coil ・Damascus Greaves | ・Potion x10 ・Mega Potion x10 ・Max Potion x2 ・Dust of Life x3 ・Ration x10 ・Whetstone ・Throwing Kunai ・BBQ Spit | |
| Switch Skills | |||
| Step Slash | Spirit Roundslash Combo | Soaring Kick | |
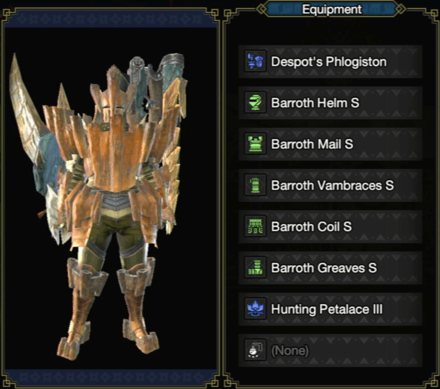
Gunlance
| Weapon | Armor | Items | |
|---|---|---|---|
| Despot's Phlogiston | ・Barroth Helm S ・Barroth Mail S ・Barroth Vambraces S ・Barroth Coil S ・Barroth Greaves S | ・Potion x10 ・Mega Potion x10 ・Max Potion x2 ・Dust of Life x3 ・Ration x10 ・Whetstone ・Throwing Kunai ・BBQ Spit | |
| Switch Skills | |||
| Blast Dash | Hail Cutter | Guard Reload | |
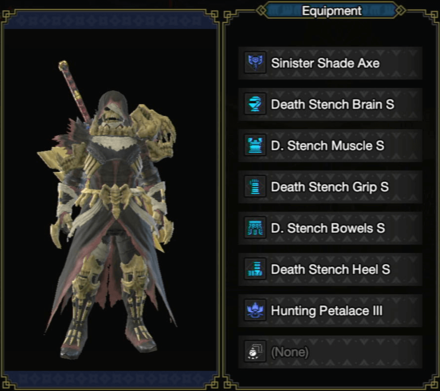
Charge Blade
| Weapon | Armor | Items | |
|---|---|---|---|
| Sinister Shade Axe | ・Death Stench Brain S ・D. Stench Muscle S ・Death Stench Grip S ・D. Stench Bowels S ・Death Stench Heel S | ・Potion x10 ・Mega Potion x10 ・Max Potion x2 ・Dust of Life x3 ・Ration x10 ・Whetstone ・Trap Tool ・Throwing Kunai ・BBQ Spit | |
| Switch Skills | |||
| Condensed Element Slash | Morph Slash | Counter Peak Performance | |
Insect Glaive
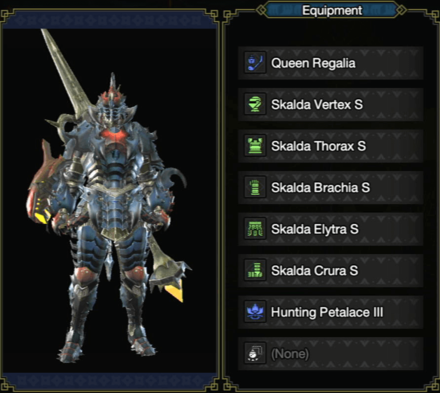
| Weapon | Armor | Items | |
|---|---|---|---|
| Queen Regalia | ・Skalda/Spio Vertex S ・Skalda/Spio Thorax S ・Skalda/Spio Brachia S ・Skalda/Spio Elytra S ・Skalda/Spio Crura S | ・Potion x10 ・Mega Potion x10 ・Max Potion x2 ・Dust of Life x3 ・Ration x10 ・Armorcharm ・Armortalon ・Whetstone ・Throwing Kunai ・BBQ Spit | |
| Switch Skills | |||
| Leaping Slash | Tornado Slash | Diving Wyvern | |
Light Bowgun

| Weapon | Armor | Items | |
|---|---|---|---|
| Comet Bolt | ・Somnacanth Helm S ・Somnacanth Mail S ・Somnacanth Braces S ・Somnacanth Coil S ・Somnacanth Greaves S | ・Potion x10 ・Mega Potion x10 ・Max Potion x2 ・Dust of Life x3 ・Ration x10 ・Large Barrel Bomb x3 ・Mega Barrel Bomb x2 ・Whetstone ・Throwing Kunai ・BBQ Spit | |
| Switch Skills | |||
| Reload | Quickstep Evade | Fanning Maneuver | |
| Light Bowgun Ammo | ||
|---|---|---|
| Normal Ammo 2 x99 | Pierce Ammo 1 x60 | Spread Ammo 1 x60 |
| Spread Ammo 2 x60 | Spread Ammo 3 x60 | Shrapnel Ammo 1 x60 |
| Sticky Ammo 1 x9 | Sticky Ammo 2 x9 | Sticky Ammo 3 x9 |
| Poison Ammo 1 x12 | Poison Ammo 2 x12 | Paralysis Ammo 1 x12 |
| Sleep Ammo 1 x12 | Sleep Ammo 2 x8 | Demon Ammo x5 |
| Water Ammo x60 | ||
S Rank Guide: Long Sword
| Long Sword Tips |
|---|
Counterattack As Much As Possible
Counterattacks are what Long Sword are known for! Take advantage of Iai Slashes and Foresight Slashes to maintain the offensive and quickly maximize your Spirit Gauge.
Spirit Helm Breakers are Crucial
Spirit Helm Breakers are vital to achieve S Rank clears in Arena Quest 06. Only perform this move on weak spots like the head and with a full Spirit Gauge.
Spirit Helm Breakers also deal mounting damage, which allows us to Wyvern Ride monsters!
Eliminate Bazelgeuse First
Bazelgeuse's starting position is directly in front of a Water Vent. The Water Vent deals a lot of damage to a monster if it's launched toward it, making it possible to eliminate Bazelgeuse within two minutes.
Immediately fast travel to Sub-Camp 2 at the start of the run and grab the Blastoad along the way. The Blastoad is instrumental in knocking Volvidon down later on.
S Rank Guide: Gunlance
| Gunlance Tips |
|---|
Utilize Burst Fire, Hail Cutter, and Guard Edge
These three attacks are vital in achieving S Rank clears in Arena Quest 06. Refer to the table below for tips on optimal positioning and timing for each attack:
| Attack | How to Use |
|---|---|
| Burst Fire Combo | Focus on landing as many lance slaps as possible on weak spots for optimal damage. You do not have to land the full combo every time. |
| Hail Cutter | Hail Cutter is another heavy-hitting attack combination and should only be used when you're sure that your downward strike will connect. This attack also allows us to Wyvern Ride monsters once enough damage has been accumulated. |
| Guard Edge | Guard Edge allows us to regain a bit of sharpness from blocking and land Wyvernstakes quickly. Activate Guard Edge just before your target's attack connects to trigger Offensive Guard as well. |
Blast Dash to Close the Distance
Blast Dash is an excellent way to close the distance whenever monsters charge away from you. Strikes before landing also contribute towards mounting damage, allowing you to Wyvern Ride monsters even faster.
Time Your Blocks
Barroth's Set comes with Offensive Guard and must be activated as much as possible for maximum damage. Make sure you time your blocks just before a monster's attack lands!
Eliminate Bazelgeuse First
Bazelgeuse's starting position is directly in front of a Water Vent. Take advantage of this by immediately fast travelling to Sub-Camp 2 at the start of the run. Make sure you grab the Blastoad along the way as this helps you knock one of the last two monsters down easily, creating a nice window of attack.
S Rank Guide: Charge Blade
| Charge Blade Tips |
|---|
Element Discharges are Crucial
Proper positioning and timing of Element Discharges are absolutely necessary to achieve S Rank clears in Arena Quest 06 — Especially since we're using a Charge Blade with Impact Phials.
Amped Element Discharges
Amped Element Discharges allows us to land our impact phials precisely and must always land on a monster's head. This lets you deal solid amounts of KO damage and can lead to quick knockouts.
Take note that your discharges will turn into Ultra Element Discharges by default whenever your shield is charged. You can still perform regular discharges with a charged shield by inputting (↓ + X) before the swing.
Ultra Element Discharges
Ultra Element Discharges is a more devastating discharge that can only be performed when your shield is charged. Make sure your axe swings land on the head or other weak spots.
The phials will travel three steps forward from the final swing's impact area — Maximize the damage by making sure that the rest or most of the monster is directly in front of the initial impact.
Utilize Counterpeak Performance and Morphing Advance
A Charge Blade's Silkbind Moves are some of the best in Monster Hunter Rise and must always be utilized regardless of the hunt.
Counterpeak Performance allows you to instantly fill your phials from blocks and gives you the ability to charge both sword and shield quickly. The non-phial damage from counterattacks also do mounting damage, allowing you to Wyvern Ride monsters.
Morphing Advance, on the other hand, is a mobility skill that lets us dash forward with the Charge Blade in Axe Form. This lets us perform quick Element Discharges or get out of harm's way.
Keep Your Shield Charged
Charging your Shield is important because it increases your shield-based, phial-based, and Axe Form attacks. You can charge the shield easily via Counterpeak Performance.
Eliminate Bazelgeuse First
Bazelgeuse's starting location is directly in front of a Water Vent. Take advantage of the extra damage from the Water Vent to clear Bazelgeuse quickly.
Aside from the Blastoad along the way, you can also grab the Thunderbug beside Sub-Camp 2 to create a Shock Trap. This is extremely useful for pinning Volvidon down later on.
Charge Your Sword Against Basarios
A Charged sword allows you to bypass Basarios' hard exterior and prevent weapon bounces! Always keep your sword charged against Basarios to make quick work of this tough monster.
S Rank Guide: Insect Glaive
| Insect Glaive Tips |
|---|
Eliminate Bazelgeuse First
We should always take advantage of Bazelgeuse's starting location since it has a Water Vent that we can use to inflict major damage. Start the run by immediately fast travelling to Sub-Camp 2 and grabbing the Blastoad on the way to Bazelgeuse.
Always Activate White and Orange Buffs First
Activating these buffs first allows us to completely ignore monster roars, making the start of a fight a lot smoother.
Luckily, our Insect Glaive comes with Foebeetle. This particular Kinsect is a Dual-Color type, which means we can grab two colors per Kinsect attack.
Make sure you fling your Kinsect towards torsos and hindlegs to ensure you get White and Orange buffs online at the start of the fight!
Utilize Aerial Attacks, Diving Wyvern, and Tornado Slashes
These three attacks are your best sources of damage to achieve S-Rank clears in Arena Quest 06.
Aerial Attacks and Diving Wyvern allow us to mount monsters quickly. Diving Wyvern, in particular, must always be used to initiate the Wyvern Ride for efficiency.
Tornado Slash combos are your heaviest moves in terms of damage on the ground and synergize well with our Kinsect. Make sure you direct these combinations towards weak spots like the head as much as possible for maximum damage.
S Rank Guide: Light Bowgun
| Light Bowgun Tips |
|---|
Compensate for Deviation
Comet Bolt's shots deviate heavily to the left. Compensate for this by always aiming to the right of your intended target — The farther you are from the target, the more you should compensate.
Proper Ammo Usage is Crucial
Using the right ammo against the right monster is absolutely important to achieve S Rank clears. Click the button below for recommended ammo types and their proper usage.
| Ammo Type | How to Use |
|---|---|
| | Poison Ammo 2 allows us to apply Poison the first time within 2-3 shots (depending on the target). This must always be used to start fights, along with Sleep Ammo 2. Take note that poison ticks do not wake monsters up. |
| | Sleep Ammo 2 is strong enough to put targets to sleep within 1-2 shots (depending on the target). This is a solid way to start fights because we can set our Wyvernblasts and Barrel Bombs safely and ignite them with waking damage. |
| | This ammo type must only be used against Volvidon to pin it down and keep it in place. One shot is enough to knock Volvidon out if combined with Sticky Ammo 2 and a few melee bashes with the Light Bowgun itself. |
| | Similar to Sticky Ammo 3, this should only be used on Volvidon to knock it out and keep it grounded. It also has one shot in the clip and a very long reload time so don't bother using more than one on Volvidon. |
| | Pierce Ammo 1 works best against Bazelgeuse due to its length and rather large head. |
| | Water Ammo has two rapid fire rounds and is extremely effective against Volvidon and Basarios. Make sure you aim for the head as much as possible for optimal damage. |
Eliminate Bazelgeuse First
Just like the other guides above, taking Bazelgeuse out first is always the optimal start for Arena Quest 06 because its starting position is directly beside a Water Vent. Fast travel to Sub-Camp 2 and jump into the hole to the north. Make sure you also grab the Blastoad at the undeground ledge overlooking Bazelgeuse's position.
| How to Quickly Slay Bazelgeuse | |
|---|---|
| 1 | Start by using Poison and Sleep Ammo 2 on Bazelgeuse from afar. Make sure Bazelgeuse is positioned directly in front of the Water Vent before putting it to sleep! |
| 2 | Plant your Mega Barrel Bombs beside Bazelgeuse's head, towards the Water Vent. Ignite the bombs with the Blastoad you picked up earlier.
Let the Water Vent hit Bazelgeuse first before rushing into melee range to avoid getting launched. |
| 3 | Plant at least two Wyvernblasts beside Bazelgeuse's head while its down. Blow them up using a full clip of Pierce Ammo 1.
Finish your explosive assault with Silkbind Glide's melee attack on Bazelgeuse's head. The damage, combined with the final explosion of your Wyvernblasts should be enough to Wyvern Ride Bazelgeuse afterward. |
| 5 | Ram Bazelgeuse into walls and pillars then finish it off with Pierce Ammo 1 and Silkbind Glide's melee attack. |
Fast travel to Sub-Camp 1 once you've dealt with Bazelgeuse. You'll have the opportunity to fight Volvidon alone if you clear Bazelgeuse within 2 minutes of the run.
Use Large Barrel Bombs against Basarios
Large Barrel Bombs are instrumental against Basarios in two situations:
- Use the bombs at the start of the fight after putting Basarios to sleep. Place two bombs beside its head and wake Basarios up by dropping the third bomb from mid-air via Wirebug.
- Interrupt Basarios' burrow attack by planting a bomb in its path. The damage is enough to incapacitate Basarios for a few seconds.
Monster Hunter Rise Related Guides

Quest Types and List of Quests
All Quest Guides by Type
| Quest Types | |
|---|---|
 Village Quests Village Quests |
 Urgent Quests Urgent Quests
|
 Gathering Hub Quests Gathering Hub QuestsBase Game | Sunbreak |
 Arena Quests Arena Quests |
 Side Quests Side Quests |
 Requests Requests |
 Event Quests Event Quests(Rewards) |
 Collaboration Quests Collaboration Quests |
 Challenge Quests Challenge Quests |
 Anomaly Quests Anomaly Quests |
 Follower Quests Follower Quests |
 Support Surveys Support Surveys |
Author

Arena Quest 06 - Volvidon, Basarios, and Bazelgeuse: How to Get S Rank | Monster Hunter Rise
Please participate in our site
improvement survey
03/2026
improvement survey
03/2026
Would you assist in
improving Game8's site?
improving Game8's site?

×
We are listening to our users' valuable opinions and discussing how to act on them.
The information collected through this survey will be used for the purpose of improving our services. In addition, the information will only be disclosed a part of a statistic in a format that will not allow identification of personal information.
Begin Survey
Not Now
×
Please rate each item regarding Game8.co's Advertisements.
Amount of Ads
Very Dissatisfied
Somewhat Dissatisfied
Fine
Somewhat Satisfied
Highly Satisfied
Placement of Ads
Timing of Ad Display
Ad Loading Speed
Safeness of Ads
Content of Ads
×
Please rate each item regarding Game8.co's Quality of Articles.
Amount of information
Very Dissatisfied
Somewhat Dissatisfied
Fine
Somewhat Satisfied
Highly Satisfied
Frequency of updates
Speed of new information
Accuracy of articles
Understandibility of articles
Readability of sentences
×
Please rate each item regarding Game8.co's Usability of the Site.
Ease of finding information
Very Dissatisfied
Somewhat Dissatisfied
Fine
Somewhat Satisfied
Highly Satisfied
Loading Speed
Use of Color
Font Size
Visibility of Images
Easy to Understand Layout
×
Please rate each item regarding Game8.co's Message Boards, Comments.
Ease of Writing
Very Dissatisfied
Somewhat Dissatisfied
Fine
Somewhat Satisfied
Highly Satisfied
Readability
Ease in Finding Information
Comment Quality
Comment Quantity
Admin Response
×
Please rate each item regarding Game8.co's Site's new design.
Please rate our site's new design
Very Dissatisfied
Somewhat Dissatisfied
Fine
Somewhat Satisfied
Highly Satisfied
Do you think that the website's design change makes the site easier to use?
Has the new design made it easier for you to find information on the site?
Has the new design improved the overall visual appeal of the site?
How would you rate your overall satisfaction with the new design of the site?
×
How likely are you to recommend Game8 to someone you know?
Very Unlikely
0
1
2
3
4
5
6
7
8
9
10
Very Likely
If you have other opinions regarding potential improvement to the website, please share them with us. We would appreciate your honest opinion.
Note: This is a free response section, so you can proceed without entering anything.
Note: Please be sure not to enter any kind of personal information into your response.
Note: Please be sure not to enter any kind of personal information into your response.
×
Thank You
×
Thank you for participating in our survey! Your answers will help us to improve the quality of our website and services.
We hope you continue to make use of Game8.
We hope you continue to make use of Game8.
Close
Rankings
- We could not find the message board you were looking for.
Gaming News


![Monster Hunter Stories 3 Review [First Impressions] | Simply Rejuvenating](https://img.game8.co/4438641/2a31b7702bd70e78ec8efd24661dacda.jpeg/thumb)
Popular Games

Genshin Impact Walkthrough & Guides Wiki
Honkai: Star Rail Walkthrough & Guides Wiki
Umamusume: Pretty Derby Walkthrough & Guides Wiki
Pokemon Pokopia Walkthrough & Guides Wiki
Resident Evil Requiem (RE9) Walkthrough & Guides Wiki
Monster Hunter Wilds Walkthrough & Guides Wiki
Wuthering Waves Walkthrough & Guides Wiki
Arknights: Endfield Walkthrough & Guides Wiki
Pokemon FireRed and LeafGreen (FRLG) Walkthrough & Guides Wiki
Pokemon TCG Pocket (PTCGP) Strategies & Guides Wiki


Recommended Games
Diablo 4: Vessel of Hatred Walkthrough & Guides Wiki
Cyberpunk 2077: Ultimate Edition Walkthrough & Guides Wiki
Fire Emblem Heroes (FEH) Walkthrough & Guides Wiki
Yu-Gi-Oh! Master Duel Walkthrough & Guides Wiki
Super Smash Bros. Ultimate Walkthrough & Guides Wiki
Pokemon Brilliant Diamond and Shining Pearl (BDSP) Walkthrough & Guides Wiki
Elden Ring Shadow of the Erdtree Walkthrough & Guides Wiki
Monster Hunter World Walkthrough & Guides Wiki
The Legend of Zelda: Tears of the Kingdom Walkthrough & Guides Wiki
Persona 3 Reload Walkthrough & Guides Wiki


All rights reserved
©CAPCOM CO., LTD. ALL RIGHTS RESERVED.
The copyrights of videos of games used in our content and other intellectual property rights belong to the provider of the game.
The contents we provide on this site were created personally by members of the Game8 editorial department.
We refuse the right to reuse or repost content taken without our permission such as data or images to other sites.