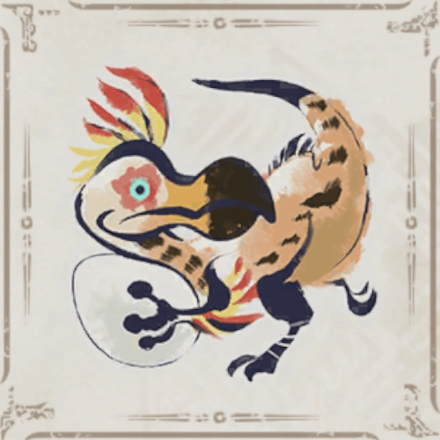
Arena Quest 01 - Kulu-Ya-Ku: How to Get S Rank | Monster Hunter Rise
★ All Title Updates now available for ALL PLATFORMS!
┗ Title Update 4 | Title Update 5 | Bonus Update
┗ Check out all our Best Builds For Every Weapon!
┗ TU4 Monsters: Velkhana | Risen C.G. Valstrax
┗ TU5 Monsters: Amatsu | Risen Shagaru Magala
┗ Bonus Update Monster: Primordial Malzeno
This is a comprehensive guide on the Arena Quest 01 found in Monster Hunter Rise (MH Rise). Read on for a guide on how to beat Kulu-Ya-Ku in the Arena, how to get S Rank, armor and weapon loadouts, and more!
List of Contents
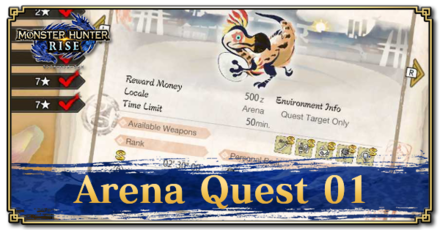
Arena Quest 01 Basic Information
| Slay a Kulu-Ya-Ku | |
|---|---|
|
|
| Locale | Arena |
| Time Limit | 50 min. |
| Available Weapons | |
Rank Clear Times
| S Rank | 2 min 30 sec |
|---|---|
| A Rank | 5 min |
| B Rank | 50 min |
Arena Quest 01 Rewards
| Kulu-Ya-Ku (Low Rank) | |
|---|---|
| Item Name | Drop Rate (#) |
| Monster Bone M | 14% |
| Kulu-Ya-Ku Beak | 7% |
| Kulu-Ya-Ku Plume | 13% |
| Kulu-Ya-Ku Hide | 41% |
| Kulu-Ya-Ku Scale | 25% |
| Rewards | Drop Rate |
|---|---|
| Kulu Coin | - |
| Pinnacle Coin | - |
Weapon and Armor Sets
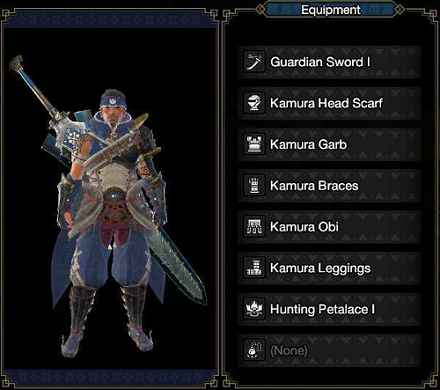
Long Sword
| Weapon | Armor | Items | |
|---|---|---|---|
| Guardian Sword I | ・Kamura Head Scarf ・Kamura Garb ・Kamura Braces ・Kamura Obi ・Kamura Leggings | ・Potion x10 ・Ration x10 ・Whetstone ・Throwing Kunai ・BBQ Spit | |
| Switch Skills | |||
| Step Slash | Spirit Roundslash Combo | Soaring Kick | |
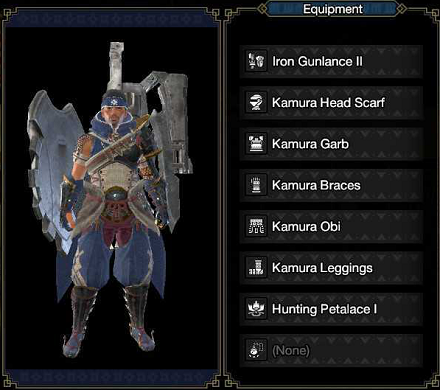
Gunlance
| Weapon | Armor | Items | |
|---|---|---|---|
| Iron Gunlance II | ・Kamura Head Scarf ・Kamura Garb ・Kamura Braces ・Kamura Obi ・Kamura Leggings | ・Potion x10 ・Ration x10 ・Whetstone ・Throwing Kunai ・BBQ Spit | |
| Switch Skills | |||
| Charged Shelling | Hail Cutter | Quick Reload | |
Hunting Horn

| Weapon | Armor | Items | |
|---|---|---|---|
| Wind Horn | ・Kamura Head Scarf ・Kamura Garb ・Kamura Braces ・Kamura Obi ・Kamura Leggings | ・Potion x10 ・Ration x10 ・Whetstone ・Throwing Kunai ・BBQ Spit | |
| Switch Skills | |||
| Overhead Smash | Melody Mode: Performance | Earthshaker | |
Switch Axe

| Weapon | Armor | Items | |
|---|---|---|---|
| Bone Axe II | ・Kamura Head Scarf ・Kamura Garb ・Kamura Braces ・Kamura Obi ・Kamura Leggings | ・Potion x10 ・Ration x10 ・Normal Ammo 1 ・Throwing Kunai ・BBQ Spit | |
| Switch Skills | |||
| Forward Slash | Finishing Discharge | Invincible Gambit | |
Light Bowgun
| Weapon | Armor | Items |
|---|---|---|
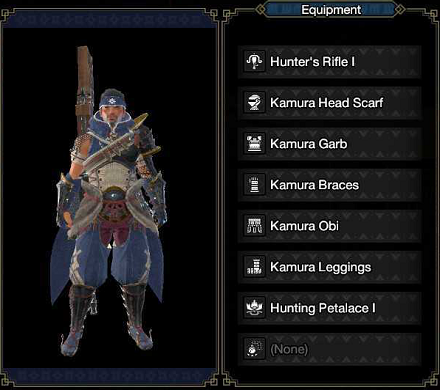
| Hunter's Rifle I | ・Kamura Head Scarf ・Kamura Garb ・Kamura Braces ・Kamura Obi ・Kamura Leggings | ・Potion x10 ・Ration x10 ・Normal Ammo 1 ・Throwing Kunai ・BBQ Spit |
| Switch Skills | ||
| Reload | Forward Dodge | Fanning Vault |
| Light Bowgun Ammo | ||
|---|---|---|
| Normal Ammo 2 x99 | Pierce Ammo 1 x60 | Pierce Ammo 2 x60 |
| Spread Ammo 1 x60 | Spread Ammo 2 x60 | Shrapnel Ammo 1 x60 |
| Exhaust Ammo 2 x8 | Recover Ammo 2 x8 | Thunder Ammo x60 |
S Rank Guide: Long Sword
| Long Sword Tips |
|---|
Maximize and Maintain Your Spirit Gauge
Reaching red Spirit Gauge and maintaining it throughout the arena run are absolutely crucial to achieve S-Rank clear times. This allows us to deal maximum damage for all our attacks — especially our Spirit Helm Breakers.
Counter Kulu-Ya-Ku's Attacks
Long Swords are extremely effective in using a monster's attacks against them! Take advantage of Iai Spirit Slash and Foresight Slash to counter Kulu-Ya-Ku's attacks and quickly build Spirit Gauge.
Make Your Spirit Helm Breakers Count
Properly positioned Spirit Helm Breakers are the key to taking down Kulu-Ya-Ku as fast as possible. We recommend landing your Spirit Helm Breakers directly on the head as this usually results in quick mounts, which we can utilize for an easy knockout.
Take note that it is absolutely crucial that you only perform this move with red Spirit Gauge to ensure maximum damage.
S Rank Guide: Gunlance
| Gunlance Tips |
|---|
Burst Firing is Crucial
Take advantage of your Iron Gunlance II's normal shelling and Burst Fire that Kulu-Ya-Ku into oblivion!
It is improtant to note that the cumulative damage from a well-placed Burst Fire is just high enough to immediately disarm Kulu-Ya-Ku, so always make sure you position the slam below or directly beside Kulu-Ya-Ku's arms for optimal damage.
Ignore Your Sharpness
You do not have to sharpen your Gunlance at all during this arena quest. Lance pokes that start your Burst Fire animation can push through any of the Kulu-Ya-Ku's parts at Yellow and Orange sharpness.
If you find yourself in Red sharpness already, start the Burst Fire animation by thrusting the air beside Kulu-Ya-Ku instead to prevent bouncing.
Lastly, you can always use Guard Edge to regain some of your lost sharpness!
Hail Cutters are Unnecessary
Hail Cutter animations are extremely long and offer no real benefits to pulling off. We recommend saving your wirebugs for Guard Edge counters instead!
S Rank Guide: Hunting Horn
| Hunting Horn Tips |
|---|
Focus on the Head
As with all blunt weapons, make sure you prioritize Kulu-Ya-Ku's head during the arena run! Not only does this ensure optimal damage, but it also can lead to knockouts as well.
Take Advantage of Slide Beat and Magnificent Trio
Magnificent Trio and Slide Beat are time-efficient moves that deal a substantial amount of damage and synergize well with Sonic Waves. Make sure you perform these moves on the head whenever possible to ensure a quick clear!
Maximize your Infernal Melody Buff
You generally only have time to setup Infernal Melody once during the S-Rank time frame. Make the most out of this damage buff by dishing out your heaviest combos during its duration — especially Earthshakers!
Make Your Earthshakers Count
Earthshaker is an incredibly powerful move that can lead to quick clears if positioned correctly and used at the right time. The best time to use this is during your Infernal Melody up time. It is important to note that you should only use this move whenever Kulu-Ya-Ku is knocked out or standing in place.
Also make sure that to avoid connecting this attack on Kulu-Ya-Ku's rock at all costs since this significantly reduces the damage! The best area to land your Earthshaker is the head.
S Rank Guide: Switch Axe
| Switch Axe Tips |
|---|
Use Your Silkbind Moves
Invincible Gambit and Switch Charger are important to achieve S-Rank clears on Switch Axe because of the mobility they bring to the table.
Switch Charger, in particular, also regenerates your Switch Gauge and prevents gauge loss for a few seconds. This move allows you to perform Finishing Discharges efficiently and more often!
Fill Your Switch Gauge Immediately
Maxing out your Switch Gauge as soon as possible is paramount in this arena quest. You can do this by performing Axe: Heavy Slam to increase your fill rate with Sword Attacks.
Using regular Finishing Discharges whenever Kulu-Ya-Ku's digging for rocks or Quick Element Discharges are effective ways of filling up your Switch Gauge as well.
Use Zero Sum Discharge Finisher
Zero Sum Discharge Finisher deals the most damage and should be used once you've maxed your Switch Gauge. While you can't get knocked off during the animation, we recommend using the move whenever Kulu-Ya-Ku's digging or doing small attacks to avoid excessive damage that can lead to unexpected faints!
S Rank Guide: Light Bowgun
| Switch Axe Tips |
|---|
Plant Wyvernblasts on Kulu-Ya-Ku
Fanning Vault allows you to stick Wyvernblasts on Kulu-Ya-Ku from the air! This can be very tricky to perform at first as positioning and timing are crucial, but doing so gives us a much needed damage boost for S Rank clears.
Planted Wyvernblasts also gives us the opportunity to mount Kulu-Ya-Ku for an easy knockout when enough damage has been accumulated.
Use Normal Ammo 2 and Spread Ammo 1
Normal Ammo 2 and Spread Ammo 1 are your best ammo types for S Rank clears. Make sure you stay within their critical range when shooting to deal maximum damage.
Spread Ammo 1, in particular, is extremely effective at shooting planted Wyvernblasts due to its wide attack cone.
Aim for the Head
Always aim for Kulu-Ya-Ku's head. This part has the highest hit zone value, ensuring our shots deal maximum damage at critical range. It's also optimal that you plant your Wyvernblasts around Kulu-Ya-Ku's head as well for efficiency.
Monster Hunter Rise Related Guides

Quest Types and List of Quests
All Quest Guides by Type
| Quest Types | |
|---|---|
 Village Quests Village Quests |
 Urgent Quests Urgent Quests
|
 Gathering Hub Quests Gathering Hub QuestsBase Game | Sunbreak |
 Arena Quests Arena Quests |
 Side Quests Side Quests |
 Requests Requests |
 Event Quests Event Quests(Rewards) |
 Collaboration Quests Collaboration Quests |
 Challenge Quests Challenge Quests |
 Anomaly Quests Anomaly Quests |
 Follower Quests Follower Quests |
 Support Surveys Support Surveys |
Author

Arena Quest 01 - Kulu-Ya-Ku: How to Get S Rank | Monster Hunter Rise
Rankings
- We could not find the message board you were looking for.
Gaming News
![Neverness to Everness (NTE) Review [Beta Co-Ex Test] | Rolling the Dice on Something Special](https://img.game8.co/4414628/dd3192c8f1f074ea788451a11eb862a7.jpeg/show)


Popular Games

Genshin Impact Walkthrough & Guides Wiki
Honkai: Star Rail Walkthrough & Guides Wiki
Arknights: Endfield Walkthrough & Guides Wiki
Umamusume: Pretty Derby Walkthrough & Guides Wiki
Wuthering Waves Walkthrough & Guides Wiki
Pokemon TCG Pocket (PTCGP) Strategies & Guides Wiki
Abyss Walkthrough & Guides Wiki
Zenless Zone Zero Walkthrough & Guides Wiki
Digimon Story: Time Stranger Walkthrough & Guides Wiki
Clair Obscur: Expedition 33 Walkthrough & Guides Wiki


Recommended Games
Fire Emblem Heroes (FEH) Walkthrough & Guides Wiki
Pokemon Brilliant Diamond and Shining Pearl (BDSP) Walkthrough & Guides Wiki
Diablo 4: Vessel of Hatred Walkthrough & Guides Wiki
Super Smash Bros. Ultimate Walkthrough & Guides Wiki
Yu-Gi-Oh! Master Duel Walkthrough & Guides Wiki
Elden Ring Shadow of the Erdtree Walkthrough & Guides Wiki
Monster Hunter World Walkthrough & Guides Wiki
The Legend of Zelda: Tears of the Kingdom Walkthrough & Guides Wiki
Persona 3 Reload Walkthrough & Guides Wiki
Cyberpunk 2077: Ultimate Edition Walkthrough & Guides Wiki


All rights reserved
©CAPCOM CO., LTD. ALL RIGHTS RESERVED.
The copyrights of videos of games used in our content and other intellectual property rights belong to the provider of the game.
The contents we provide on this site were created personally by members of the Game8 editorial department.
We refuse the right to reuse or repost content taken without our permission such as data or images to other sites.