This survey will take about 1 minute.
Your answers will help us to improve our website.
Monster Hunter Rise: Sunbreak
Sunbreak Kamura Points Farming Guide
★ All Title Updates now available for ALL PLATFORMS!
┗ Title Update 4 | Title Update 5 | Bonus Update
┗ Check out all our Best Builds For Every Weapon!
┗ TU4 Monsters: Velkhana | Risen C.G. Valstrax
┗ TU5 Monsters: Amatsu | Risen Shagaru Magala
┗ Bonus Update Monster: Primordial Malzeno

This is a guide to farming Kamura Points in Monster Hunter Rise (MH Rise): Sunbreak. Read on to learn how to farm Kamura Points, other methods to farm Kamura Points, and the fastest way to farm Kamura Points.
| How to Farm Money | |
|---|---|
 Farm Kamura Points Farm Kamura Points |
 Farm Zenny Farm Zenny |
List of Contents
Best Kamura Points Farming Route
Frost Islands Farming Route
We devised a route that you can use around the Frost Islands to effectively farm Kamura Points. This method will net you around 30,000pts to 40,000pts per run depending on how fast you move!
Check out the video here:
Make sure that you run this when there is a Upsurge of Local Items in the Frost Islands and you already have a Gathering Set with at least Lv. 2 Geologist to maximize the account items harvested per node!
| Frost Islands Kamura Points Farming Route |
|---|
 |
| Nodes to look out for: Frigid Berries, Money Pouches, and Oyster Beds |
| 1 | From the main camp, turn right and approach the first node. |
|---|---|
| 2 | Head straight to the watery part with lots of rocks, enter the cave there for the second node. |
| 3 | Exit the cave and turn left. Your third node is there. |
| 4 | Head east across the watery area, you will see the fourth node. |
| 5 | Climb the wall next to the fourth node, cross the upper ledge, and go down again - the fifth node should be there. |
| 6 | Go across Area 5 and approach the Great Wirebug. Ride it up then get off to the upper ledge. The sixth node is atop a small pillar. |
| 7 | Go down the pillar and head north for the seventh node. |
| 8 | Head farther north until you see a very narrow bridge on your right. Cross that bridge until you arrive at a small island. The eigth node should be there! |
| 9 | Head back to the bridge and continue going forward. Use Wirebugs across the other ledge and you will see your ninth node. |
| 10 | Drop down to the watery area and you will see a small pillar. Head up there to harvest your tenth node. |
| 11 | Go down the pillar and head south, still in the watery area. Harvest your eleventh node. |
| 12 | Go across the watery area, past the pillar of the tenth node. You will see your twelfth node! |
| 13 | Go continue north and climb the ledge approaching the subcamp. Your thirteenth node is to its right atop a pillar. |
| 14 | Turn right and you will see a ship. Use Wirebugs towards the ship until you reach the roof of the small enclosure. Your fourteenth node is there. |
| 15 | Head down and inside the enclosure. Your fifteenth node is there. |
| 16 | Head west and go down the ship, way down to the watery path. Your sixteenth node should be there waiting for you. |
| 17 | Follow the side of the ledge on your left and you will see the seventeenth node in Area 10. |
| 18 | Continue following the side of the ledge on your left until you reach the eighteenth node. |
| 19 | Climb the ledge to the north and you will see a small mound. Climb that mound to get to the ninteenth node. |
| 20 | Go across the ledges to the south, past the Subcamp - the twentieth node should be in the vicinity. |
| 21 | Use Wirebugs to cross towards the monument in the middle of Area 7. The twenty-first and final node should be near the monument. Fast travel back to Main Camp and do the route again! |
Lava Caverns Farming Route
In addition to the Frost Islands route above, we devised a route that you can use around the Lava Caverns to effectively farm Kamura Points. This method will net you around 30,000pts to 40,000pts per run depending on how fast you move!
Check out the video here:
Make sure that you run this when there is a Upsurge of Local Items in the Lava Caverns and you already have a Gathering Set with at least Lv. 2 Geologist to maximize the account items harvested per node!
| Lava Caverns Kamura Points Farming Route |
|---|
Upper Area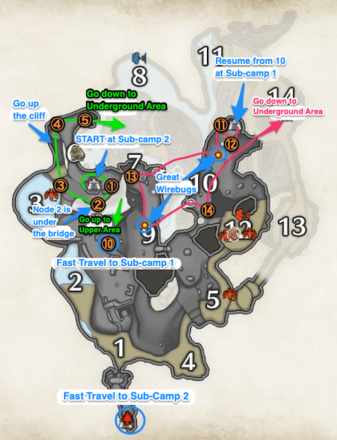 |
Underground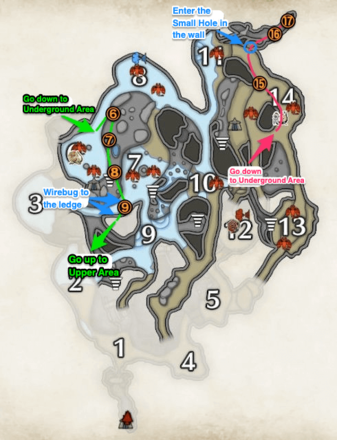 |
| Nodes to look out for: Monster Fossils, Iridescent Ores, and Scorched Ores |
| 1 | From the main camp, fast travel to Sub-camp 2 and go to your first node to the east near a big hole. |
|---|---|
| 2 | Follow the narrow path beside the ravine until you arrive near the broken bridge. Jump down and harvest from the second node. |
| 3 | Go up the inclined ramp approach the Honey node. Head towards Area 3 and drop down to the third node. |
| 4 | Wirebug to across to the platform with three pillars, approach the farthest one and climb the wall behind it. You'll find the fourth node above. |
| 5 | Continue east until you see a big hole to jump down. Before you do, harvest the fifth node just to the left of the hole! |
| 6 | Jump down the big opening then make sure to land on the left cliff. Go north where you'll see a pillar with the sixth node on top! |
| 7 | Continue walking south where you'll pass by the seventh node on the ground. This is pretty easy to see so you can't miss it! |
| 8 | Climb the rock platform with a Honey node on it. The eigth node is beside it. |
| 9 | Move south a bit then look left. You'll see a small ledge sticking out - you'll find the ninth node on it! |
| 10 | Climb to the upper levels using the wall on the south. Past the Sending Sprigs, you'll see a rock formation. Behind it is the tenth node. |
| 11 | Fast travel to Sub-camp 1 then immediately turn left, down the ledge. You'll see the eleventh node. |
| 12 | Go back up the ledge where you'll see the twelfth node just in front of the Sub-camp. |
| 13 | Continue south until you see a Great Wirebug Jewel Lilly and ride that across the magma river. Continue going west until you see the thirteenth node. |
| 14 | Ride your Palamute and run south. You'll see another Great Wirebug Jewel Lilly and ride that across the magma river again. Once across go south towards a big hole - the fourteenth node is just before. |
| 15 | Ride your Palamute again and run towards Sub-camp 1. Turn right towards the hole that drops you Underground to Area 14. Continue going north towards Area 11. You'll see your fifteenth node on the left! |
| 16 | Next, you'll see a hole in the wall on your right. You can't miss this because there is a green spiribird in front of it. Enter that hole, look right, then up. Aim your wirebug PERFECTLY to the hole above, climb up, and enter the hole! Continue following the path until you arrive at the mouth of the volcano. Turn right and climb the ledge where you'll see the sixteenth node. |
| 17 | Drop down the ledge and you'll see the seventeenth and final node just sitting on the ground. Harvest it then fast travel back to Sub-camp 2 to repeat the route! |
How to Farm Kamura Points
Collect Account Items

Account Items are items that are automatically used after a quest and are converted to money and Kamura points. Always pick up account items when you have the chance!
Best Account Items to Farm
These items are obtained from gathering nodes.
| Lava Caverns Scorched Ore |
300 pts | MR | |
| Lava Caverns Iridescent Ore |
250 pts | HR, MR | |
| Lava Caverns Monster Fossil |
222 pts | HR, MR | |
| Frost Islands Money Pouch |
201 pts | HR, MR | |
| Lava Caverns Scorched Ore |
200 pts | HR, MR | |
| Frost Islands Oyster Bed |
173 pts | HR, MR | |
| Frost Islands Frigid Berry |
151 pts | HR, MR |
Regularly Pick Up Optional Subquests
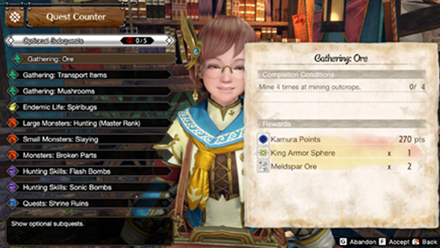
To add on top of any farming methds, opt to pick up Optional Subquests since every one of these quests rewards Kamura Points and valuable items.
You can have up to five (5) optional subquests active at any time. They can be picked up from Hinoa the Quest Maiden in Kamura, and Chichae the Quest Damsel in Elgado Outpost if you have the Sunbreak expansion.
Side Quests and Optional Subquests Guide
How to Increase Kamura Points Farming Efficiency
Farm During Upsurge on Local Items
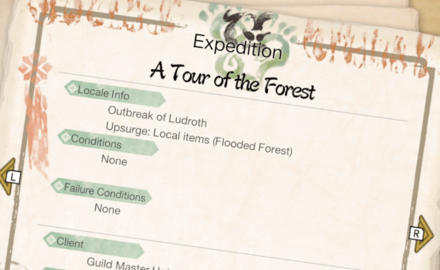
There will be upsurges on expeditions. An upsurge means that all items you obtain from that particular resource will be increased. If you wish to farm for Kamura Points, going to Expeditions with an Upsurge on Local Items is ideal as it greatly increases the number of Account Items you can get - up to three times the usual number!
Upsurges Last For Around 10 Minutes
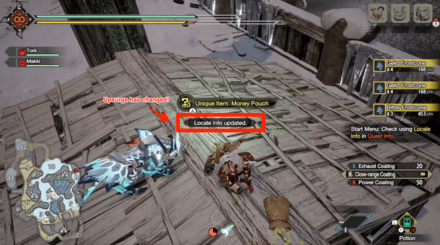
Upsurges usually last for around 10 minutes from quest start. You know an upsurge has ended when you see a ''Locale Info updated.'' message on your screen!
We suggest making this your stopping point whenever you are farming Local Items in a locale. Anything gathered afterwards is just too little, it's not worth it anymore.
Build a Gathering Armor Set

Creating an armor set that's focused on improving your harvest's yields is highly advised if you wish to farm up on Kamura points. Skills like the Geologist and Hunger Resistance are great skills to have when gathering and traversing the map, respectively.
After building the armor set, you can save it into one of your Loadouts and just equip it whenever you feel like farming for Kamura Points!
| Set 1 Low Rank (Guild Cross Set) | ||
|---|---|---|
| Easy to grab Low Rank armor. Consider this if you have not gone for a High Rank armor set yet. | ||
| Armor | Slots | Skills |
|
|
ーーー |
Botanist Lv. 1
Hunger Resistance Lv. 1
|
|
|
ーーー |
Geologist Lv. 1
Marathon Runner Lv. 1
|
|
|
ーーー |
Geologist Lv. 1
Wall Runner Lv. 1
|
|
|
ーーー |
Botanist Lv. 1
Wirebug Whisperer Lv. 1
|
|
|
ーーー |
Carving Pro Lv. 1
Geologist Lv. 1
|
| Skills | |
|---|---|
|
Geologist Lv. 3 | Wirebug Whisperer Lv. 1 Botanist Lv. 2 | Carving Pro Lv. 1 Hunger Resistance Lv. 1 | Marathon Runner Lv. 1 Wall Runner Lv. 1 |
| Set 2 High Rank (Leather Kamura Mix Set) | ||
|---|---|---|
| Easy to access High Rank armor. This is a go-to if you are starting out gathering in High Rank. | ||
| Armor | Slots | Skills |
|
|
①①ー |
Geologist Lv. 1
Hunger Resistance Lv. 1
|
|
|
①ーー | |
|
|
①①ー |
Geologist Lv. 1
Special Ammo Boost Lv. 1
|
|
|
①ーー |
Hunger Resistance Lv. 2
Recovery Up Lv. 1
|
|
|
②ーー |
Geologist Lv. 1
|
| Skills | |
|---|---|
|
Geologist Lv. 3
| Hunger Resistance Lv. 3 Wirebug Whisperer Lv. 2 | Recovery Up Lv. 1 Wall Runner Lv. 1 | Special Ammo Boost Lv. 1 Critical Eye Lv. 1 |
| The main skill Geologist makes sure that you get extra amounts whenever you gather from any node. You can even gem in Botanist when you can.
Hunger Resistance extends the time before your stamina starts to deplete. When going into High Rank, you can switch out Guild Cross pieces with Leather Armor for full hunger resistance so that you can explore to your heart's content. Of course, these are just a baseline builds that uses easily accessible pieces for both Low Rank and High Rank. Once you have unlocked more armor sets from later monsters, you can tweak these builds to include some more quality of life skills like Constitution and Evade Extender! |
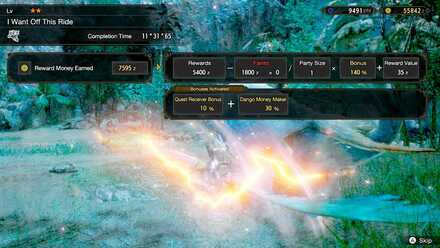
Eat Dangos at the Canteen

Similar to the Dango Money Maker that increases the amount of money you obtain from the end of the quest, we suggest eating dangos that will increase your efficiency in farming Kamura Points.
Both of these randomly appers in the Canteen menu as a Daily Special so always keep a lookout:
| Dango Name | Dango Skill and Effect |
|---|---|
| The Kamura | Dango Calculator Increases the number of Kamura points obtained after the quest. |
| Raisin d'etre | Dango Harvester Reduces the time between gathering point respawns. |
In addition, we suggest using Dango Tickets whenever you eat these dangos to make sure the effect activates!
Dango List: Effects and How to Unlock
Play Solo
Similar to Kamura Points points obtained at the end of a quest are also divided by the number of players. Even if you have 4 people dedicated to delivering account items, 4 deliveries will still equal one delivery by a solo player.
To maximize your efficiency in gathering Kamura Points, it is advised to take the solo route!
What Are Kamura Points?
Earned from Quests and Item Nodes
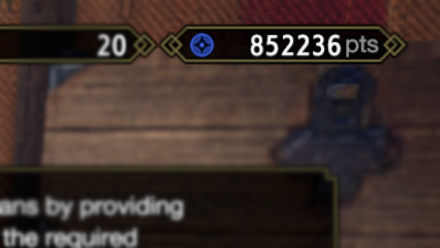
Kamura Points are used as an alternative payment method for services like the canteen or as an exclusive currency for services like training buddies or melding talismans.
They are signified by the blue coin icon usually found at the top right of screen, and will appear at that spot on a menu if there is something that can be bought using Kamura Points.
They are always rewarded when completing quests or gathering from item nodes that net these points in a locale. Buddies can help provide Kamura Points to you as they can regularly check for items to gather during a hunt.
Used for the Melding Pot

One popular use for Kamura Points is for creating talismans at the Melding Pot. You must always have these points on you, since you cannot create talismans with zennies.
Save up Kamura Points for farming talismans. To meld talismans, simply talk to Kagero the Merchant or Maido the Merchant in Kamura, or Oboro the Merchant in Elgado Outpost if you have the Sunbreak DLC.
Talisman Farming and Best Melding Pot Methods
Ordering and Exchanging at the Argosy

Kamura Points can be used in Buddy Bargaining and as an exclusive payment method for Exchanging for Items at the Argosy.
It is also valuable to have if you are looking to grab more for crafting rarer decorations. Save them up for spending on farming the Argosy.
You can reach the Argosy through Rondine the Trader or your Housekeeper.
For Meowcenaries and the Buddy Dojo
Pay for Meowcenaries

These points can be spent on Meowcenaries for gathering valuable items and equipment only craftable from materials obtained from nodes.
Meowcenaries can mainly be accessed through Felyne Chief Kogarashi in Kamura, Nagi the Buddy Agent in Elgado Outpost if you have the Sunbreak expansion, or through your Housekeeper.
Spend on Training Buddies

You will want to spend your points on the Buddy Dojo if you have a lot of vacant buddies you want to train while you are out on a hunt.
To access the Buddy Dojo, reach Buddy Expert Shirubei in Kamura or Nagi the Buddy Agent in the Elgado Outpost. Alternatively, you access it also through the Housekeeper.
Pay for Dango Meals or Motley Mix
If you do not want to use zennies to pay for your dango meals or motley mix, you can alternatively pay with Kamura Points.
However, it is advised to regularly pay with zennies as you go higher up the ranks since these are more easily available than Kamura Points.
The canteen can easily be found in the Gathering Hub in Kamura or in the Tea Shop area in Elgado Outpost. Alternatively, you can also use the Camp Tent (also known as the Mobile Tea Shop) during a quest to pay for meals.
Canteen (Tea Shop) and Food Skills
Monster Hunter Rise Related Guides

All Tips and Tricks
Author

Sunbreak Kamura Points Farming Guide
Please participate in our site
improvement survey
03/2026
improvement survey
03/2026
Would you assist in
improving Game8's site?
improving Game8's site?

×
We are listening to our users' valuable opinions and discussing how to act on them.
The information collected through this survey will be used for the purpose of improving our services. In addition, the information will only be disclosed a part of a statistic in a format that will not allow identification of personal information.
Begin Survey
Not Now
×
Please rate each item regarding Game8.co's Advertisements.
Amount of Ads
Very Dissatisfied
Somewhat Dissatisfied
Fine
Somewhat Satisfied
Highly Satisfied
Placement of Ads
Timing of Ad Display
Ad Loading Speed
Safeness of Ads
Content of Ads
×
Please rate each item regarding Game8.co's Quality of Articles.
Amount of information
Very Dissatisfied
Somewhat Dissatisfied
Fine
Somewhat Satisfied
Highly Satisfied
Frequency of updates
Speed of new information
Accuracy of articles
Understandibility of articles
Readability of sentences
×
Please rate each item regarding Game8.co's Usability of the Site.
Ease of finding information
Very Dissatisfied
Somewhat Dissatisfied
Fine
Somewhat Satisfied
Highly Satisfied
Loading Speed
Use of Color
Font Size
Visibility of Images
Easy to Understand Layout
×
Please rate each item regarding Game8.co's Message Boards, Comments.
Ease of Writing
Very Dissatisfied
Somewhat Dissatisfied
Fine
Somewhat Satisfied
Highly Satisfied
Readability
Ease in Finding Information
Comment Quality
Comment Quantity
Admin Response
×
Please rate each item regarding Game8.co's Site's new design.
Please rate our site's new design
Very Dissatisfied
Somewhat Dissatisfied
Fine
Somewhat Satisfied
Highly Satisfied
Do you think that the website's design change makes the site easier to use?
Has the new design made it easier for you to find information on the site?
Has the new design improved the overall visual appeal of the site?
How would you rate your overall satisfaction with the new design of the site?
×
How likely are you to recommend Game8 to someone you know?
Very Unlikely
0
1
2
3
4
5
6
7
8
9
10
Very Likely
If you have other opinions regarding potential improvement to the website, please share them with us. We would appreciate your honest opinion.
Note: This is a free response section, so you can proceed without entering anything.
Note: Please be sure not to enter any kind of personal information into your response.
Note: Please be sure not to enter any kind of personal information into your response.
×
Thank You
×
Thank you for participating in our survey! Your answers will help us to improve the quality of our website and services.
We hope you continue to make use of Game8.
We hope you continue to make use of Game8.
Close
Rankings
Gaming News


![Monster Hunter Stories 3 Review [First Impressions] | Simply Rejuvenating](https://img.game8.co/4438641/2a31b7702bd70e78ec8efd24661dacda.jpeg/thumb)
Popular Games

Genshin Impact Walkthrough & Guides Wiki
Honkai: Star Rail Walkthrough & Guides Wiki
Umamusume: Pretty Derby Walkthrough & Guides Wiki
Pokemon Pokopia Walkthrough & Guides Wiki
Resident Evil Requiem (RE9) Walkthrough & Guides Wiki
Monster Hunter Wilds Walkthrough & Guides Wiki
Wuthering Waves Walkthrough & Guides Wiki
Arknights: Endfield Walkthrough & Guides Wiki
Pokemon FireRed and LeafGreen (FRLG) Walkthrough & Guides Wiki
Pokemon TCG Pocket (PTCGP) Strategies & Guides Wiki


Recommended Games
Diablo 4: Vessel of Hatred Walkthrough & Guides Wiki
Cyberpunk 2077: Ultimate Edition Walkthrough & Guides Wiki
Fire Emblem Heroes (FEH) Walkthrough & Guides Wiki
Yu-Gi-Oh! Master Duel Walkthrough & Guides Wiki
Super Smash Bros. Ultimate Walkthrough & Guides Wiki
Pokemon Brilliant Diamond and Shining Pearl (BDSP) Walkthrough & Guides Wiki
Elden Ring Shadow of the Erdtree Walkthrough & Guides Wiki
Monster Hunter World Walkthrough & Guides Wiki
The Legend of Zelda: Tears of the Kingdom Walkthrough & Guides Wiki
Persona 3 Reload Walkthrough & Guides Wiki


All rights reserved
©CAPCOM CO., LTD. ALL RIGHTS RESERVED.
The copyrights of videos of games used in our content and other intellectual property rights belong to the provider of the game.
The contents we provide on this site were created personally by members of the Game8 editorial department.
We refuse the right to reuse or repost content taken without our permission such as data or images to other sites.
Farm local items on upsurge