Sunbreak | List of Settings: Best Settings to Choose
★ All Title Updates now available for ALL PLATFORMS!
┗ Title Update 4 | Title Update 5 | Bonus Update
┗ Check out all our Best Builds For Every Weapon!
┗ TU4 Monsters: Velkhana | Risen C.G. Valstrax
┗ TU5 Monsters: Amatsu | Risen Shagaru Magala
┗ Bonus Update Monster: Primordial Malzeno
This is a comprehensive guide on the List of Settings and Best Settings to choose from while playing Monster Hunter Rise (MH Rise): Sunbreak. Read on to learn about the settings for Graphics, Game, Camera, Controls, and more!
List of Contents
List of Settings and Best Settings
These are our picks of the best settings to go with for the perfect Monster Hunter experience. Remember that your mileage may vary!
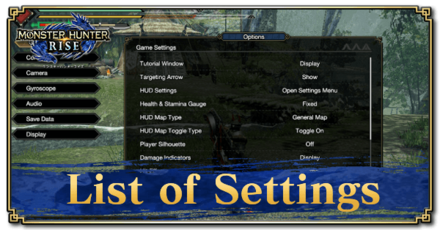
Game Settings

The Game Settings allow you to fix various game options that can cater to your specific playstyle. You can be able to do things such as fixing your HUD, Damage Indicator Display, and more!
| Recommended Settings | |
|---|---|
| Tutorial Window | Do Not Display |
| Targeting Arrow | Optional |
| HUD Settings | Optional |
| Display Switch Skill Info | Dynamic |
| HUD Map Type | Detailed Map |
| Player Silhouette | Type 1 - Type 5 |
| Damage Indicators | Optional |
| Hit Effects | Optional |
| Character Names | Optional |
Tutorial Window: Do Not Display
If you are a veteran hunter, we suggest turning this off. Tutorial prompts appear at the center of the screen and pause your game, which can suddenly halt the flow of the game. However, if you are new to the game, leave it on until you are familiar with what to do!
Targeting Arrow: Optional
Turning this on displays a large red arrow that points to your target monster. In Monster Hunter Rise, the position of the monster is already displayed on the map, so this arrow may be unnecessary to some.
HUD Display: Optional
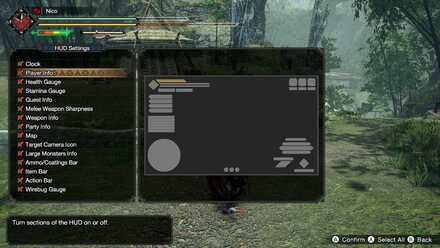
Under HUD settings, you can choose to toggle multiple items on or off. Everything in this section is optiona,l but we suggest keeping most information on your screen. However, if you do not like showing your name on your HUD, you may toggle it off!
Display Switch Skill Info: Dynamic
A new option added in Version 10 of Sunbreak shows the active Switch Skills on the selected scroll. The time it stays up can be shortened, or you can choose to keep it fixed. We recommend the dynamic setting so it doesn't always take up screen space.
HUD Map Type: Detailed Map for Farming Items
We suggest leaving the HUD Map Type to Detailed Map when farming specific items. This will allow you to search for specific items by first setting them on the Detailed Map, then revealing their positions on the mini-map for easy hunting.
| Step | How to Farm Materials with Detailed Map |
|---|---|
| 1 | Options > Game Settings > HUD Map Type: Detailed Map |
| 2 | Open the + Menu and select Detailed Map |
| 3 | Press L and R to sort between categories, or press X to filter to specific Materials |
| 4 | Upon returning to the game, the mini-map will display the Material(s) you have selected |
When setting the HUD Map Type to General Map, even if you select Materials on the Detailed Map screen, they will not be reflected on the mini-map.
HUD Map Type: General Map for Hunts
The General Map setting is effective for viewing the positions of Monsters and is recommended for standard play.
The Detailed Map setting will make it harder to understand the locations of Monsters and the shape of the Map, so this setting is best for normal Quests when not specifically farming Items.
Player Silhouette: Type 1 - Type 5
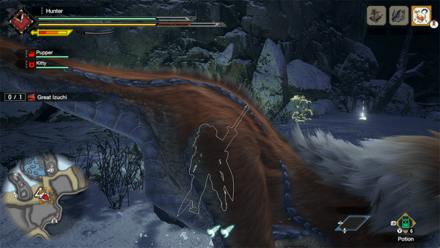
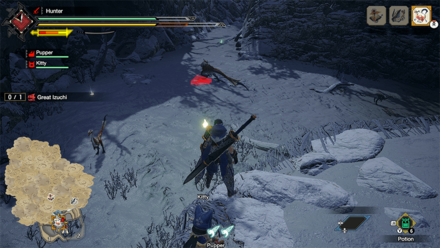
This one is very important, as some monsters are big enough to obscure your position while you're behind them! We suggest turning this on and choosing a desired outline color from the different types for your silhouette.
Damage Indicators: Optional
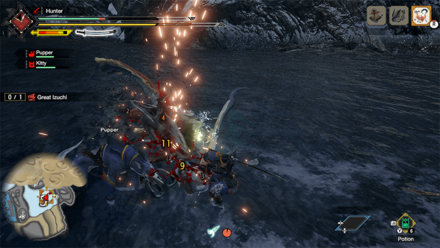
Some hunters will appreciate seeing how much damage they're dealing, while others might find it very distracting. Thankfully, damage numbers can be turned off for those who want a more classic feel to the game.
Hit Effects: Optional
This turns blood effects on or off. Old Monster Hunter games used to have very flashy blood animations every hit, which is preferred by some. If you do not like flashy effects, you may choose Less.
Character Names: Optional
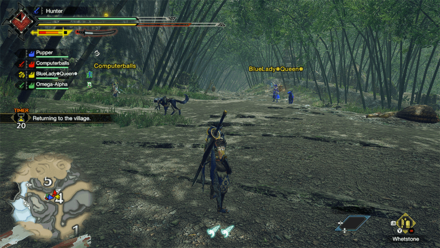
The names of your buddies and fellow hunters will be visible above their character models by default. If you find them distracting, you can hide them with this setting.
Controls Settings

Under the Controls is where you can change the in-game controls.
| Recommended Settings | |
|---|---|
| Directional Control Settings | Varies |
| Buttons for Wyvern Riding | Weapon Sheathed |
| Sheathe Settings | Manual Sheathe |
| Radial Menu Settings | Optional |
| - Controls | Optional |
Directional Control Settings: Varies
| Type 1 | Type 2 |
|---|---|
▲ Dodging direction when tilting down on the left joystick.
Directional Control Settings, also known as Orientation in past games, determine the direction of actions such as dodging when tilting your left stick. By default, this is set to Type 1, where pulling down while dodging will have your character roll toward the camera. Doing the same action in Type 2 will have your character roll to their back instead. This means if your character is facing left, they will roll to the right.
This also affects how the direction of the joystick interacts with certain moves. For example, canceling a SAED to a regular AED requires pulling back on the left stick. If the character is facing left, Type 1 requires tilting the stick to the right, while Type 2 requires tilting the stick down.
Buttons for Wyvern Riding: Weapon Sheathed

Version 10 introduced an option to initiate Wyvern Riding only when sheathed and pressing a button. Use this option to prevent unwanted Wyvern Rides or to let you continue attacking while a monster is mountable.
Sheathe Settings: Manual Sheathe
Anything automatic takes the control out of the player, so it breaks the experience. We suggest using Manual Sheathing because it may cause wrong actions to be executed.
Radial Menu Settings: Optional
This one is optional. 'Type 1' does the action the moment you release the R Analog Stick. 'Type 2' requires you to align the pointer to the item and then press the R Analog Stick to use it.
'Type 1' is generally faster than 'Type 2', but it can cause bad inputs as it instantly uses that item on release. If you are used to using 'Type 1', we suggest keeping using it!
- Controls: Optional
Depending on how often you access the - menu, we suggest tailoring this setting to your playstyle! By default, holding will open the map while a single press opens the chat menu.
Camera Settings

Under Camera, you can change the shake, controls, speed, and reticle controls for Gunners, among other things.
| Recommended Settings | |
|---|---|
| Camera Speed | Fast |
| Camera Style | Optional |
| Camera Distance | 100 |
Camera Speed: Fast
This may be daunting at first, but it can help in the long run. We suggest turning it to Fast when you start playing the game so you'll get used to it by the mid-game!
Gunners can also consider adjusting the Gunner Reticle Speed, which only engages while aiming manually and overrides camera speed.
How to Aim: Manual Aim Vs. Gyroscrope
Camera Style: Optional

This depends on your preference! Focus Camera follows the monsters automatically, while Target Camera relies on your L button input to re-align the camera to the monster!
Camera Distance: 100
If you do not have any specific reason to use a zoomed-in view, we suggest turning the camera distance to 100 (maximum). This gives you a wider area of view which helps in environmental awareness!
Gyroscope Settings
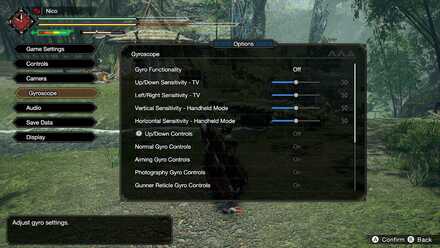
Under Gyroscope or Motion Sensor, you can choose to toggle it on or off, adjust sensitivity, and more.
| Recommended Settings | |
|---|---|
| Gyro Functionality | Off |
Gyro Functionality: Off
This one has no contest. We suggest turning Gyroscope Settings OFF. If you want to try it out, turn it on only while aiming. While motion controls are nice to have for the Switch and PlayStation, they take some time to learn and may end up hurting your performance.
Audio Settings

Under Audio, you can adjust multiple volume bars, multiplayer voice settings, and more. If you cannot stand the Hunter shouting random words while hunting, you may set Player Voice Frequency to OFF.
In Sunbreak, Followers audio can also be adjusted in case you find their dialogue distracting.
| Recommended Settings | |
|---|---|
| Audio Settings | Optional |
Save Data Settings
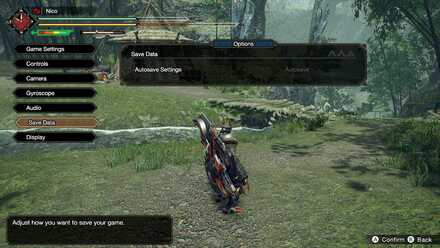
Under Save Data, you can configure your Autosave Settings. We recommend turning it on just to be safe!
| Recommended Settings | |
|---|---|
| Autosave Settings | Autosave |
Display Settings
Nintendo Switch Display Setings

Under Display, you can adjust your TV Mode Screen brightness. Just follow the on-screen instruction for a better experience!
PlayStation and Xbox
The PlayStation and Xbox versions offer options either to Prioritize Graphics or Framerate. Either option is serviceable and is up to preference!
PC Display Settings
| Recommended Settings | |
|---|---|
| Graphics Settings | Average |
| Screen Mode | Full Screen |
| V-Sync | On |
The PC version offers plenty of customization with its graphics options. In general, we recommend playing full screen at your monitor's native resolution for an immersive experience.
The Average preset is enough to provide decent graphical quality for most systems, while Low should only be used if your hardware's performance is lacking. V-Sync can be enabled to prevent screen tearing.
Radial Menu Settings
Where Do You Edit the Radial Menu?

To edit the Radial Menu, access the Start Menu by pressing +, go to Items and Equipment tab, then Radial Menu Settings.
Assign Most Used Actions to ↑
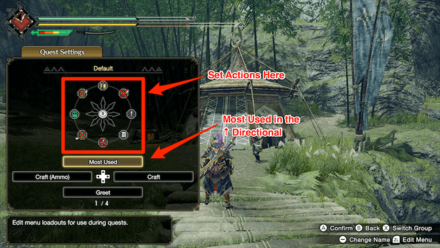
You can set a total of 32 actions with 8 actions per radial menu distributed among 4 directional buttons. We suggest assigning your most used actions in the ↑ because it is the default radial menu used at the start of quests.
| Examples of Most Used Actions |
|---|
Divide Other Direction by Role

We recommend assigning the three remaining directional buttons to different roles. This could be assigned for quick crafting or greeting, depending on your needs.
Controller Settings
Console Settings

Though not an in-game setting in Monster Hunter Rise, it is useful to check your controller settings via your console's menu to adjust properties such as button maps or vibration. For the Nintendo Switch, just go to Home Screen → System Settings → Controllers and Sensors.
If you want to learn more about Switch controllers and which ones to invest in, check out this article below!
Steam Settings
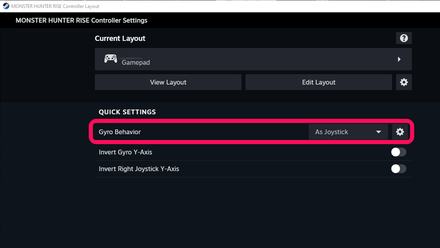
The Steam and Windows versions also support controllers and their customization in addition to keyboard and mouse control options. Steam is unique in that Gyro functions can be added even if the game doesn't officially support it in this version.
Monster Hunter Rise Related Guides
Author

Sunbreak | List of Settings: Best Settings to Choose
Rankings
- We could not find the message board you were looking for.
Gaming News


![Monster Hunter Stories 3 Review [First Impressions] | Simply Rejuvenating](https://img.game8.co/4438641/2a31b7702bd70e78ec8efd24661dacda.jpeg/thumb)
Popular Games

Genshin Impact Walkthrough & Guides Wiki
Honkai: Star Rail Walkthrough & Guides Wiki
Umamusume: Pretty Derby Walkthrough & Guides Wiki
Pokemon Pokopia Walkthrough & Guides Wiki
Resident Evil Requiem (RE9) Walkthrough & Guides Wiki
Monster Hunter Wilds Walkthrough & Guides Wiki
Wuthering Waves Walkthrough & Guides Wiki
Arknights: Endfield Walkthrough & Guides Wiki
Pokemon FireRed and LeafGreen (FRLG) Walkthrough & Guides Wiki
Pokemon TCG Pocket (PTCGP) Strategies & Guides Wiki


Recommended Games
Diablo 4: Vessel of Hatred Walkthrough & Guides Wiki
Cyberpunk 2077: Ultimate Edition Walkthrough & Guides Wiki
Fire Emblem Heroes (FEH) Walkthrough & Guides Wiki
Yu-Gi-Oh! Master Duel Walkthrough & Guides Wiki
Super Smash Bros. Ultimate Walkthrough & Guides Wiki
Pokemon Brilliant Diamond and Shining Pearl (BDSP) Walkthrough & Guides Wiki
Elden Ring Shadow of the Erdtree Walkthrough & Guides Wiki
Monster Hunter World Walkthrough & Guides Wiki
The Legend of Zelda: Tears of the Kingdom Walkthrough & Guides Wiki
Persona 3 Reload Walkthrough & Guides Wiki


All rights reserved
©CAPCOM CO., LTD. ALL RIGHTS RESERVED.
The copyrights of videos of games used in our content and other intellectual property rights belong to the provider of the game.
The contents we provide on this site were created personally by members of the Game8 editorial department.
We refuse the right to reuse or repost content taken without our permission such as data or images to other sites.