This survey will take about 1 minute.
Your answers will help us to improve our website.
Monster Hunter Rise: Sunbreak
Sunbreak Heavy Bowgun Guide: Combos, Controls and Moveset
★ All Title Updates now available for ALL PLATFORMS!
┗ Title Update 4 | Title Update 5 | Bonus Update
┗ Check out all our Best Builds For Every Weapon!
┗ TU4 Monsters: Velkhana | Risen C.G. Valstrax
┗ TU5 Monsters: Amatsu | Risen Shagaru Magala
┗ Bonus Update Monster: Primordial Malzeno

This is a guide to the Heavy Bowgun (HBG), a weapon in Monster Hunter Rise: Sunbreak (MH Rise). Read on to learn about new Heavy Bowgun (HBG) controls and combos, how to use Heavy Bowgun ammo and mods, Heavy Bowgun vs Light Bowgun comparisons as well as details on Heavy Bowgun Switch Skills.
| All Heavy Bowgun Guides | ||
|---|---|---|
 Trees & Full List Trees & Full List |
 How to Use How to Use |
 Best Builds Best Builds |
List of Contents
- Balance Changes
- New Sunbreak Attacks and Moves
- How Good is the Heavy Bowgun?
- Controls
- Silkbind Attacks
- Switch Skills
- Ammo Types and Mods Guide
- Attacks and Moves
- Tips on How to Use the Heavy Bowgun
- Heavy Bowgun vs. Light Bowgun
- Known Bugs and Fixes
- Changes from MHW: Iceborne
- Monster Hunter Rise (MH Rise) Related Guides
Heavy Bowgun Balance Changes
Update 13.0
| Heavy Bowgun Balance Changes and Fixes (Update 13.0) |
|---|
| ・Fixed an issue where the skill Intrepid Heart would unintentionally activate after a counter is successfully triggered when taking a hit during the crouching portions of Counter Charger or Counter Shot. ・Crouching Shot: Adjusted as follows: The recovery speed of the overheat gauge has been increased. ・Overheat duration has been decreased. ・Normal Ammo 1–3, Pierce Ammo 1–3, Flaming Ammo, Water Ammo, Freeze Ammo, Thunder Ammo: The interval between rapidfire shots has been decreased, and the total number of shots has been increased. ・Dragon Ammo, Piercing Dragon Ammo, All Status-Effect Ammo Types 1–3: The interval between rapidfire shots has been decreased. |
The Heavy Bowgun has received a couple of fixes this update. Crouching Shot has been buffed: the recovery speed of the overheat gauge has been increased. Overheat duration, on the other hand, has been decreased.
Rapidfire shot intervals of the following have been decreased, alongside an increase to a number of shots: Normal Ammo, Pierce Ammo, Flaming Ammo, Water Ammo, Freeze Ammo, and Thunder Ammo.
For Dragon Ammo, Piercing Dragon Ammo, and all Status-Effect Ammo Types, the interval between rapidfire shots has been lessened.
Update 10.0
| Heavy Bowgun Balance Changes and Fixes (Update 10.0) |
|---|
| ・ Adjustments were made to the following light bowgun ammo types. ・ Normal Ammo 1: Attack power increased ・ Normal Ammo 2: Attack power slightly increased ・ Pierce Ammo 3: Attack power slightly increased ・ Spread Ammo 1: Attack power slightly increased ・ Shrapnel Ammo 1: Attack power slightly increased ・ Sticky Ammo 2: Attack power slightly decreased; Stun value slightly decreased; Recoil slightly increased ・ Sticky Ammo 3: Attack power slightly decreased; Stun value decreased; Recoil slightly increased ・ Cluster Bomb 3: Attack power slightly decreased ・ Slicing Ammo: Attack power slightly decreased; Recoil slightly increased; Part break endurance multiplier slightly increased ・ Several adjustments have been made to Charged Shots per level (excluding for Wyvern Ammo). ・ Charge Level 1: Attack power increased; Elemental scaling increased ・ Charge Level 2: Attack power increased; Elemental scaling increased ・ Charge Level 3: Attack power increased; Elemental scaling increased ・ The following adjustments have been made to Mech-Wyvernsnipe and Healing Mech-Wyvernsnipe. ・ Impact Explosion (Small): Attack power increased ・ Impact Explosion (Medium): Attack power increased ・ Impact Explosion (Large): Attack power increased ・ Healing Mech-Wyvernsnipe: Wyvernsnipe Gauge recovers more quickly. ・ Counter Charger: Wirebug Gauge recovers more quickly. |
Like for LBG, the nerd on Sticky Ammo would hit HBG's performance as one of the top tier damage dealer in the game.
Though the nerf is pretty obvious, it's more of a balance. Sticky Ammo is known to be really overpowered in the base game and the nerf is much needed.
There are new introductions utility-wise though, so players should now explore these options than relying on Sticky Ammos.
Heavy Bowgun New Sunbreak Attacks and Moves
Official Heavy Bowgun Preview Video
Silkbind Attack: Setting Sun
Using Setting Sun lets your Wirebug create a ring that increases the number of hits for ammo fired through it. This makes it especially useful for multi-hit ammo like Pierce Ammo and Piercing Element Ammo, allowing you to rack up a lot of damage!
Switch Skill: Crouching Shot

Crouching Shot is a new Switch Skill added in Sunbreak. This allows Heavy Bowgun users to crouch and stay in place, allowing rapid, successive shots with lower recoil. This is similar to how Crouching Fire or Siege Mode worked in previous titles.
Firing intervals are shorter as shots are fired while crouching. However, there is a risk of overheating the weapon, and you can't use Crouching Shot again until it cools down.
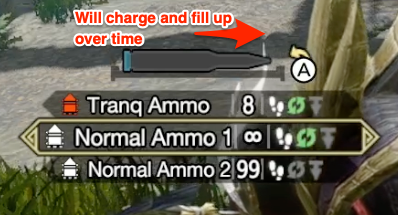
Detailed Mechanics
Two identical gauges show how close you are to overheating. One is around your reticle while the other is below the stamina bar. You'll be able to cancel the attack before overheating and let the gauge cool down.
The ammo used also comes directly from your pouch rather than from what is loaded in your weapon. Your ammo count can be seen below the reticle. This switches with Charged Shot, so the controls are similar.
Silkbind Attack: Rising Moon
This Silkbind attack creates a circular, floating reticle that extends the range of some ammo that passes through, making it possible to shoot from safer places. Since the HBG is known to be really slow to evade, shooting from very far gives players the leeway to react more promptly.
Like Setting Sun, it can also be used by other bowgun users as long as they fire compatible ammo.
Monster Hunter Rise: Sunbreak
Release Date and New Monsters
How Good is the Heavy Bowgun?
Tier List Ranking
| MHRise Ranking | → | Sunbreak Ranking |
|---|---|---|
(S - A - B) 3 Level Tier |
(SS - S - A) 3 Level Tier |
The nerf on Sticky, Cluster, and Slicing ammo affected the Heavy Bowgun greatly. Unlike the Light Bowgun though, no new moves to increase mobility was introduced for the Heavy Bowgun.
Like the LBG though, HBG was shadow buffed with the elemental damage meta we have today. It still suffers from mobility and vulnerability problems though, which is why it's still not in the same level as the LBG.
Heavy Bowgun Strengths
High Damage

Loyal to its name, the Heavy Bowgun boasts high damage output per bullet and can punish, but at the cost of less mobility.
Can Guard
You can add a shield mod for your Heavy Bowgun. This allows your Heavy Bowgun to block incoming attacks and reduce damage taken from them. Partner this with Guard and Guard Up for maximum survivability.
Heavy Bowgun Weaknesses
Low Mobility
Even with the Heavy Bowgun being a powerhouse given the right build, it still suffers from low mobility. As an HBG user, you are usually anchored to one spot and dish out damage. If a monster charges at you, it will take some time for you to sheathe the HBG and dodge - which usually gives the monster a clear shot at you.
To mitigate this use the mobility Silkbind Attack Free Silkbind Glide or counter using Counter Shot / Counter Charger.
Distance Problems
There is a specific set distance for bullets and arrows to hit an enemy monster. You can't be far away and still hit your shots, essentially avoiding a fight and becoming a sniper. That's why for most players it is difficult to figure out the critical distance or the Goldilocks spot, the place just right to hit your shots and keep a safe distance from an enemy monster.
Heavy Bowgun Controls
| Controls | Action | |
|---|---|---|
| PC |
PS |
Crosshairs |
| Switch |
Xbox |
|
| PC |
PS |
Fire |
| Switch |
Xbox |
|
| PC |
PS |
Load Special Ammo |
| Switch |
Xbox |
|
| PC |
PS |
Reload |
| Switch |
Xbox |
|
| PC Hold, |
PS Hold, |
Select Ammo |
| Switch Hold, |
Xbox Hold, |
|
| PC |
PS |
Melee Attack |
| Switch |
Xbox |
|
| PC Hold, |
PS Hold, |
Counter Shot |
| Switch Hold, |
Xbox Hold, |
|
| PC Hold, |
PS Hold, |
Free Silkbind Glide |
| Switch Hold, |
Xbox Hold, |
|
Recommended Control Setups
| Auto Sheath | Manual Sheathe |
|---|---|
| Camera Speed | Fast |
| Gunner Reticle Camera Controls | Type 1 |
| Gunner Reticle Speed | Fast |
To easily learn the bowgun, we highly suggest that the player adjust the camera settings first. We suggest changing the camera speed to fast to make the aiming way easier. If the player is not comfortable with this setup, we suggest switching back to default.
Heavy Bowgun Silkbind Attacks
Official Heavy Bowgun Preview Video
Counter Shot
| Controls | |
|---|---|
| Switch | R + X |
| PC | Shift + MB5 |
| PlayStation | R1 + Triangle |
| Xbox | RB + Y |
With Counter Shot, you plant yourself firmly on the ground with the Wirebug and block incoming attacks. If you block an attack, you can quickly recover and charge up a Counter Shot. While charging, you can change the direction you're aiming at or fire it off early to escape quickly. Note that this Silkbind Attack consumes two Wirebugs but has a fast Wirebug recovery speed.
Free Silkbind Glide
| Controls | |
|---|---|
| Switch | R + A |
| PC | Shift + MB4 |
| PlayStation | R1 + Circle |
| Xbox | RB + B |
The Free Silkbind Glide is similar to a tactical slide. It can close the gap between you and the monster. You can follow it up with a melee attack or a quick sheathe with the Y button or (E for PC, Square for PS, or X for Xbox). You can also change the direction while gliding. This can be swapped with Setting Sun and uses one Wirebug and has fast recovery.
Counter Charger

| Controls | |
|---|---|
| Switch | R + X |
| PC | Shift + MB5 |
| PlayStation | R1 + Triangle |
| Xbox | RB + Y |
This Silkbind Attack can be switched out with Counter Shot and costs one Wirebug to use and has a fast Wirebug recovery speed.
A parry-specific move, Counter Charger can absorb an attack from a monster and nullify its damage. This also has the bonus effect of reducing the amount of time needed to fire a Charged Shot.
Setting Sun
| Controls | |
|---|---|
| Switch | R + A |
| PC | Shift + MB4 |
| PlayStation | R1 + Circle |
| Xbox | RB + B |
Setting Sun uses one Wirebug to create a ring that slightly slows down ammo and increases the number of hits for multi-hit ammo, such as Pierce Ammo, fired through it. The ring can be used by other Bowgun users as long as they use compatible ammo.
The ring stays up for one minute, but you can use Setting Sun again before then to set up another ring. Note that you can only place one ring at a time. This Silkbind Attack can be swapped with Free Silkbind Glide has fast Wirebug recovery.
Rising Moon
| Controls | |
|---|---|
| Switch | R + X |
| PC | Shift + MB5 |
| PlayStation | R1 + Triangle |
| Xbox | RB + Y |
This Silkbind attack creates a circular, floating reticle that extends the range of some ammo that passes through, making it possible to shoot from safer places. Since the HBG is known to be really slow to evade, shooting from very far gives players the leeway to react more promptly.
Like Setting Sun, it can also be used by other Bowgun users as long as they fire compatible ammo.
Heavy Bowgun Switch Skills
Switch Skills are unlocked with different conditions as you progress in the game. Base game MHRise provides Hunters with three (3) slots of Switch Skills, with the Sunbreak expansion adding two (2) more.
Note: Skills in red are exclusive to the Sunbreak expansion.
| Skill Slot | Switch Skill Choices |
|---|---|
| 1 | ・ Melee Attack ・ Tackle |
| 2 | ・ Mech-Wyvernsnipe ・ Healing Wyvernsnipe |
| 3 | ・ Charged Shot ・ Crouching Shot |
| 4 | ・ Counter Shot ・ Counter Charger ・ Rising Moon |
| 5 | ・ Free Silkbind Glide ・ Setting Sun |
Switch Skills Guide: How to Unlock Switch Skills
Tackle

| Switched With | |
|---|---|
| Melee Attack | |
| Description | |
| A shoulder check by the Hunter. Prevents flinching and knockback, but still allow significant damage. Only use this for weak attacks that may knock you back! | |
| Controls | |
| Switch PC PlayStation Xbox |
|
We suggest using this more than Melee Attack. As a Heavy Bowgunner, you don't need the Melee Attack because you are always far from the monster but having a Tackle ready for when a monster suddenly pounces on you is a great thing to have.
Counter Charger
| Switched With | |
|---|---|
| Counter Shot | |
| Description | |
| A parry skill using Wirebugs. Absorbs an attack from a monster without taking any damage. Will shorten the amount of time for a Charged Shot. Wirebug Gauge Recovery Speed: Fast Wirebug Cost: 1 |
|
| Controls | |
| Switch PC PlayStation Xbox |
|
Though this sounds awesome, we still recommend using Counter Shot over Counter Charger. Unless your build revolves around Charged Shots, there is no reason to sacrifice the quick counterattack capability of Counter Shot.
Healing Mech-Wyvernsnipe

| Switched With | |
|---|---|
| Mech-Wyvernsnipe | |
| Description | |
| Fires a specialized shot, different depending on the weapon. Has its own gauge, and replenishes over time. Regular Wyvernheart and Wyvernsnipe deals less damage but can heal the hunter. | |
| Controls | |
| Press (Press A, MB4, Circle, or B again to stop.) Press to fire. Press A, MB4, Circle, or B (Press A, MB4, Circle or B again to stop.) Press zR, Left Click, R2, or RT to fire. |
|
With Switch Skill Swap in Sunbreak, we recommend having this on one scroll for cases whenever you need to recover health and when the monster is down.
Crouching Shot
| Switched With | |
|---|---|
| Charged Shot | |
| Description | |
| Your Hunter crouches down and lets out a barrage of bullets, allowing you to fire in rapid succession. The longer you fire, the shorter the firing interval becomes. This also overheats your HBG so manage it properly, else you won't be able to use this technique for a while. Does not apply to certain ammo types. | |
| Controls | |
| Switch Hold zR
PC Hold Left Click
PlayStation Hold R2
Xbox Hold RT |
|
Replacing your charge attack shots with a machine-gun like attack, this move deals tons of damage especially to a downed monster. We don't suggest using it haphazardly though, as you're stuck in a spot while crouched. Also, keep a look out for that overheat meter!
Rising Moon
| Switched With | |
|---|---|
| Counter Shot | |
| Description | |
| Generates a ring of Ironsilk. When ammo passes through it, it extends the ammo's range extending some ammo's viability from father away. Wirebug Gauge Recovery Speed: Fast Wirebug Cost: 1 |
|
| Controls | |
| Switch PC PlayStation Xbox |
|
This Silkbind attack creates a circular, floating reticle that extends the range of some ammo that passes through, making it possible to shoot from safer places. Since the HBG is known to be really slow to evade, shooting from farther away gives players some leeway to react more promptly.
Like Setting Sun, it can also be used by other bowgun users as long as they have compatible ammo.
Setting Sun
| Switched With | |
|---|---|
| Free Silkbind Glide | |
| Description | |
| Generates a ring of Ironsilk. When ammo passes through it, range is decreased but firing pierce / multi-hit ammos will have increased number of hits upon impact. Wirebug Gauge Recovery Speed: Fast Wirebug Cost: 1 |
|
| Controls | |
| Switch PC PlayStation Xbox |
|
Like Rising Moon, this Silkbind attack creates a circular reticle that you need to let ammo pass through. Pierce and Piercing Element Ammo will deal additional hits on impact, increasing your overall DPS. Do note that this doesn't affect other ammo types like Spread.
Ammo Types and Mods Guide
Ammo Guide
The Heavy Bowgun relies on the proper use of ammo types in certain situations. Knowing how to use them is half the work! Here is a quick guide on how each ammo works:
|
|
Normal Ammo fires a single shot that increases in power with level. Normal Ammo 1 has an infinite number of uses. |
|---|---|
|
|
Pierce Ammo penetrates armor and hits multiple times. |
|
|
Ammo specialized for short range. When fired close to a monster, it deals multiple hits. The number of hits increases with level. |
|
|
Explodes after landing on a monster. The number of hits increases with level. |
|
|
Powerful pierce and burst ammo. Headshots may stun. |
|
|
Detonates 3 bombs on impact. Can also hit your allies. The number of bombs increases with level. |
|
|
Ammo imbued with Fire Element. Good against monsters weak to Fire. |
|
|
Ammo imbued with Water Element. Good against monsters weak to Water. |
|
|
Ammo imbued with Thunder Element. Good against monsters weak to Thunder. |
|
|
Ammo imbued with Ice Element. Good against monsters weak to Ice. |
|
|
Pierce Ammo imbued with Fire Element. Good against monsters weak to Fire. |
|
|
Pierce Ammo imbued with Water Element. Good against monsters weak to Water. |
|
|
Pierce Ammo imbued with Thunder Element. Good against monsters weak to Thunder. |
|
|
Pierce Ammo imbued with Ice Element. Good against monsters weak to Ice. |
|
|
Ammo imbued with Poison. Poisons the monster after a number of hits. |
|
|
Ammo imbued with Paralysis. Paralyzes monsters after a number of hits. |
|
|
Ammo imbued with Sleep. Makes the monsters doze off after a certain number of hits. |
|
|
Decreases the monster's stamina so it tires more easily. Headshots may stun. |
|
|
Reovers health to allies when shot. |
|
|
Provides increased attack on allies when shot. |
|
|
Provides increased defense on allies when shot. |
|
|
Ammo that deals cutting damage. Can cut tails. |
|
|
Ammo imbued with the Dragon Element. Useful against monsters with a weakness to dragon. |
Special Ammo
| Wyvernsnipe Cooldown | Wyvernheart Cooldown |
|---|---|
 |
 |
Using the Heavy Bowgun gives you the option to use ammo unique to the HBG. Both ammo types are different from each other, which takes a bit of practice to use.
These special ammo are also included with the HBG and differ from weapon to weapon. They can be used anytime but has cooldowns between uses.
Wyvernheart (Close to Mid-Range)
| Controls | |
|---|---|
| Switch | While unsheathed, While unsheathed, press A then aim and fire. (zL+ zR) |
| PC | While unsheathed, While unsheathed, press MB4 then aim and fire. (Right Click+ Left Click) |
| PlayStation | While unsheathed, While unsheathed, press Circle then aim and fire. (L2+ R2) |
| Xbox | While unsheathed, While unsheathed, press B then aim and fire. (LT+ RT) |
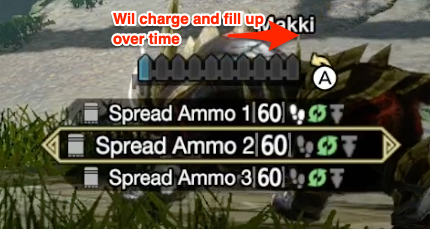
The Wyvernheart is the closest you get to a hand-held minigun in the game. It has a charge meter but you can choose to use it even if it is not fully charged. Make sure to keep your rapid-fire on the target since straying off from the target decreases your damage but staying on point increases it.
Wyvernsnipe (Long Range)

| Controls | |
|---|---|
| Switch | While unsheathed, While unsheathed, press A then aim and fire. (zL+ zR) |
| PC | While unsheathed, While unsheathed, press MB4 then aim and fire. (Right Click+ Left Click) |
| PlayStation | While unsheathed, While unsheathed, press Circle then aim and fire. (L2+ R2) |
| Xbox | While unsheathed, While unsheathed, press B then aim and fire. (LT+ RT) |
True to its name, the Wyvernsnipe grants an HBG user the ability to pop shots that deal high amounts of damage. Once the shot connects, it hits a monster a few times before finally ending in a big explosion. Like Sticky Ammo and Cluster Bombs, the explosions can also stun a monster.
Heavy Bowgun Mods
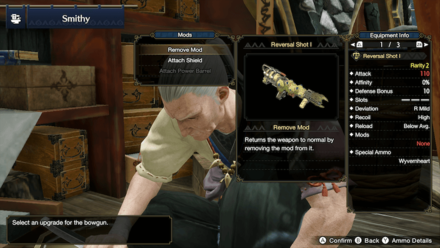
If you talk to Hamon the Blacksmith, he can offer you several ways to Mod your Heavy Bowgun. Just talk to him, choose Customize Bowgun, and choose the Bowgun you want to customize. The options are as follows:
| Shield | Makes it possible to Auto-Guard |
|---|---|
| Power Barrel | Improves Firepower |
Block Using Auto-Guard
When your Heavy Bowgun is equipped with the shield, you can automatically block attacks! If a monster is too quick for you to react, think about equipping a Shield mod for your Heavy Bowgun!
Use Mods Depending on Your Playstyle!
We recommend using mods depending on your playstyle. These can be enhanced further with the Tune-Up skill in Sunbreak. If you prefer to stay beside monsters and use Spread Shots, use the Shield mod for extra safety from the auto-guard.
Heavy Bowgun Attacks and Moves
Charged Shot

| Controls | |
|---|---|
| Switch | Hold Hold zR |
| PC | Hold Hold Left Click |
| PlayStation | Hold Hold R2 |
| Xbox | Hold Hold RT |
You can fire Charged Shots with a Heavy Bowgun by holding down the fire button. While charging, your Heavy Bowgun will glow like the Hammer, Great Sword, and Bow during their charge attacks. Release at the right time for maximum damage!
Load Special Ammo

| Controls | |
|---|---|
| Switch | While unsheathed, While unsheathed, press A. |
| PC | While unsheathed, While unsheathed, press MB4. |
| PlayStation | While unsheathed, While unsheathed, press Circle. |
| Xbox | While unsheathed, While unsheathed, press B. |
The Heavy Bowgun has a different mode that allows it to fire special ammo like Wyvernheart and Wyvernsnipe. It has a long animation, so only switch ammo when there are no enemies nearby or whenever the monster is downed/unable to act. Press the command again to exit this mode.
Tips on How to Use the Heavy Bowgun
|
|
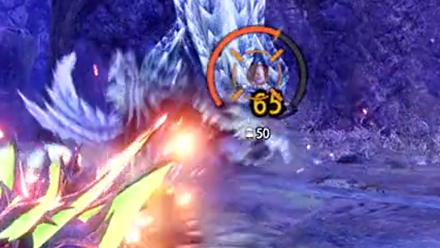
Maintain Critical Distance
| Non-Critical Distance Damage |  |
|---|---|
| Critical Distance Damage |  |
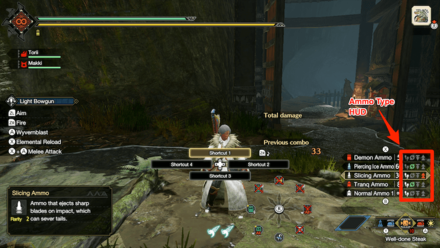
Critical distance or critical range is achieved by positioning a certain distance away from a monster. This is indicated by an orange reticle with an inner circle. Each ammo type has its own critical distance thresholds and shots within critical distance deal maximum damage.
Maintaining critical distance is the key to efficient hunts with a Heavy Bowgun, and maintaining it for as much as possible is paramount. You can check the critical distance ranges of all ammo types in the Training Area!
Use The Right Ammo Type for the Right Monster
| Physical Ammo Types | |
|---|---|
|
|
Ammo types that are effective against monsters with a singular weakpoint to ammo. Aim properly on the head or the weakspot whenever the monster is down for maximum damage. |
|
|
These are effective against Flying Wyverns and Leviathans. The larger or longer the body, the more hits a Pierce Ammo can do! Use these against large monsters like Tetranadon or Basarios. |
|
|
The most difficult one to utilize but also the most devastating, Spread Ammo is used when close to a monster and is effective for all Monster types. Just be sure to avoid getting hit because you are technically in close-range. |
|
|
Arguably the most difficult ammo type to utilize due to its weird spread pattern, Shrapnel Ammo is best used for extremely large monsters such as a bloated Tetranadon or Diablos. It also doesn't require much aiming as shots tend to specific zones such as Zinogre's head. |
|
|
Slicing Ammo is one of the most effective ammo during any hunt due to its ability to focus all of its damage on a single spot. As the name implies, this particular ammo type can sever monster tails as well, allowing you to get that extra carve on certain monsters. |
|
|
Be careful when using Cluster Bombs since you can only carry a few of these into your item pouch. This ammo type is essentially a mortar shell, so timing and positioning are key to using this efficiently. After firing, it leaves you exposed too since the reload time is longer than other ammo types. Cluster Bombs can also knock your allies back. |
Elemental Ammo Types
| Elemental Ammo Types | |||
|---|---|---|---|
|
|
|
|
|
|
|
|
|
|
Elemental ammo can be very powerful against monsters weak to elemental damage. These also have very generous critical distance thresholds, as the elemental damage does not drop with distance. Dragon Ammo is generally not worth using due to its very limited capacity. Check your Hunter's Notes to learn the elemental weaknesses of every monster!
Bring Items for Crafting Ammo and Use the Radial Menu
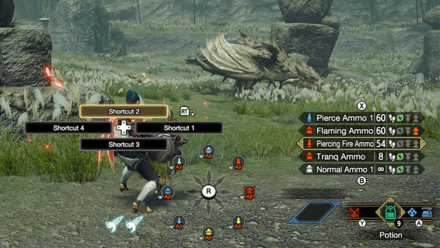
On longer hunts, you might find yourself running out of ammo before finishing a hunt. To avoid having to return to camp and restock, bring crafting materials to make more ammo. Make sure to assign these to your radial menu or shortcuts so you can combine while shooting!
Ammo Crafting List and How to Craft Items
Don't Forget to Use Status Ammo
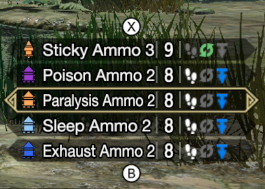
If your Heavy Bowgun can use Status Ammo, do not forget to use them. They may not have high firepower, but they can create openings for you and your allies!
Use Special Ammo (Wyvernheart / Wyvernsnipe) When a Monster is Down
Using Wyvernheart and Wyvernsnipe when a monster is downed is ideal since using special ammo leaves you exposed to attacks. Wyvernheart and Wyvernsnipe become less relevant later on, but they can still find use with large openings.
Know the Ammo Behavior in the Weapon Details
| You can shoot while moving. | |
| You can reload while moving. | |
| If you shoot a single shot, it will reload automatically. | |
| Shots can be fired quickly. |
In Monster Hunter Rise, the shot type behavior of certain ammo changes per weapon. You can check these out in Equipment Info from the Start Menu then press Y to check the Ammo details. This screen also displays the recoil and reload speed of each ammo in the weapon. This will help you better understand how each ammo behaves with your current Bowgun!
Aim for Low Recoil and Fastest Reload

Bowguns are most effective when recoil and reload time are minimized for your primary ammo. Use skills like Recoil Down and Reload Speed to bring these down to Low and Fastest, respectively, for your desired ammo.
Shield and Counter Shot

Evading while using a Heavy Bowgun is a slow feat, so it's best to invest in a Shield mod and some levels in Guard or Guard Up if your goal is survivability. It's better to attempt a block than evade, and with the new counter Silkbind Attack Counter Shot / Counter Charger, you can counterattack instead of getting knocked back.
Take note that you can block shots with Counter Shot / Counter Charger without a shield mod as well.
Heavy Bowgun vs. Light Bowgun
The Heavy Bowgun and the Light Bowgun plays almost alike but with a few minor differences. If you are trying to decide on which one to try out, here are some comparisons that we observed:
| Light Bowgun | Heavy Bowgun | |
|---|---|---|
| Mobility | High | Low |
| Access to All Ammo | No | Yes |
| Wyvernblast | Yes | No |
| Elemental Reload | Yes | No |
| Charged Shots | No | Yes |
| Guarding | No | Yes |
| Wyvernheart / Wyvernsnipe | No | Yes |
Heavy Bowgun Known Bugs and Fixes
Update 3.5 Bug Fix

Update 3.5 fixed a bug related to both the Light Bowgun and the Heavy Bowgun! Specifically, this was about the Steadiness skill. When Bowgun players used this skill, it didn't show up on the screens of the other players in the lobby.
You can also now reliably change ammo through the Radial Menu while riding your Palamute.
Update 3.5: Ghosts 'n Goblins Resurrection Collaboration, DLC, and Patch Notes
Changes from MHW: Iceborne
Elemental and Elemental Pierce Ammo are now Separate
In Monster Hunter World, Elemental Ammo can penetrate monsters and hit them multiple times. In Monster Hunter Rise (MH Rise), Elemental Ammo now hits once, and the ''piercing'' characteristic has been passed to the Piercing Elemental Ammo.
Heavy Bowgun Can Charge Shots
In Monster Hunter Rise (MH Rise), Heavy Bowguns can now charge their shots like Great Swords and Bows by holding down zR.
Monster Hunter Rise (MH Rise) Related Guides

| Weapon Type Guides | ||
|---|---|---|
 Weapons and Weapon Types Weapons and Weapon Types |
 Weapon Type Tier List Weapon Type Tier List |
 Builds for Each Weapon Type Builds for Each Weapon Type |
Melee Weapon Guides
| Melee Weapons | ||
|---|---|---|
Guide | Weapon Tree |
Guide | Weapon Tree |
Guide | Weapon Tree |
Guide | Weapon Tree |
Guide | Weapon Tree |
Guide | Weapon Tree |
Guide | Weapon Tree |
Guide | Weapon Tree | Melodies |
Guide | Weapon Tree |
Guide | Weapon Tree |
Guide | Weapon Tree | Kinsects |
|
Ranged Weapon Guides
| Ranged Weapons | ||
|---|---|---|
Guide | Weapon Tree |
Guide | Weapon Tree |
Guide | Weapon Tree |
Comment
14  Omni almost 3 years
I think some of the info between heavy and light bowgun was mixed up, I checked all the light bowguns and none of them can use wyvern ammo not even the rampage L. Bowgun
Author

Sunbreak Heavy Bowgun Guide: Combos, Controls and Moveset
Please participate in our site
improvement survey
03/2026
improvement survey
03/2026
Would you assist in
improving Game8's site?
improving Game8's site?

×
We are listening to our users' valuable opinions and discussing how to act on them.
The information collected through this survey will be used for the purpose of improving our services. In addition, the information will only be disclosed a part of a statistic in a format that will not allow identification of personal information.
Begin Survey
Not Now
×
Please rate each item regarding Game8.co's Advertisements.
Amount of Ads
Very Dissatisfied
Somewhat Dissatisfied
Fine
Somewhat Satisfied
Highly Satisfied
Placement of Ads
Timing of Ad Display
Ad Loading Speed
Safeness of Ads
Content of Ads
×
Please rate each item regarding Game8.co's Quality of Articles.
Amount of information
Very Dissatisfied
Somewhat Dissatisfied
Fine
Somewhat Satisfied
Highly Satisfied
Frequency of updates
Speed of new information
Accuracy of articles
Understandibility of articles
Readability of sentences
×
Please rate each item regarding Game8.co's Usability of the Site.
Ease of finding information
Very Dissatisfied
Somewhat Dissatisfied
Fine
Somewhat Satisfied
Highly Satisfied
Loading Speed
Use of Color
Font Size
Visibility of Images
Easy to Understand Layout
×
Please rate each item regarding Game8.co's Message Boards, Comments.
Ease of Writing
Very Dissatisfied
Somewhat Dissatisfied
Fine
Somewhat Satisfied
Highly Satisfied
Readability
Ease in Finding Information
Comment Quality
Comment Quantity
Admin Response
×
Please rate each item regarding Game8.co's Site's new design.
Please rate our site's new design
Very Dissatisfied
Somewhat Dissatisfied
Fine
Somewhat Satisfied
Highly Satisfied
Do you think that the website's design change makes the site easier to use?
Has the new design made it easier for you to find information on the site?
Has the new design improved the overall visual appeal of the site?
How would you rate your overall satisfaction with the new design of the site?
×
How likely are you to recommend Game8 to someone you know?
Very Unlikely
0
1
2
3
4
5
6
7
8
9
10
Very Likely
If you have other opinions regarding potential improvement to the website, please share them with us. We would appreciate your honest opinion.
Note: This is a free response section, so you can proceed without entering anything.
Note: Please be sure not to enter any kind of personal information into your response.
Note: Please be sure not to enter any kind of personal information into your response.
×
Thank You
×
Thank you for participating in our survey! Your answers will help us to improve the quality of our website and services.
We hope you continue to make use of Game8.
We hope you continue to make use of Game8.
Close
Rankings
- We could not find the message board you were looking for.
Gaming News


![Monster Hunter Stories 3 Review [First Impressions] | Simply Rejuvenating](https://img.game8.co/4438641/2a31b7702bd70e78ec8efd24661dacda.jpeg/thumb)
Popular Games

Genshin Impact Walkthrough & Guides Wiki
Honkai: Star Rail Walkthrough & Guides Wiki
Umamusume: Pretty Derby Walkthrough & Guides Wiki
Pokemon Pokopia Walkthrough & Guides Wiki
Resident Evil Requiem (RE9) Walkthrough & Guides Wiki
Monster Hunter Wilds Walkthrough & Guides Wiki
Wuthering Waves Walkthrough & Guides Wiki
Arknights: Endfield Walkthrough & Guides Wiki
Pokemon FireRed and LeafGreen (FRLG) Walkthrough & Guides Wiki
Pokemon TCG Pocket (PTCGP) Strategies & Guides Wiki


Recommended Games
Diablo 4: Vessel of Hatred Walkthrough & Guides Wiki
Cyberpunk 2077: Ultimate Edition Walkthrough & Guides Wiki
Fire Emblem Heroes (FEH) Walkthrough & Guides Wiki
Yu-Gi-Oh! Master Duel Walkthrough & Guides Wiki
Super Smash Bros. Ultimate Walkthrough & Guides Wiki
Pokemon Brilliant Diamond and Shining Pearl (BDSP) Walkthrough & Guides Wiki
Elden Ring Shadow of the Erdtree Walkthrough & Guides Wiki
Monster Hunter World Walkthrough & Guides Wiki
The Legend of Zelda: Tears of the Kingdom Walkthrough & Guides Wiki
Persona 3 Reload Walkthrough & Guides Wiki


All rights reserved
©CAPCOM CO., LTD. ALL RIGHTS RESERVED.
The copyrights of videos of games used in our content and other intellectual property rights belong to the provider of the game.
The contents we provide on this site were created personally by members of the Game8 editorial department.
We refuse the right to reuse or repost content taken without our permission such as data or images to other sites.
Hi, Omni! Thank you for catching that. We've updated both guides accordingly.