Sunbreak Light Bowgun Guide: Combos, Controls and Moveset
★ All Title Updates now available for ALL PLATFORMS!
┗ Title Update 4 | Title Update 5 | Bonus Update
┗ Check out all our Best Builds For Every Weapon!
┗ TU4 Monsters: Velkhana | Risen C.G. Valstrax
┗ TU5 Monsters: Amatsu | Risen Shagaru Magala
┗ Bonus Update Monster: Primordial Malzeno
This is a guide to the Light Bowgun (LBG), a weapon in Monster Hunter Rise: Sunbreak (MH Rise). Read on to learn about new Light Bowgun (LBG) controls and combos, how to use Light Bowgun ammo and mods, Light Bowgun vs Heavy Bowgun comparisons, as well as details on Light Bowgun Switch Skills.
| All Light Bowgun Guides | ||
|---|---|---|
 Trees & Full List Trees & Full List |
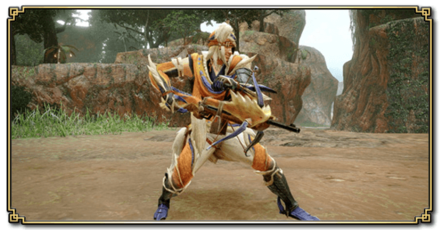 How to Use How to Use |
 Best Builds Best Builds |
List of Contents
- Balance Changes
- New Sunbreak Attacks and Moves
- How Good is the Light Bowgun?
- Controls
- Silkbind Attacks
- Switch Skills
- Ammo Types and Mods
- Attacks and Combos
- Tips on How to Use the Light Bowgun
- Heavy Bowgun vs. Light Bowgun
- Known Bugs and Fixes
- Changes from MHW: Iceborne
- Monster Hunter Rise (MH Rise) Related Guides
Light Bowgun Balance Changes
Update 10.0
| Light Bowgun Balance Changes and Fixes (Update 10.0) |
|---|
| ・ Adjustments were made to the following light bowgun ammo types. ・ Normal Ammo 1: Attack power increased ・ Normal Ammo 2: Attack power slightly increased ・ Pierce Ammo 3: Attack power slightly increased ・ Spread Ammo 1: Attack power slightly increased ・ Shrapnel Ammo 1: Attack power slightly increased ・ Sticky Ammo 2: Attack power slightly decreased; Stun value slightly decreased; Recoil slightly increased ・ Sticky Ammo 3: Attack power slightly decreased; Stun value decreased; Recoil slightly increased ・ Cluster Bomb 3: Attack power slightly decreased ・ Slicing Ammo: Attack power slightly decreased; Recoil slightly increased; Part break endurance multiplier slightly increased ・ Silkbind Glide: Now only costs one Wirebug Gauge, and the Wirebug Gauge recovers more slowly. Due to the gauge cost reduction, however, net total cooldown for this move is now shorter. ・ Fanning Vault: The Wyvernblast used in this skill now causes increased Wyvern Riding buildup. ・ Elemental Reload: Fixed an issue where the increased status effect buildup effect was not mentioned in the description of this move. Nintendo Switch ・ Fixed a bug where you couldn't chain into ZR button combos from an aimed midair Wiredash while sheathed. ・ Fixed a bug where Draw skills would not work correctly when falling off a ledge immediately after unsheathing with the X button while walking in sheathed mode. Steam (PC) ・ Fixed a bug where you couldn't chain into mouse button 5 combos from an aimed midair Wiredash while sheathed. ・ Fixed a bug where Draw skills would not work correctly when falling off a ledge immediately after unsheathing with the left mouse button while walking in sheathed mode. |
Decreasing the wirebug cost of Silkbind Guide significantly increased LBG's comfort and overall playability.
The nerf on Sticky Ammo as well as the increase in recoil on powerful ammos would definitely hit its damage performance compared to base Rise - but in a sense LBG is still pretty great to use.
Light Bowgun New Sunbreak Attacks and Moves
Official Light Bowgun Preview Video
Silkbind Attack: Wyvern Counter

This attack works as a retreating maneuver by firing a shot with massive recoil and using the Wirebug to stop the hunter from flying too far.
While this move doesn't deal a lot of damage, it gives the Light Bowgun more mobility to evade incoming attacks. It can even stop breath attacks if the explosion is timed right!
Switch Skill: Critical Firepower

The Switch Skill narrows down the critical distance range and increases recoil. In exchange, some shots can deal more damage than usual! Note that this only applies to certain ammo types.
It works best with raw ammo and boosts the damage by around 30% for Normal, 20% for Spread, and 10% for Pierce.
Silkbind Attack: Mech Silkbind Shot
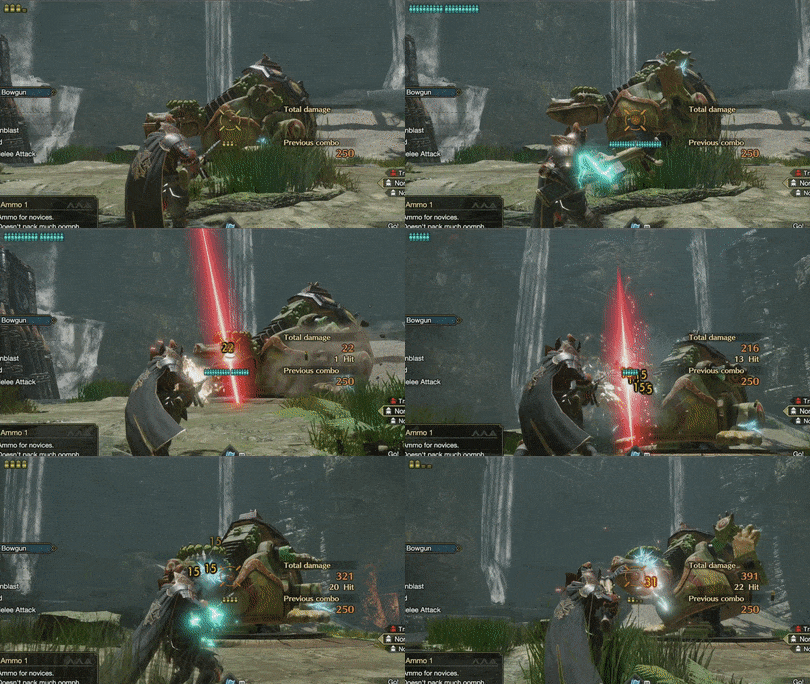
Not introduced in any trailer, Mech Silkbind Shot is an additional Silkbind Attack added to the Sunbreak Expansion. This Silkbind attack unleashes a flurry of shots that has increased partbreak and deals mounting damage. This is the Light Bowgun's version of Heavy Bowgun's crouching shot that enables the Hunter to let out bullets one after the other. Mech Silkbind Shot does not overheat, but it has a limited number of bullets.
Monster Hunter Rise: Sunbreak
Release Date and New Monsters
How Good is the Light Bowgun?
Tier List Ranking
| MHRise Ranking | → | Sunbreak Ranking |
|---|---|---|
(S - A - B) 3 Level Tier |
(SS - S - A) 3 Level Tier |
The nerf on Sticky and Slicing ammo really hurt the Light Bowgun but the mobility options it got in Sunbreak lessened the blow. The new Critical Firepower switch skill are synergized well with the new silkbind attacks as it gives the Hunter options to create a gap whenever necessary.
However, the elemental damage meta we have today is proven effective to maximize the LBG's power, making it a top weapon in Sunbreak!
Light Bowgun Strengths
High Mobility

The Light Bowgun offers higher mobility compared to its heavier counterpart. You can essentially juggle tasks while firing without having to be stationary while doing so.
Rapid Fire
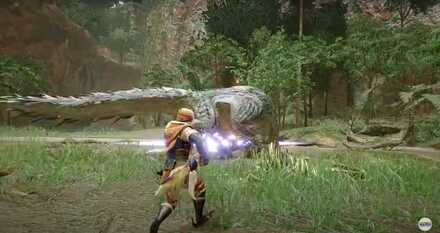
In some builds and instances, such as special upgrades, the Light Bowgun can rapidly fire its bullets at a target. One such build is the Sticky Ammo Rapid Fire build which has proven to be popular among Light Bowgun users.
All-Around Utility

Similar to the Heavy Bowgun, the Light Bowgun has access to a wide range of ammo types which covers everything from damage to utility. LBG can play a support role in multiplayer, shooting different types of munitions like sleep or stun, or act as a DPS by raining powerful ammo through monsters.
Light Bowgun Weaknesses
Cannot Guard
Perhaps to balance its mobility, you cannot guard against monster attacks with a Light Bowgun. You have to make do with being nimble and keeping your distance against monsters.
Light Bowgun Controls
| Controls | Action | |
|---|---|---|
| PC |
PS |
Crosshairs |
| Switch |
Xbox |
|
| PC |
PS |
Fire |
| Switch |
Xbox |
|
| PC |
PS |
Wyvernblast |
| Switch |
Xbox |
|
| PC |
PS |
Reload |
| Switch |
Xbox |
|
| PC Hold, |
PS Hold, |
Select Ammo |
| Switch Hold, |
Xbox Hold, |
|
| PC |
PS |
Melee Attack |
| Switch |
Xbox |
|
| PC Hold, |
PS Hold, |
Silkbind Glide |
| Switch Hold, |
Xbox Hold, |
|
| PC Hold, |
PS Hold, |
Fanning Vault |
| Switch Hold, |
Xbox Hold, |
|
Recommended Control Setups
| Auto Sheath | Manual Sheathe |
|---|---|
| Camera Speed | Fast |
| Gunner Reticle Camera Controls | Type 1 |
| Gunner Reticle Speed | Fast |
To easily learn the bowgun, we highly suggest that the player adjust the camera settings first. We suggest changing the camera speed to fast to make the aiming way easier. If the player is not comfortable with this setup, we suggest switching back to default.
List of Settings: Best Settings to Choose
Light Bowgun Silkbind Attacks
Silkbind Glide
| Controls | |
|---|---|
| Switch | R + X |
| PC | Shift + MB5 |
| PlayStation | R1 + Triangle |
| Xbox | RB + Y |
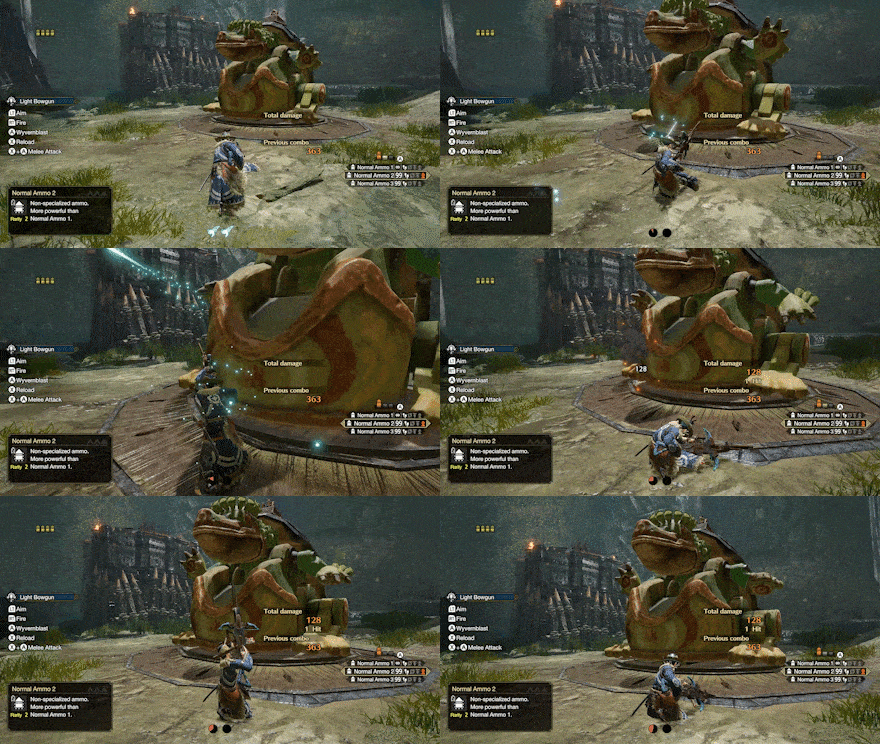
The Silkbind Glide is similar to a combat slide. You can use this to close the distance between you and the enemy monster or to quickly move away. You can also fire off a powerful attack anytime while gliding or at the end of the glide. This attack boosts the damage of detonated Wyvernblasts and stops you mid-glide. It also uses one Wirebug and has medium Wirebug recovery speed.
Fanning Vault
| Controls | |
|---|---|
| Switch | R + A |
| PC | Shift + MB4 |
| PlayStation | R1 + Circle |
| Xbox | RB + B |
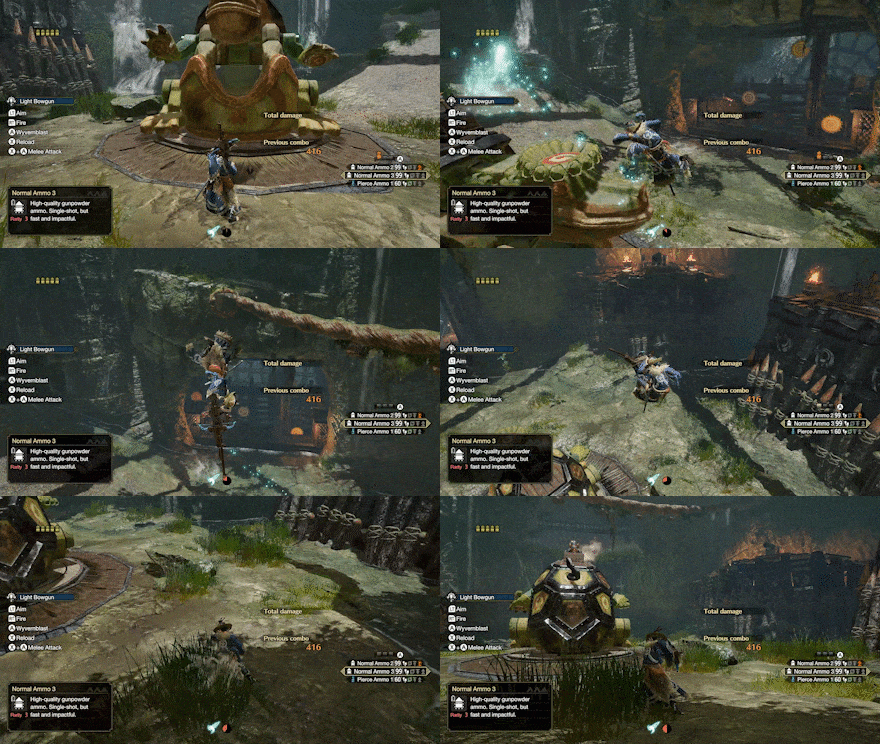
The Fanning Vault is an excellent addition to the Light Bowgun's kit, giving it added mobility. It sends you flying high, allowing you to dodge incoming attacks and perform additional actions such as reloading or firing down a Wyvernblast while midair. This Silkbind Attack also uses one Wirebug and has fast recovery.
Possible Actions During a Fanning Vault
| Switch | Action | |
|---|---|---|
| PC |
PS |
Fire |
| Switch |
Xbox |
|
| PC |
PS |
Wyvernblast |
| Switch |
Xbox |
|
| PC |
PS |
Reload |
| Switch |
Xbox |
|
Fanning Maneuver

| Controls | |
|---|---|
| Switch | R + A |
| PC | Shift + MB4 |
| PlayStation | R1 + Circle |
| Xbox | RB + B |
This technique can be switched out with Fanning Vault or Wyvern Counter. It requires one Wirebug and has fast recovery.
The user slides sideways in an arc with the Wirebug and can fire shots while in motion. This attack is very useful in maintaining critical distance while moving sideways!
On top of that, Fanning Maneuver also temporarily increases attack power by around 10%.
Mech Silkbind Shot

| Controls | |
|---|---|
| Switch | R + X |
| PC | Shift + MB5 |
| PlayStation | R1 + Triangle |
| Xbox | RB + Y |
This Silkbind attack unleashes a flurry of shots that has increased partbreak and deals mounting damage. This is the Light Bowgun's version of Heavy Bowgun's crouching shot that enables the Hunter to let out bullets one after the other. Mech Silkbind Shot does not overheat, but it has a limited number of bullets.
Wyvern Counter

| Controls | |
|---|---|
| Switch | R + A |
| PC | Shift + MB4 |
| PlayStation | R1 + Circle |
| Xbox | RB + B |
With Sunbreak monsters terrorizing Hunters with their insane attack damage, it's great that Light Bowguns will have a new evasive Silkbind in Wyvern Counter. Use this to create distance between you and the monster when you're in a pinch!
Light Bowgun Switch Skills
Switch Skills are unlocked with different conditions as you progress in the game. Base game MHRise provides Hunters with three (3) slots of Switch Skills, with the Sunbreak expansion adding two (2) more.
Note: Skills in red are exclusive to the Sunbreak expansion.
| Skill Slot | Switch Skill Choices |
|---|---|
| 1 | ・ Forward Dodge ・ Quickstep Evade |
| 2 | ・ Reload ・ Elemental Reload |
| 3 | ・ Marksman ・ Critical Firepower |
| 4 | ・ Fanning Vault ・ Fanning Maneuver ・ Wyvern Counter |
| 5 | ・ Silkbind Glide ・ Mech Silkbind Shot |
Switch Skills Guide: How to Unlock Switch Skills
Elemental Reload
| Switched With | |
|---|---|
| Reload | |
| Description | |
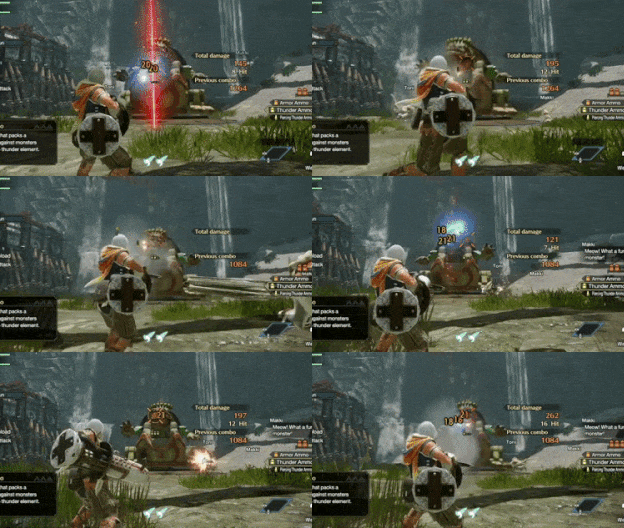
| Reloads take longer than usual but boosts elemental damage of elemental shots. | |
| Controls | |
| While unsheathed: While unsheathed, press X, MB4, Triangle, or Y |
|
Elemental Reload is only worth using if you can bring reload speed to Fastest with skills or using Tune-Up with no mods. Use this only with elemental bowguns, as it doesn't do anything otherwise.
Quickstep Evade

| Switched With | |
|---|---|
| Forward Dodge | |
| Description | |
| Quick evasive maneuver while your Light Bowgun is drawn. Distance covered is much smaller but requires less time to recover. Ammo fired immediately after this deals increased damage. | |
| Controls | |
| While unsheathed: While unsheathed, press: B, Space, X or A |
|
This converts the usual roll dodge into a dash dodge. The distance covered is not that big but the recovery time between dodges are smaller so you can dodge all day. The attack power of the shot used immediately after evading is also boosted!
Fanning Maneuver

| Switched With | |
|---|---|
| Fanning Vault | |
| Description | |
| Uses wirebug as a level to quickly flank left or right. Increases attack power temporarily. Wirebug Gauge Recovery Speed: Fast Wirebug Cost: 1 |
|
| Controls | |
| Switch PC PlayStation Xbox |
|
This is a Silkbind move that strafes you left or right depending on the direction. You can shoot while sliding and maintain distance from the monster. This is a great tool for repositioning yourself when in a pinch or for gaining around 10% additional damage.
Critical Firepower

| Switched With | |
|---|---|
| Marksman | |
| Description | |
| A shooting style that further raises the damage output but narrows down the critical distance and increases recoil. Does not apply to certain ammo types. | |
| Controls | |
| Switch Press zR
PC Press Left Click
PlayStation Press R2
Xbox Press RT |
|
Increases damage in exchange for a narrower critical distance and more recoil, so proper recoil management with Recoil Down or a Silencer will be required. Ballistics may also be necessary to make up the lost critical distance. Critical Firepower boosts Normal shots by 30%, Spread increases by 20%, and Pierce increases by 10%.
Mech Silkbind Shot

| Switched With | |
|---|---|
| Silkbind Glide | |
| Description | |
| Unleashes an onslaught of attacks. Each shot is laced with Ironsilk, giving each the increased power to break parts or make the monster mountable. Only lasts for a certain amount of time. Wirebug Gauge Recovery Speed: Medium Wirebug Cost: 1 |
|
| Controls | |
| Switch PC PlayStation Xbox |
|
This Silkbind attack unleashes a flurry of shots that has increased partbreak and deals mounting damage. This is the Light Bowgun's version of Heavy Bowgun's crouching shot that enables the Hunter to let out bullets one after the other. Mech Silkbind Shot does not overheat, but it has a limited number of bullets.
Wyvern Counter

| Switched With | |
|---|---|
| Fanning Vault | |
| Description | |
| An urgent retreat that fires a shot with massive recoil. Use this mainly for evasion only as the shot does not deal huge damage. Wirebug Gauge Recovery Speed: Fast Wirebug Cost: 1 |
|
| Controls | |
| Switch PC PlayStation Xbox |
|
With Sunbreak monsters terrorizing Hunters with their insane attack damage, it's great that Light Bowguns will have a new evasive silkbind in Wyvern Counter. This can even be used against certain breath attacks. Use this to create distance between you and the monster when you're in a pinch!
Ammo Types and Mods
List of Light Bowgun Ammo Types
Light Bowguns have specific ammo support. Check your Light Bowgun's details to know if a certain ammo type is compatible.
|
|
Normal Ammo fires a single shot that increases in power with level. Normal Ammo 1 has an infinite number of uses. |
|---|---|
|
|
Pierce Ammo penetrates armor and hits multiple times. |
|
|
Ammo specialized for short range. When fired close to a monster, it deals multiple hits. The number of hits increases with level. |
|
|
Explodes after landing on a monster. The number of hits increases with level. |
|
|
Powerful pierce and burst ammo. Headshots may stun. |
|
|
Detonates 3 bombs on impact. Can also hit your allies. The number of bombs increases with level. |
|
|
Ammo imbued with Fire Element. Good against monsters weak to Fire. |
|
|
Ammo imbued with Water Element. Good against monsters weak to Water. |
|
|
Ammo imbued with Thunder Element. Good against monsters weak to Thunder. |
|
|
Ammo imbued with Ice Element. Good against monsters weak to Ice. |
|
|
Pierce Ammo imbued with Fire Element. Good against monsters weak to Fire. |
|
|
Pierce Ammo imbued with Water Element. Good against monsters weak to Water. |
|
|
Pierce Ammo imbued with Thunder Element. Good against monsters weak to Thunder. |
|
|
Pierce Ammo imbued with Ice Element. Good against monsters weak to Ice. |
|
|
Ammo imbued with Poison. Poisons the monster after a number of hits. |
|
|
Ammo imbued with Paralysis. Paralyzes monsters after a number of hits. |
|
|
Ammo imbued with Sleep. Makes the monsters doze off after a certain number of hits. |
|
|
Decreases the monster's stamina so it tires more easily. Headshots may stun. |
|
|
Reovers health to allies when shot. |
|
|
Provides increased attack on allies when shot. |
|
|
Provides increased defense on allies when shot. |
|
|
Ammo that deals cutting damage. Can cut tails. |
|
|
Ammo imbued with the Dragon Element. Useful against monsters with a weakness to dragon. |
Light Bowgun Mods

If you interact with the Smithy in the Steelworks or Hub Prep Area or check out any Item Box, you can apply mods to your Light Bowgun. Just interact with them and choose Customize Bowgun.
| Silencer | • Slightly reduces recoil • Makes monsters less likely to target the user • Shortens the critical distance range. |
|---|---|
| Long Barrel | • Extends the barrel length • Improves firepower • Increases the critical distance range. |
Use Mods Depending on Your Playstyle!
We recommend using mods depending on your playstyle. If you prefer using Sticky Ammo or recoil-heavy Pierce Ammo, use a Silencer mod because of the recoil reduction. For most ammo types, use the Long Barrel to slightly extend your range and boost your damage. The Tune-Up skill also boosts the effects of mods, and can provide an additional level of Reload Speed if not using any mods.
Light Bowgun Attacks and Combos
Rapid Fire
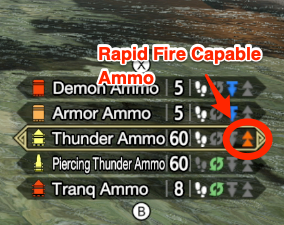
The Light Bowgun is capable of Rapid Firing shots or hitting multiple times per shot. Only ammo with the Rapid Fire Shot Type behavior can be fired rapidly, so take note of this! These vary per weapon so keep an eye out for weapons with the ammo you'd like to Rapid Fire if you enjoy using Rapid Fire LBGs!
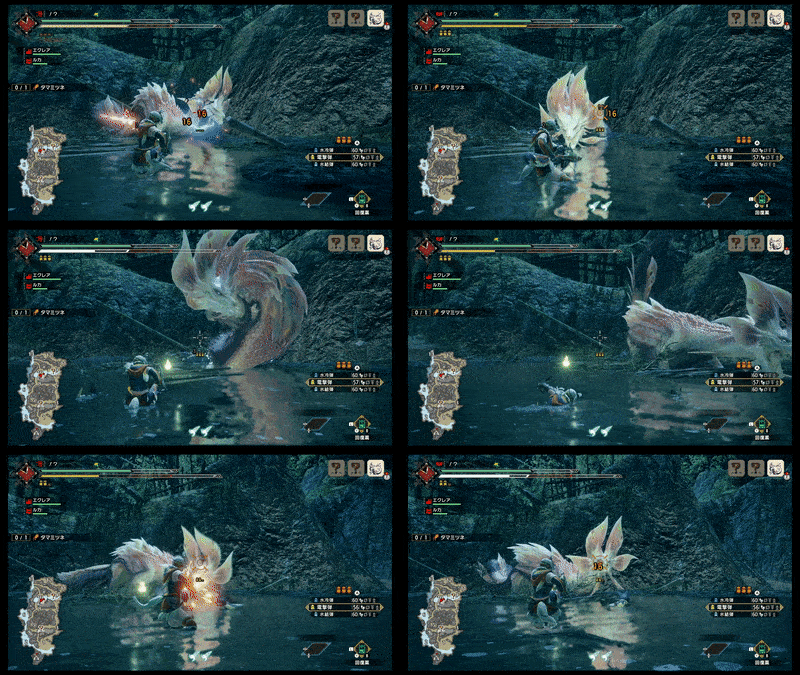
Slide Evade
| Switch Controls | Double tap Double tap B |
|---|---|
| PC Controls | Double tap Double tap Space |
| PlayStation Controls | Double tap Double tap Cross |
| Xbox Controls | Double tap Double tap A |
You can execute a Slide Evade by evading twice in succession. This is useful when you need to quickly distance yourself from the monster!
Detonate Wyvernblasts
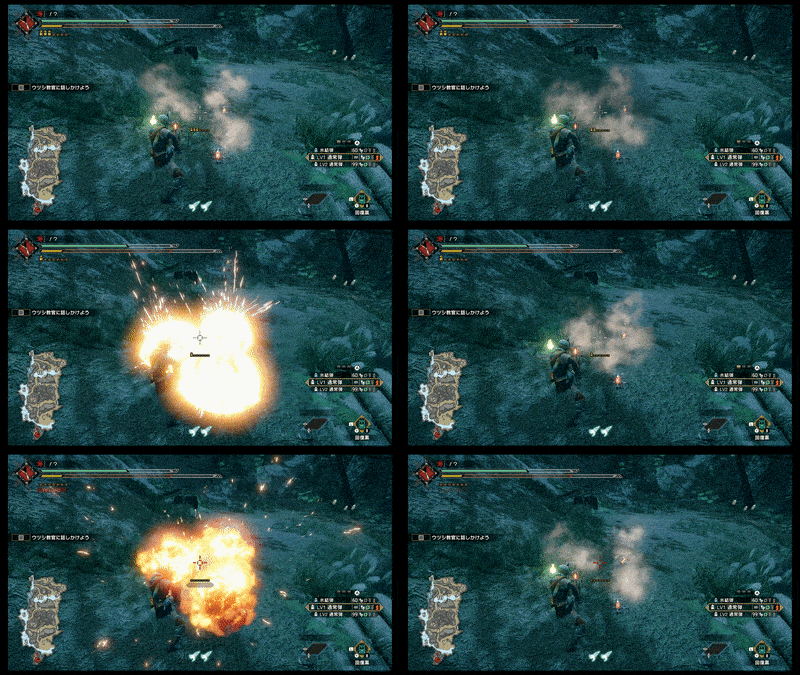
You can detonate Wyvernblasts by attacking or shooting them or by letting monsters hit them (like a trap). You can place up to 3 Wyvernblasts in a row. Each Wyvernblast refreshes in around a minute.
Tips on How to Use the Light Bowgun
|
|
Keep Proper Distance

Like the Heavy Bowgun, maintaining critical distance is important for maximizing your damage output. The critical distance is indicated by an orange reticle with a red center. While maintaining a safe distance is good for survivability, you should only consider using Status, Slicing, and Sticky Ammo at this distance since most shots at this range will deal reduced damage and make your hunts take longer. Avoid going out of range as your shots will not hit the monster.
Types of Distances
| Critical Distance | 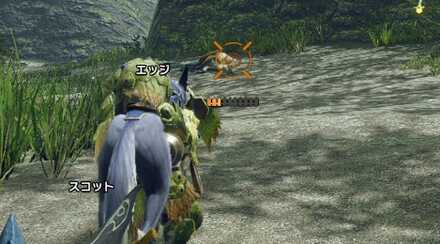 |
|---|---|
| Safe Distance | 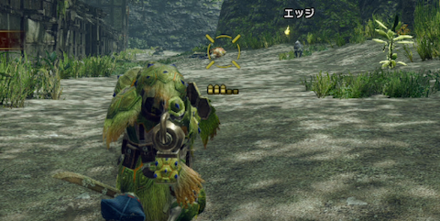 |
| Out of Range | 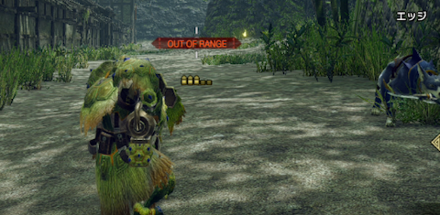 |
Know the Ammo Behavior in the Weapon Details
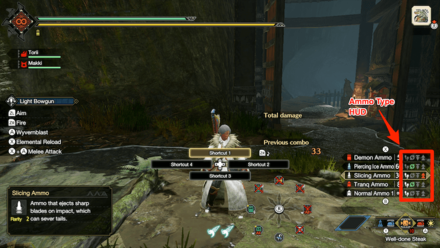
| You can shoot while moving. | |
| You can reload while moving. | |
| If you shoot a single shot, it will reload automatically. | |
| Shots can be fired quickly. |
In Monster Hunter Rise, the shot type behavior of certain ammo changes per weapon. You can check these out in Equipment Info from the Start Menu then press Y to check the Ammo details. This screen also displays the recoil and reload speed of each ammo in the weapon. This will help you better understand how each ammo behaves with your current Bowgun!
Aim for Low Recoil and Fastest Reload
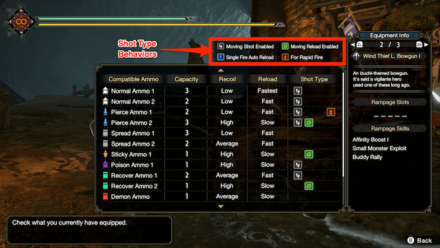
Bowguns are most effective when recoil and reload time are minimized for your primary ammo. Use skills like Recoil Down and Reload Speed to bring these down to Low and Fastest, respectively, for your desired ammo. Watch out for any equipped Switch Skills and Mods like the Silencer as these can also affect recoil and reload!
Bring Items for Crafting Ammo and Use the Radial Menu
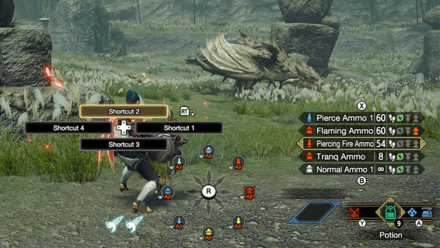
On longer hunts, you might find yourself running out of ammo before finishing a hunt. To avoid having to return to camp and restock, bring crafting materials to make more ammo. Make sure to assign these to your radial menu or shortcuts so you can combine while shooting!
Ammo Crafting List and How to Craft Items
Don't Forget to Use Status Ammo
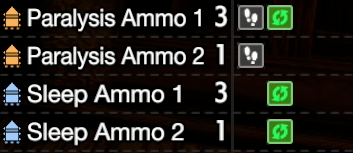
If your Bowgun supports status ammo, don't forget to use them. Though they won't deal massive damage, they can create openings that you and your allies can exploit!
Use the Proper Ammo Against Monsters
Depending on the monster's physiology and body frame, some ammo is more effective than others. Knowing which ammo to use per monster is a sign of a great Gunner.
| Normal Ammo | |
|---|---|
|
|
Ammo types that are effective against monsters with a singular weakpoint to ammo. Aim properly on the head or the weakspot whenever the monster is down for maximum damage. |
| Pierce Ammo | |
|
|
These are effective against Flying Wyverns and Leviathans. The larger or longer the body, the more hits a Pierce Ammo can do! Use these against large monsters like Tetranadon or Basarios. |
| Spread Ammo | |
|
|
The most difficult one to utilize but also the most devastating, Spread Ammo is used when close to a monster and is effective for all Monster types. Just be sure to avoid getting hit because you are technically in close-range. |
Elemental Ammo Types
| Elemental Ammo Types | |||
|---|---|---|---|
|
|
|
|
|
|
|
|
|
|
Elemental ammo can be very powerful against monsters weak to elemental damage. These also have very generous critical distance thresholds, as the elemental damage does not drop with distance. Dragon Ammo is generally not worth using due to its very limited capacity. Check your Hunter's Notes to learn the elemental weaknesses of every monster!
Utilize Repositioning Silkbinds
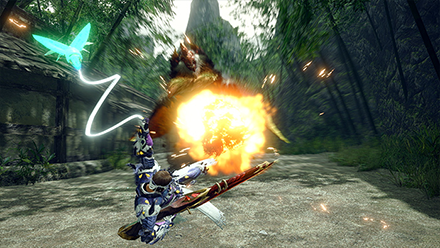
The Light Bowgun comes with several Silkbinds for repositioning, so use these to your advantage. Fanning Vault can help you reposition yourself to a safer location and can even let you place a Wyvernblast on the monster while in the air! Fanning Maneuver not only moves you a great distance, but also boosts damage. Wyvern Counter is also great for getting out of tight spots in Master Rank.
Use Wyvernblast When There is a Huge Opening
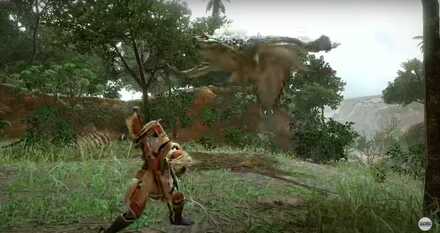
The Light Bowgun is unique for having the Wyverblast. When an enemy monster is staggering on the ground or asleep, place Wyverblasts next to them, then detonate them for extra damage.
Be Mindful of Wyvernblast's Cooldown
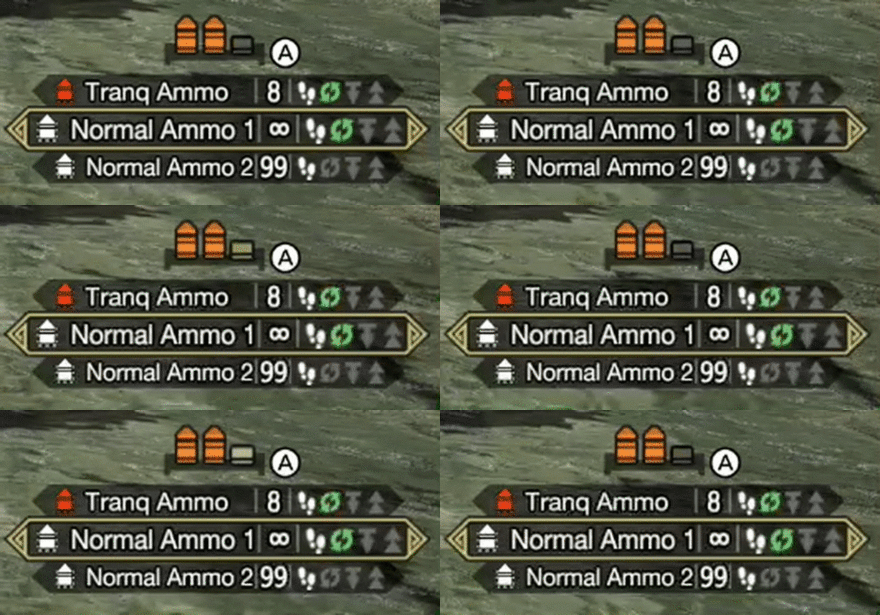
Wyvernblast is one of the most useful tools in a Light Bowgunner's arsenal so try to use this effectively and be aware of its cooldown!
You'll know a Wyvernblast is on cooldown if the ammo head is missing and the case is blinking yellow. Wyvernblast has an estimated cooldown time of 1 minute per ammo.
Heavy Bowgun vs. Light Bowgun
The Heavy Bowgun and the Light Bowgun play similarly but with a few minor differences. If you are trying to decide on which one to try out, here are some comparisons that we observed:
| Light Bowgun | Heavy Bowgun | |
|---|---|---|
| Mobility | High | Low |
| Access to All Ammo | No | Yes |
| Wyvernblast | Yes | No |
| Elemental Reload | Yes | No |
| Charged Shots | No | Yes |
| Guarding | No | Yes |
| Wyvernheart / Wyvernsnipe | No | Yes |
Light Bowgun Known Bugs and Fixes
Update 3.5 Bug Fix

Update 3.5 fixed a bug related to both the Light Bowgun and the Heavy Bowgun! Specifically, this was about the Steadiness skill. When Bowgun players used this skill, it didn't show up on the screens of the other players in the lobby.
You can also now reliably change ammo through the Radial Menu while riding your Palamute.
Update 3.5: Ghosts 'n Goblins Resurrection Collaboration, DLC, and Patch Notes
Changes from MHW: Iceborne
Elemental and Elemental Pierce Ammo are now Separate

In Monster Hunter World, Elemental Ammo can penetrate monsters and hit them multiple times. In Monster Hunter Rise (MH Rise), Elemental Ammo now hits once, and the ''piercing'' characteristic has been passed to the Pierce Elemental Ammo.
Cluster Bomb is Now Useable by Light Bowguns
In Monster Hunter World, Cluster Bombs were exclusive to the Heavy Bowgun. Light Bowguns can now use Cluster Bombs in Monster Hunter Rise (MH Rise), so feel free to use them!
Monster Hunter Rise (MH Rise) Related Guides

| Weapon Type Guides | ||
|---|---|---|
 Weapons and Weapon Types Weapons and Weapon Types |
 Weapon Type Tier List Weapon Type Tier List |
 Builds for Each Weapon Type Builds for Each Weapon Type |
Melee Weapon Guides
| Melee Weapons | ||
|---|---|---|
Guide | Weapon Tree |
Guide | Weapon Tree |
Guide | Weapon Tree |
Guide | Weapon Tree |
Guide | Weapon Tree |
Guide | Weapon Tree |
Guide | Weapon Tree |
Guide | Weapon Tree | Melodies |
Guide | Weapon Tree |
Guide | Weapon Tree |
Guide | Weapon Tree | Kinsects |
|
Ranged Weapon Guides
| Ranged Weapons | ||
|---|---|---|
Guide | Weapon Tree |
Guide | Weapon Tree |
Guide | Weapon Tree |
Comment
Smth to note about the Silkbind Glide shot is that it's Severing a.k.a. can cut tails.
Author
Sunbreak Light Bowgun Guide: Combos, Controls and Moveset
improvement survey
03/2026
improving Game8's site?

Your answers will help us to improve our website.
Note: Please be sure not to enter any kind of personal information into your response.

We hope you continue to make use of Game8.
Rankings
- We could not find the message board you were looking for.
Gaming News
Popular Games

Genshin Impact Walkthrough & Guides Wiki

Honkai: Star Rail Walkthrough & Guides Wiki

Umamusume: Pretty Derby Walkthrough & Guides Wiki

Pokemon Pokopia Walkthrough & Guides Wiki

Resident Evil Requiem (RE9) Walkthrough & Guides Wiki

Monster Hunter Wilds Walkthrough & Guides Wiki

Wuthering Waves Walkthrough & Guides Wiki

Arknights: Endfield Walkthrough & Guides Wiki

Pokemon FireRed and LeafGreen (FRLG) Walkthrough & Guides Wiki

Pokemon TCG Pocket (PTCGP) Strategies & Guides Wiki
Recommended Games

Diablo 4: Vessel of Hatred Walkthrough & Guides Wiki

Cyberpunk 2077: Ultimate Edition Walkthrough & Guides Wiki

Fire Emblem Heroes (FEH) Walkthrough & Guides Wiki

Yu-Gi-Oh! Master Duel Walkthrough & Guides Wiki

Super Smash Bros. Ultimate Walkthrough & Guides Wiki

Pokemon Brilliant Diamond and Shining Pearl (BDSP) Walkthrough & Guides Wiki

Elden Ring Shadow of the Erdtree Walkthrough & Guides Wiki

Monster Hunter World Walkthrough & Guides Wiki

The Legend of Zelda: Tears of the Kingdom Walkthrough & Guides Wiki

Persona 3 Reload Walkthrough & Guides Wiki
All rights reserved
©CAPCOM CO., LTD. ALL RIGHTS RESERVED.
The copyrights of videos of games used in our content and other intellectual property rights belong to the provider of the game.
The contents we provide on this site were created personally by members of the Game8 editorial department.
We refuse the right to reuse or repost content taken without our permission such as data or images to other sites.


![Monster Hunter Stories 3 Review [First Impressions] | Simply Rejuvenating](https://img.game8.co/4438641/2a31b7702bd70e78ec8efd24661dacda.jpeg/thumb)


Omg I had no idea about this! I’ve never seen this posted or even talked about anywhere else either. Much like this site would’ve been if it weren’t for you speaking up. I know MH is the type of game you can play for 100’s of hours and then still learn something new, but I’m kinda shocked this mechanic slipped under the radar. It’s kinda a big deal for LBG peeps. Will help with farming immensely. You’re a saint, Anonymous 🙏 Now I can’t wait to blast Diablos tail right off his ass 😆