Rampage Guide and Tips: How to Get S-Rank
★ All Title Updates now available for ALL PLATFORMS!
┗ Title Update 4 | Title Update 5 | Bonus Update
┗ Check out all our Best Builds For Every Weapon!
┗ TU4 Monsters: Velkhana | Risen C.G. Valstrax
┗ TU5 Monsters: Amatsu | Risen Shagaru Magala
┗ Bonus Update Monster: Primordial Malzeno

This is a guide to Rampage Quests in Monster Hunter Rise (MH Rise). Read on to learn tips on surviving the Rampage, how to get S-Rank, and more!
List of Contents
Rampage Quest Tips
Rampage Walkthrough Guide
|
|
Play Online If You Can
Rampage Quests are like Tower Defense games, so the more people there are, the easier they get. On top of that, during Rampage Quests, 3 player deaths won't fail the quest, so you don't have to worry too much about messing up. For more details on how to play online, check out the following guide:
Prepare Hunting Installations

In order to stop the Rampage, you'll need to take advantage of the various Hunting Installations that can be set up in each area. These can be taken down and put back up freely before and during each wave. Once you're finished preparing, you can skip the timer and let the horde in!
3 Types of Installations
| Installation Type | Effect |
|---|---|
Mountable |
These are Ballistae or Cannons that you can control yourself. |
Auto |
Installations manned by NPCs that will target nearby monsters. |
Limited |
Special NPCs like the twins or Utsushi that will fight for you during a single wave. |
Level Up Your Stronghold

At the beginning of a Rampage quest, you'll be limited to using the weakest Hunting Installations. However, by leveling up your Stronghold, you'll gain access to more and stronger weapons and items. As the difficulty increases, you'll begin to struggle if you don't use stronger weapons so focus on leveling up as much as you can!
How to Level up Your Stronghold
| ① | Defeat monsters |
|---|---|
| ② | Complete sub assignments |
| ③ | Afflict monsters with Statuses/Blights |
Protect the Stronghold From Monsters
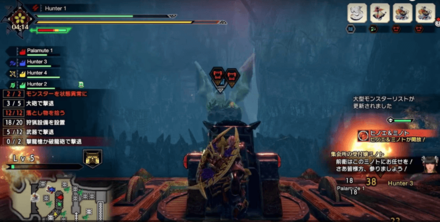
During each wave, monsters with different types of behaviors will approach the Stronghold. Use your Hunting Installations or brawl out with your weapon to send them running back, tails between their legs!
Types of Monsters
| Type | Actions |
|---|---|

|
Stalker Focuses on attacking hunters. Example Monsters: Arzuros | Tigrex | Zinogre |
 |
Targeter Uses ranged attacks to go after hunters. Example Monsters: Pukei-Pukei | Rathalos | Rajang |
 |
Gate Crasher Focus on destroying gates. Example Monsters: Basarios | Anjanath | Rakna-Kadaki |
Each monster type will be marked with the icon above so you know which is which.
Knock Targeters Out of the Sky

Flying Targeters such as Pukei-Pukei can be a major nuisance during the rampage if left unchecked. Shooting them with the Ballista's Retreat Shot will send them crashing down to the ground and incapacitate them for a few precious seconds.
Alternatively, you can also use a Flash Bomb if you are not manning an installation.
Control Gate Crashers

Gate Crashers must always be eliminated as soon as possible to ensure that your barricades and gates remain healthy! Fortunately, all of the manned installations have efficient ways to restrain and control them.
| How to Control Gate Crashers via Installations | |
|---|---|
 Ballista |
Use Crag Shot on a Gate Crasher's head twice to knock it down. You can also use Retreat Shot on most Gate Crashers to interrupt their attack. |
 Cannon |
Charge your Thunder Shot to at least level two for a good chance to apply Thunderblight. Once Thunderblight is applied, bombard the Gate Crasher's head with regular shots to knock it down. |
 Machine Cannon |
Use Silkbind Shot at a Gate Crasher to drag and restrain it in front of you for a few seconds. You can pelt it with Cluster Shots as soon as it is within close range. |
Take Advantage of the Guard Mechanic
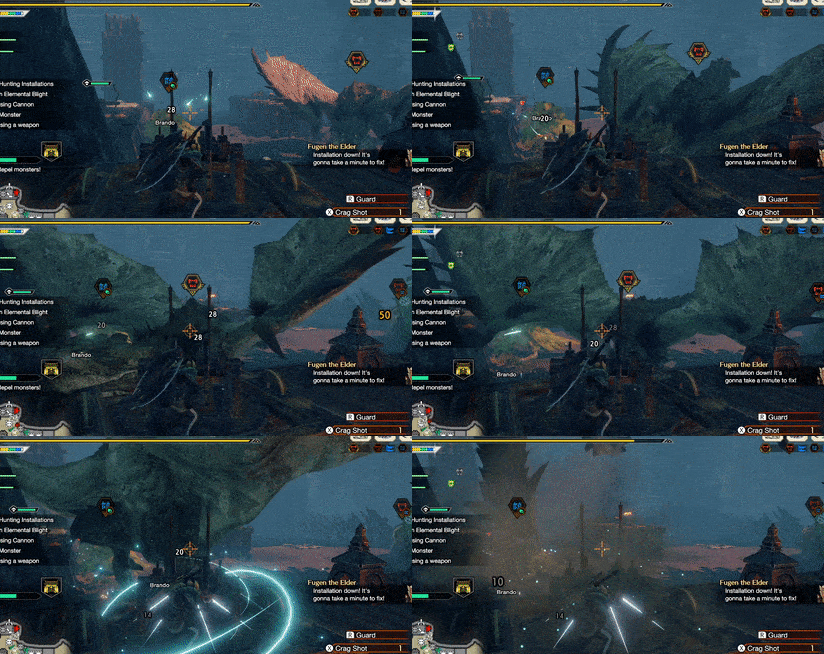
Be mindful of the Guard mechanic whenever you are manning an installation! Guard not only reduces the damage taken by you and the installation itself, but it also prevents you from getting knocked off.
You also do not have to worry about timing your guard because the stance is maintained as long as you hold your Guard button .
Use the Power Kiln to Refresh Installations

Make the most out of the rest period in between Rampage Waves by using the Power Kiln. This repairs installations and, with every third heave of coal, reduces the cooldown of the Dragonator and Splitting Wyvernshot.
This ensures that all of your installations are primed and ready for the next wave!
Position Wyvernfire Artillery Beside Gates
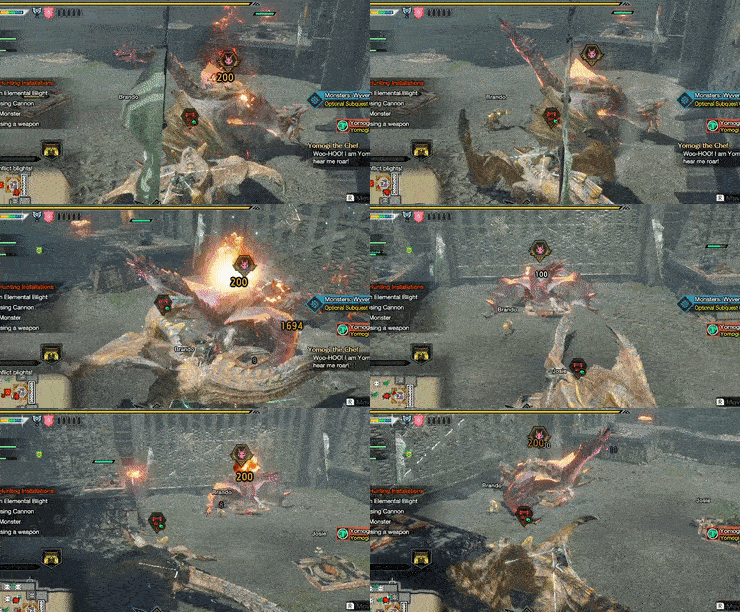
Wyvernfire Artillery may seem like a clunky installation at first glance but the key here is to determine the best position for it. We find that these installations perform best when positioned just beside the gate because this ensures constant damage to any monster that approaches it!
It can also be instrumental against all major rampage targets such as the Apex Monsters and Ibushi from this position due to their tendency to charge their large attacks near the gate itself.
Position Dragonbait In Front of Dragonators

Dragonbait attracts Stalkers with its loud horn, making it the perfect installation to place in front of Dragonators. Keep in mind that you only have a limited number of Dragonbait per Rampage Quest so make the most out of them!
Bring Your Own Traps and Bombs

If you're looking to fortify your position further, consider using your own Shock and Pitfall Traps at key positions and choke points. Large and Mega Barrel Bombs can also be stacked on top of Bamboo Bombs to further increase their potency!
You Can Restock at the Campsite
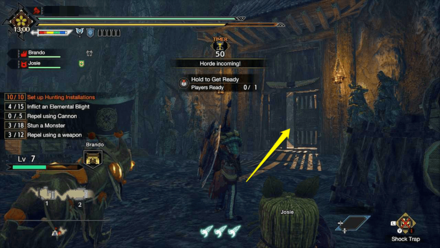
You can replenish your stock in between Rampage Waves by entering the indicated room within the campsite.
List of All Items and Materials
Make Use of Limited Warriors of Kamura

Warriors of Kamura are strong enough to turn the tide of battle just by summoning them. However, some of the warriors can only be summoned during the wave they first appeared in, so be sure to use them immediately or risk wasting them.
Warriors of Kamura
 Hinoe and Minoto Hinoe and Minoto |
 Yomogi Yomogi |
 Iori Iori |
 Utsushi Utsushi |
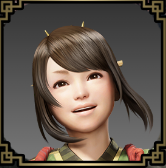
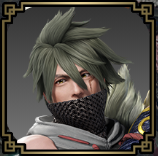
There are 4 limited Warriors of Kamura (not including Fugen) that can be deployed during Rampage Quests. They are quite powerful so be sure to use them if you're in trouble. Also, if you happen to have a sub-assignment that requires you to inflict Elemental Blights on monsters, Iori's attacks are elemental and will fulfill this requirement.
Ring the Counter Gong in a Pinch

When ringing the Counter Gong, you'll gain the effects of the Counter Signal which will increase your attack power, as well as the monsters' attack power while riding them. If you find yourself cornered by a group of monsters, consider ringing the Counter Gong and going to town on them!
Wyvern Riding is Possible

Even during Rampage Quests, Wyvern Riding is possible! While riding a monster, you'll be able to inflict statuses or blights depending on the monster, so monsters like Rathian, Rathalos, or Pukei-Pukei are recommended.
Riding Under the Counter Signal Effects is Stronger
As mentioned before, Wyvern Riding is far more powerful. In some situations you may be better off fighting on your own, but being able to deal damage without the danger of taking damage is always a plus!
Use the Dragonator or Splitting Wyvernshot in Dire Situations
| Dragonator | Splitting Wyvernshot |
|---|---|
 |
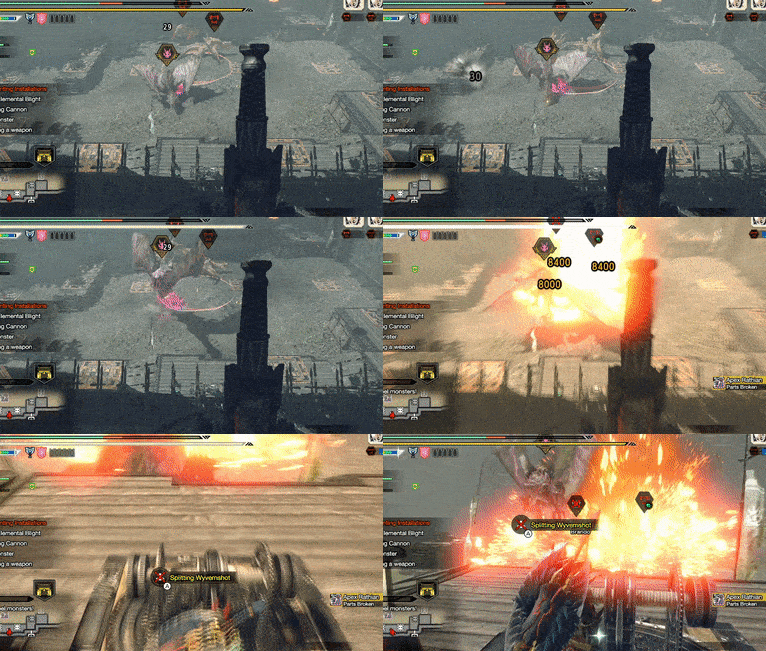 |
When the Main Threat appears, be it a regular or Apex monster, make use of the Dragonators or Splitting Wyvernshot. One shot from these powerful weapons can deal upwards of 8000 damage, making the hunt much easier! While they have a lengthy reload time, you can use a Power Kiln to speed up the cooldown if you fired one off in an earlier wave.
Don't Forget to Carve the Major Threat Monster

Monsters that appear during waves will run away before they fall so they can't be carved, but the Major Threat monsters that appear at the end of the final wave can be both hunted and carved. Some of the monsters that appear are stronger types that can be dealt with more easily in Rampage Quests, so be sure to strip them of all they have before leaving.
Solo Rampage Quest Tips
You Can Safely Ignore Sub-assignments
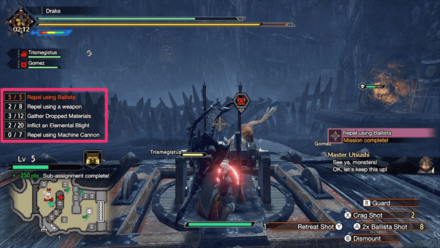
While playing solo, you'll run into sub-assignments that will be difficult to clear on your own. While your Clear Rank will go down, if you try to go out of your way to clear every sub-assignment, you risk the final gate being destroyed and failing the quest. Instead, try to clear sub-assignments you can do on your own.
How to Clear the Inflict an Elemental Blight Sub-assignment
To satisfy the requirements for this sub-assignment, you can use the Cannon's Charged Thunder Shot, Wyvern Riding, or the various bombs that drop to inflict elemental blight. However there are times when you will need to inflict elemental blight up to 20 times, so if you play alone try for a different sub-assignment.
How to inflict elemental blight
| Cannon | Using a Cannon's Charged Thunder Shot will allow you to, as the name suggests, inflict thunder blight on enemies it strikes. You can increase the range and power by holding down the charge button to hit as many monsters as possible. |
|---|---|
| Wyvern Riding | Riding monsters like Rathians, Rathalos, or Tobi-Kadachi will allow you to inflict blights on enemies you attack. |
| Elemental Bombs | During Rampage Quests, monsters will more often drop Horde Materials that can be in the form of Bombs with various elements attached. Using these bombs will deal damage and inflict elemental blights to add to your numbers. |
Abnormal Status and Elemental Blight Guide
How to Clear the Inflict a Status Ailment Sub-assignment
For this sub-assignment, you'll want to use weapons or ride monsters that can inflict status ailments. These include ailments such as poison, paralysis, and sleep. Keep in mind that stunning enemies does not count towards this sub-assignment, so using the Ballista's Crag Shot won't help you here.
How to inflict status ailments
| Status Inflicting Weapons | Weapons or vials with poison, paralysis, sleep, or blast elemental attack. Bowguns with their various bullets are great for this. |
|---|---|
| Wyvern Riding | Ride monsters that can inflict poison like Rathians, Rathalos, or Pukei-Pukei. |
How to Clear the Village Defender Repels a Monster Sub-assignment
To clear this sub-assignment, you'll want to put all of your Village Defenders as close to the gates as possible. This will allow them to target the nearby monsters after you've weakened them to finish them off.
Rampage Quest Rewards
Change Based on Clear Rank

▲You can view this information from Rampage Quest Info in the Start Menu
During Rampage Quests you will be assigned a rank based on your performance that affects your rewards. Clearing sub-assignments will fill up the bar and raise your overall rank for the quest so you should try and finish as many of these as possible.
No item differences based on Rank
While your rank does matter, the items you receive won't change depending on rank. What changes is the amount of each item you get so don't worry if you can't quite get the highest rank.
Obtain Defender Tickets
The main reward you will receive from clearing Rampage Quests is Defender Tickets. Defender Tickets of different types are used to make Rampage Weapons and obtain Rampage Skills so you'll want to do these quests.
Can be used with the Melding Pot
Defender Tickets are also a great source of materials for the Melding Pot. Especially Defender Ticket 7, obtained from ★7 Rampage Quests, which is worth a lot of points! If you want to get a lot of talismans quickly then you should farm these quests.
Talisman Farming: How to Meld the Best Talismans
Make Rampage Weapons with Apex Materials
Aside from randomly appearing from Anomaly Investigations, Apex monsters will mainly appear in Rampage Quests, with their materials being necessary for creating and upgrading special Rampage weapons. These weapons can have up to 3 Rampage Skills and are quite strong so don't pass these up!
Obtain a Large Amount of Monster Materials
You will also receive materials of the various monsters that appear during each wave of the quest. While it will be difficult to get specific materials, you will obtain many excess materials that can be used elsewhere. If you really want a certain material you'll be better off doing a specific quest for the monster.
Hunting Installation Guides
Mountable Hunting Installations
Ballista
| Ballista Shot | Deals damage. Number of ammo fired increases when leveled up. |
|---|---|
| Crag Shot | Deals impact damage. Hit enemy monsters in the head to stun them! |
| Retreat Shot | Knocks back a target. Also sends flying enemies straight to the ground. |
Cannon
| Cannon Ammo | Deals damage. Number of cannons fired increases when leveled up. |
|---|---|
| Piercing Ammo | Fires a cannon ball in a straight line. Pierces targets and is highly effective against large sized monsters. |
| Thunder Shot | Launches a lightning elemental cannon ball. Can be charged up for more damage. Has a higher chance of inflicting thunder blight if charged up. |
Machine Cannon
| Normal Shot | Deals damage. Slowly speeds up while firing. |
|---|---|
| Cluster Shot | Fires several bullets at close range. Effective against enemies near you or against enemies pulled by the s |
| Silkbind Shot | Pulls a target towards you. Useful for maximizing the Spread Shot's effect as well as preventing Gate Crashers from attacking your base . |
Automatic Hunting Installations
 Defender Ballista |
Fires normal arrows periodically |
|---|---|
 Defender Cannons |
Fires cannon balls which deals area damage periodically |
 Bamboo Bomb |
Explodes when a monster passes over it, dealing damage once. |
 Wyvernfire Artillery |
Flaming Beam fires a pillar of flame that deals a high amount of damage. Flaming Shot fires a ball of flame that deals a decent amount of damage. |
Limited Hunting Installations (Warriors of Kamura)
Elder Fugen
Charges up a strong slash and strikes nearby enemies for massive damage. Can be used until the end of the rampage so we recommend using it against the Rampage's Major Threat to greatly deal damage to it for free!
Buddy Handler Iori
Causes an explosion that causes blights to enemies. Useful for the blight requirement sub-quest if both appear in a rampage. Only usable on the wave he appears at.
Hinoa and Minoto
Attacks enemies using a Lance and a Bow. They can deal decent AOE damage but they are only usable on the wave they appear at.
Master Utsushi
Damages all monsters nearby and makes them rideable. Mostly appears on the Apex wave. It's suggested to use Master Utsushi when the Apex monster appears and it summons a horde so you can ride a monster and deal damage to the Apex monster without being at risk yourself!
Chef Yomogi
Uses a Machine Cannon and repeatedly attacks enemies. While summoned, she also improves the hunter's hunting capabilities. Increased hunting capabilities have the same effect as a counter gong.
Monster Hunter Rise Related Links

All Tips and Tricks
Author
Rampage Guide and Tips: How to Get S-Rank
improvement survey
03/2026
improving Game8's site?

Your answers will help us to improve our website.
Note: Please be sure not to enter any kind of personal information into your response.

We hope you continue to make use of Game8.
Rankings
- We could not find the message board you were looking for.
Gaming News
Popular Games

Genshin Impact Walkthrough & Guides Wiki

Honkai: Star Rail Walkthrough & Guides Wiki

Umamusume: Pretty Derby Walkthrough & Guides Wiki

Pokemon Pokopia Walkthrough & Guides Wiki

Resident Evil Requiem (RE9) Walkthrough & Guides Wiki

Monster Hunter Wilds Walkthrough & Guides Wiki

Wuthering Waves Walkthrough & Guides Wiki

Arknights: Endfield Walkthrough & Guides Wiki

Pokemon FireRed and LeafGreen (FRLG) Walkthrough & Guides Wiki

Pokemon TCG Pocket (PTCGP) Strategies & Guides Wiki
Recommended Games

Diablo 4: Vessel of Hatred Walkthrough & Guides Wiki

Cyberpunk 2077: Ultimate Edition Walkthrough & Guides Wiki

Fire Emblem Heroes (FEH) Walkthrough & Guides Wiki

Yu-Gi-Oh! Master Duel Walkthrough & Guides Wiki

Super Smash Bros. Ultimate Walkthrough & Guides Wiki

Pokemon Brilliant Diamond and Shining Pearl (BDSP) Walkthrough & Guides Wiki

Elden Ring Shadow of the Erdtree Walkthrough & Guides Wiki

Monster Hunter World Walkthrough & Guides Wiki

The Legend of Zelda: Tears of the Kingdom Walkthrough & Guides Wiki

Persona 3 Reload Walkthrough & Guides Wiki
All rights reserved
©CAPCOM CO., LTD. ALL RIGHTS RESERVED.
The copyrights of videos of games used in our content and other intellectual property rights belong to the provider of the game.
The contents we provide on this site were created personally by members of the Game8 editorial department.
We refuse the right to reuse or repost content taken without our permission such as data or images to other sites.


![Monster Hunter Stories 3 Review [First Impressions] | Simply Rejuvenating](https://img.game8.co/4438641/2a31b7702bd70e78ec8efd24661dacda.jpeg/thumb)


