List of Base Game Switch Skills
★ All Title Updates now available for ALL PLATFORMS!
┗ Title Update 4 | Title Update 5 | Bonus Update
┗ Check out all our Best Builds For Every Weapon!
┗ TU4 Monsters: Velkhana | Risen C.G. Valstrax
┗ TU5 Monsters: Amatsu | Risen Shagaru Magala
┗ Bonus Update Monster: Primordial Malzeno
This is a guide that lists down all of the Base Game's Switch Skills in Monster Hunter Rise. Learn more about how each Switch Skill work, their button inputs, as well as a quick preview of the moves.
| Switch Skill Related Guides | |
|---|---|
 How to Unlock All Switch Skills How to Unlock All Switch Skills |
|
 Base Game MHRise Switch Skills Base Game MHRise Switch Skills |
 Sunbreak Expansion Switch Skills Sunbreak Expansion Switch Skills |
List of Contents
New Sunbreak Switch Skills
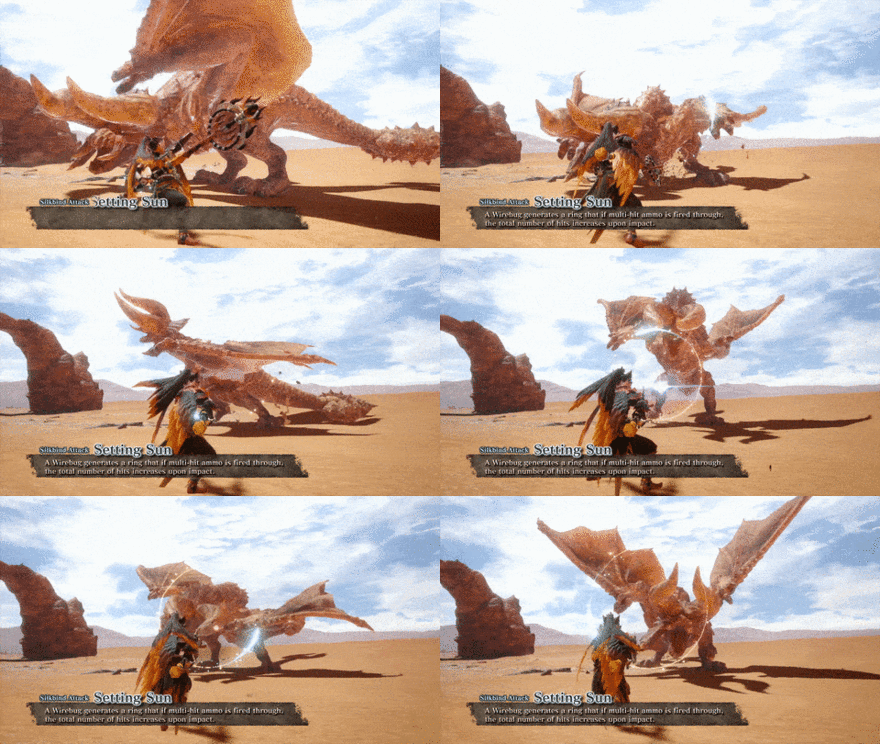
With the Sunbreak expansion and master rank will come the new Silkbind Attacks and Switch Skills for all 14 weapons!
New Silkbind Attacks and Switch Skills
List of Base Game Switch Skills
| Jump to a Weapon! | |||
|---|---|---|---|
| Great Sword | Long Sword | Sword and Shield | |
| Dual Blades | Lance | Gunlance | |
| Hammer | Hunting Horn | Switch Axe | |
| Charge Blade | Insect Glaive | Light Bowgun | |
| Heavy Bowgun | Bow | ||
Great Sword Switch Skills
Guard Tackle

| Switched With | |
|---|---|
| Tackle | |
| Description | |
| A forward-dashing attack using the flat side of the blade. More cumbersome that your standard tackle, but strong and allows you to guard. | |
| Controls | |
| Switch A
while charging PC Right Click
while charging PlayStation Circle
while charging Xbox B while charging |
|
Rage Slash

| Switched With | |
|---|---|
| True Charge Slash | |
| Description | |
| Strike from a unique stance. Not as powerful that True Charge Slash but when met with an attack, Rage Slash will increase its damage. | |
| Controls | |
| Switch Change direction using Left Stick while charging.
PC Change direction using WASD while charging.
PlayStation Change direction using Left Stick while charging.
Xbox Change direction using Left Stick while charging. |
|
Adamant Charged Slash

| Switched With | |
|---|---|
| Hunting Edge | |
| Description | |
| Uses a Wirebug to dash forward, and deliver a Strong Charged Slash. Has knockback protection as you dash forth. Wirebug Gauge Recovery Speed: Medium Wirebug Cost: 1 |
|
| Controls | |
| Switch PC PlayStation Xbox |
|
Great Sword Guide: Combos, Controls and Moveset
Long Sword Switch Skills
Drawn Double Slash

| Switched With | |
|---|---|
| Drawn Double Slash | |
| Description | |
| A drawn attack that unleashes two attacks in a row. You can absorb attacks while moving forward and this move can be comboed with R to go straight to Spirit Blade II! | |
| Controls | |
| Switch PC PlayStation Xbox |
|
Spirit Reckoning Combo

| Switched With | |
|---|---|
| Spirit Roundslash Combo | |
| Description | |
| Changes into a Spirit Blade at the third strike. Drives forward using Dividing Slash then finishes with the Spirit Reckining combo. Difficult to pull off, but has high damage. | |
| Controls | |
| Switch PC PlayStation Xbox |
|
Silkbind Sakura Slash

| Switched With | |
|---|---|
| Soaring Kick | |
| Description | |
| A whirlwind-like attack, dashing past the target with a Wirebug. Increases the Spirit Gauge by 1. Wirebug Gauge Recovery Speed: Slow Wirebug Cost: 1 |
|
| Controls | |
| Switch PC PlayStation Xbox |
|
Long Sword Guide: Combos, Controls and Moveset
Sword and Shield Switch Skills
Drill Slash Combo
| Switched With | |
|---|---|
| Hard Basher Combo | |
| Description | |
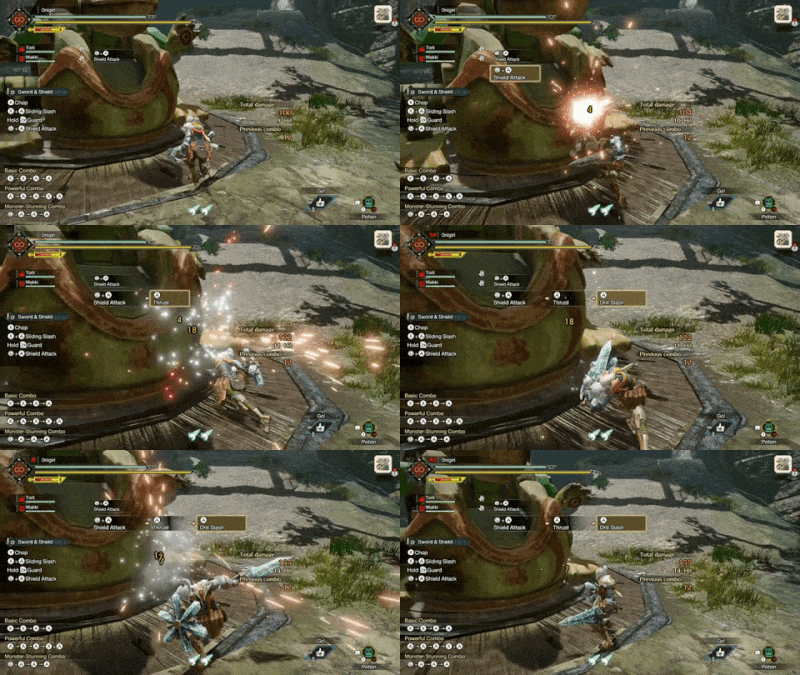
| A derivative of the Shield Slam that converts Thrust to a Drill Slash. Basically a multi-hit attack with great potential when combined with an elemental weapon. | |
| Controls | |
| Switch PC PlayStation Xbox |
|
Sliding Slash

| Switched With | |
|---|---|
| Advancing Slash | |
| Description | |
| A sliding attack that slashes the target twice. High reach but no ability to turn. Allows for follow up jumping attack. | |
| Controls | |
| Switch Draw Attack when sheathed. Pressing A while sliding changes attack to Jumping Rising Slash. PC Draw Attack when sheathed. Pressing Right Click while sliding changes attack to Jumping Rising Slash. PlayStation Draw Attack when sheathed. Pressing Circle while sliding changes attack to Jumping Rising Slash. Xbox Draw Attack when sheathed. Pressing B while sliding changes attack to Jumping Rising Slash. |
|
Metsu Shoryugeki
| Switched With | |
|---|---|
| Windmill | |
| Description | |
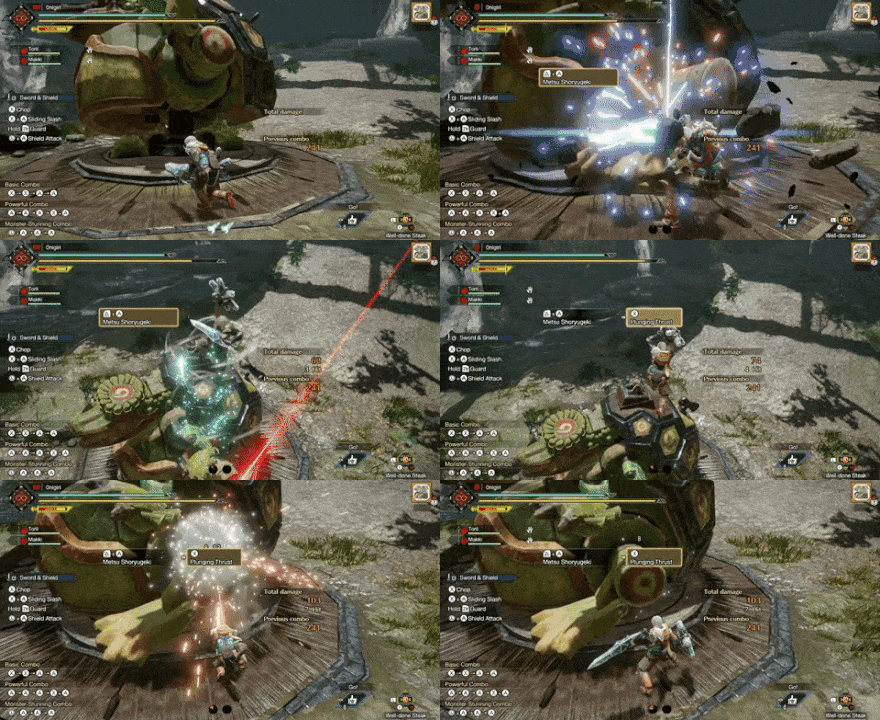
| A jumping Wirebug attack that uses the shield to uppercut the target. Can perform a Guard at the start and can finish off with a Falling Bash. Wirebug Gauge Recovery Speed: Medium Wirebug Cost: 2 |
|
| Controls | |
| Switch PC PlayStation Xbox |
|
Sword and Shield Guide: Combos, Controls and Moveset
Dual Blades Switch Skills
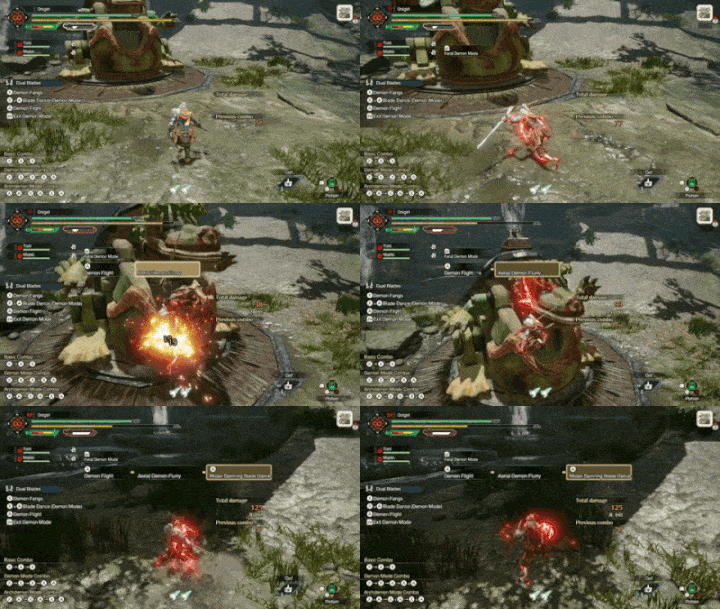
Demon Flight
| Switched With | |
|---|---|
| Demon Flurry Rush | |
| Description | |
| An attack performed by slamming down both blades. A successful hit vaults you into the air, slicing your target as you spin upwards. Effective against monsters with weakpoints high above. | |
| Controls | |
| Switch Press A while in Archdemon Mode.
PC Right Click while in Archdemon Mode.
PlayStation Press Circle while in Archdemon Mode.
Xbox Press B while in Archdemon Mode. |
|
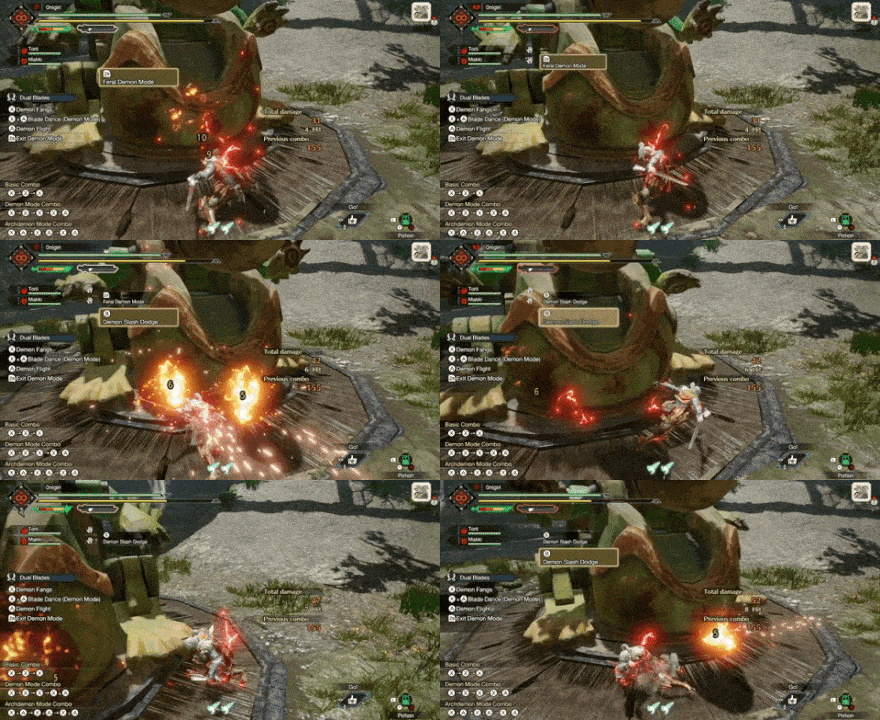
Feral Demon Mode
| Switched With | |
|---|---|
| Demon Mode | |
| Description | |
| A more offernsive verson of Demon mode. You switch to an attack-focused stance, dealing slashing attacks when dodging. | |
| Controls | |
| Switch PC Press
PlayStation Press
Xbox Press |
|
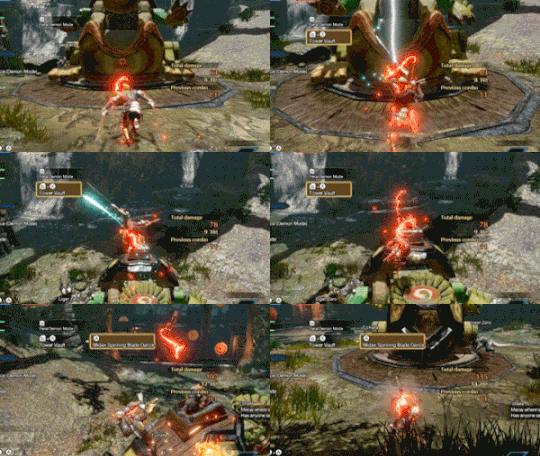
Tower Vault
| Switched With | |
|---|---|
| Piercing Bind | |
| Description | |
| Launches a Wirebug upwards and pulls you into the air. Does not deal any damage but allows you to execute aerial combos with the Dual Blades. Wirebug Gauge Recovery Speed: Fast Wirebug Cost: 1 |
|
| Controls | |
| Switch PC PlayStation Xbox |
|
Dual Blades Guide: Combos, Controls and Moveset
Lance Switch Skills
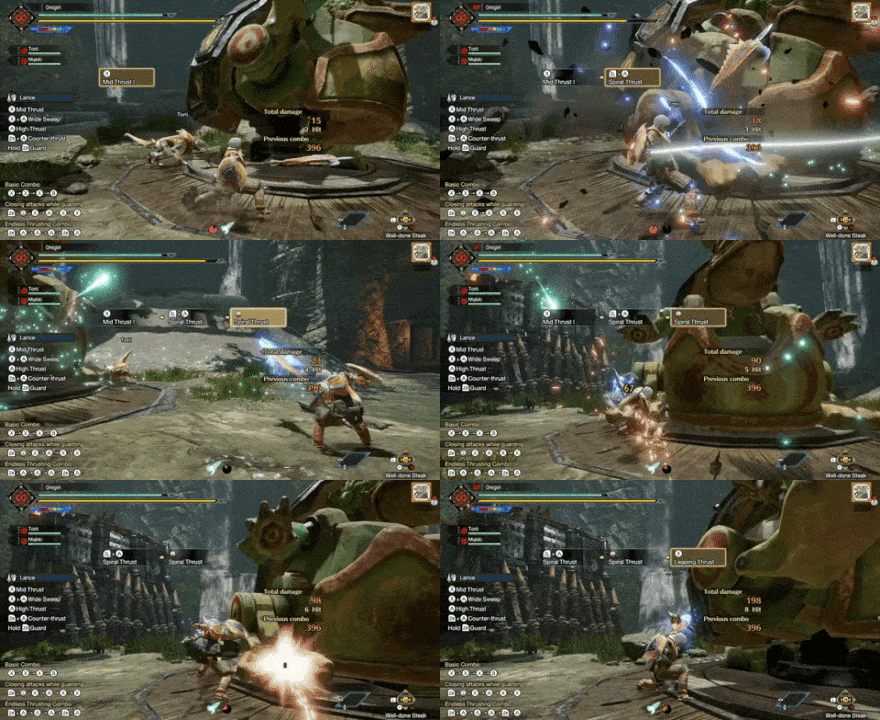
Spiral Thrust
| Switched With | |
|---|---|
| Anchor Rage | |
| Description | |
| Two-step maneuver to counterattack. Uses the shield to parry then uses Wirebugs to pull you forward. Use this to confuse your targets and let out a flurry of strikes. Reposition using the Left Analog after the first dash or halt altogether. Wirebug Gauge Recovery Speed: Medium Wirebug Cost: 1 |
|
| Controls | |
| Switch PC PlayStation Xbox |
|
Shield Charge

| Switched With | |
|---|---|
| Dash Attack | |
| Description | |
| A charging attack with the shield up. Can only dash for a limited amount of time while fending off attacks with the shield. Crashing into a monster deals shield-based blunt damage. | |
| Controls | |
| Switch Hold zR → X + A Press X to perform a Shield Bash then A lead into a Leaping Thrust PC Hold MB4 → Left Click + Right Click Press Left Click to perform a Shield Bash then Right Click lead into a Leaping Thrust PlayStation Hold R2 → Triangle + Circle Press Triangle to perform a Shield Bash then Circle lead into a Leaping Thrust Xbox Hold RT → Y + B Press Y to perform a Shield Bash then B lead into a Leaping Thrust |
|
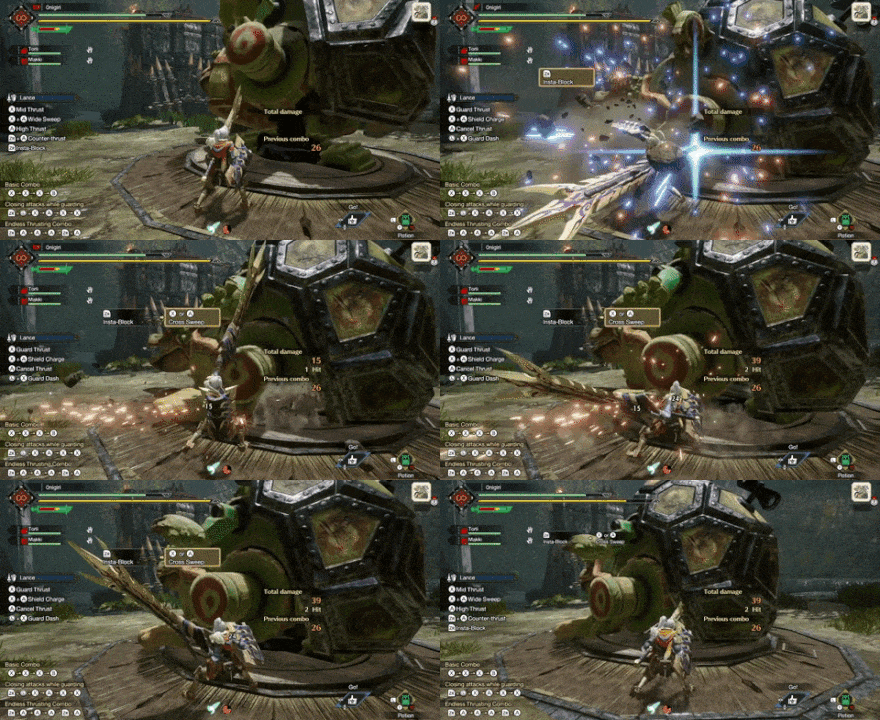
Insta-Block
| Switched With | |
|---|---|
| Guard | |
| Description | |
| Swings your shield in an arch to parry attacks. Time your guard just before a monster hits you to follow-up with a Cross Slash. Great for countering right after blocking. | |
| Controls | |
| Switch Press After a successful Insta-Block, pressing X will lead into a Cross Sweep.
PC Press After a successful Insta-Block, pressing Left Click will lead into a Cross Sweep.
PlayStation Press After a successful Insta-Block, pressing Triangle will lead into a Cross Sweep.
Xbox Press After a successful Insta-Block, pressing Y will lead into a Cross Sweep. |
|
Lance Guide: Combos, Controls and Moveset
Gunlance Switch Skills
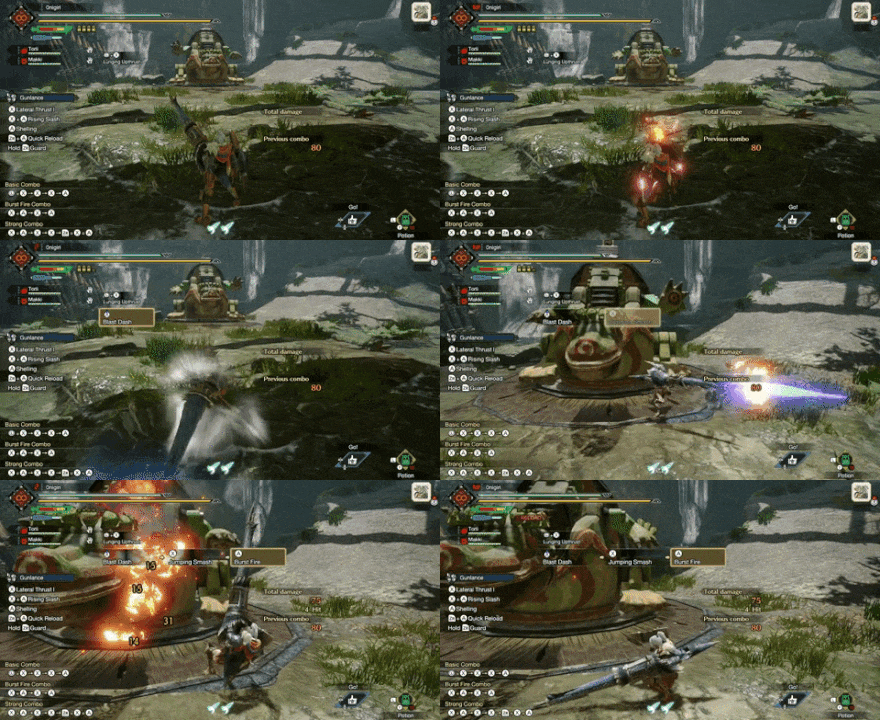
Blast Dash
| Switched With | |
|---|---|
| Charged Shelling | |
| Description | |
| Uses recoil to travel far. Aims the Gunlance backwards then launches forward to close in the target. It is possible to use Blast Dash again while hurtling! | |
| Controls | |
| Switch Hold
Can be performed midair using PC Hold Can be performed midair using PlayStation Hold Can be performed midair using Xbox Hold Can be performed midair using |
|
Ground Splitter

| Switched With | |
|---|---|
| Hail Cutter | |
| Description | |
| Scrapes the ground while slashing upwards. Increases shell, Wyrmstake Shot, and Wyvern Fire damage temporarily. Wirebug Gauge Recovery Speed: Slow Wirebug Cost: 1 |
|
| Controls | |
| Switch PC PlayStation Xbox |
|
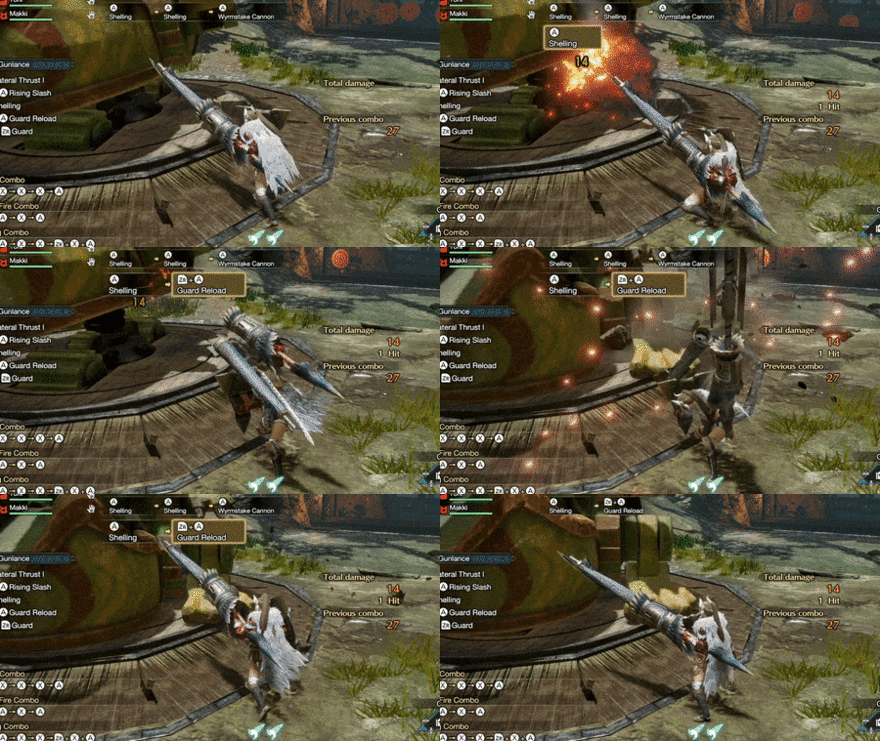
Guard Reload
| Switched With | |
|---|---|
| Quick Reload | |
| Description | |
| Has a Guard at the start of the reload. Reloads both the shells and the Wyrmstake Cannon but only reloads less shells than normal Reload. | |
| Controls | |
| Switch PC PlayStation Xbox |
|
Gunlance Guide: Combos, Controls and Moveset
Hammer Switch Skills
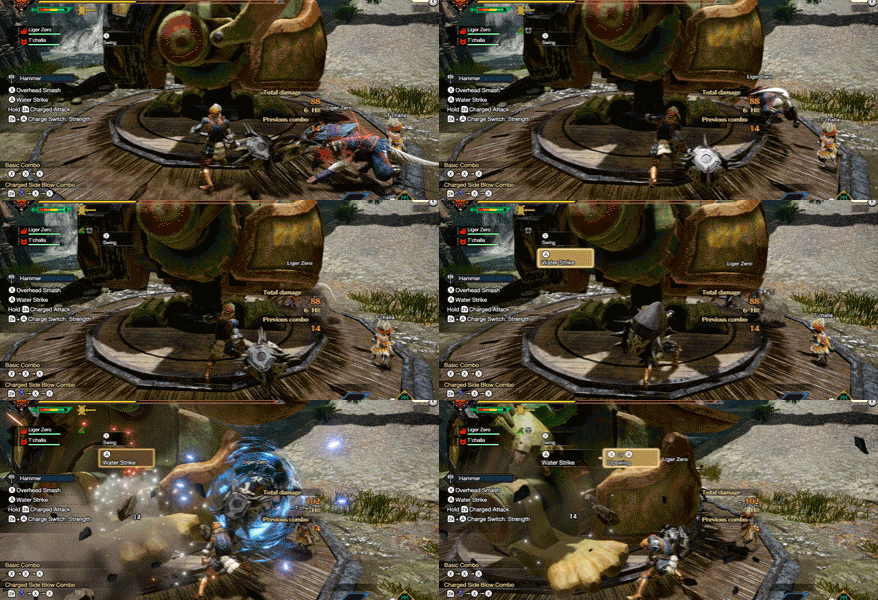
Water Strike
| Switched With | |
|---|---|
| Side Smash | |
| Description | |
| Attack that allows you to absorb an enemy attack. Perform before getting hit to negate the damage. Can be followed-up by an upswing hammer attack. | |
| Controls | |
| Switch Press
If successful, press A or X to follow-up with an upswing. PC Press
If successful, press Right Click or Left Click to follow-up with an upswing. PlayStation Press
If successful, press Circle or Triangle to follow-up with an upswing. Xbox Press If successful, press B or Y to follow-up with an upswing. |
|
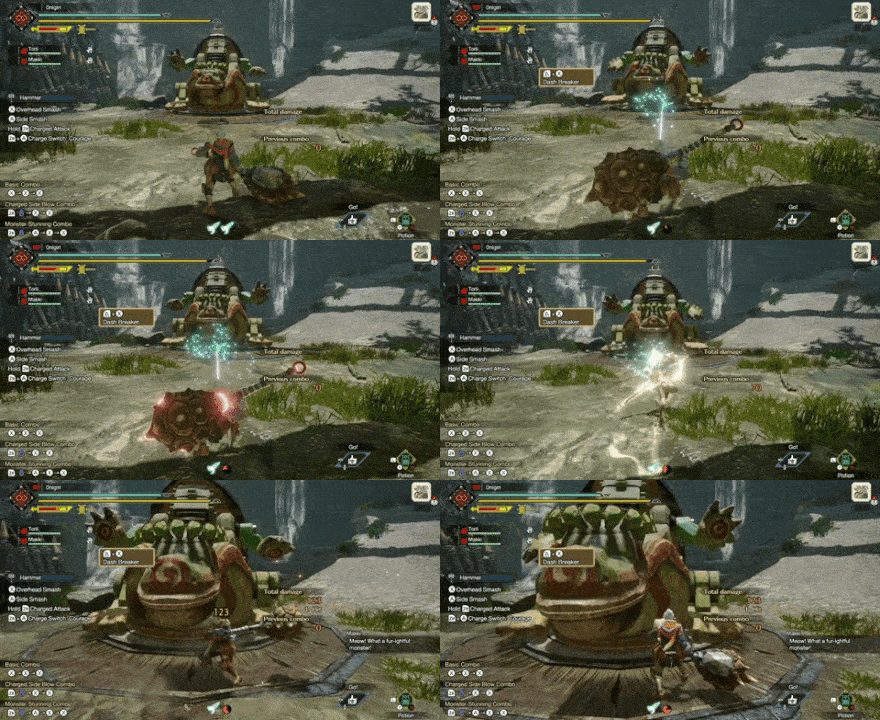
Dash Breaker
| Switched With | |
|---|---|
| Silkbind Spinning Bludgeon | |
| Description | |
| Forward rush using Wirebugs. Enemy attack damage is negated while launching forward! Wirebug Gauge Recovery Speed: Fast Wirebug Cost: 1 |
|
| Controls | |
| Switch Hold zR to charge before launching the attack. PC Hold MB4 to charge before launching the attack. PlayStation Hold R2 to charge before launching the attack. Xbox Hold RT to charge before launching the attack. |
|
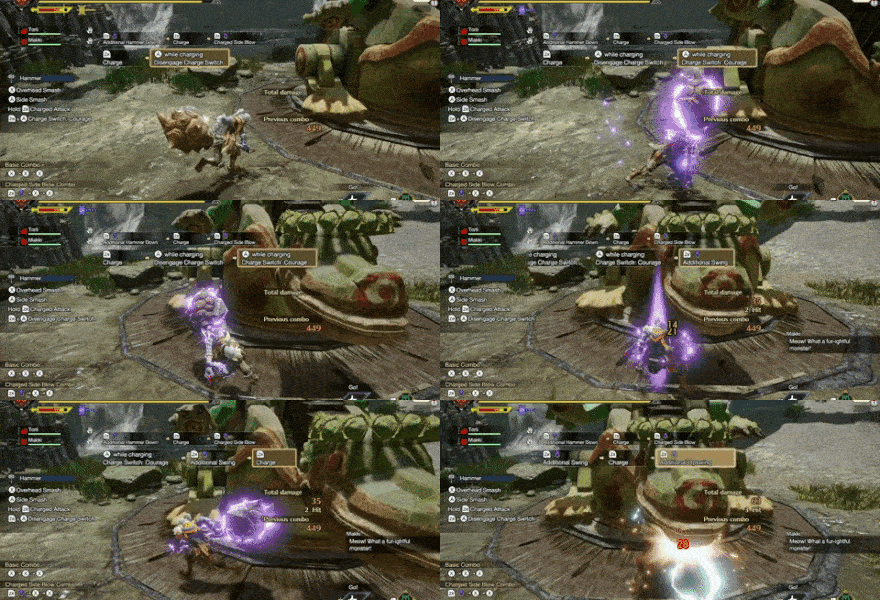
Charge Switch: Courage
| Switched With | |
|---|---|
| Charge Switch: Strength | |
| Description | |
| Decreases charging levels, but allows you to follow from one charge into another more quickly. | |
| Controls | |
| Switch Press Press again to disengage.Charge level increases to maximum when diengaged. PC Press Press again to disengage.Charge level increases to maximum when diengaged. PlayStation Press Press again to disengage.Charge level increases to maximum when diengaged. Xbox Press Press again to disengage.Charge level increases to maximum when diengaged. |
|
Hammer Guide: Combos, Controls and Moveset
Hunting Horn Switch Skills
Melodic Slap

| Switched With | |
|---|---|
| Overhead Smash | |
| Description | |
| Swings the Hunting Horn around once, generating a forwards Sonic Smash. Low damage output but effective at stunning. | |
| Controls | |
| Switch PC PlayStation Xbox |
|
Melody Mode: Echo

| Switched With | |
|---|---|
| Melody Mode: Performance | |
| Description | |
| An action that affects invigorating melodies. Generates a melody effect from the Staff using zR, MB4, R2, or RT, while boosting your own abilities. A mode focused on applying various melody effects. | |
| Controls | |
| Switch Press
PC Press
PlayStation Press
Xbox Press |
|
Bead of Resonance

| Switched With | |
|---|---|
| Earthshaker | |
| Description | |
| Places a Wirebug cocoon on the ground. If the same hunter generates melody effects, the cocoon also generates those effects, as does as a Sonic Wave that damages nearby monsters. Only one cocoon can be placed at a time. Wirebug Gauge Recovery Speed: Medium Wirebug Cost: 2 |
|
| Controls | |
| Switch PC PlayStation Xbox |
|
Hunting Horn Guide: Combos, Controls and Moveset
Switch Axe Switch Skills
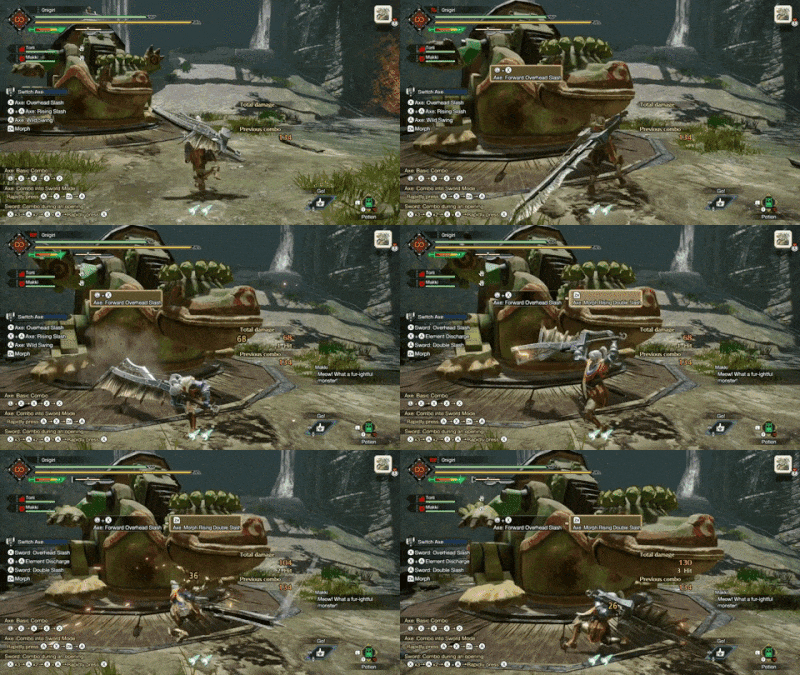
Forward Overhead Slash
| Switched With | |
|---|---|
| Forward Slash | |
| Description | |
| A lunging attack performed by winding up the axe and smashing it down. Difficult to pull off but delivers good damage. A subsequent Sword Mode attack will turn into a Double Slash. | |
| Controls | |
| Swtich PC PlayStation Xbox |
|
Compressed Finishing Discharge

| Switched With | |
|---|---|
| Finishing Discharge | |
| Description | |
| Puts you in a knockdown-resistant state and delivers a swift strike accompanied by an elemental explosion. The Activation Gauge has no effect on this action. | |
| Controls | |
| Switch PC PlayStation Xbox |
|
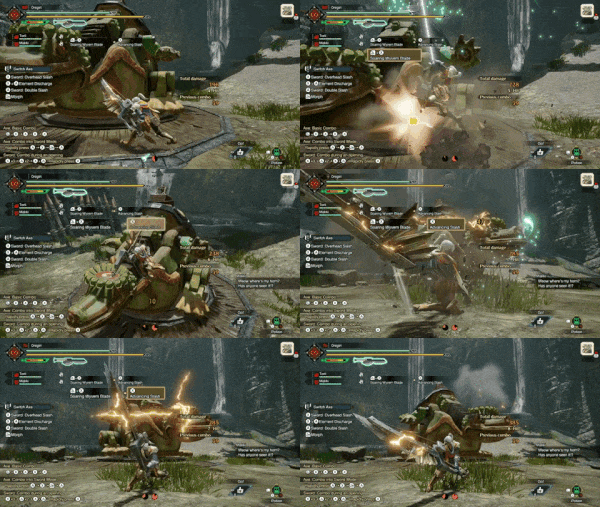
Soaring Wyvern Blade
| Switched With | |
|---|---|
| Invincible Gambit | |
| Description | |
| Launches you in the air while ending with a Forward Slash in midair. If Forward Slash connects, an explosion occurs. Wirebug Recovery Speed: Medium Wirebug Cost: 1 |
|
| Controls | |
| Switch After jumping up, press X to perform a Forward Slash. PC After jumping up, press Left Click to perform a Forward Slash. PlayStation After jumping up, press Triangle to perform a Forward Slash. Xbox After jumping up, press Y to perform a Forward Slash. |
|
Switch Axe Guide: Combos, Controls and Moveset
Charge Blade Switch Skills
Condensed Spinning Slash

| Switched With | |
|---|---|
| Condensed Element Slash | |
| Description | |
| Activates the Element Regeneration system while charging. The shield rotates and acts as a spinning saw blade. Switches the weapon to Axe mode and turns energy into phials. | |
| Controls | |
| Switch Hold Release X at the right time
PC Hold Release Left click at the right time
PlayStation Hold Release Triangle at the right time
Xbox Hold Release Y at the right time |
|
Counter Morph Slash

| Switched With | |
|---|---|
| Morph Slash | |
| Description | |
| A more defense-focused switching attack with a longer blocking effect. If successful, the follow-up Element Discharge Slash's damage increases. | |
| Controls | |
| In Sword Mode, In Axe Mode, In Sword mode: zR + X MB4 + Left Click R2 + Triangle RT + Y In Axe Mode: zR, MB4, R2, or RT |
|
Axe Hopper

| Switched With | |
|---|---|
| Counter Peak Performance | |
| Description | |
| Slam the Axe overhead, using recoil and Ironsilk to propel you to the air. While airborne, you can execute a Super Amped Elemental Discharge (SAED). Wirebug Recovery Speed: Medium Wirebug Cost: 1 |
|
| Controls | |
| Switch PC PlayStation Xbox |
|
Charge Blade Guide: Combos, Controls and Moveset
Insect Glaive Switch Skills
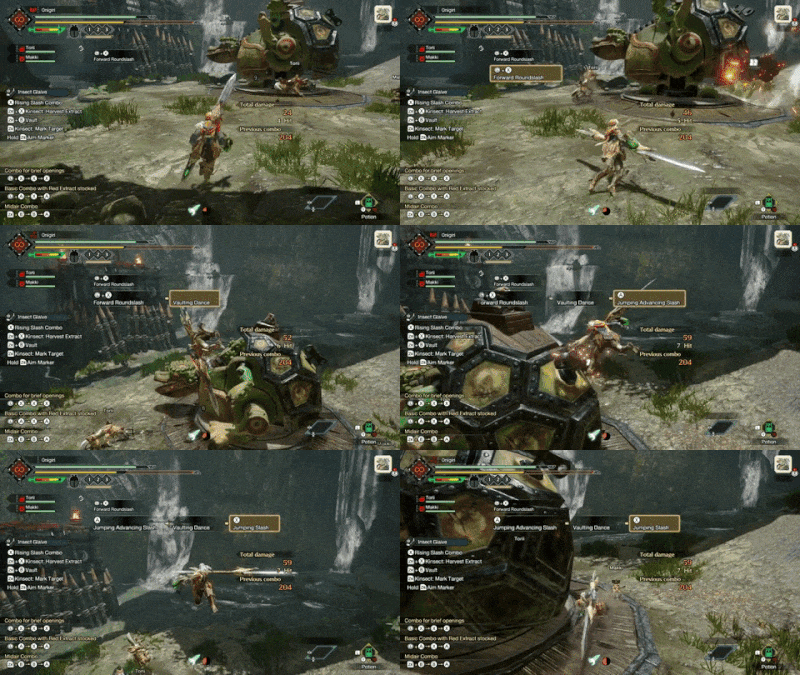
Advancing Roundslash
| Switched With | |
|---|---|
| Leaping Slash | |
| Description | |
| Attack performed by spinning foward like a top. When attacked during the spin, you will use that force to jump up. Only happens while you still have momentum. | |
| Controls | |
| Switch Draw Weapon on foot while unsheathed. Left Stick + A
PC Draw Weapon on foot while unsheathed. PlayStation Draw Weapon on foot while unsheathed. Left Stick + Circle
Xbox Draw Weapon on foot while unsheathed. Left Stick + B |
|
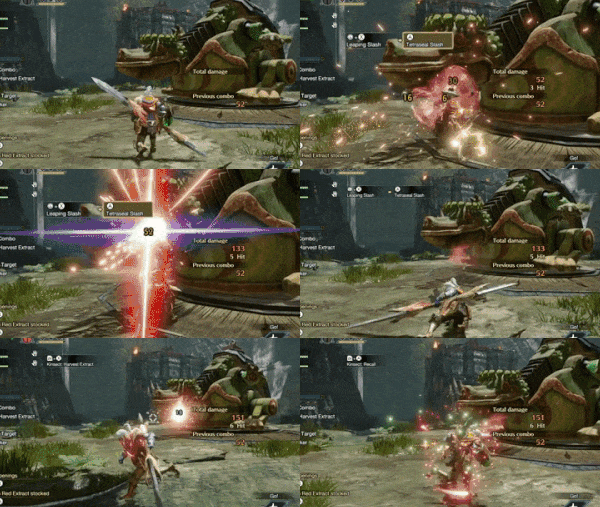
Tetraseal Slash
| Switched With | |
|---|---|
| Tornado Slash | |
| Description | |
| Delivers four strikes on the spot. One of the attacks is hit with the handle's seal, which can lure in Powder Kinsects. | Controls |
| With Red Extract loaded, perform a Leaping Slash and press Press A, Right Click, Circle, or B |
|
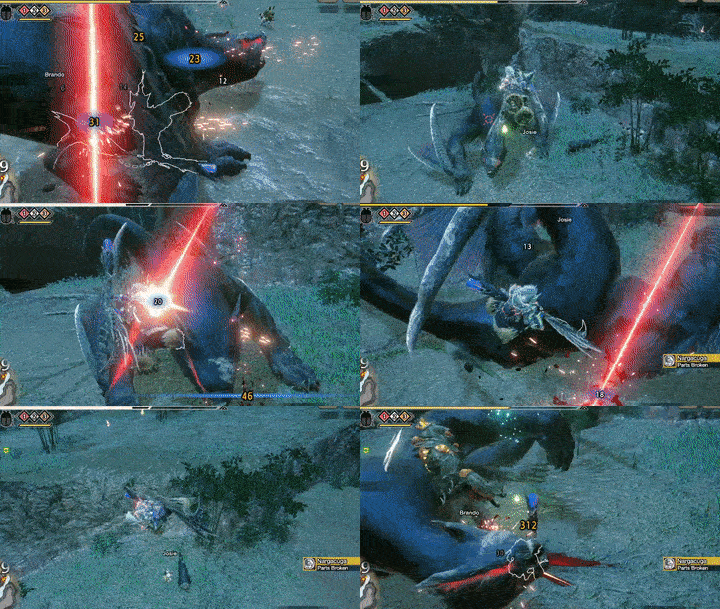
Diving Wyvern
| Switched With | |
|---|---|
| Recall Kinsect | |
| Description | |
| A strong attack that pulls you downward with great force. The attack has a small damage radius which means all damage is concentrated at that one specific point. Wirebug Gauge Recovery Speed: Medium Wirebug Cost: 1 |
|
| Controls | |
| Switch PC PlayStation Xbox |
|
Insect Glaive Guide: Combos, Controls and Moveset
Light Bowgun Switch Skills
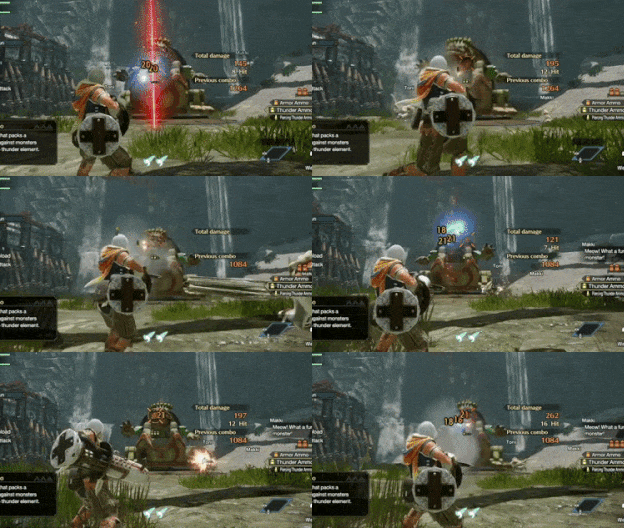
Elemental Reload
| Switched With | |
|---|---|
| Reload | |
| Description | |
| Reloads take longer than usual but boosts elemental damage of elemental shots. | |
| Controls | |
| While unsheathed: While unsheathed, press X, MB4, Triangle, or Y |
|
Quickstep Evade

| Switched With | |
|---|---|
| Forward Dodge | |
| Description | |
| Quick evasive maneuver while your Light Bowgun is drawn. Distance covered is much smaller but requires less time to recover. Ammo fired immediately after this deals increased damage. | |
| Controls | |
| While unsheathed: While unsheathed, press: B, Space, X or A |
|
Fanning Maneuver

| Switched With | |
|---|---|
| Fanning Vault | |
| Description | |
| Uses wirebug as a level to quickly flank left or right. Increases attack power temporarily. Wirebug Gauge Recovery Speed: Fast Wirebug Cost: 1 |
|
| Controls | |
| Switch PC PlayStation Xbox |
|
Light Bowgun Guide: Combos, Controls and Moveset
Heavy Bowgun Switch Skills
Tackle

| Switched With | |
|---|---|
| Melee Attack | |
| Description | |
| A shoulder check by the Hunter. Prevents flinching and knockback, but still allow significant damage. Only use this for weak attacks that may knock you back! | |
| Controls | |
| Switch PC PlayStation Xbox |
|
Counter Charger

| Switched With | |
|---|---|
| Counter Shot | |
| Description | |
| A parry skill using Wirebugs. Absorbs an attack from a monster without taking any damage. Will shorten the amount of time for a Charged Shot. Wirebug Gauge Recovery Speed: Fast Wirebug Cost: 1 |
|
| Controls | |
| Switch PC PlayStation Xbox |
|
Healing Mech-Wyvernsnipe

| Switched With | |
|---|---|
| Mech-Wyvernsnipe | |
| Description | |
| Fires a specialized shot, different depending on the weapon. Has its own gauge, and replenishes over time. Regular Wyvernheart and Wyvernsnipe deals less damage but can heal the hunter. | |
| Controls | |
| Press (Press A, MB4, Circle, or B again to stop.) Press to fire. Press A, MB4, Circle, or B (Press A, MB4, Circle or B again to stop.) Press zR, Left Click, R2, or RT to fire. |
|
Heavy Bowgun Guide: Combos, Controls and Moveset
Bow Switch Skills
Absolute Power Shot

| Switched With | |
|---|---|
| Power Shot | |
| Description | |
| Fires a powerful shot after charging. Shots are fired with a higher level than usual (but never over the charge level limit). Power Shots will cost more stamina but can stun the target. | |
| Controls | |
| After firing an arrow, press: After firing an arrow, press: A, MB4, Circle, or B |
|
Dodgebolt

| Switched With | |
|---|---|
| Charging Sidestep | |
| Description | |
| Spinning evade that doubles as an attack. Making it a near-miss can fill up the charge level considerably. Allows you to move forward, backwards, left, or right. | |
| Controls | |
Left Stick + B Directional Button + Space Left Stick + X Left Stick + A while aming. B, Space, X, or A during a combo |
|
Aerial Aim

| Switched With | |
|---|---|
| Focus Shot | |
| Description | |
| An action for firing arrows by jumping straight up with a Wirebug. Particularly damaging shots can be fired from midair. A close-range attack using an arrow can also be aimed directly underneath you. Aerial Aim also retains you current bow charge level so use this at max level (3 or 4) Wirebug Gauge Recovery Speed: Medium Wirebug Cost: 1 |
|
| Controls | |
Press A, MB4, Circle, or B to continue firing arrows midair. Press X, MB5, Triangle, or Y to follow-up with an Aerial Diving Melee Attack. R + X Shift + MB5 R1 + Triangle RB + Y |
|
Bow Guide: Combos, Controls and Moveset
How to Unlock All Switch Skills
For more information on how to unlock all the Switch Skills above, check out this article:
Switch Skills Guide:
How to Unlock Switch Skills
Monster Hunter Rise Related Links
Author
List of Base Game Switch Skills
improvement survey
03/2026
improving Game8's site?

Your answers will help us to improve our website.
Note: Please be sure not to enter any kind of personal information into your response.

We hope you continue to make use of Game8.
Rankings
- We could not find the message board you were looking for.
Gaming News
Popular Games

Genshin Impact Walkthrough & Guides Wiki

Honkai: Star Rail Walkthrough & Guides Wiki

Umamusume: Pretty Derby Walkthrough & Guides Wiki

Pokemon Pokopia Walkthrough & Guides Wiki

Resident Evil Requiem (RE9) Walkthrough & Guides Wiki

Monster Hunter Wilds Walkthrough & Guides Wiki

Wuthering Waves Walkthrough & Guides Wiki

Arknights: Endfield Walkthrough & Guides Wiki

Pokemon FireRed and LeafGreen (FRLG) Walkthrough & Guides Wiki

Pokemon TCG Pocket (PTCGP) Strategies & Guides Wiki
Recommended Games

Diablo 4: Vessel of Hatred Walkthrough & Guides Wiki

Cyberpunk 2077: Ultimate Edition Walkthrough & Guides Wiki

Fire Emblem Heroes (FEH) Walkthrough & Guides Wiki

Yu-Gi-Oh! Master Duel Walkthrough & Guides Wiki

Super Smash Bros. Ultimate Walkthrough & Guides Wiki

Pokemon Brilliant Diamond and Shining Pearl (BDSP) Walkthrough & Guides Wiki

Elden Ring Shadow of the Erdtree Walkthrough & Guides Wiki

Monster Hunter World Walkthrough & Guides Wiki

The Legend of Zelda: Tears of the Kingdom Walkthrough & Guides Wiki

Persona 3 Reload Walkthrough & Guides Wiki
All rights reserved
©CAPCOM CO., LTD. ALL RIGHTS RESERVED.
The copyrights of videos of games used in our content and other intellectual property rights belong to the provider of the game.
The contents we provide on this site were created personally by members of the Game8 editorial department.
We refuse the right to reuse or repost content taken without our permission such as data or images to other sites.


![Monster Hunter Stories 3 Review [First Impressions] | Simply Rejuvenating](https://img.game8.co/4438641/2a31b7702bd70e78ec8efd24661dacda.jpeg/thumb)


