Weathered Obelisk Puzzle Solutions and Locations
✉ Send your thoughts in our Genshin 6.4 Patch Survey!
★ Exclusive: Dive back in time with the Meta History
◆ Hot: Version 6.4, Luna 5 Codes
◆ Builds: Varka, Flins, Skirk, Escoffier
◆ Events: Travelers' Tales, He Who Caught the Wind
◆ Future: Linnea, Version 6.5 Luna VI
Weathered Obelisks are glowing rocks with symbols added in the Desert of Hadramaveth, Sumeru for Genshin Impact 3.4. See all the locations of Weathered Obelisks and how to solve them here!
List of Contents
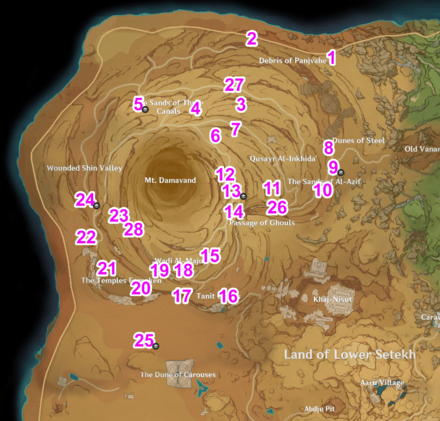
All Weathered Obelisk Locations
Weathered Obelisk Full Location Map
| All Weathered Obelisk Locations | ||
|---|---|---|
 View Full Image |
||
| Click to Jump on a Weathered Obelisk Puzzle Solution | ||
| Obelisk #1 | Obelisk #2 | Obelisk #3 |
| Obelisk #4 | Obelisk #5 | Obelisk #6 |
| Obelisk #7 | Obelisk #8 | Obelisk #9 |
| Obelisk #10 | Obelisk #11 | Obelisk #12 |
| Obelisk #13 | Obelisk #14 | Obelisk #15 |
| Obelisk #16 | Obelisk #17 | Obelisk #18 |
| Obelisk #19 | Obelisk #20 | Obelisk #21 |
| Obelisk #22 | Obelisk #23 | Obelisk #24 |
| Obelisk #25 | Obelisk #26 | Obelisk #27 |
| Obelisk #28 | ||
Weathered Obelisk #1 Puzzle Guide
| Pattern to Match | Obelisk to Solve |
|---|---|
 |
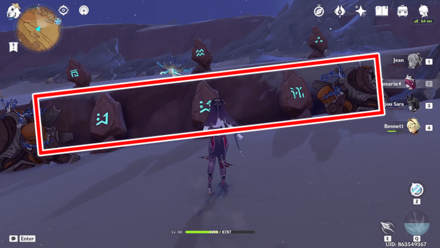 |
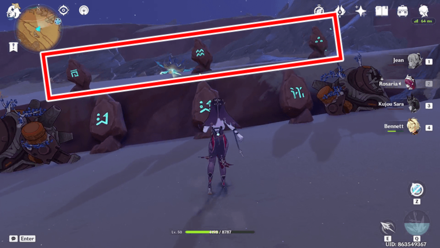
Memorize the pattern shown by the three small obelisks above the platform. Attack the obelisks below them to change the pattern to match the ones above to solve the puzzle.
Weathered Obelisk #2 Puzzle Guide
| Pattern to Match | Obelisk to Solve |
|---|---|
 |
 |
Head north from the area and glide down to find another set of three obelisks. Attack the obelisks to change the pattern to solve the puzzle.
Weathered Obelisk #3 Puzzle Guide
| Pattern to Match | Obelisk to Solve |
|---|---|
 |
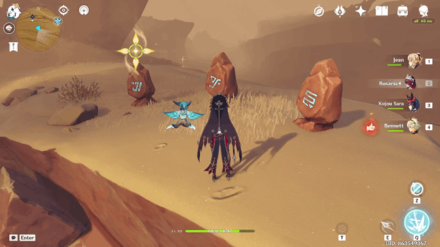 |
Head to the opposite side of the obelisks that you need to solve to find another set of obelisks with the correct symbols. Match the symbols to solve the puzzle.
Weathered Obelisk #4 Puzzle Guide
| Weathered Obelisk #4 Puzzle Solution |
|---|
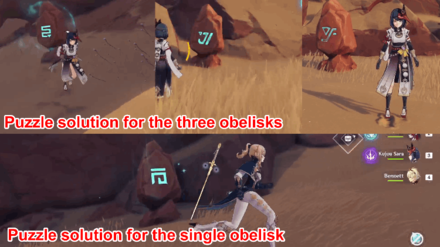 |
There are three obelisks at the base of the cliff and the correct symbols are located at the top. Use the Four-Leaf Sigil to reach the top and change the symbols of the obelisks at the base of the cliff.
Go back to the top of the cliff and find the gust ball. Approach it to uncover another obelisk. Drop down north of this obelisk to find the corresponding obelisk below and change its symbol to match it to solve the puzzle.
Weathered Obelisk #5 Puzzle Guide
| Weathered Obelisk #5 Step-by-Step Guide | |
|---|---|
| 1 |  Find the three obelisks near the entrance of the temple and change the symbols to match the ones shown in the above image. |
| 2 |  Head inside the temple on the right side of the obelisks and activate the ruin mechanisms inside. Head to the area where the door moved during the small cutscene. |
| 3 |  Move the ruin mechanism to remove the sand pile revealing the buried pair of obelisks. Memorize the symbols and go back to the entrance of the temple. |
| 4 |  Change the symbols of the pair of obelisks to match the ones inside the temple to solve the puzzle. |
Weathered Obelisk #6 Puzzle Guide
| Weathered Obelisk #6 Puzzle Solution |
|---|
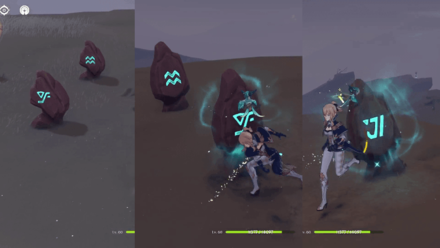 |
There are four pairs of obelisks situated in the nearby area. Memorize the patterns of the ones in the northern area.
Head south towards the cliffside to find the other pair of obelisks. Change their symbols to match the ones from the northern area to solve the puzzle.
Weathered Obelisk #7 Puzzle Guide
| Weathered Obelisk #7 Step-by-Step Guide | |
|---|---|
| 1 | 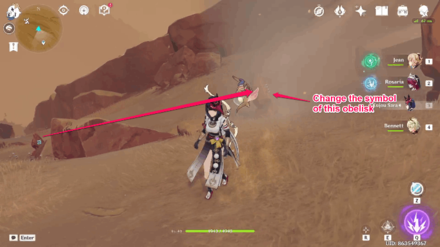 Find the first obelisk with the correct symbol behind the large rock. Match the symbol of the nearby obelisk inside the Atmospheric Vortex. |
| 2 | 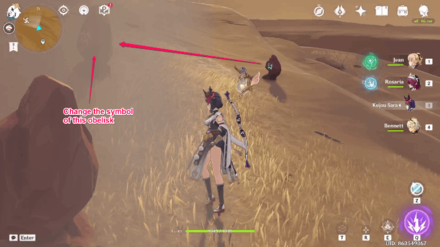 Find the next obelisk at the right side of the vortex and change the symbol of the nearby obelisk inside the vortex. |
| 3 | 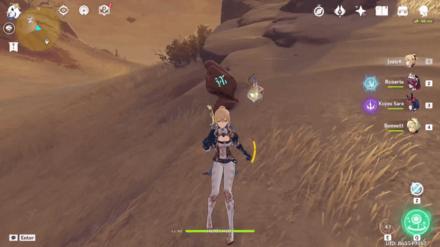 Attack the sand pile north of the vortex to uncover the last obelisk. Match the symbol on the nearby obelisk inside the vortex to solve the puzzle. |
Weathered Obelisk #8 Puzzle Guide
| Weathered Obelisk #8 Step-by-Step Guide | |
|---|---|
| 1 |  Head opposite of the seven obelisks and use the Four-Leaf Sigils to reach the two obelisks that has the symbols you need to memorize. |
| 2 | 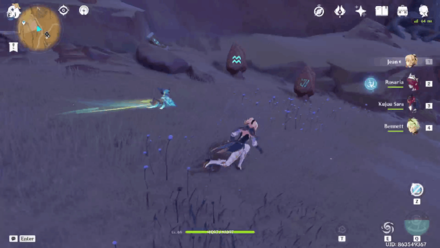 Go back to the previous area and check to see if the two obelisks on the right side match. |
| 3 |  Head south of the three obelisks in the middle to find three small obelisks. Memorize the symbols. |
| 4 |  Go back and switch the symbols on the three obelisks in the middle. |
| 5 |  Use the Four-Leaf Sigil on the left side of the seven obelisks to find the last set of obelisks. Memorize the symbols. |
| 6 |  Go back to the seven obelisks and switch the ones on the left side to solve the puzzle. |
Weathered Obelisk #9 Puzzle Guide
| Weathered Obelisk #9 Step-by-Step Guide | |
|---|---|
| 1 | 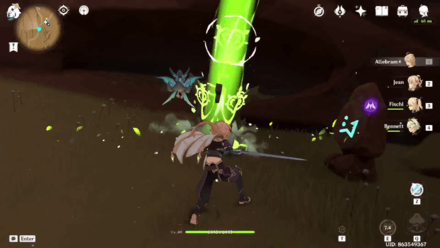 Find the locked Dendro Monument with one obelisk beside it. Attack the obelisk to match the symbol in a nearby lone obelisk, which looks like a reverse capital L with two dots. |
| 2 |  Head to the next locked monument with two obelisks. The symbols for these are a long S shaped snake and a broken V with a slash. |
| 3 | 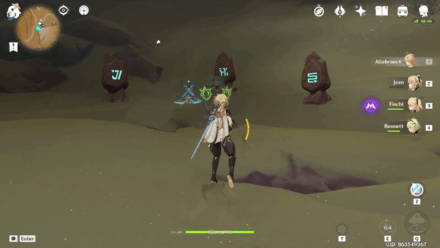 Look for the third locked Dendro Monument and attack the obelisks to match the symbols in the image above. |
Weathered Obelisk #10 Puzzle Guide
| Weathered Obelisk #10 Puzzle Solution |
|---|
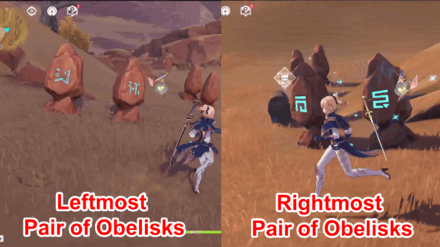 |
There are two pairs of obelisks surrounding the rocks and the tree. Use the Four-Leaf Sigil to reach opposite side to find the obelisks with the correct matching symbols to solve the puzzle.
Weathered Obelisk #11 Puzzle Guide
| Weathered Obelisk #11 Puzzle Solution |
|---|
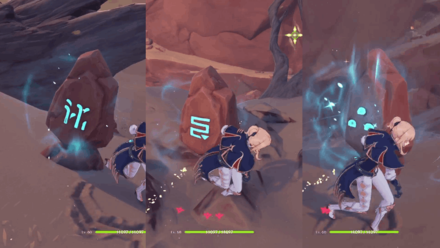 |
Find the obelisks below the cliff and memorize the symbols. Use the Four-Leaf Sigil to reach the top of the cliff. Switch the symbols to match the ones below the cliff to solve the puzzle.
Weathered Obelisk #12 Puzzle Guide
| Weathered Obelisk #12 Step-by-Step Guide | |
|---|---|
| 1 | Find the two obelisks in the area and head south from it to find a partailly buried obelisk. |
| 2 |  Use an Anemo character to blow away the sand to reveal the second obelisk buried under it. Memorize the patterns. |
| 3 |  Go back to the first two obelisks and change the symbols to match the ones buried underneath the sand. |
| 4 | Look for the three obelisks near the first two obelisks. Head south from it to find another set of three obelisks. |
| 5 |  Change the symbols of the three obelisks near the first two ones to solve the puzzle. |
Weathered Obelisk #13 Puzzle Guide
| Weathered Obelisk #13 Puzzle Solution |
|---|
 |
Match the symbols on the three obelisks at the top of the cliff to solve the puzzle.
Weathered Obelisk #14 Puzzle Guide
| Pattern to Match | Obelisk to Solve |
|---|---|
 |
 |
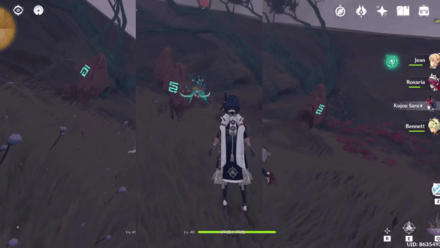
Memorize the symbols on the three obelisks. Head north from it to find another set of obelisks hidden in a tornado. Change the symbols to match the first set to solve the puzzle.
Weathered Obelisk #15 Puzzle Guide
| Weathered Obelisk #15 Step-by-Step Guide | |
|---|---|
| 1 | 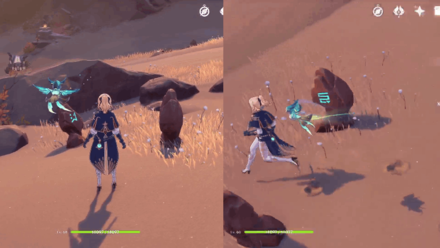 Look for the two obelisks that are facing each other and memorize the symbols. |
| 2 |  Head north to find another two obelisks in the same position. Attack them to match the symbols from the first two obelisks. |
| 3 |  Use an Anemo character to remove the sand to reveal a hidden obelisk underneath. |
| 4 |  Switch the symbol on the single obelisk to match the one from underneath the sand to solve the puzzle. |
Weathered Obelisk #16 Puzzle Guide
| Pattern to Match | Obelisk to Solve |
|---|---|
 |
 |
Find the three obelisks in front of fallen tree and memorize the patterns. Head opposite of these to find another set of obelisks that you can attack to change the pattern to solve the puzzle.
Weathered Obelisk #17 Puzzle Guide
| Pattern to Match | Obelisk to Solve |
|---|---|
 |
 |
Find the three obelisks near the rocks and shrubbery and memorize the patterns. Head south to find another set of obelisks and attack it to change the pattern they are displaying to solve the puzzle.
Weathered Obelisk #18 Puzzle Guide
| Pattern to Match | Obelisk to Solve |
|---|---|
 |
 |
Find the three obelisks on top of a large flat rock and memorize the patterns. Head opposite from the location to find the second set of obelisks near the side of the cliff.
Attack them to change the pattern to match the first set of obelisks to solve the puzzle.
Weathered Obelisk #19 Puzzle Guide
| Pattern to Match | Obelisk to Solve |
|---|---|
 |
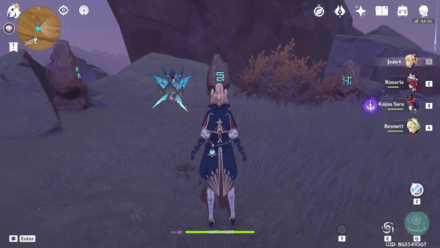 |
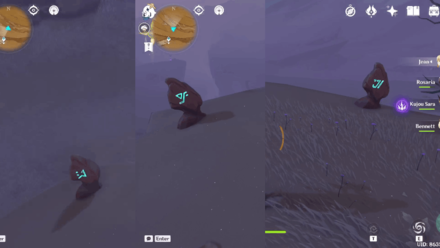
Find the three obelisks near the cliff side of the area and memorize the patterns. Head opposite of them to find another set of obelisks that you can attack to match the pattern to solve the puzzle.
Weathered Obelisk #20 Puzzle Guide
| Weathered Obelisk #20 Step-by-Step Guide | |
|---|---|
| 1 | 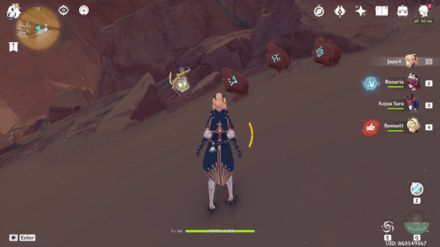 Find the three obelisks and head northeast of it to find the corresponding obelisks. Match the symbols shown in the above image. |
| 2 |  South of the three obelisks are two pairs of obelisks. Head north from them and find the sand pile near the rightmost corner. |
| 3 | 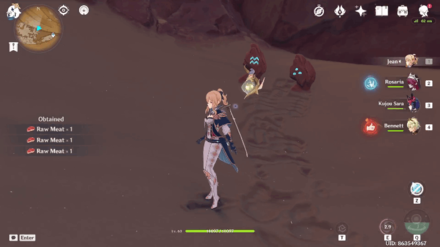 Uncover the sand pile and defeat the scorpion. Match the symbols from the buried obelisks to solve the puzzle. |
Weathered Obelisk #21 Puzzle Guide
| Weathered Obelisk #21 Step-by-Step Guide | |
|---|---|
| 1 | 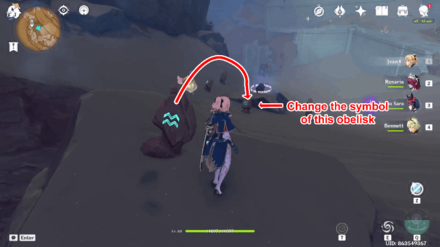 Start from the locked chest surrounded by the obelisks. Head south from one side to find the single obelisk on top of a rock. Match the symbol from this obelisk to the one north of it. |
| 2 | 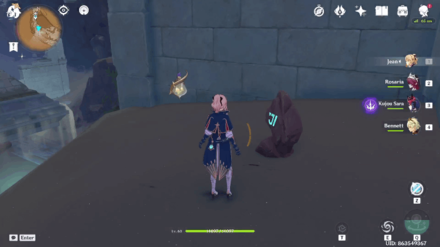 Use the Four-Leaf Sigil east of the locked chest and approach the gust ball to remove it. Memorize the symbol on the obelisk and change the symbol of the obelisk that is facing the Four-Leaf Sigil. |
| 3 |  Use an Anemo character to remove the sand pile to uncover an obelisk and a scorpion. Memorize the symbol and change the symbol of the obelisk that is facing the sand pile. |
| 4 |  Head towards the sleeping Ruin Guard and use the Four-Leaf Sigil to sneak past it. Drop down underneath the sand to find the obelisk. Match the symbol on the obelisk that is facing the Ruin Guard. |
| 5 |  Climb up the cliff on the left side of the locked chest to find the obelisk with the symbol you need to match. Drop down from the cliff and match the symbol on the obelisk that is facing the cliff. |
| 6 | 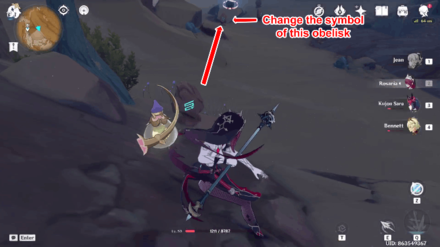 Head southwest from the locked chest and attack the shrub on the side of the cliff to reveal the obelisk. Match the symbol on the obelisk north of it to complete the puzzle. |
Weathered Obelisk #22 Puzzle Guide
| Weathered Obelisk #22 Step-by-Step Guide | |
|---|---|
| 1 |  Find the three obelisks near the cliffside. Head south from the rightmost obelisk and approach the gust ball to uncover an obelisk. Memorize the symbol and switch the rightmost obelisk to match it. |
| 2 | 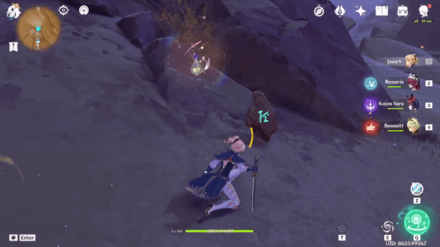 Drop down from the middlemost obelisk to find the corresponding obelisk underneath the area. Memorize the symbol and switch the middlemost obelisk to match it. |
| 3 | 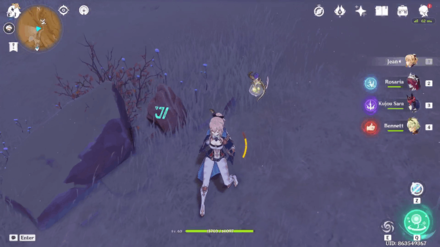 Head north from the leftmost obelisk to find the corresponding obelisk beside a rock. Memorize the symbol and switch the leftmost obelisk to match it and to solve the puzzle. |
Weathered Obelisk #23 Puzzle Guide
| Weathered Obelisk #23 Step-by-Step Guide | |
|---|---|
| 1 | 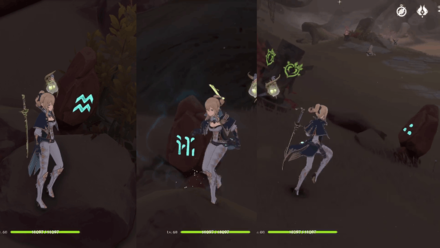 Change the symbols of the first set of obelisks to match the image shown above. |
| 2 | 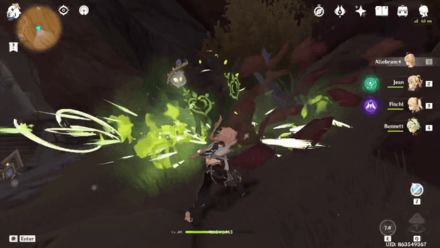 Use a Dendro character to activate the Dendro switch. |
| 3 |  Head northeast to find another set of obelisks. Change the symbols to match the image above to unlock the Dendro switch. Activate the Dendro swtich. |
| 4 |  Head to the last locked Dendro switch on the west side of the area and defeat the giant scorpion to unlock it. Activate the switch to solve the puzzle. |
Weathered Obelisk #24 Puzzle Guide
| Weathered Obelisk #24 Step-by-Step Guide | |
|---|---|
| 1 | 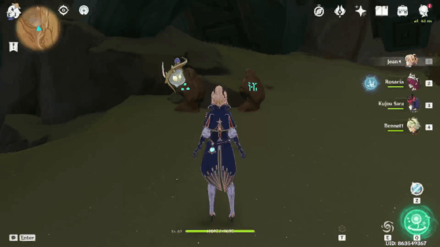 Find the two pairs of obelisk on a small cliffside. Memorize the symbols. |
| 2 | 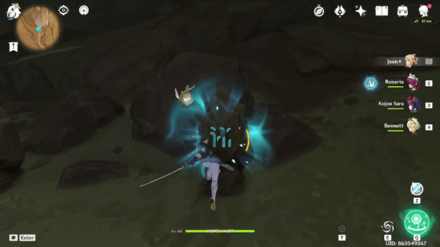 Drop down from the cliff to find another pair of obelisks. Attack them to change the symbols to match the ones from above the cliff. |
| 3 | 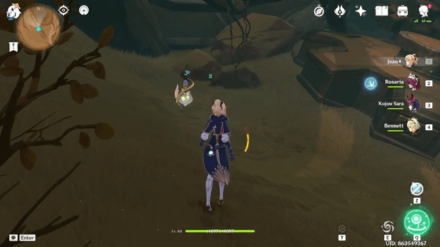 Head to the right side to find another pair of obelisks near a fallen giant gear. Memorize the symbols. |
| 4 |  Head south from that pair of obelisks to find another that you can attack. Change the symbols to solve the puzzle. |
Weathered Obelisk #25 Puzzle Guide
| Pattern to Match | Obelisk to Solve |
|---|---|
 |
 |
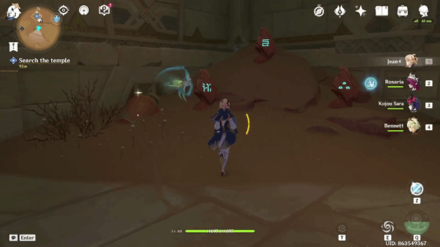
Head up the stairs to find three obelisks that you can attack at the base of the temple. Climb to the top to find the other three obelisks at a right corner and memorize the symbols. Head back down to the first three obelisks and change their symbols to solve the puzzle.
Weathered Obelisk #26 Puzzle Guide
| Weathered Obelisk #26 Step-by-Step Guide | |
|---|---|
| 1 | 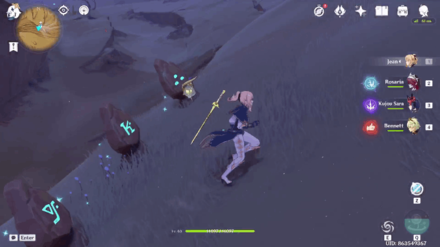 Attack the obelisks below the western side of the cliff to match the symbols as shown in the above image. This unlocks the Pyro switch next to the enemy standing across the three nearby obelisks. |
| 2 |  Head to the top of the western cliff near the locked chest and attack the two obelisks to match the synbol shown in the image above. |
| 3 |  Drop down on the lower ground and attack the single obelisk to match the symbol in the above image. |
| 4 |  Head to the eastern side of the cliff and change the symbols on the two obelisk to match them to the above image. |
| 5 |  After unlocking all Pyro switches, use a Pyro character and light up the Pyro switch next to the single obelisk on the western side of the cliff. |
| 6 |  Use the Four-Leaf Sigil to reach the eastern cliff and light the second Pyro switch near the two obelisks. |
| 7 | 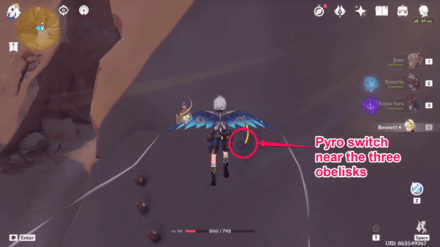 Drop down below towards the three obelisks and activate the Pyro switch nearby. |
| 8 |  Go back to the locked chest and activate the Pyro switch near it to solve the puzzle. |
Weathered Obelisk #27 Puzzle Guide
| Pattern to Match | Obelisk to Solve |
|---|---|
 |
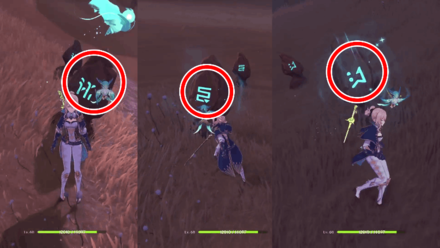 |
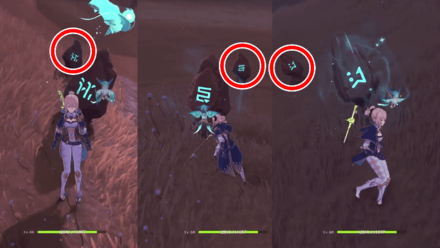
This puzzle has the obelisks situated next to each other and requires you to change the symbols immediately. After changing the symbols, head north from the obelisks to obtain the wisp from the torch. Lead the wisp to the locked domain to open it and solve the puzzle.
Weathered Obelisk #28 Puzzle Guide
| Weathered Obelisk #28 Step-by-Step Guide | |
|---|---|
| 1 |  Approach the Atmospheric Vortex to uncover three obelisks that have the symbols you need to match. Note that you need to complete The Falcon's Hunt quest in order to upgrade your Liloupar gadget to remove the vortex. |
| 2 | 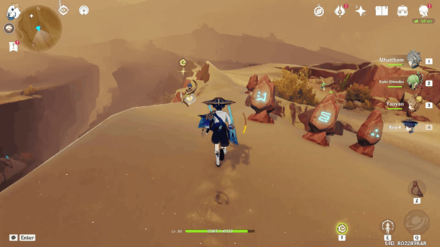 Head to opposite side of the obelisks to find the three sets of obelisks that you can attack to change the symbols. Match the symbols as shown in the above image. |
| 3 |  Head north of the two obelisks to find a fungi guarding the two sets of obelisks that have the symbols you need to match. |
| 4 |  Go back to the two obelisks and change the symbols to match the ones shown in the above image to solve the puzzle. |
How to Solve Weathered Obelisk Puzzles
Hit the Obelisks to Match a Pattern
Weathered Obelisk puzzles are solved by hitting the shifting obelisks until their symbols match another set of obelisks nearby. Solving these puzzles may reveal hidden chests or other secrets!
Some obelisk sets where you can get the correct symbols are hiding behind other objects in the environment, so search the area if you can only see the shifting Weathered Obelisks!
What are Weathered Obelisks?
Glowing Blue Rocks in the Hadramaveth Desert
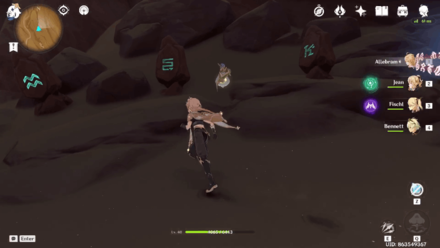
Weathered Obelisks are stones with ancient writings on their surface and can be found scattered all over the Desert of Hadramaveth.
Release in the 3.4 Hadramaveth Desert
| Genshin Impact Version 3.4 | |
|---|---|
 |
|
| Release Date | January 18, 2023 |
Weathered Obelisks are part of the Desert of Hadramaveth, which became available in Version 3.4!
Version 3.4 Release Date and Patch Notes
Genshin Impact Related Guides
All Tips and Tricks Guides

All Version 3.4 Tips & Tricks
Other Regional Tips & Tricks
Author
Weathered Obelisk Puzzle Solutions and Locations
improvement survey
03/2026
improving Game8's site?

Your answers will help us to improve our website.
Note: Please be sure not to enter any kind of personal information into your response.

We hope you continue to make use of Game8.
Rankings
Gaming News
Popular Games

Genshin Impact Walkthrough & Guides Wiki

Honkai: Star Rail Walkthrough & Guides Wiki

Umamusume: Pretty Derby Walkthrough & Guides Wiki

Pokemon Pokopia Walkthrough & Guides Wiki

Resident Evil Requiem (RE9) Walkthrough & Guides Wiki

Monster Hunter Wilds Walkthrough & Guides Wiki

Wuthering Waves Walkthrough & Guides Wiki

Arknights: Endfield Walkthrough & Guides Wiki

Pokemon FireRed and LeafGreen (FRLG) Walkthrough & Guides Wiki

Pokemon TCG Pocket (PTCGP) Strategies & Guides Wiki
Recommended Games

Diablo 4: Vessel of Hatred Walkthrough & Guides Wiki

Fire Emblem Heroes (FEH) Walkthrough & Guides Wiki

Yu-Gi-Oh! Master Duel Walkthrough & Guides Wiki

Super Smash Bros. Ultimate Walkthrough & Guides Wiki

Pokemon Brilliant Diamond and Shining Pearl (BDSP) Walkthrough & Guides Wiki

Elden Ring Shadow of the Erdtree Walkthrough & Guides Wiki

Monster Hunter World Walkthrough & Guides Wiki

The Legend of Zelda: Tears of the Kingdom Walkthrough & Guides Wiki

Persona 3 Reload Walkthrough & Guides Wiki

Cyberpunk 2077: Ultimate Edition Walkthrough & Guides Wiki
All rights reserved
Copyright© 2012-2024 HoYoverse — COGNOSPHERE. All Rights Reserved.
The copyrights of videos of games used in our content and other intellectual property rights belong to the provider of the game.
The contents we provide on this site were created personally by members of the Game8 editorial department.
We refuse the right to reuse or repost content taken without our permission such as data or images to other sites.


![Monster Hunter Stories 3 Review [First Impressions] | Simply Rejuvenating](https://img.game8.co/4438641/2a31b7702bd70e78ec8efd24661dacda.jpeg/thumb)


#23 is wrong, the second picture should be the snake looking one