Pyroculus Locations and How to Use
✉ Send your thoughts in our Genshin 6.4 Patch Survey!
★ Exclusive: Dive back in time with the Meta History
◆ Hot: Version 6.4, 6.4 Codes, Linnea, Version 6.5
◆ Builds: Varka, Flins, Skirk, Escoffier
◆ Events: Travelers' Tales, Sightseeing With Friends
◆ Endgame: Spiral Abyss (March 2026)
Pyroculus are collectible items used to level up the Natlan Statue of the Seven in Genshin Impact. See all Pyroculus locations and how to get them here!
| Elemental Oculus Items | |||
|---|---|---|---|
 All Oculi All Oculi |
 Anemoculus Anemoculus |
 Geoculus Geoculus |
 Electroculus Electroculus |
 Dendroculus Dendroculus |
 Hydroculus Hydroculus |
 Pyroculus Pyroculus |
 Lunoculus Lunoculus |
List of Contents
Pyroculus Interactive Map and Locations
Pyroculus Interactive Map
| ・Click on the arrow in the upper left corner to access our sidebar to check all other pins and even search for individual pins. ・Pins checked off the map will reflect in the list below. We encourage users to sign up and log in to save your progress with the map. |
| Note: You can toggle the Area drop down menu to see Natlan underground areas! |
| Item | Area | How to Get |
|---|---|---|
| Pyroculus 1 |
Natlan Surface |  Location: Located on the path leading west towards "Children of Echoes" from the first waypoint. |
| Pyroculus 2 |
Natlan Surface | 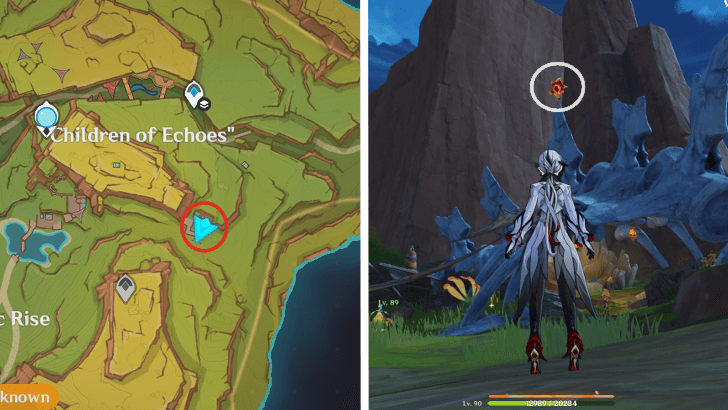 Location: Above some skeletal remains and enemy camp. |
| Pyroculus 3 |
Natlan Surface | 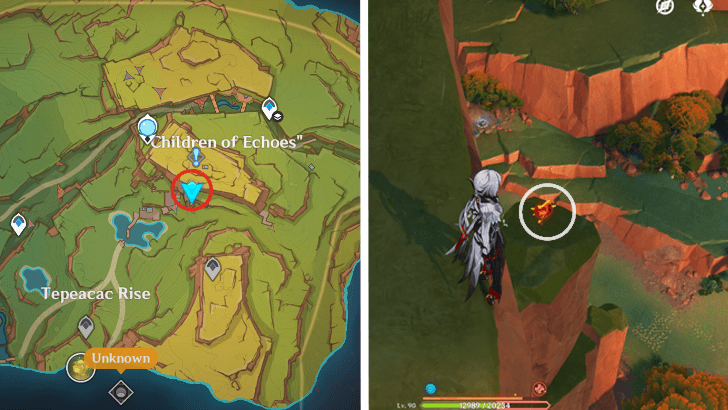 Location: Located on the opposite side of the southern summit of "Children of Echoes", and may be reached by gliding. |
| Pyroculus 4 |
Natlan Underground | 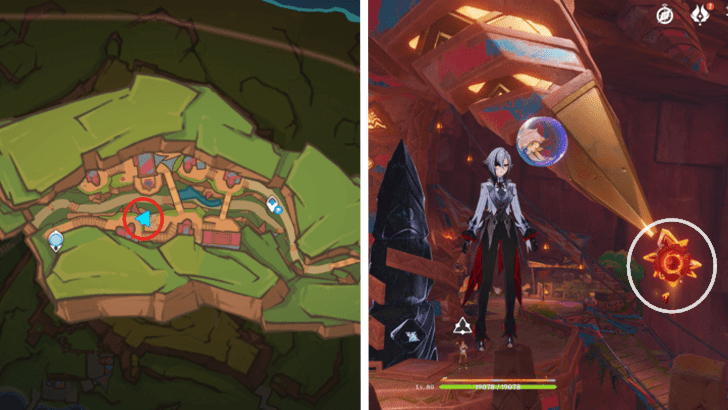 Location: Can be found along the path as you head upward towards the Statue of the Seven near "Children of Echoes". |
| Pyroculus 5 |
Natlan Surface | 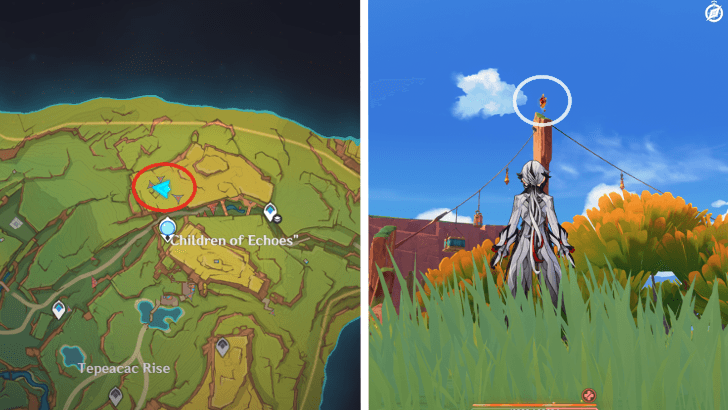 Location: On the northern summit of "Children of Echoes", Indwell with a Tepetlisaur by an opponent and use its ability to climb. |
| Pyroculus 6 |
Natlan Surface | 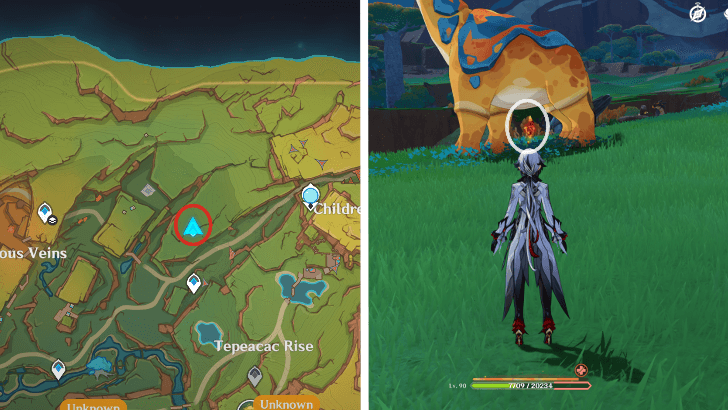 Location: Under a Long-Necked Rhino. |
| Pyroculus 7 |
Natlan Underground | 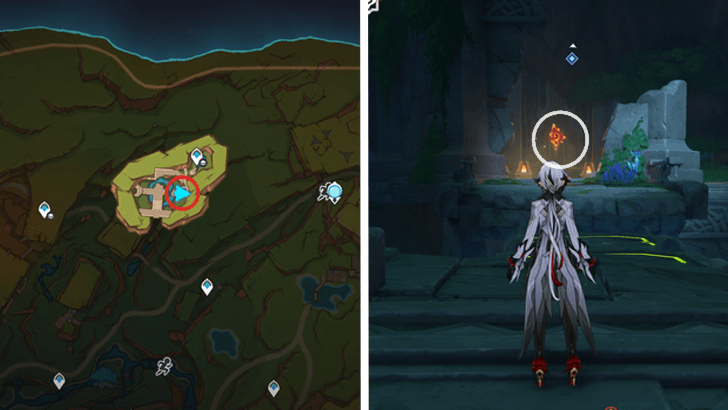 Location: Found during the quest Revelations from the Past to the left of the ruins' entrance. |
| Pyroculus 8 |
Natlan Surface |  Location: On a rock formation beside a cliff, surrounded by Halberd-Crest Birds. |
| Pyroculus 9 |
Natlan Surface | 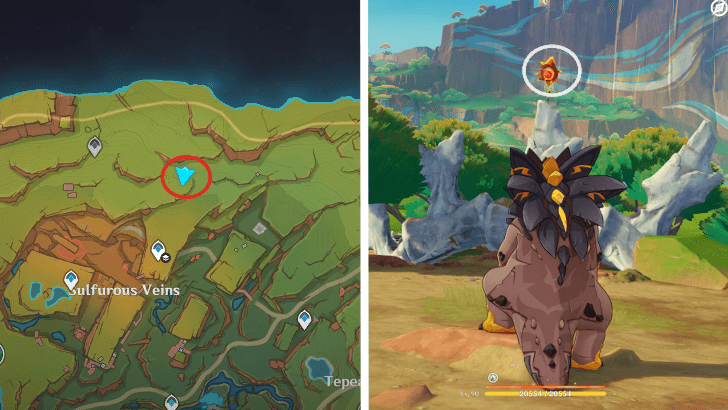 Location: Found above the skeletal remains of foes defending a chest and two Tepetlisaurs. |
| Pyroculus 10 |
Natlan Surface | 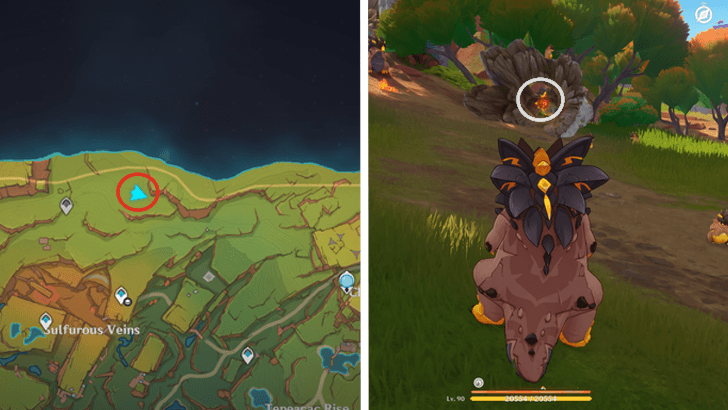 Location: Located inside a hollow fallen tree trunk in the "Tepetlisaur hangout spot". |
| Pyroculus 11 |
Natlan Surface | 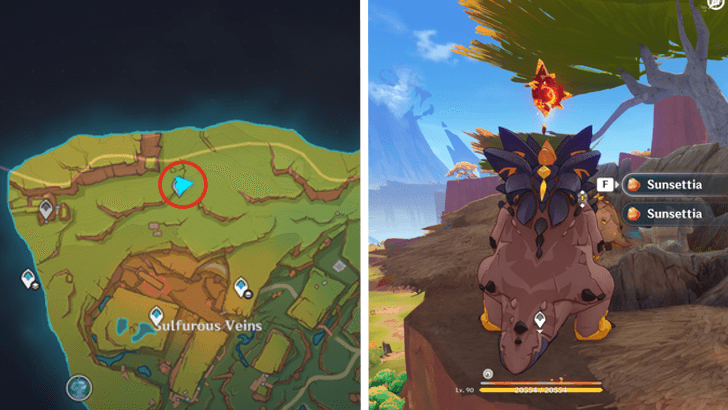 Location: Located above a rock formation with a Tepetlisaurus nest, near the teleport waypoint. |
| Pyroculus 12 |
Natlan Surface | 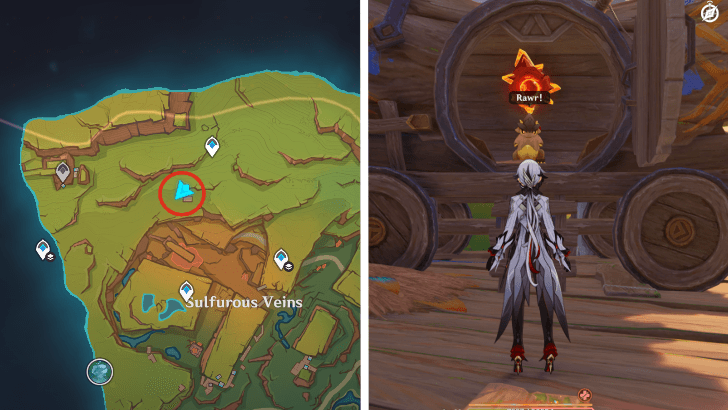 Location: Located inside a Saurian cart next to an Exquisite Chest guarded by a group of Treasure Hoarders. The key can be found near a Treasure Hoarder: Seaman. |
| Pyroculus 13 |
Natlan Underground | 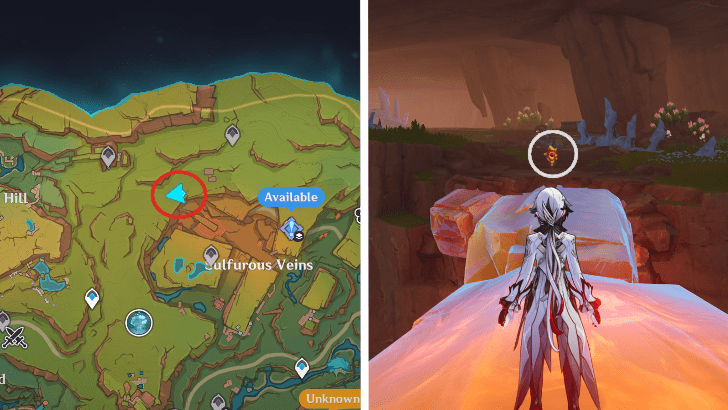 Location: Placed above a Phlogiston bridge in Sulfurous Veins. If approaching from the east, there would be no bridge connection, but as you get closer, a tall Phlogiston block will fall and make the bridge. |
| Pyroculus 14 |
Natlan Underground | 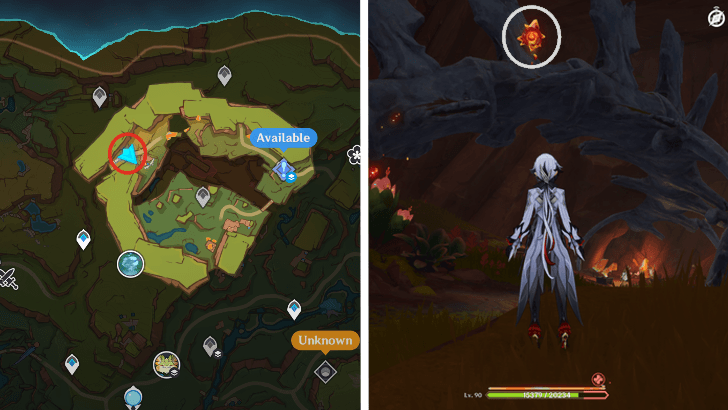 Location: Located atop a gigantic skeletal remains in sulfurous veins, near an enemy camp. |
| Pyroculus 15 |
Natlan Underground | 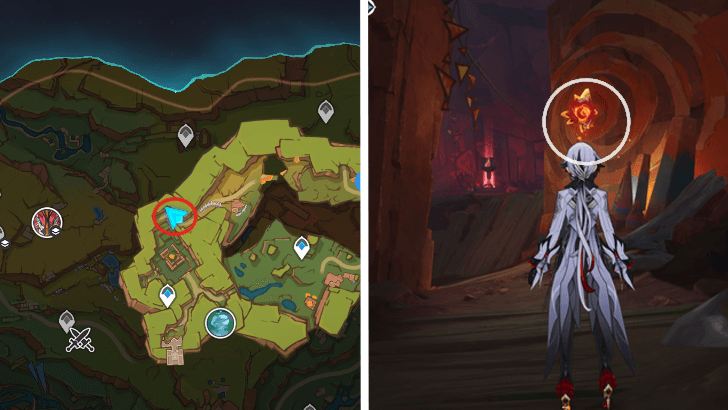 Location: Located by a wall mural near the Basin of Unnumbered Flames waypoint and Shadow Pin. |
| Pyroculus 16 |
Natlan Surface |  Location: Located on the edge of the rock formation, easily accessible from the Tequemecan Valley Waypoint to the east. |
| Pyroculus 17 |
Natlan Surface | 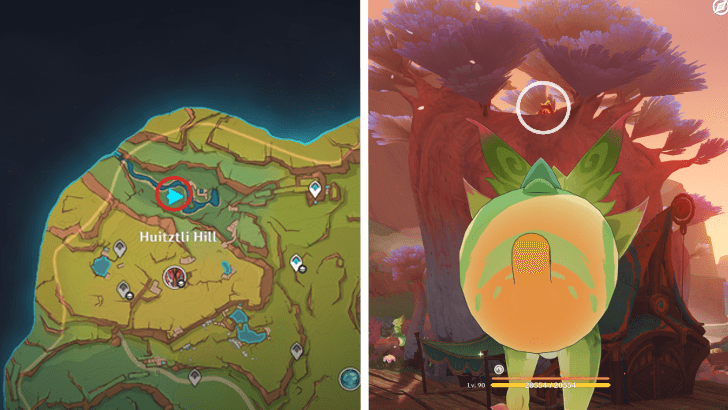 Location: Found on top of a hole in a broad hollow tree that can be climbed. |
| Pyroculus 18 |
Natlan Surface |  Location: Found on top of a remarkable rock formation with Fatui Agents at its base. |
| Pyroculus 19 |
Natlan Surface | 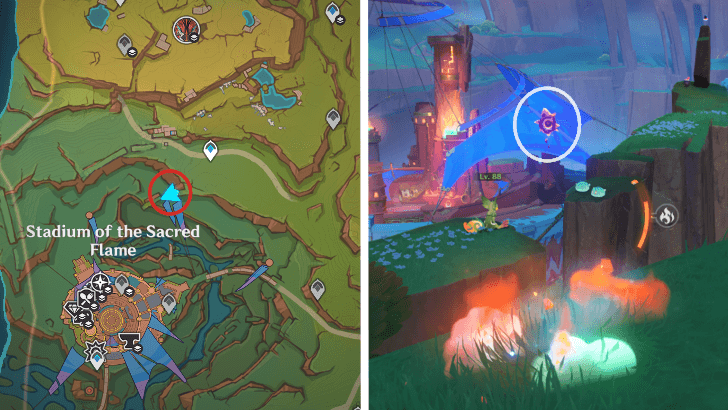 Location: Located between two rock formations, with a Yumkasaurus and two Anemo Slimes on either side of it. |
| Pyroculus 20 |
Natlan Surface |  Location: On top of a rock formation with an enemy camp at the base. |
| Pyroculus 21 |
Natlan Surface | 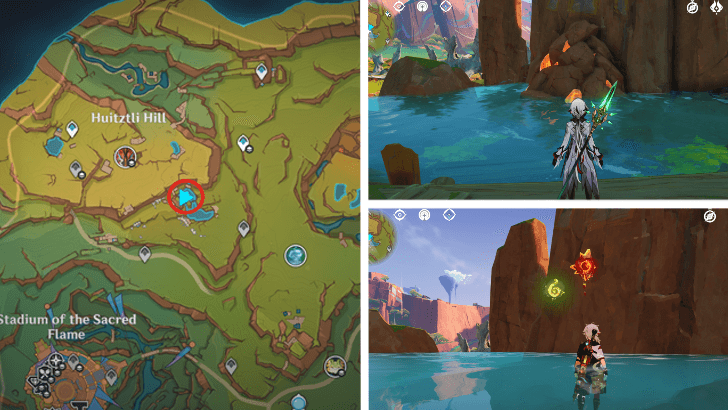 Location: Break the rock pile and Indwell with the Yumkasaurus Spiritsconce by the graffiti wall to obtain. |
| Pyroculus 22 |
Natlan Underground | 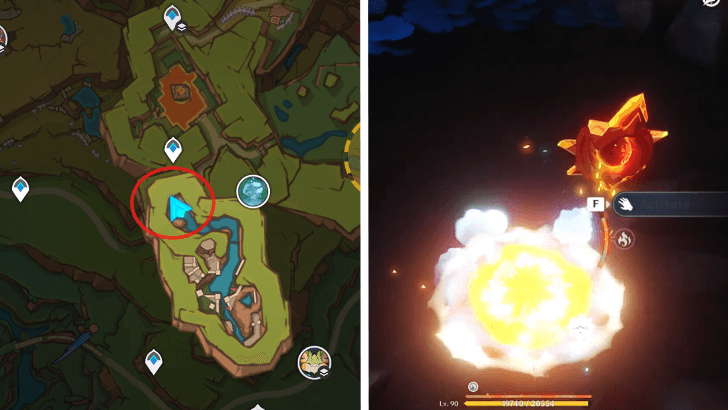 Location: Advance the Beneath the Crystal Rock quest by breaking the ground and falling down; Pyroculus will be at the landing area. |
| Pyroculus 23 |
Natlan Surface | 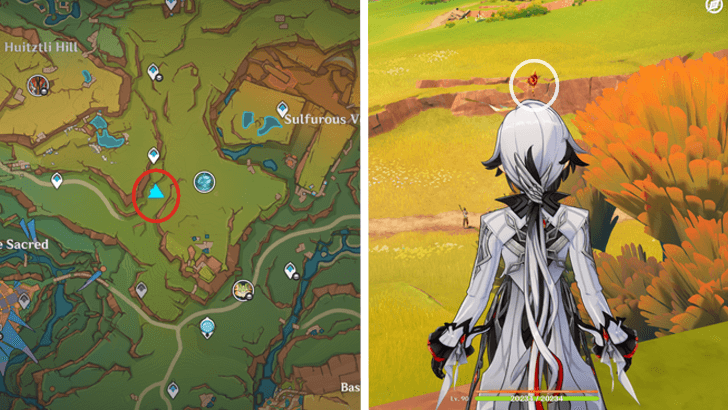 Location: Found on top of a rock formation with enemies at the foot; can be accessed by climbing from the base or gliding from the west. |
| Pyroculus 24 |
Natlan Underground |  Location: Reachable during the Beneath the Crystal Rock world quest, on a hole in the wall. |
| Pyroculus 25 |
Natlan Surface | 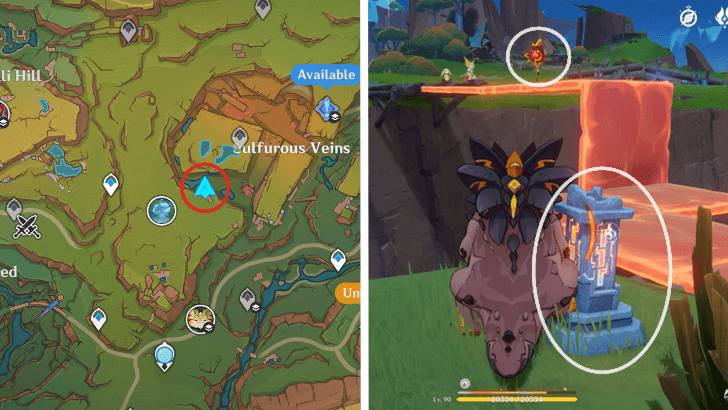 Location: Indwell with a nearby Tepetlisaur, infuse the pedestal with Phlogiston, and use the Tepetlisaur's ability to get the Pyroculus. |
| Pyroculus 26 |
Natlan Underground |  Location: Indwell with a Tepetlisaur and use its ability to climb the wall. |
| Pyroculus 27 |
Natlan Underground | 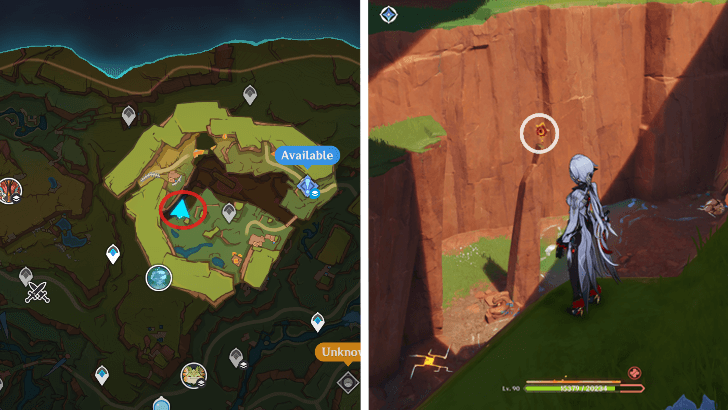 Location: Located atop a small rock formation, which can be reached by gliding from above or indwelling with a Tepetlisaur below. |
| Pyroculus 28 |
Natlan Underground |  Location: Indwell with the nearby Tepetlisaur, infuse the pedestal with Phlogiston, then use the Tepetlisaur's ability to get the Pyroculus. |
| Pyroculus 29 |
Natlan Underground | 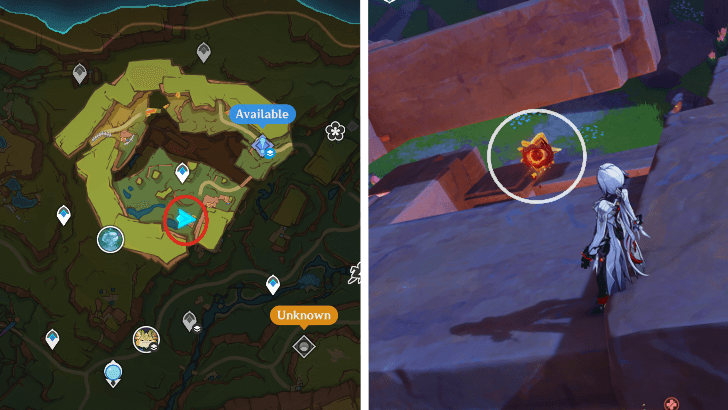 Location: Found atop a shadow pin in sulfurous veins, and can be reached by indwelling with a Tepetlisaur at the base or gliding from above. |
| Pyroculus 30 |
Natlan Surface | 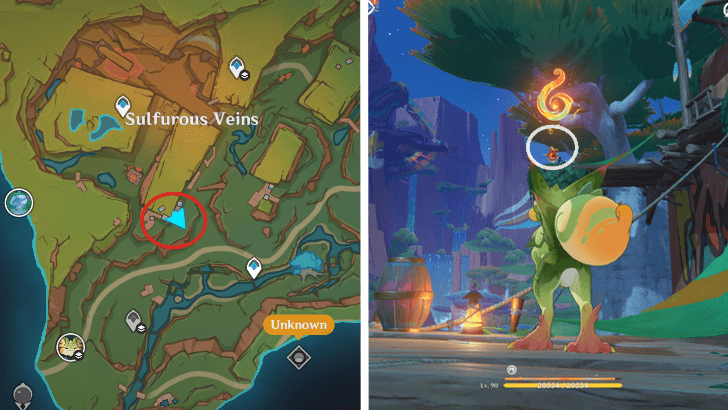 Location: Indwell with the nearby Yumkasaurus Spiritsconce, and use its skill to head towards the Pyroculus. |
| Pyroculus 31 |
Natlan Underground | 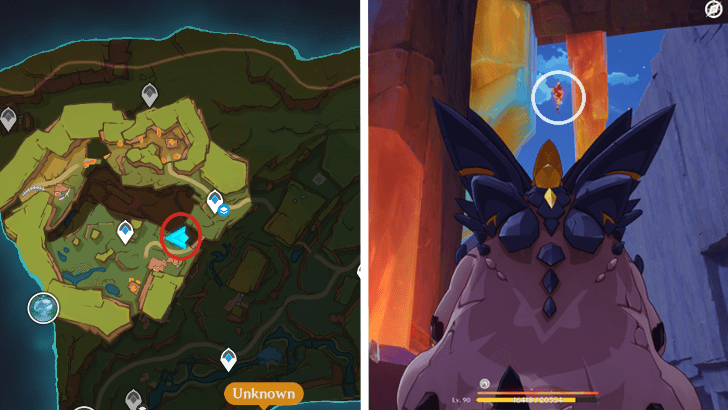 Location: Indwell with a Tepetlisaur and use its ability to climb the wall. |
| Pyroculus 32 |
Natlan Underground | 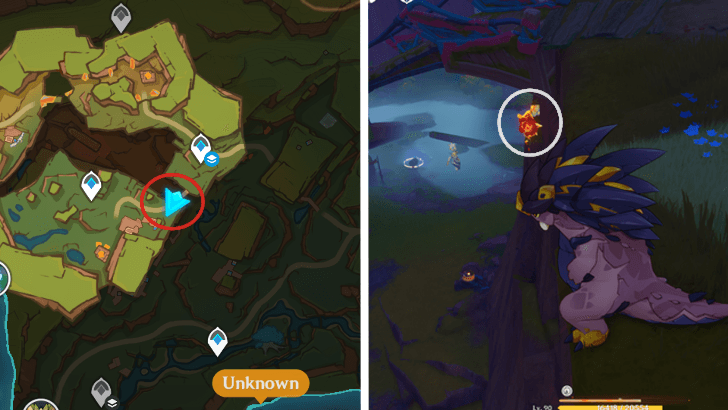 Location: Located beneath the bridge east of 31 above and can be obtained by climbing or utilizing the Tepetlisaur ability. |
| Pyroculus 33 |
Natlan Surface | 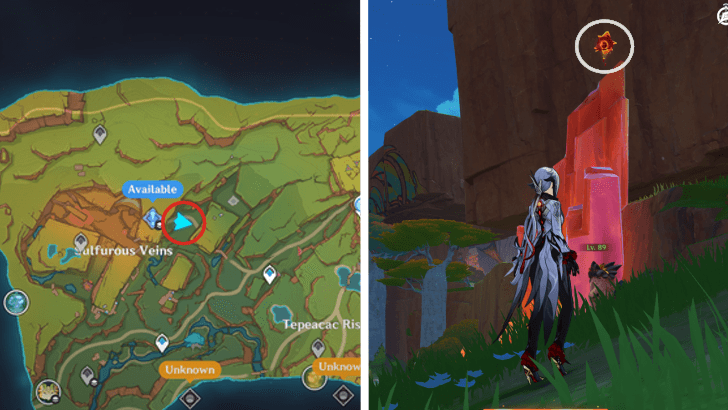 Location: On top of a solid Phlogiston block in Sulfurous Veins. Indwell with the Tepetlisaur discovered at its base, and use its ability to climb. |
| Pyroculus 34 |
Natlan Underground | 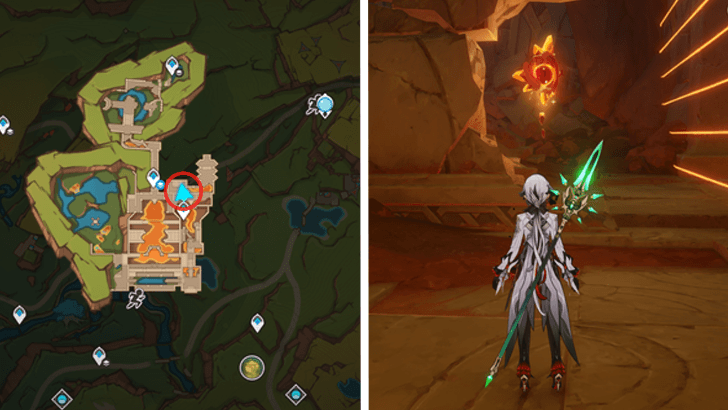 Location: Can be found during the Revelations from the Past quest. Once you are separated from your Tepetlisaurus friend, break the wall blocking the Pyroculus. |
| Pyroculus 35 |
Natlan Surface | 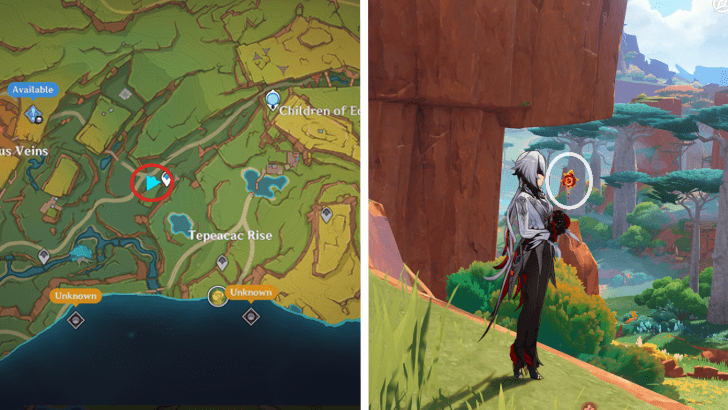 Location: Located southwest of the Tequemecan Valley Waypoint, on top of a tall rock. |
| Pyroculus 36 |
Natlan Surface | 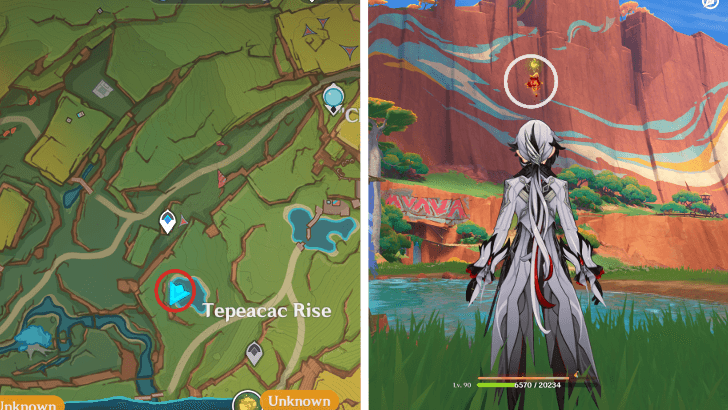 Location: Located over a small body of water. Indwell with the nearby Yumkasaurus and use its ability to reach. |
| Pyroculus 37 |
Natlan Surface | 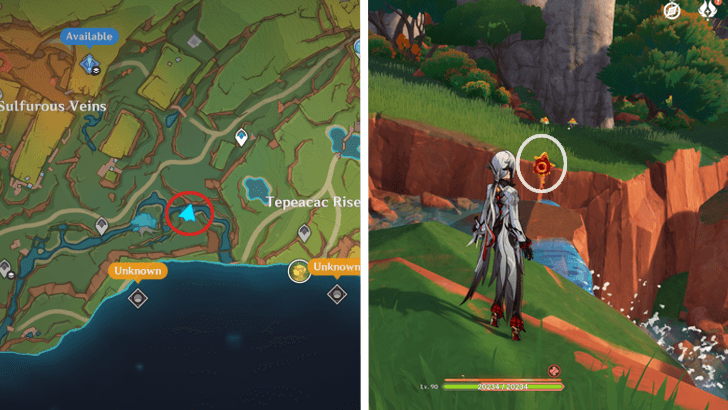 Location: South of 38, on top of a small waterfall. |
| Pyroculus 38 |
Natlan Surface | 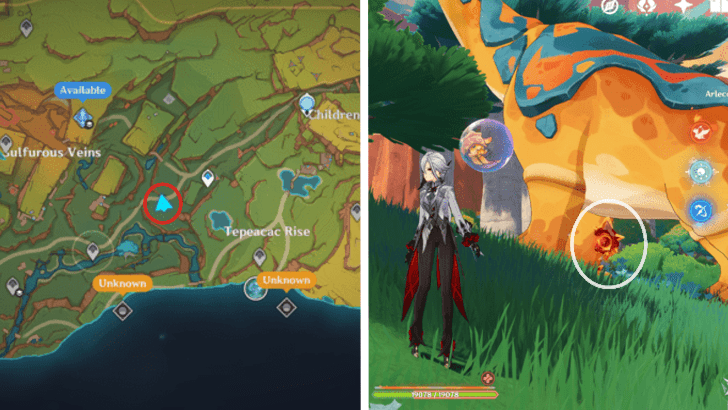 Location: Follow the path down from the Tequemecan Valley Waypoint until you spot a Long-Necked Rhino. |
| Pyroculus 39 |
Natlan Underground | 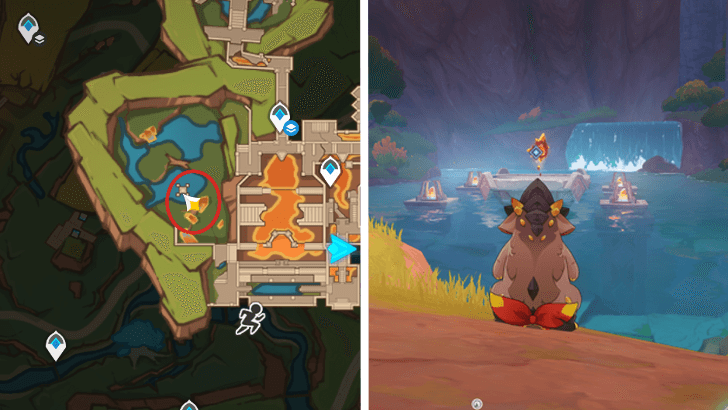 Location: Can be located during the Revelations from the Past task,. Once you get separated from your Tepetlisaurus friend and you are in control of him, solve the puzzle to make a bridge. |
| Pyroculus 40 |
Natlan Surface |  Location: On a cliff face above an enemy camp. Indwell with the enemy Tepetlisaurus and use its power to climb in get the Pyroculus. |
| Pyroculus 41 |
Natlan Surface | 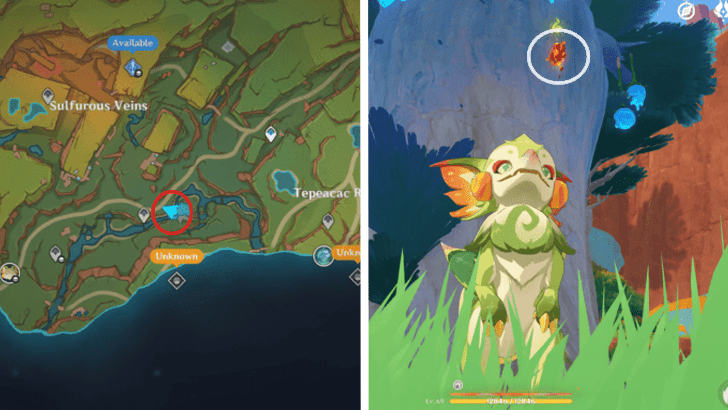 Location: In the Tequemecan Valley, there is a massive tree near another waypoint. Indwell one of the nearby Yumkasaurs and use its "Coilgrass" ability to the sigil. |
| Pyroculus 42 |
Natlan Surface | 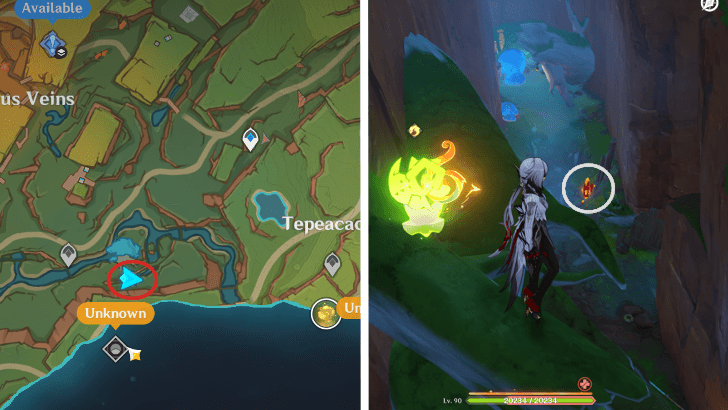 Location: On a ravine south of Pyroculus 41, in front of a waterfall. |
| Pyroculus 43 |
Natlan Underground | 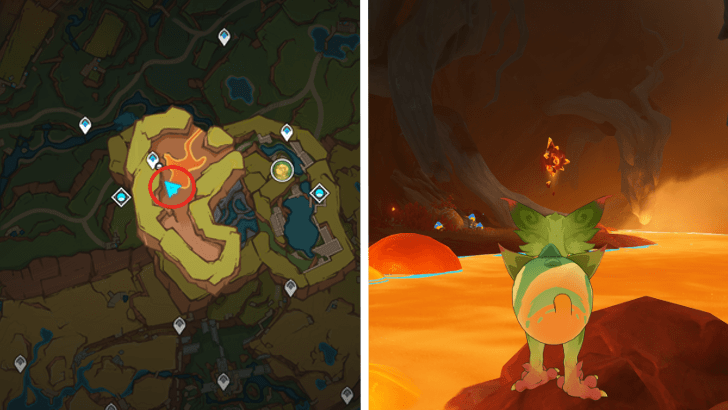 Location: Can be found while doing the Ripe for Trouble world quest. Indwell the Yumkasaurus Spiritsconce and use its ability to retrieve it. |
| Pyroculus 44 |
Natlan Underground |  Location: After starting the quest Ripe for Trouble, walk toward the Mountain King Flamegranates, and you will see the Pyroculus on the left. |
| Pyroculus 45 |
Natlan Underground | 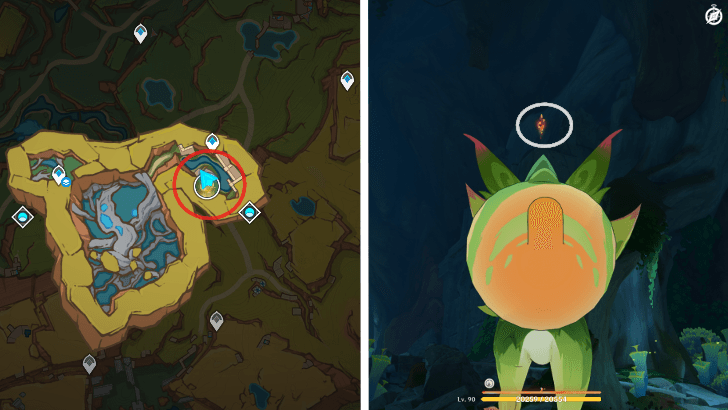 Location: Progress through the quest Ripe for Trouble, and you will see it on top of a ruined structure with a Yumkasaurus nest. |
| Pyroculus 46 |
Natlan Surface | 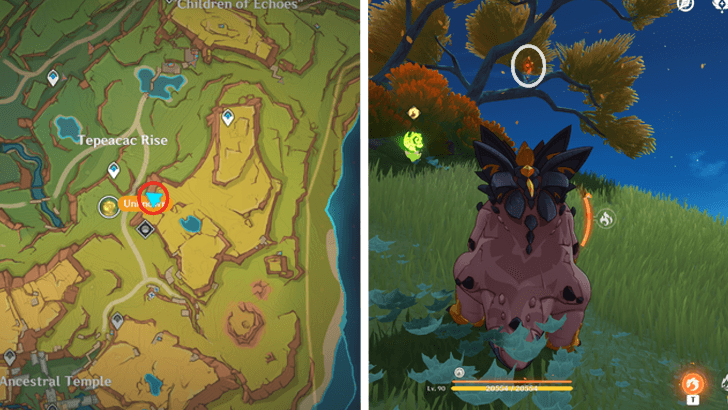 Location: Found on a tree branch hanging over a cliff, near a Yumkasaurus Spiritscone; you can walk to it or Indwell the Yumkasaurus to use its ability. |
| Pyroculus 47 |
Natlan Surface | 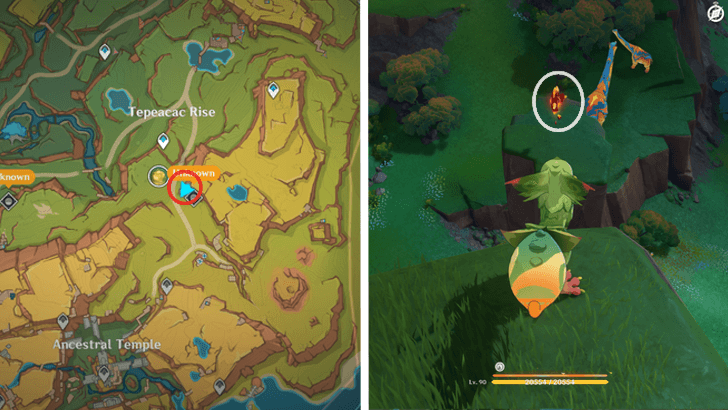 Location: On top of a thin rock formation; you can glide from 46 to reach it or use a Yumkasaurus to grapple to it. |
| Pyroculus 48 |
Natlan Underground |  Location: Indwell with the Tepetlisaurus Spiritsconce at the entrance and scale the walls using its ability. |
| Pyroculus 49 |
Natlan Underground | 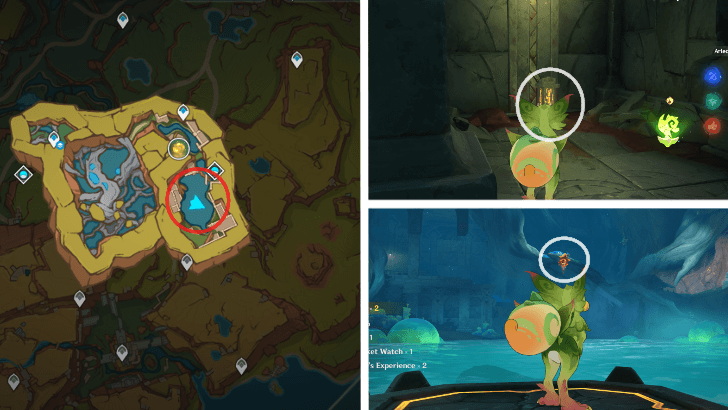 Location: Can be found while doing the Ripe for Trouble quest. Defeat the Ruin Guard, infuse the pedestal with Phlogiston, which creates several grappling points, and utilize the Yumkasaur ability to obtain it. |
| Pyroculus 50 |
Natlan Surface |  Location: On top of a rock formation with a Tepetlisaurus resting. Grab the Tepetlisaurus at the base and use its abilities to climb. |
| Pyroculus 51 |
Natlan Underground | 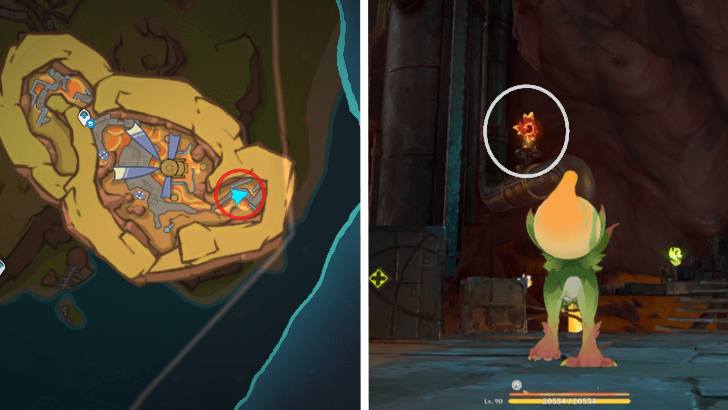 Location: Found in a room deep within a Saurian Research Facility; fight the fatui near the cave's entrance and free the yumkasaurus so that you can use its ability to capture the blue orb and open the gate farther into the facility. |
| Pyroculus 52 |
Natlan Surface | 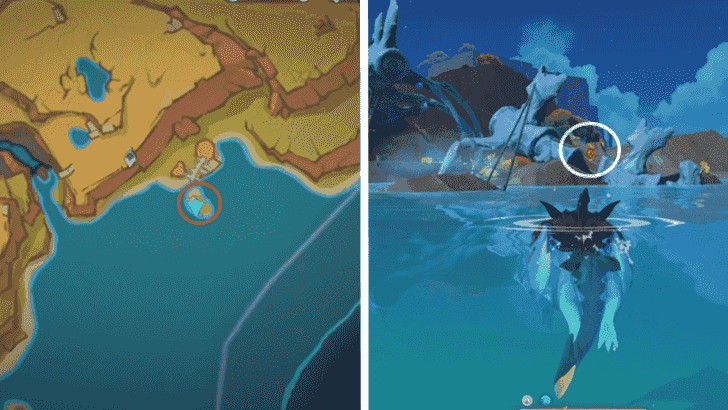 Location: From Pyroculus #59, indwell a Koholasaur and head Northeast until you see some large bones. This one lies in between a broken section of the skeleton. |
| Pyroculus 53 |
Natlan Underground | 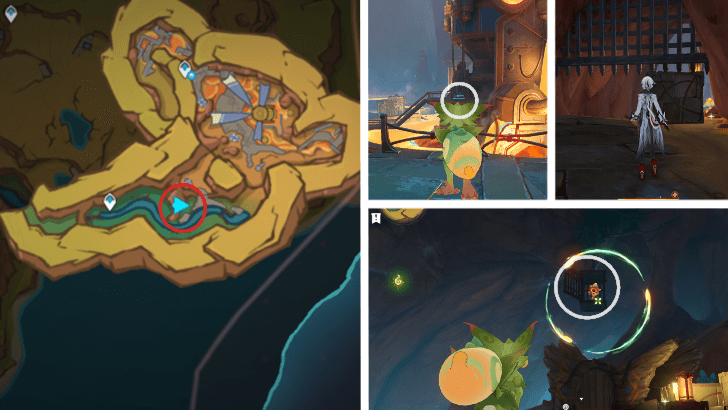 Location: Capture the Tepetlasaurus whelp in the room with Pyroculus 51 to obtain a hook. Attach the hook to the box and pull it with a Yumkasaurus until it reaches the entrance to the room. Take the blue orb and aim it at the door in the middle of the main chamber. This will unlock another gate directly behind you, where two Fatui Skirmishers will appear. Defeat the skirmishers and proceed through the door to find the Pyroculus in a suspended cage. |
| Pyroculus 54 |
Natlan Underground | 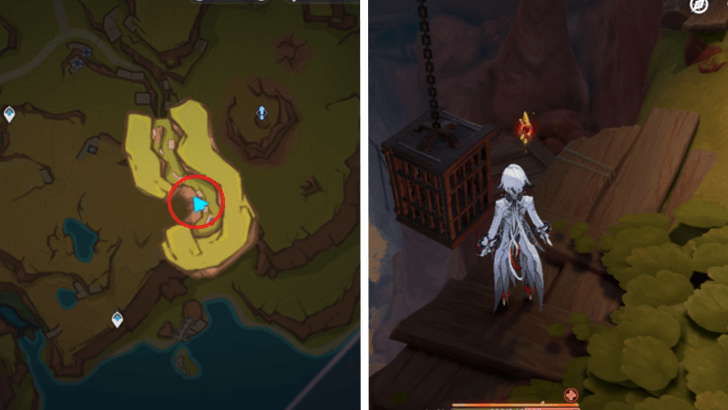 Location: Found inside the Saurian Research Facility on a ledge that leads deeper inside. The entrance is located in the fissure east of the ancestral temple. |
| Pyroculus 55 |
Natlan Surface |  Location: Found near some wooden platforms in the valley north of the Ancestral Temple. |
| Pyroculus 56 |
Natlan Underground | 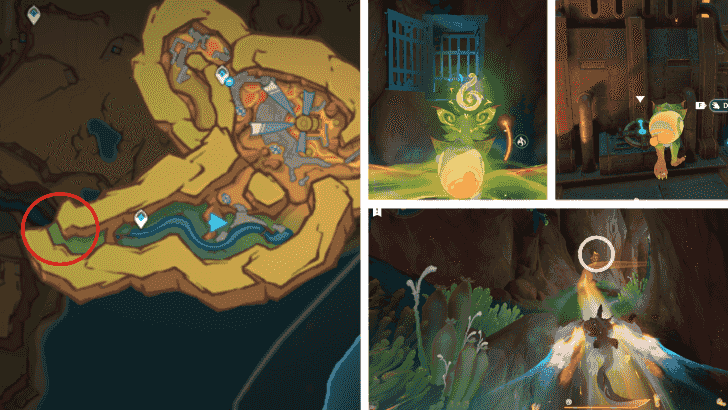 Location: In the room with Pyroculus 53, one of the hanging cages will contain a blue orb. Get the orb and place it on the small gate above the locked cart. Return through the gate to the main cavern and take the orb again. Shoot it into the center mechanism, crank the dial twice, and help the animals escape. You'll obtain a chest and a key. Use the key to open the locked cart in the area with all the hanging cages. Ride the spiritway and you'll get the Pyroculus 56 along the way. |
| Pyroculus 57 |
Natlan Underground | 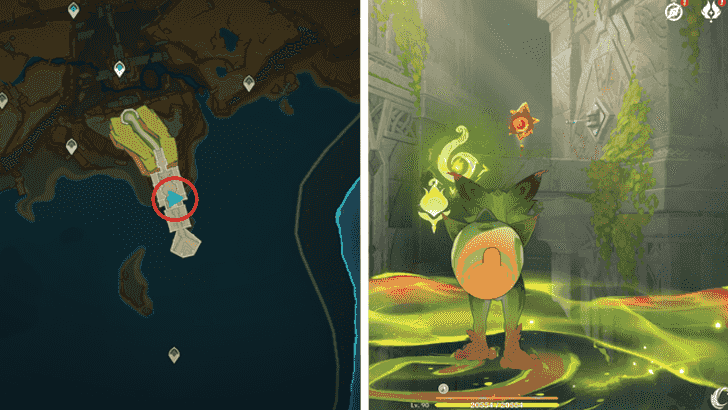 Location: Found during the "To the Night, What is the Night's" quest, indwell with the Yumkasaurus Spiritscone, and utilize the grappling points to reach the area. |
| Pyroculus 58 |
Natlan Underground | 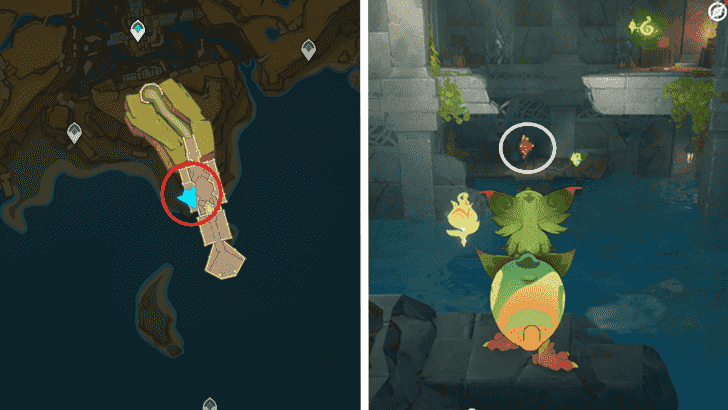 Location: Found also during the "To the Night, What is the Night's" quest, in the middle room, indwell with the Yumkasaurus Spiritscone, and utilize the grappling points to reach there. |
| Pyroculus 59 |
Natlan Surface |  Location: Continue travelling East along the coastline from the waypoint where you get Pyroculus 94. Grab the Koholasaur Spiritsconce and just swim over to this island. |
| Pyroculus 60 |
Natlan Underground | 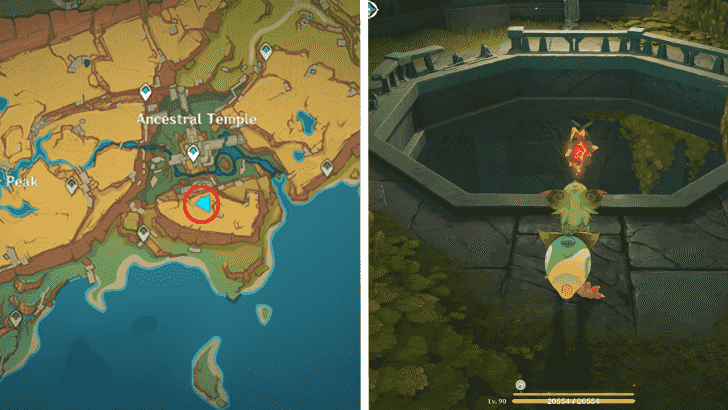 Location: Located at the entrance of the ruins during the "To the Night, What is the Night's" quest. |
| Pyroculus 61 |
Natlan Surface | 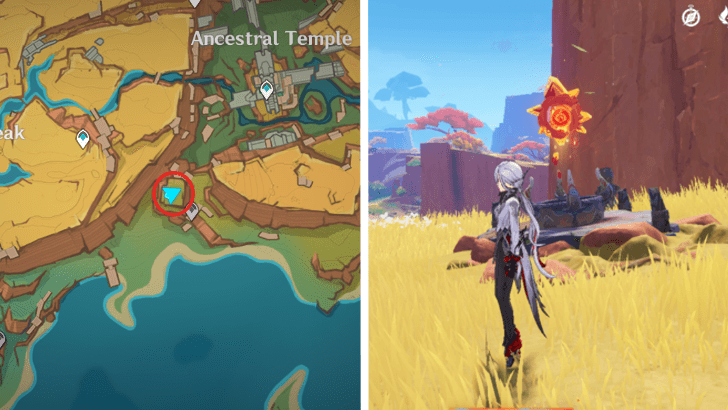 Location: Found atop a stone structure that can be climbed or glided to from the nearby cliffs. |
| Pyroculus 62 |
Natlan Surface |  Location: Located on a damaged bridge to the west of the main Ancestral Temple edifice. You can travel there using any of the neighboring Yumkasaurus. |
| Pyroculus 63 |
Natlan Surface |  Location: From the bridge where Pyroculus #62 is, utilize the Coilgrass Sigils and wooden platforms to travel south along the cliffside until you reach the platform where the Pyrouclus is. |
| Pyroculus 64 |
Natlan Surface | 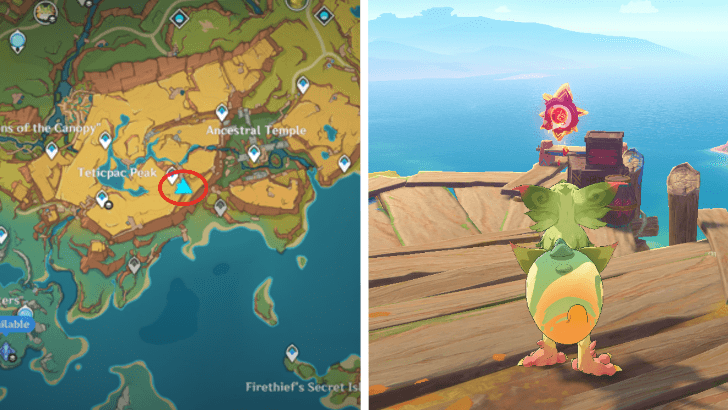 Location: Located on a wooden platform overlooking the ocean, just a few feet away from the Teleport Waypoint between the Ancestral Temple and Teticpac Peak. |
| Pyroculus 65 |
Natlan Underground | 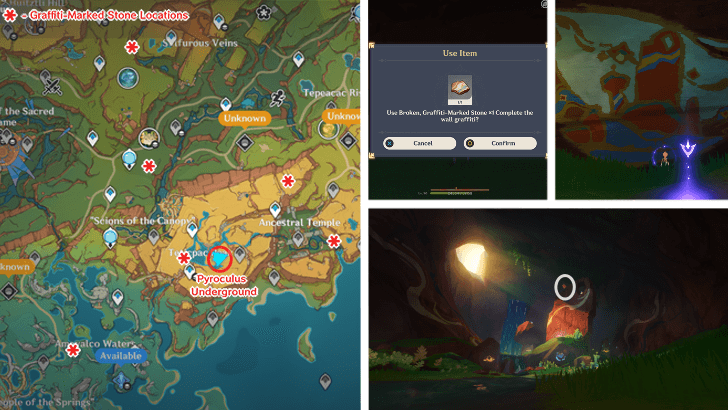 Location: Can be found in the Manse of Monetoo Murals, located beneath Teticpac Peak. To enter the area, you must submit 6 Broken Graffiti-Marked Stones. Find the murals on each Graffiti stone location and solve the puzzles to unlock a chest containing the stone. |
| Pyroculus 66 |
Natlan Surface | 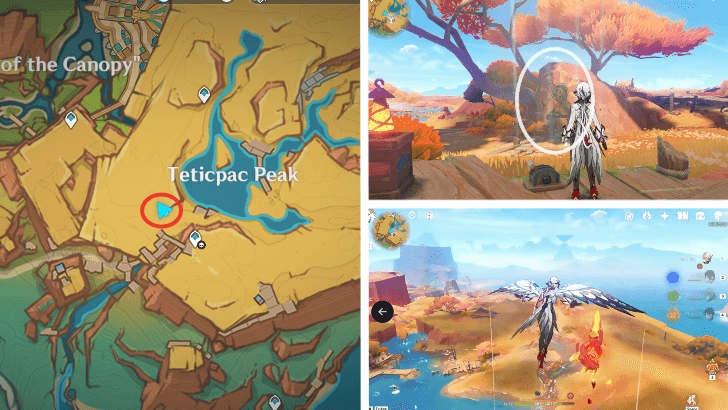 Location: Go to the camp south of Teticpac Peak, near the water. Find the lever you can operate and use it to align the windmill on the nearby rock with the painted parts. This creates a wind current, which you can ride to the pyroculus. |
| Pyroculus 67 |
Natlan Surface | 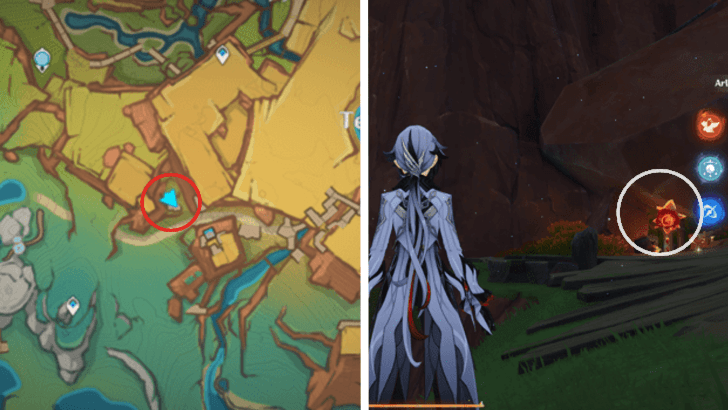 Location: Exit to the right and follow the path up from where you fell while getting Pyroculus #68. You'll see the Pyroculus on the left, next to a Monetoo secret. |
| Pyroculus 68 |
Natlan Surface | 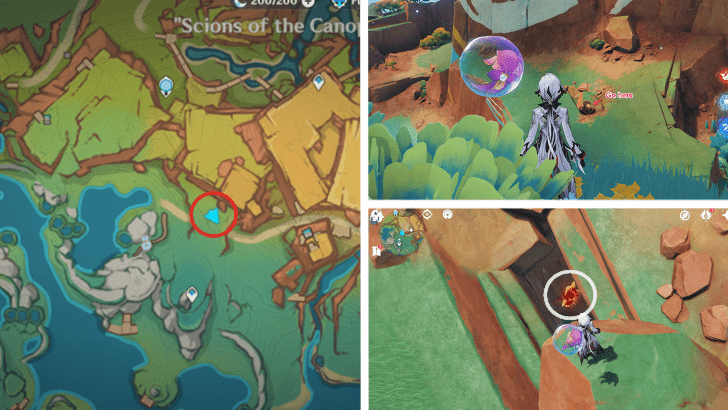 Location: Turn north from the waypoint in Ameyalco Waters. When you reach the shrine, climb up the boulder until you notice a little opening in front Jump down. |
| Pyroculus 69 |
Natlan Surface | 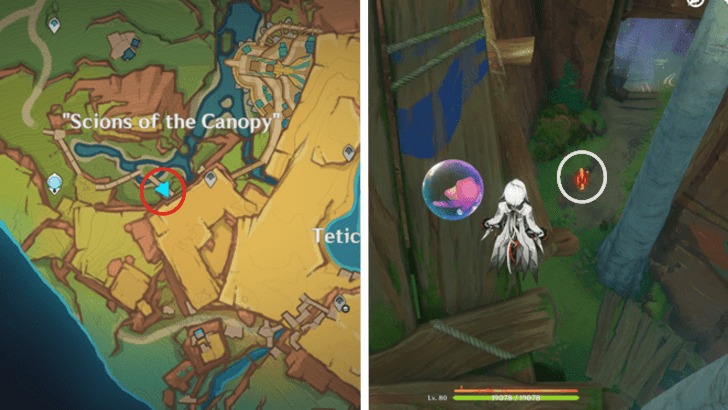 Location: Follow the tree bridge from the Statue of the Seven near "Scions of the Canopy" to the waypoint. Drop down and grab it. |
| Pyroculus 70 |
Natlan Surface | 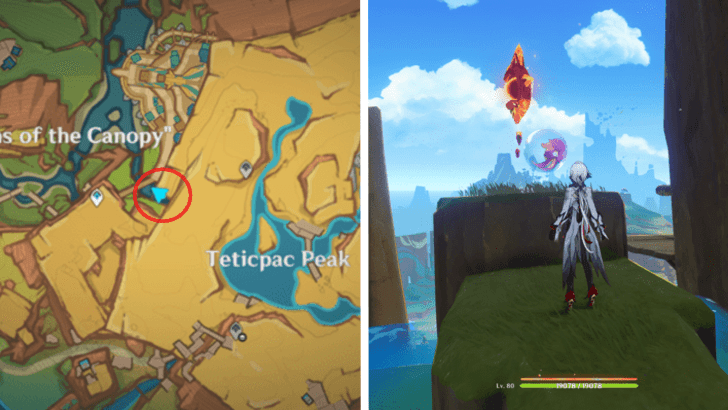 Location: Found across the bridge from the waypoint in "Scions of the Canopy". There is a high waterfall to your right that you can climb. |
| Pyroculus 71 |
Natlan Surface | 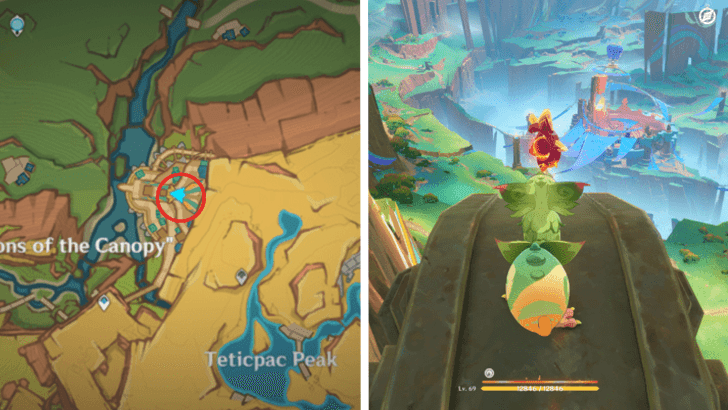 Location: Make your way to the edge of Treehouse City and indwell the nearby Yumkasaur Spiritscone. Use its abilities until you get to the roof of the main building. |
| Pyroculus 72 |
Natlan Surface | 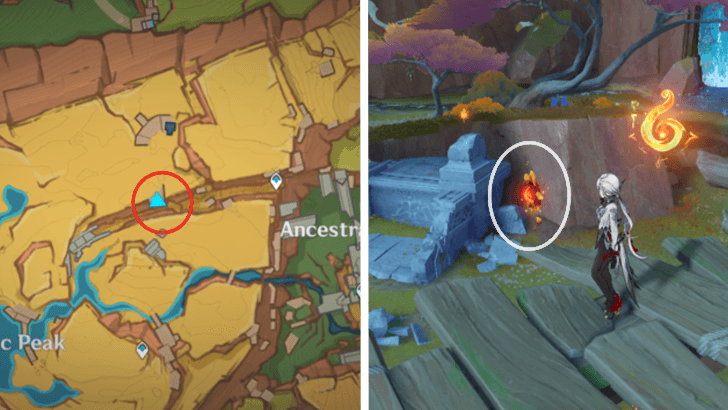 Location: Can be found floating toward the top of the valley between Teticpac Peak and Ancestral Temple, surrounded by wooden platforms. |
| Pyroculus 73 |
Natlan Underground | 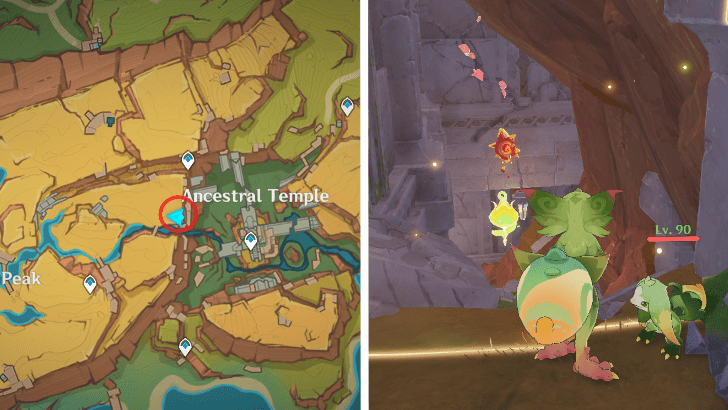 Location: The Pyroculus will be on a ledge, behind a barrier. To the right of this barrier, past a tent, there is a route into the wall. Go inside, defeat the Wayob in the center of the ruin, and complete the relay ball converter puzzle by adjusting the converters so they align. This will open a door on the ruin's upper floor. Use the sigils to navigate and open another door that leads to the Pyroculus. |
| Pyroculus 74 |
Natlan Surface | 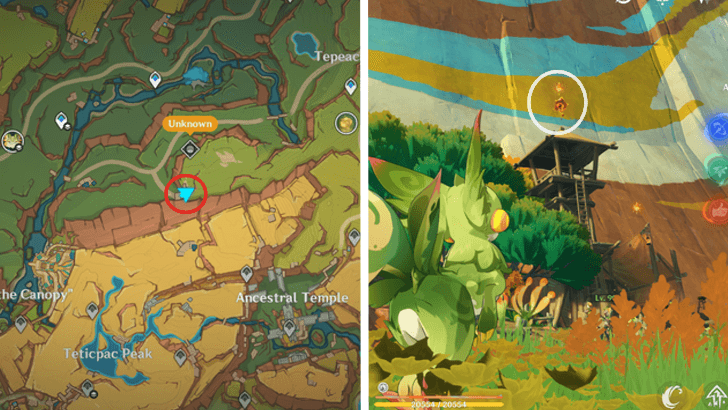 Location: On top of an enemy camp watchtower; indwell with the Yumkasaurus in the camp and utilize the grappling points to reach the top. |
| Pyroculus 75 |
Natlan Surface | 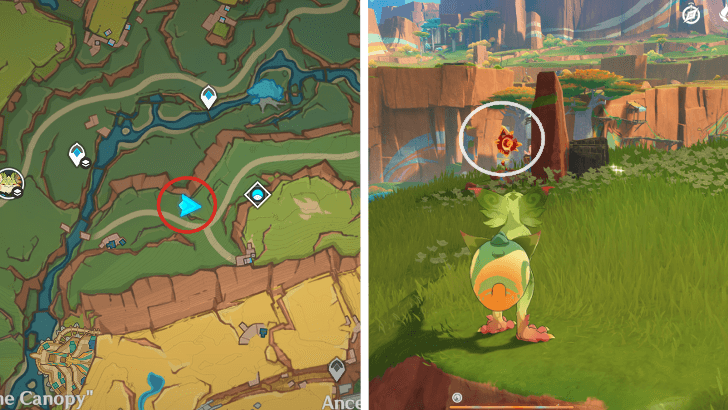 Location: Found near the Ancient Watchtower domain by a stone slab. |
| Pyroculus 76 |
Natlan Surface | 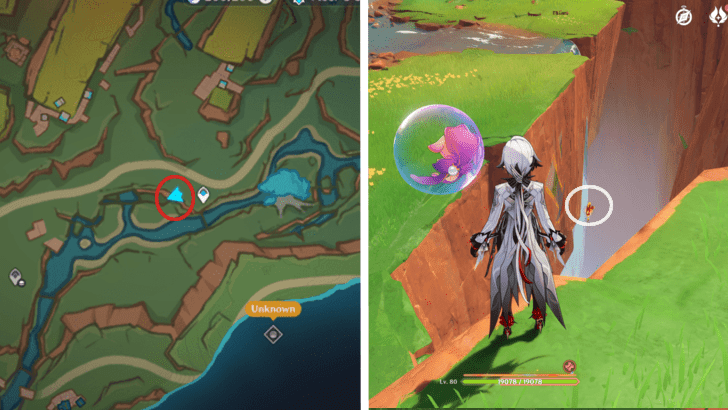 Location: After reaching the waypoint from Pyroculus 41. Continue straight until you notice a tiny gorge. |
| Pyroculus 77 |
Natlan Surface | 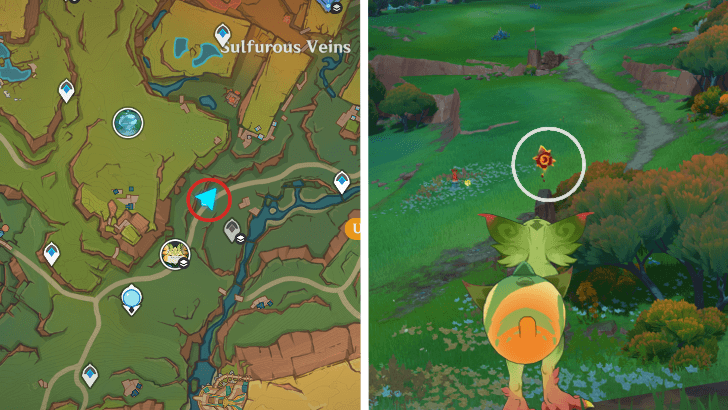 Location: On top of a rock slab near a Time Trial Challenge. |
| Pyroculus 78 |
Natlan Surface | 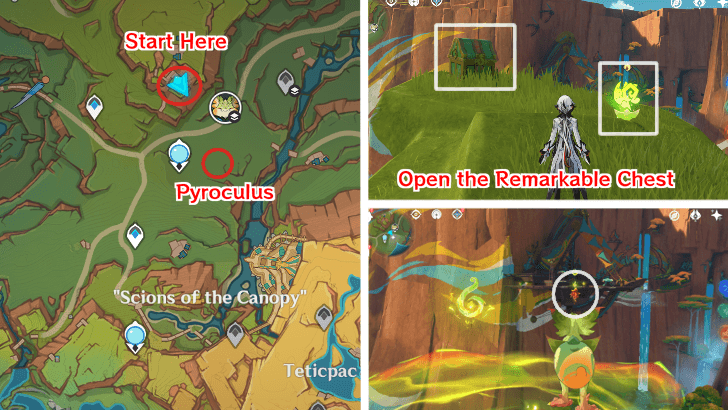 Location: Indwell with the Yumkasaurus Spiritsconce near a Remarkable Chest on the hill to the north, and use its ability to reach the Pyroculus. |
| Pyroculus 79 |
Natlan Surface | 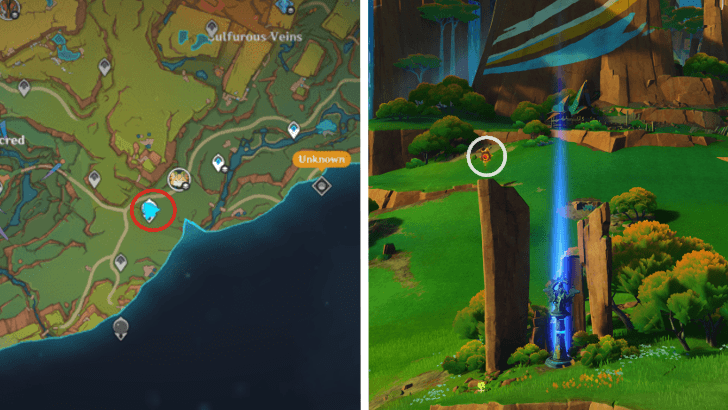 Location: On top of a rock pillar directly beside the Statue of the Seven in the 'Basin of Unnumbered Flames'. |
| Pyroculus 80 |
Natlan Surface | 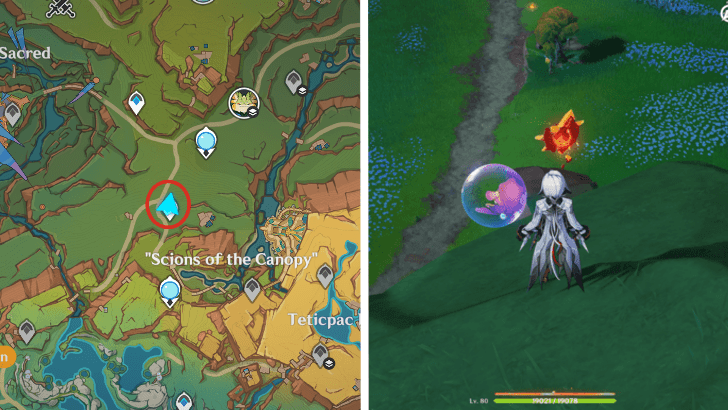 Location: Southwest of the Statue of the Seven in the Basin. Right in front of the waypoint. |
| Pyroculus 81 |
Natlan Surface | 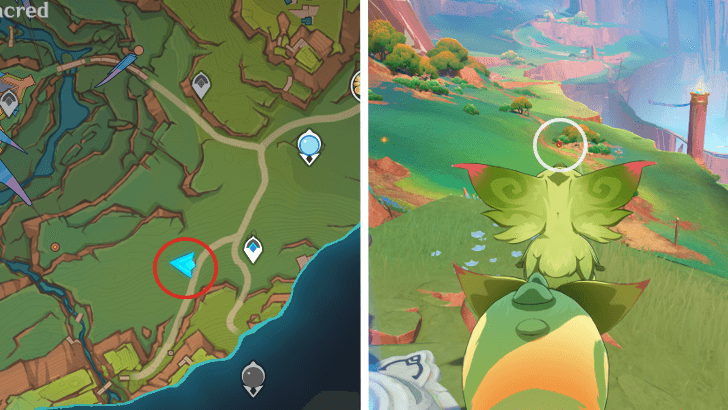 Location: Found west of the Basin of Unnumbered Flames waypoint, on top of a wooden structure with an NPC called Quipia. |
| Pyroculus 82 |
Natlan Surface |  Location: Indwell with the Yumkasaurus Spiritsconce and use the Flamegranate Pectins to pop the three bubbles. Doing so will create a grappling point to the Pyroculus, and then utilize the Yumkasaurus ability to get there. |
| Pyroculus 83 |
Natlan Surface |  Location: Indwell with the Tepetlisaurus at the bottom of a rock formation. Enter the Molten Fissure to take you right to the Pyroculus. |
| Pyroculus 84 |
Natlan Underground | 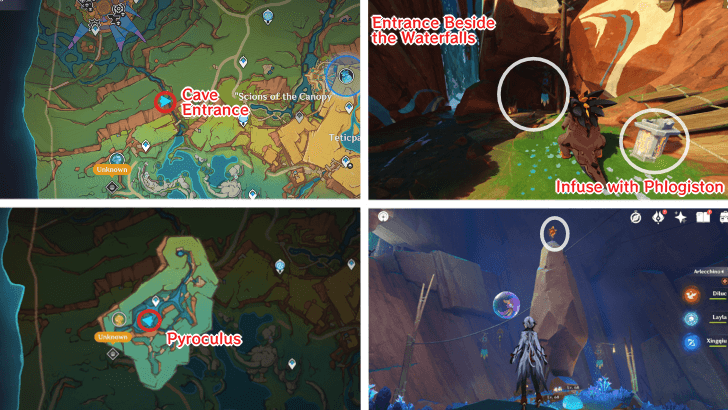 Location: Located underground east of Natlan. The entrance to the area is hidden beside the waterfalls. To unlock the path, first eliminate the enemies, then indwell the nearby Terpetlisaur to infuse Phlogiston to activate the switch that opens the gate. Break all of the barriers to reach the underground level. Follow the path down as you progress through the scripted scenario. Turn right at the intersection ; the Pyroculus is perched atop a massive stone obelisk. Terpetlisaur, your way up. |
| Pyroculus 85 |
Natlan Surface | 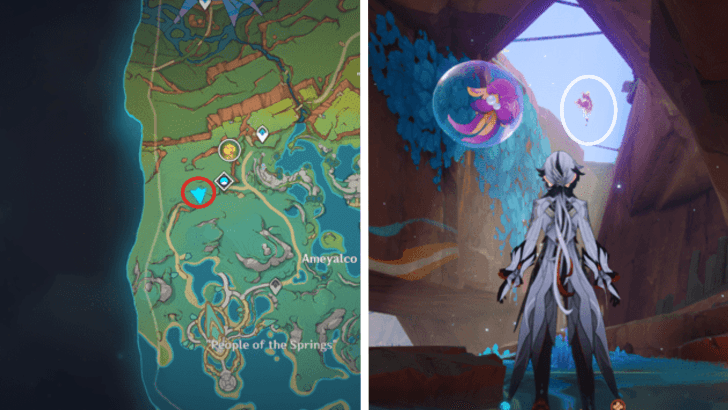 Location: After opening the "Sanctum of Rainbow Spirits" Domain, continue onward and defeat the enemies. You should notice an entrance above you. Climb up the wall or circle around the exit, then drop down from the opening above. |
| Pyroculus 86 |
Natlan Underground | 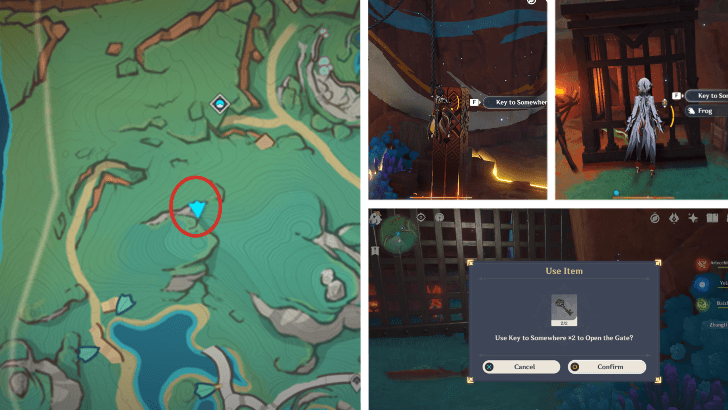 Location: From the Sanctum of Rainbow Spirits realm, take the road to a locked gate that requires two Keys to Somewhere. One of the keys will be on a rope near the gate, while the other will be in a nearby cage. Open the gate to find the Pyroculus inside. |
| Pyroculus 87 |
Natlan Surface | 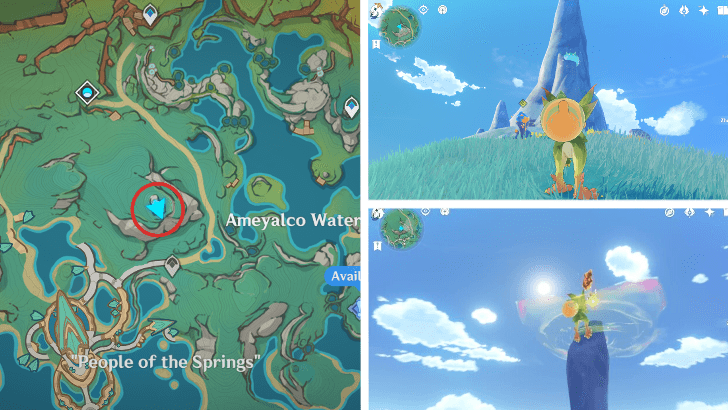 Location: Located at the top of a towering white stone structure. Defeat the anemo slime at the foot of the structure to summon Sigils, then indwell nearby Yumkasaurus to reach the top. |
| Pyroculus 88 |
Natlan Surface | 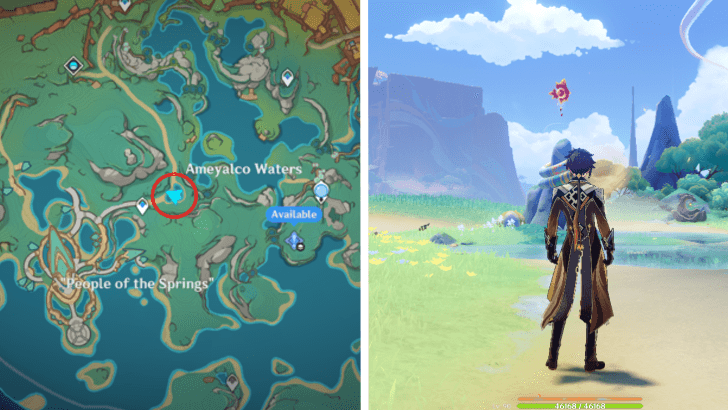 Location: Found in the center of a pond west of the Ameyalco Waters. |
| Pyroculus 89 |
Natlan Underground | 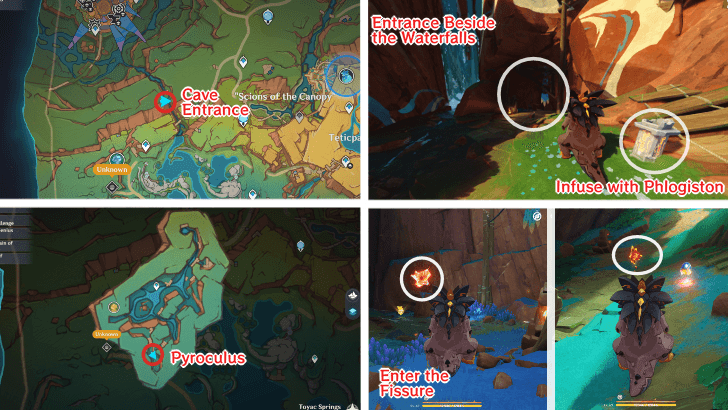 Location: Head south from Pyroculus 84 to find a fissure where you can enter as a Terpetlisaur. The Pyroculus is straight ahead as you emerge. |
| Pyroculus 90 |
Natlan Surface | 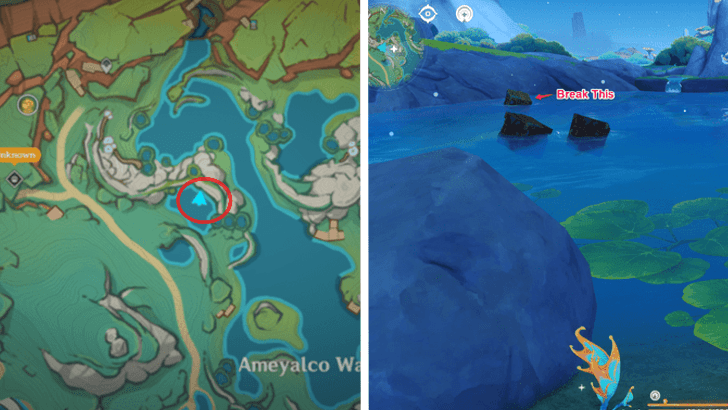 Location: Climb up from Pyroculus #91 to find a larger pond. Indwell one of the Koholasaurs and destroy the box on the corner. |
| Pyroculus 91 |
Natlan Surface | 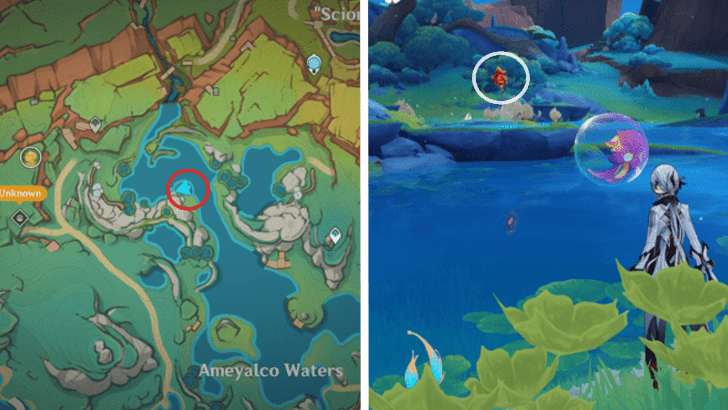 Location: Located north of the Ameyalco Waters, across a Phlogiston shrine. |
| Pyroculus 92 |
Natlan Surface | 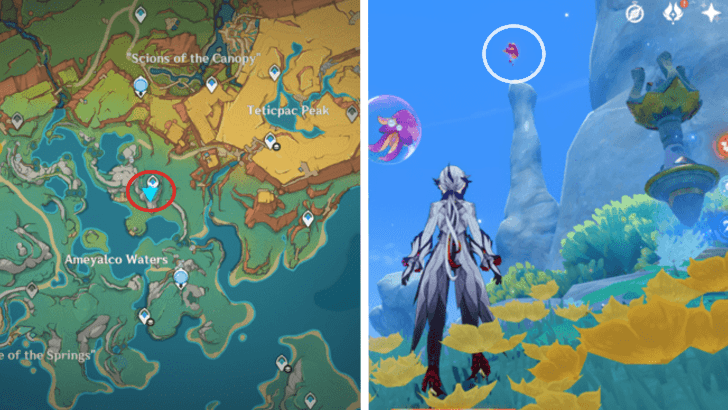 Location: Located right south of the Statue of the Seven in the 'Coatepec Mountains' location. From this point, you'll see it on top of a rock pillar. |
| Pyroculus 93 |
Natlan Surface |  Location: Travel northeast from the Ameyalco Statue of the Seven until you reach a shore where a Monetoo is stranded. To complete the Monetoo puzzle, defeat the hostiles and enter a nearby Koholasaur Spiritsconce. |
| Pyroculus 94 |
Natlan Surface |  Location: Go to this waypoint in 'Toyac Springs'. Hit the windstones in front of the waypoint and glide to get the Pyroculus. |
| Pyroculus 95 |
Natlan Underground |  Location: Head to the underground area accessible from the Statue of the Seven at Ameyalco. This one should be at the northeastern edge of the underground map. |
| Pyroculus 96 |
Natlan Surface | 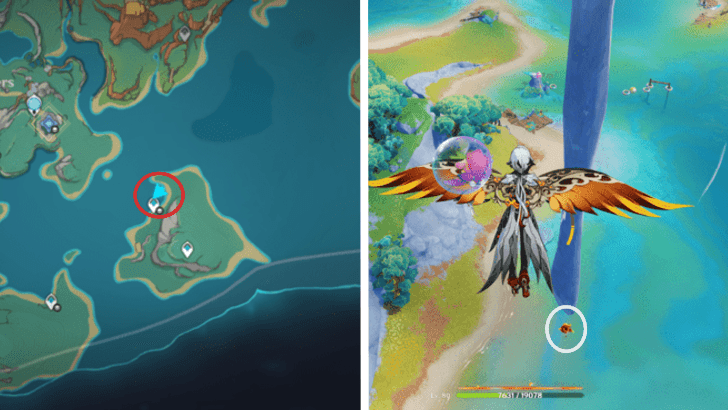 Location: Head over to the floating island from where you found 98, then leap off the edge and glide down until you spot it on the tip of the Stalactite. |
| Pyroculus 97 |
Natlan Surface | 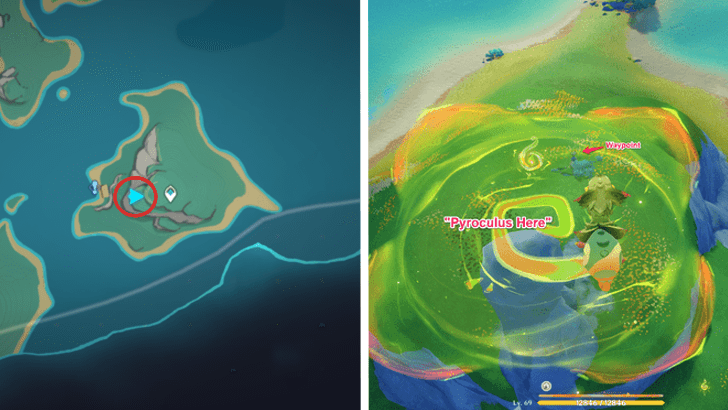 Location: In front of a waypoint on an island southeast of the Ameyalco Statue of the Seven; there are a sequence of sigils that can be followed upwards after indwelling a nearby Yumkasaur. |
| Pyroculus 98 |
Natlan Underground |  Location: Can be found after finishing the "Tracer No Tracing" world quest. From the Spiritway's waypoint, head east. Glide across the island and head near the edge, where there are a lot of Anemo Slimes. Defeat them to unlock a gust stone, which you can then ride up to get the Pyroculus. |
| Pyroculus 99 |
Natlan Surface |  Location: From the waypoint in Pyroculus 100, cross over to the adjacent island and head to the peak. Once you come across a Phlogiston shrine, clear the enemies camping out to unlock a wind tunnel that allows you to ride upward. |
| Pyroculus 100 |
Natlan Surface | 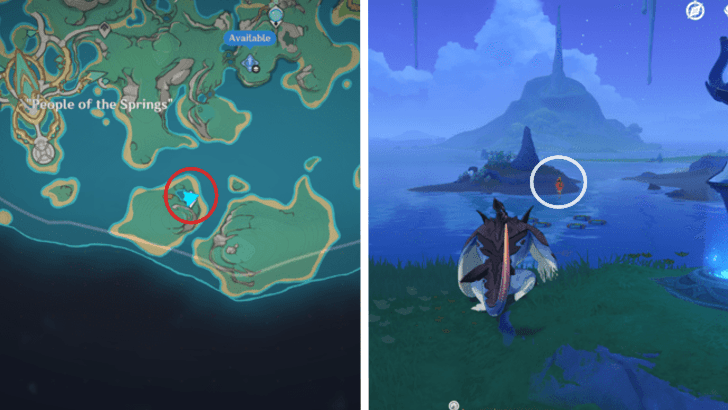 Location: Located southwest of the Statue of the Seven in Ameyalco. Indwell one of the adjacent Koholasaurs and "Eject" to acquire. |
| Pyroculus 101 |
Natlan Underground | 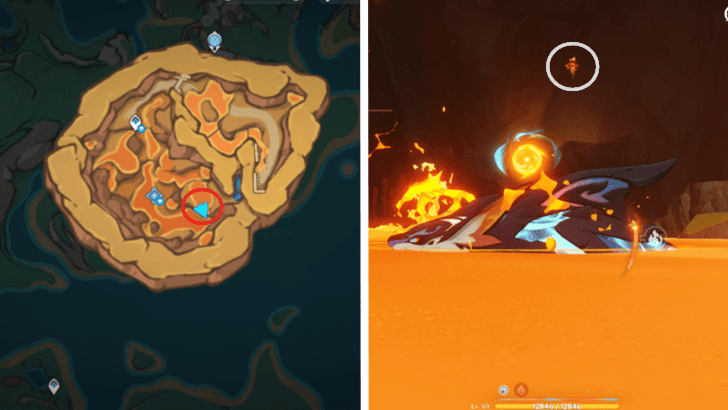 Location: Can be found by playing through the "Tracer No Tracing" world quest. It's located on a platform across from the Jet-Set Eddie . Use the jet to cross where there will be another jet that you may ride to grab it. |
| Pyroculus 102 |
Natlan Underground |  Location: Can also be found during the "Tracer No Tracing" world quest. Complete the trial and collect the script. If you get to the Jet-Set Eddie near where you acquired the script, a prompt regarding "Monetoo" should appear. Follow the Monetoo until it opens a secret entrance. Grab the Pyroculus once it opens. |
| Pyroculus 103 |
Natlan Underground | 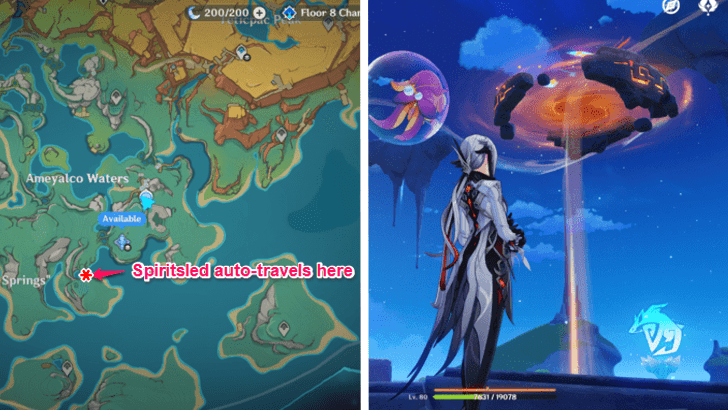 Location: This Pyroculus may only be obtained after finishing the "Tracer No Tracing" world quest. Indwell the Koholasaur Spiritsconce and simply ride out the Spiritway. |
| Pyroculus 104 |
Natlan Underground | 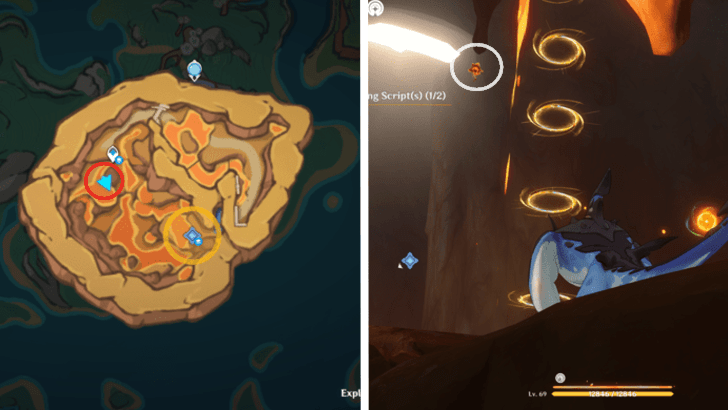 Location: Can also be found by playing through the "Tracer No Tracing" world quest. Follow the objectives to unlock the gate. Continue to progress the quest until the "Iridescent Beams" prompt occurs. Complete the task that is closest to the waypoint and ride the boost rings up to the Pyroculus. |
| Pyroculus 105 |
Natlan Underground | 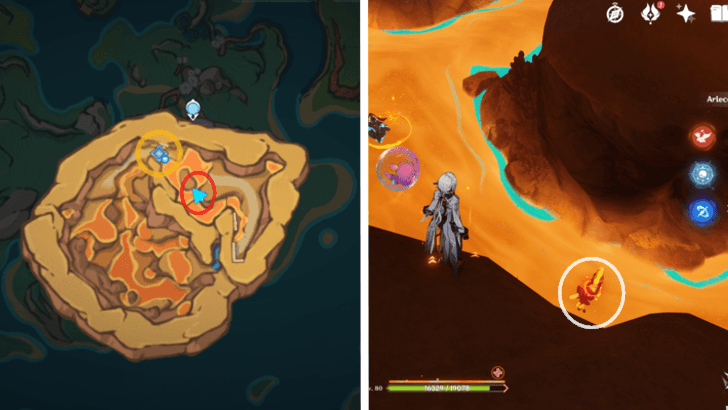 Location: Follow the path West from 95 until you reach a tiny cliff. The Pyroculus is in the liquid Phlogiston, so make sure you Indwell the Koholasaur swimming around to securely take it. |
| Pyroculus 106 |
Natlan Underground |  Location: Take the wind tunnel from Pyroculus #98 and ride it across the island. Progress through the world quest "Seeker No Finding" enough to unlock a Spiritway that leads to the final floating island. Climb the peak to get the Pyroculus. |
| Pyroculus 107 |
Natlan Surface | 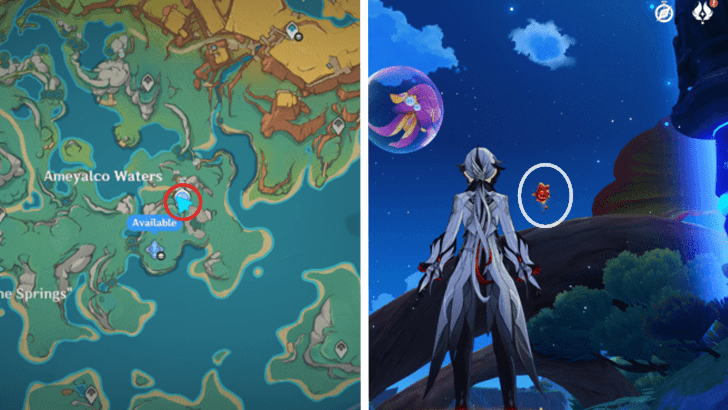 Location: Located in front of the Statue of the Seven in 'Ameyalco Waters'. Head up the arched tree trunk. |
| Pyroculus 108 |
Natlan Surface | 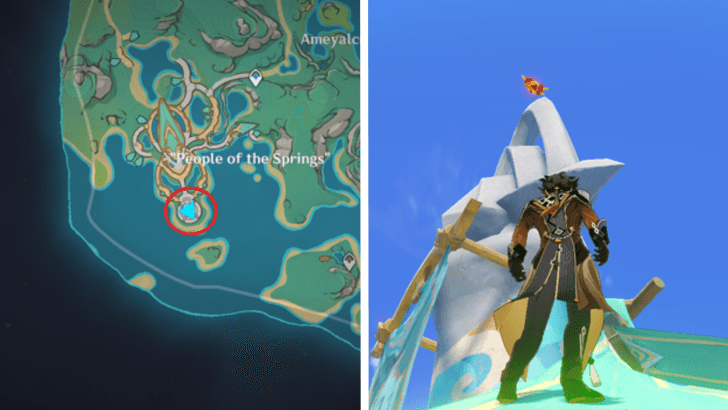 Location: Located on top of the massive tower south of the People of the Springs tribe. You can climb up one of the green flags tied to the tower to get there. |
| Pyroculus 109 |
Ochkanatlan Surface | 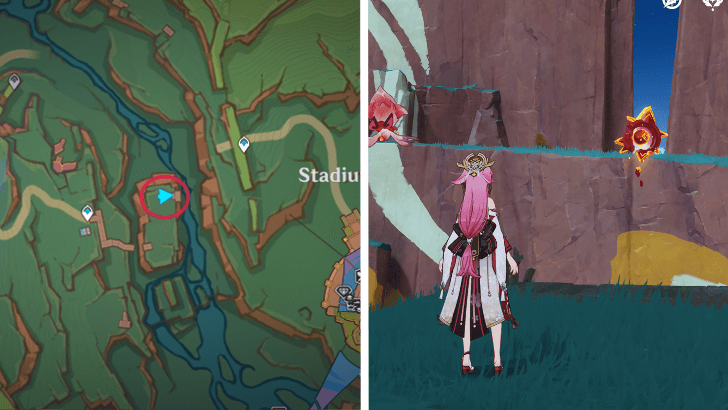 Location: Located west of the Stadium of the Sacred Flame. In between mountains and waypoints. |
| Pyroculus 110 |
Ochkanatlan Surface | 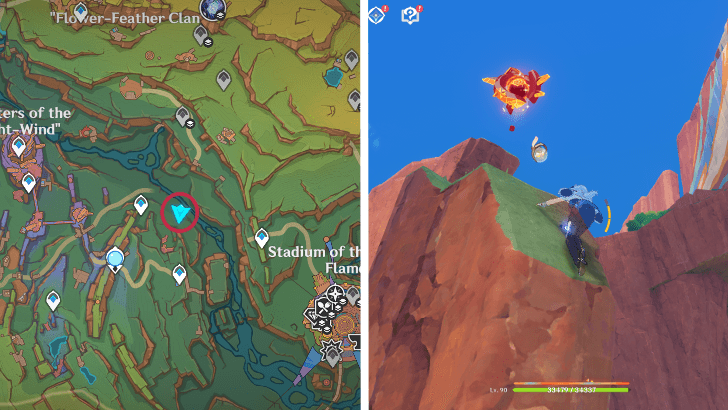 Location: Far east of The Masters of the Night-Wind, on top of a pillar at the bottom by the river east of the close waypoint. |
| Pyroculus 111 |
Ochkanatlan Surface |  Location: Found on top of a rock formation along the path to the Statue of the Seven in the Tezcatepetonco Range. |
| Pyroculus 112 |
Ochkanatlan Surface | 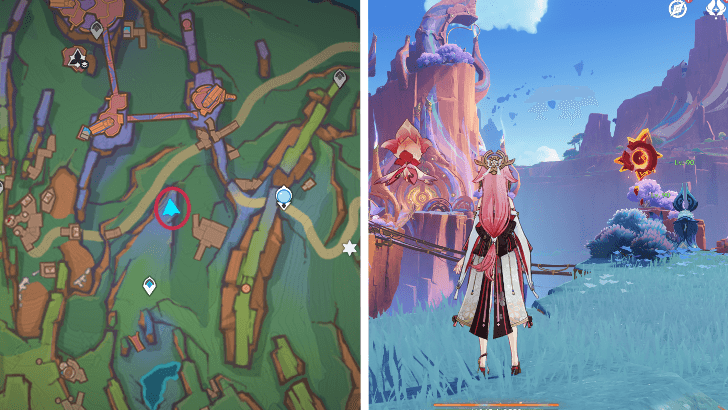 Location: Found along the path to the entrance of "The Masters of the Night-Wind" on the left side, by the cliff next to a Iktomisaurs. |
| Pyroculus 113 |
Ochkanatlan Surface |  Location: Can be found south of "The Masters of the Night-Wind", indwell a Qucusaurs to go through the ring to obtain it. |
| Pyroculus 114 |
Ochkanatlan Surface | 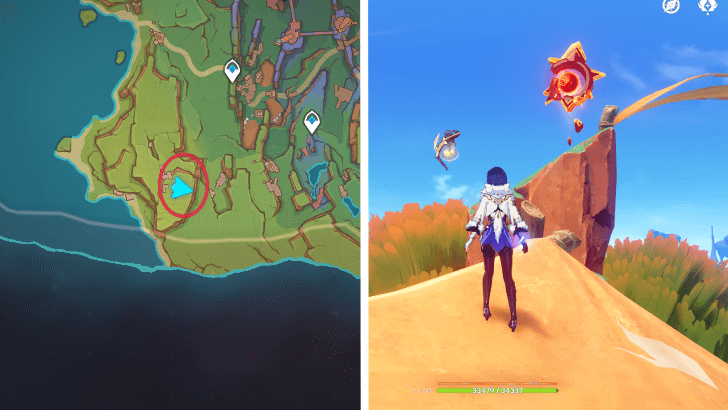 Location: Located far south of Master of the Night-Wind, at the top of a pillar behind a small tent guarded by Sauroform Tribal Warriors. |
| Pyroculus 115 |
Ochkanatlan Surface | 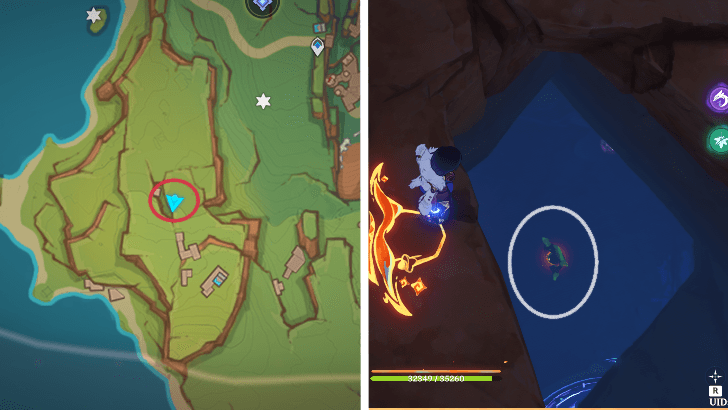 Location: South of "The Masters of the Night-Wind" and southwest of a waypoint inside a cave beneath a body of water. Unlock by utilizing the Iktomisaur ability to solve the puzzle. |
| Pyroculus 116 |
Ochkanatlan Surface | 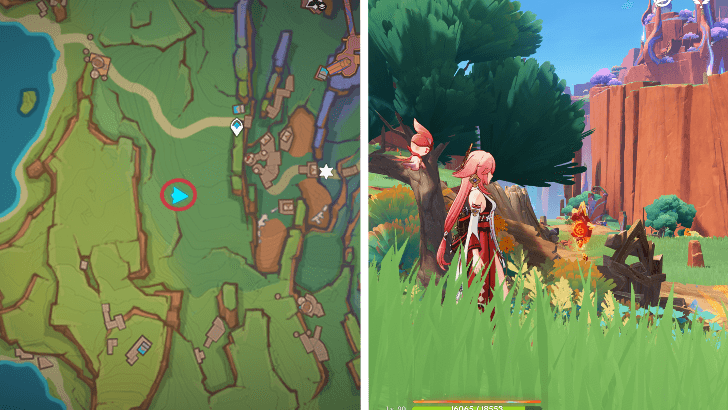 Location: Can also be seen south of "The Masters of the Night-Wind". Easily visible from the waypoint within a wreck structure. |
| Pyroculus 117 |
Ochkanatlan Surface | 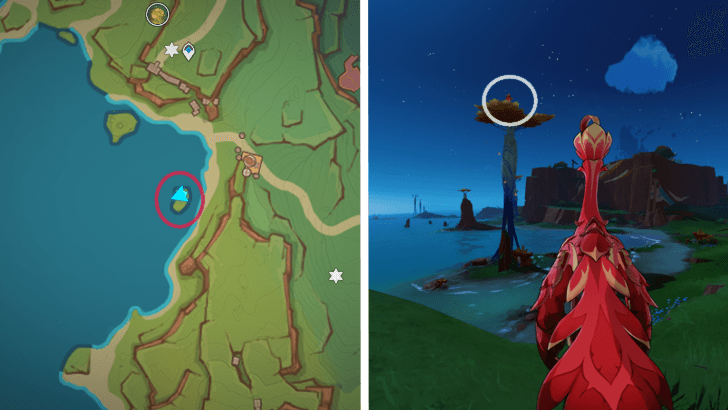 Location: Discovered atop a tree by the sea west of Tezcatepetonco Range. To obtain it, indwell nearby Saurian. |
| Pyroculus 118 |
Ochkanatlan Surface | 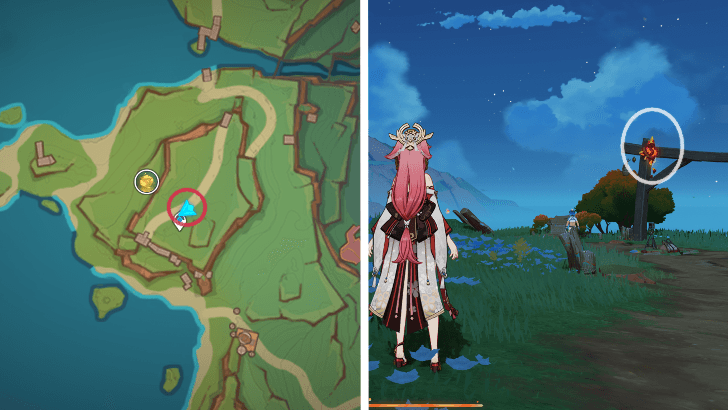 Location: Can be found by the waypoint above the Kamera, west of "The Masters of the Night-Wind". |
| Pyroculus 119 |
Ochkanatlan Surface | 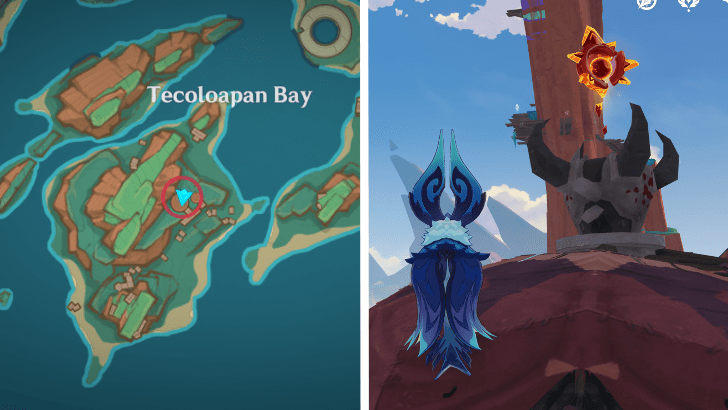 Location: Situated within an enemy camp in Tecoloapan Bay. |
| Pyroculus 120 |
Ochkanatlan Surface |  Location: Situated on a plateau west of Tecoloapan Bay, near the waypoint. |
| Pyroculus 121 |
Ochkanatlan Surface |  Location: Located in Masters of the Night-Wind, between two pincered rocks on the ground floor immediately north of the Scorchwind Trial Grounds. |
| Pyroculus 122 |
Ochkanatlan Surface | 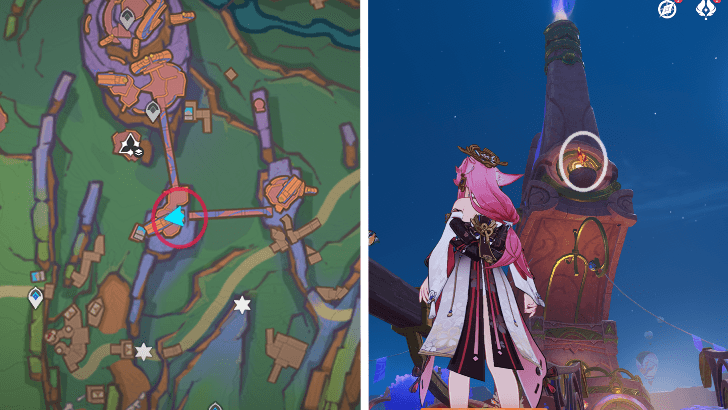 Location: Can be spotted on top of one of the buildings in "The Masters of the Night-Wind". You can indwell the nearby Iktomisaur Spiritsconces to enter the Spiritspeaker state and aim it at the graffiti on the wall. After replicating the graffiti, place it in front of the building's door to create a wind current. |
| Pyroculus 123 |
Ochkanatlan Surface |  Location: Situated within Masters of the Night-Wind underneath the bridge, on top of a little pillar on the lowest floor. |
| Pyroculus 124 |
Ochkanatlan Surface | 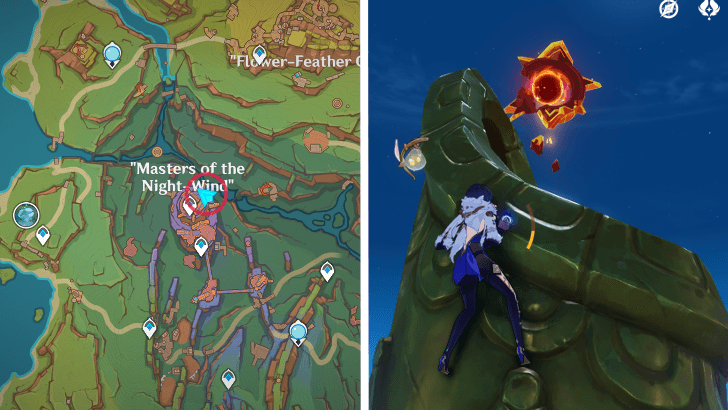 Location: Located in Masters of the Night-Wind, at the very top of the arch next to the waypoint. |
| Pyroculus 125 |
Ochkanatlan Surface |  Location: Located near the entrance to the Corroded Stone Chamber East of "The Masters of the Night-Wind" on top of a pillar. |
| Pyroculus 126 |
Ochkanatlan Surface | 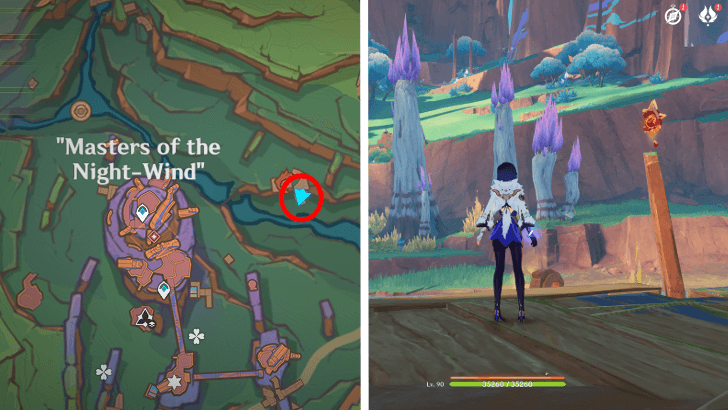 Location: On top of a small pillar along the river east of ''Masters of The Night-Wind'' area. |
| Pyroculus 127 |
Ochkanatlan Surface | 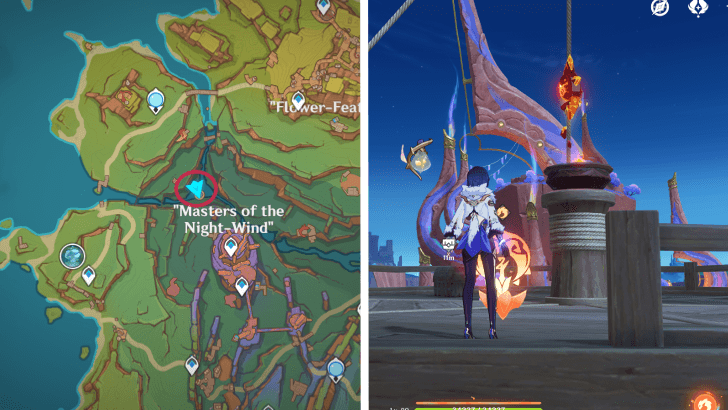 Location: Found on a hot-air balloon platform northwest of Masters of the Night-Wind. |
| Pyroculus 128 |
Ochkanatlan Surface | 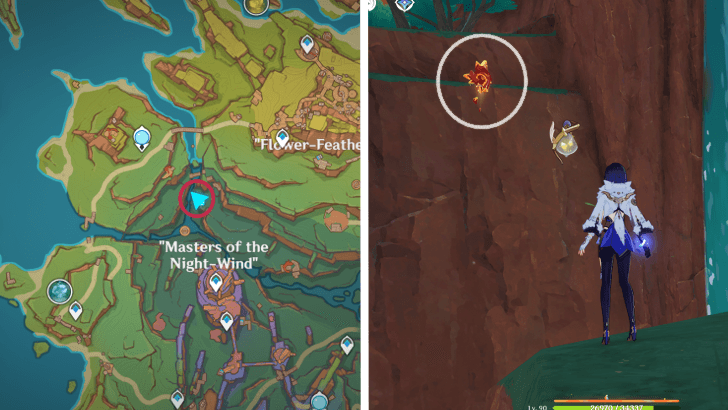 Location: Found north of Masters of the Night-Wind, floating in front of the waterfall. |
| Pyroculus 129 |
Ochkanatlan Surface |  Location: Located directly south of "Flower-Feather Clan" on top of a Long-Necked Rhino. |
| Pyroculus 130 |
Ochkanatlan Surface | 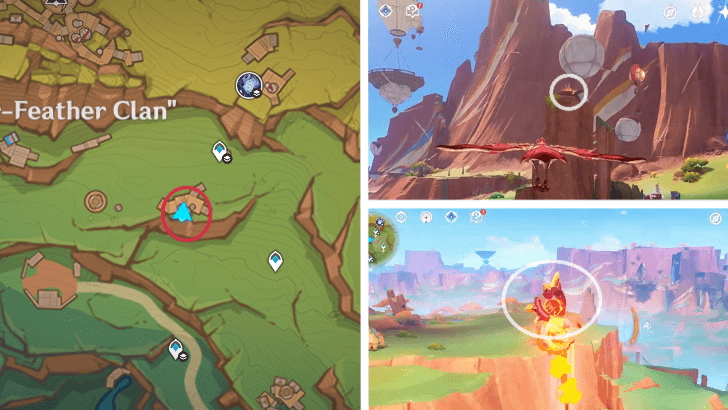 Location: Located above the camp, near the "Flower-Feather Clan" area and the Tenebrous Papilla. To obtain the pyroculus above, indwell a Qucusaur and enter the phlogiston, which should immediately transport you to the oculus. |
| Pyroculus 131 |
Ochkanatlan Special Area B1 |  Location: This oculi is located underground in Malinalco Grotto. Take the Tenebrous Papilla cave entrance and turn right at the waypoint. Inside, you'll find a spiritscone; make sure to indwell it. Continue inside until you reach a wall, then use the Iktomisaurus ability to remove it. Solve the puzzle by coloring the mural with the Peculiar Monetoos. Paint the mural in this order: Yellow, Blue, Red. The wall will open, revealing the Pyroculus. |
| Pyroculus 132 |
Ochkanatlan Surface | 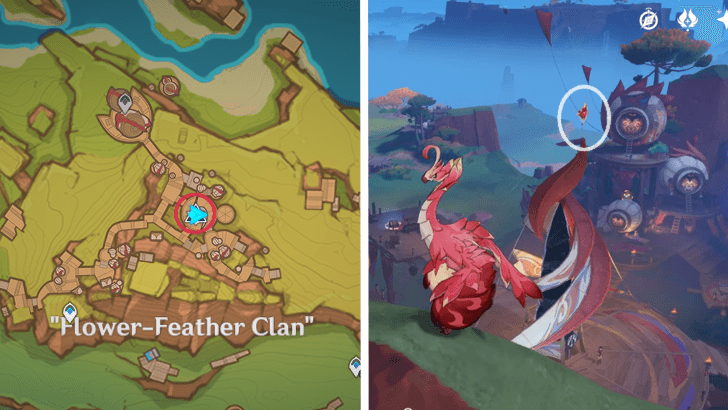 Location: Located above the Flower-Feather Clan Obsidian Totem Pole Area for the Tribe Reputation. |
| Pyroculus 133 |
Ochkanatlan Surface |  Location: Located Northeast from the Flower-Feather Clan area. It's at the edge of a cliff floating above a group of circled rocks. You need a Qucusaur to fly here. |
| Pyroculus 134 |
Ochkanatlan Surface | 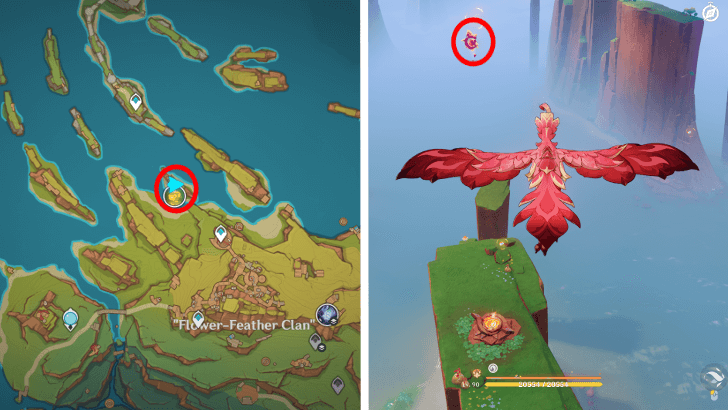 Location: Located north of the Flower-Feather Clan, this one floats above a small island. You need a Qucusaur to fly up there. |
| Pyroculus 135 |
Ochkanatlan Surface | 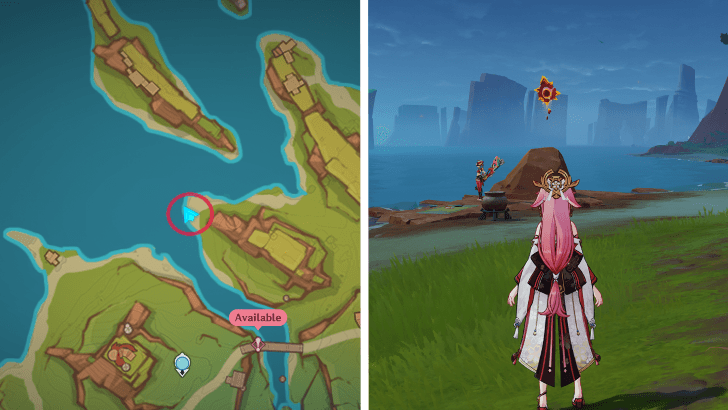 Location: Found west of "Flower-Feather Clan," north of the Statue of the Seven, and along the beach. |
| Pyroculus 136 |
Ochkanatlan Surface |  Location: Located southeast of the Ochkanatlan Statue of the Seven, by the trees. |
| Pyroculus 137 |
Ochkanatlan Surface | 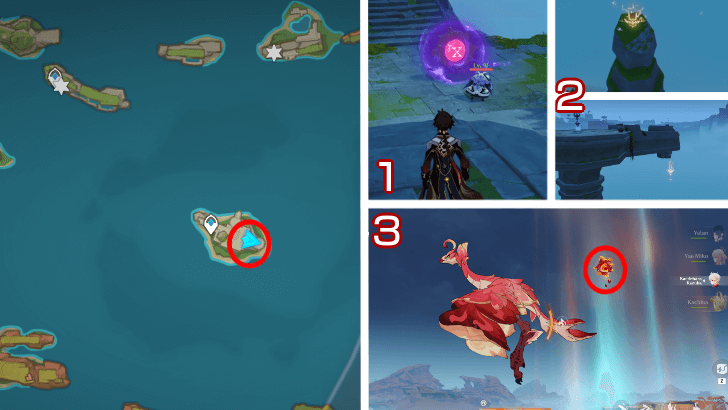 Location: Located Southeast of Ochknatlan. Defeat the enemy in front of the floating circular mechanism. After that, interact with it then get the two inscriptions using a Qucusaur and defeat a Ruin Grader. An air current towards the Pyroculus will appear next! |
| Pyroculus 138 |
Ochkanatlan Surface | 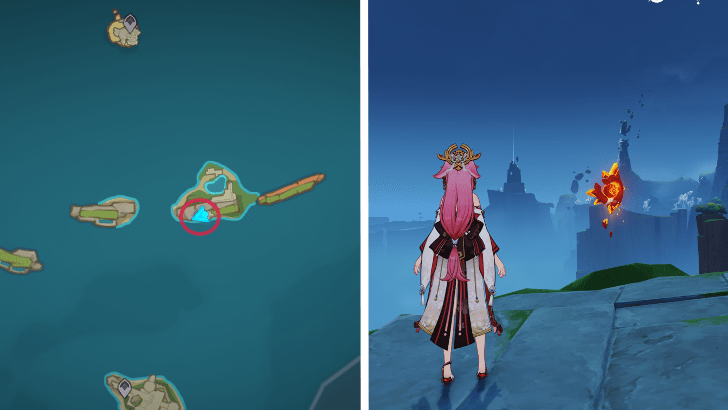 Location: Found on an island east of Ochkanatlan, on top of a mountain beneath the ruin guards. |
| Pyroculus 139 |
Ochkanatlan Surface |  Location: East of Ochkanatlan, near the waypoint below. |
| Pyroculus 140 |
Ochkanatlan Surface | 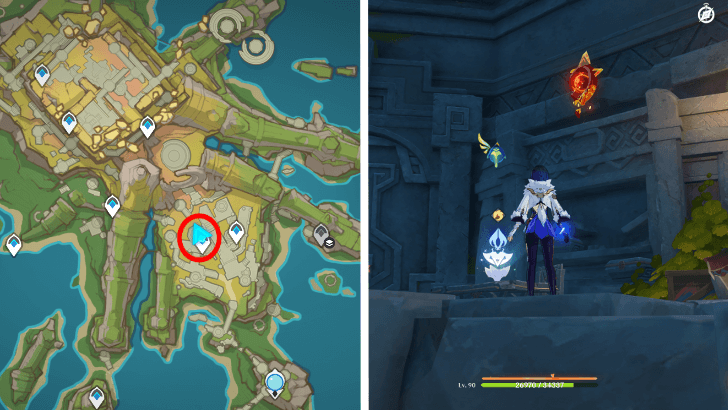 Location: Near the Teleport Waypoint in the center of Ochknatlan. Found inside a small room in the upper floor of the ancient ruins. |
| Pyroculus 141 |
Ochkanatlan Special Area B1 | 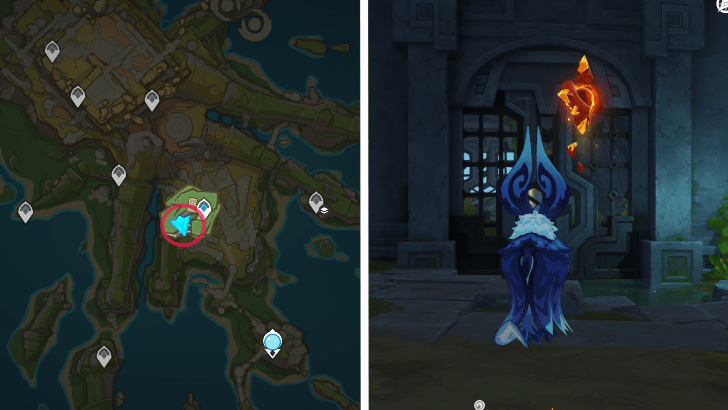 Location: Found inside the ruins between two doors during the Vaulting the Wall of Morning Mist sidequest. |
| Pyroculus 142 |
Ochkanatlan Special Area B2 | 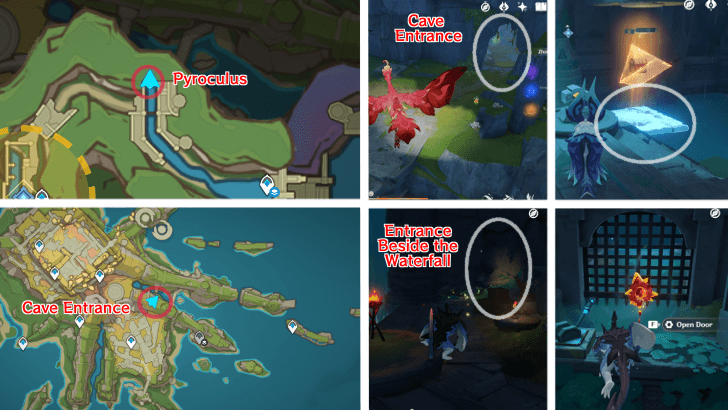 Location: Inside the cave past a time trial, proceed past the gate to the end with a deep hole. Indwell the spritscone and scan the mural, then activate the switch to raise the chest and set the platform beneath it to keep it from sinking. Past the gate, you will come across a stream. Go below the falls and use the Koholasaurus to jump up to the Pyroculus. |
| Pyroculus 143 |
Ochkanatlan Surface |  Location: Located south of the Cradle of Fleeting Dreams in Ochkanatlan. Near the waypoint, perched above the vines. |
| Pyroculus 144 |
Ochkanatlan Surface |  Location: Located south beneath the Cradle of Fleeting Dreams Ochnatlan, near a Scorchwind Conflux and a Geaesous Phlogiston Floating between a shattered pillar. |
| Pyroculus 145 |
Ochkanatlan Surface |  Location: Southwest of the Cradle of Fleeting Dreams in Ochkanatlan, near the waypoint. |
| Pyroculus 146 |
Ochkanatlan Surface |  Location: Located Southwest of the ancient ruins of Ochknatlan. It can be obtained by completing the puzzle near the 148th Pyroculus which will trigger an air current so you can get it using a Qucusaur! |
| Pyroculus 147 |
Ochkanatlan Special Area B2 |  Location: Can be found underground in the Furnace of Fiery Embers, southwest of Ochkanatlan. To enter the area, touch the inscription across the waypoint near Yumkasaur. Inside, you must complete a series of puzzles by using the Yumkasaur skill to open series of gates from relay puzzles. |
| Pyroculus 148 |
Ochkanatlan Surface |  Location: Found in Ochakanatlan, floating high up the enormous pillar. It requires you to use Qucusaurs to soar up and get there. |
| Pyroculus 149 |
Ochkanatlan Surface |  Location: Located northeast of the Cradle of Fleeting Dreams in Ochakanatlan, behind an illusionary wall. To remove the wall, fight the Mimiflora enemies to get an Exquisite Chest, then open it to trigger a cutscene that removes the wall. |
| Pyroculus 150 |
Ochkanatlan Special Area B2 | 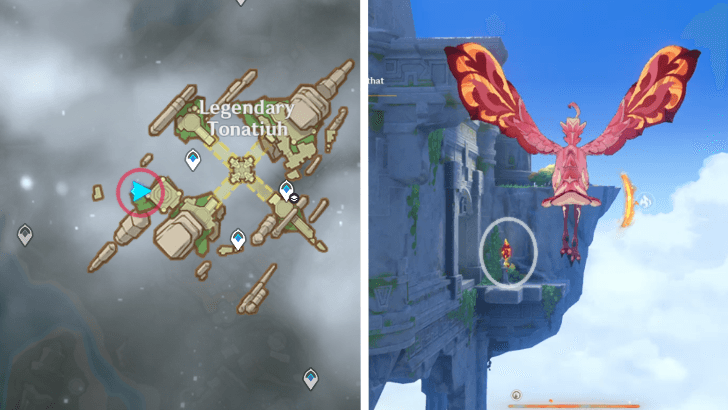 Location: Can be found on Legendary Tonatiuh during the quest The Other Side of the Sky. The pyroculus can be seen perched on a ledge in the west part of the map. |
| Pyroculus 151 |
Ochkanatlan Surface |  Location: Situated near the north waypoint within Cradle of Fleeting Dreams in Ochkanatlan, next to a Iktomisaurs. |
| Pyroculus 152 |
Ochkanatlan Special Area B1 |  Location: Found during the Palace of the Vision Serpent quest. |
| Pyroculus 153 |
Ochkanatlan Special Area B1 |  Location: Found underground in the Core of Chu'ulel Interior during the Palace of the Vision Serpent quest, near to a remarkable chest. |
| Pyroculus 154 |
Ochkanatlan Special Area B1 |  Location: Can also be found underground in the Core of Chu'ulel Interior as part of the Palace of the Vision Serpent quest. It's just across from the previous oculus, but you'll need a Radiant Pillar to get rid of Abyssal Blight. |
| Pyroculus 155 |
Ochkanatlan Special Area B2 |  Location: Found in Legendary Tonatiuh during the quest The Other Side of the Sky. To get to the area, you'll need a Qucusaur. From the waypoint, simply fly towards the entrance to find the oculus on the right side, by the trees. |
| Pyroculus 156 |
Ochkanatlan Surface | 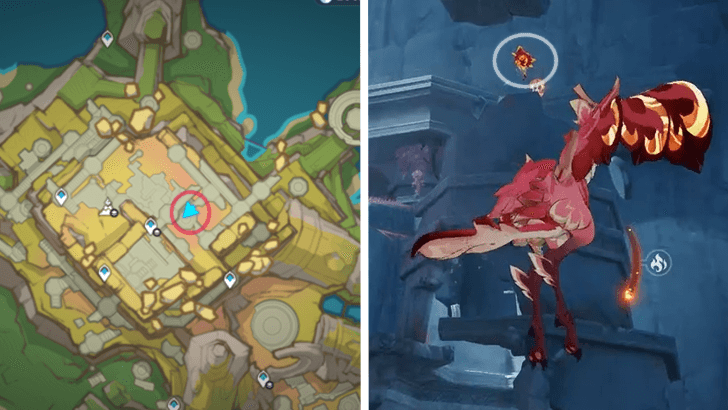 Location: Located on the lowest level of Cradle of Fleeting Dreams in Ochkanatlan, hovering above a ruined tower. |
| Pyroculus 157 |
Ochkanatlan Surface | 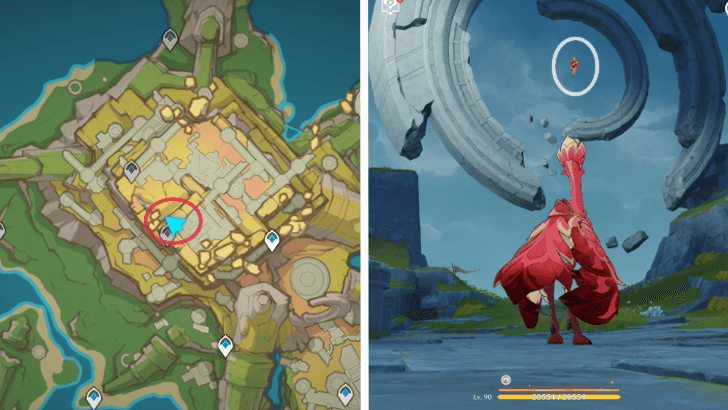 Location: Spotted floating in the center of the circular structures within the Cradle of Fleeting Dream in Ochkanatlan, near the north waypoint. |
| Pyroculus 158 |
Ochkanatlan Surface |  Location: Located on Ashflow Street in Ochkanatlan. Just turn east from the circular arena-like platform, and the oculi should be circled by inscriptions. |
| Pyroculus 159 |
Ochkanatlan Surface |  Location: Situated southeast of the Cradle of Fleeting Dreams in Ochkanatlan. Head to the cradle's lowest level until you see this blocked-off space. Below, enter the cavern with torches on the left and indwell an Iktomisaur to use its ability on the mural; position the ability inside the gap and it should remove the yellow barriers. |
| Pyroculus 160 |
Ochkanatlan Surface |  Location: Located above the floating rocks. From the west waypoint on Cradle, take a Qucusaur and follow the schorchwind east until you reach the floating stones above. |
| Pyroculus 161 |
Ochkanatlan Surface |  Location: Found during The Lone Isle Named Night quest on the Isle of Tozoz in Ochkanatlan. To obtain the pyrouclus, you must solve the iktomisaurus puzzle by activating the mechanisms to open the gate. |
| Pyroculus 162 |
Ochkanatlan Surface |  Location: This oculi can also be obtained by completing the puzzle from the previous oculus. Simply ride the platforms until you reach the top of the pillar, where you will find the oculus and an exquisite chest. |
| Pyroculus 163 |
Atocpan Surface |  Location: Located near the entrance of Atocpan Region. Indwell a Tatankasaurus and hit the Matador Monetoo, it will then create a platform for you to jump on. |
| Pyroculus 164 |
Atocpan Surface | 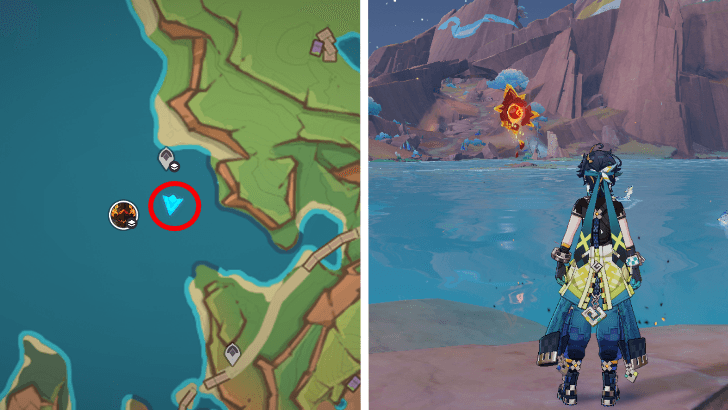 Location: Located above the water northeast of Atocpan. You can create an ice bridge with Kaeya or another Cryo character to reach it. |
| Pyroculus 165 |
Atocpan Surface | 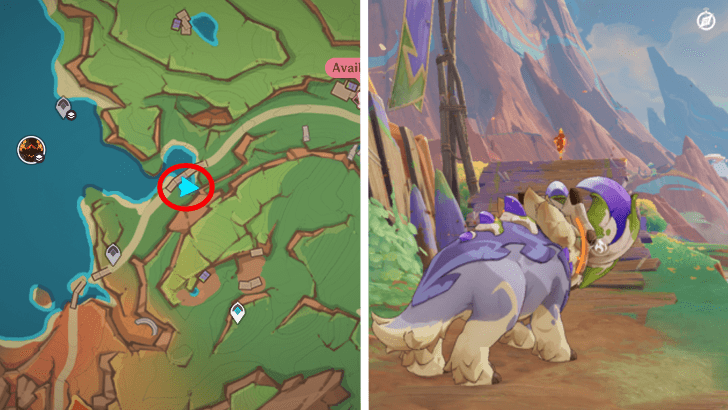 Location: Above a bridge south of pyroculus #164. Indwell a Tatankasaurus and sprint up the plank to jump high enough to reach it. |
| Pyroculus 166 |
Atocpan Surface | 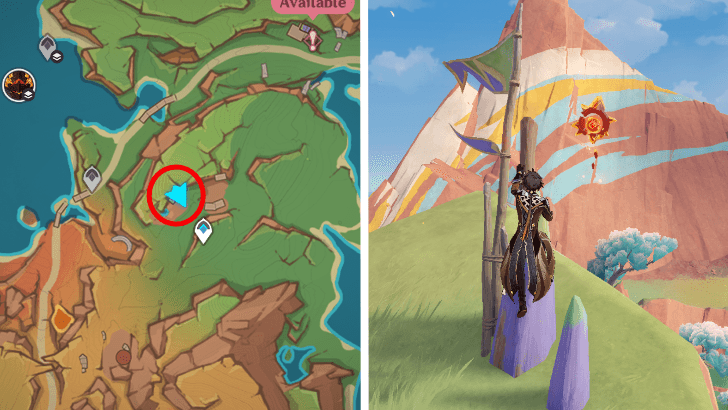 Location: Located directly off the edge of a cliff, in view of a teleport waypoint. |
| Pyroculus 167 |
Atocpan Surface | 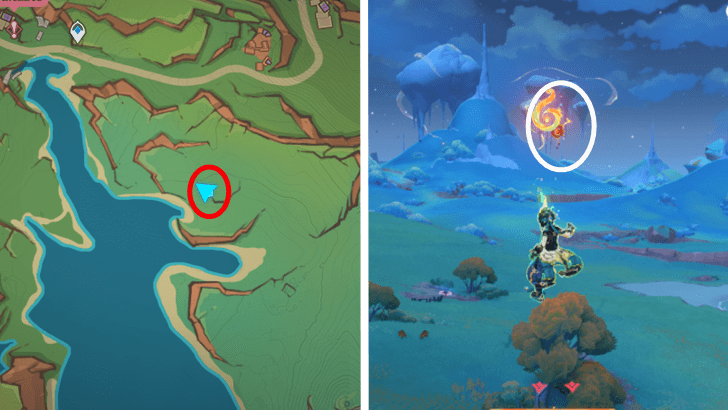 Location: Southwest of the Stadium of the Sacred Flame, located high above. Indwell a Yumkasaurus and use the sigils to get high enough to reach it. |
| Pyroculus 168 |
Atocpan Surface | 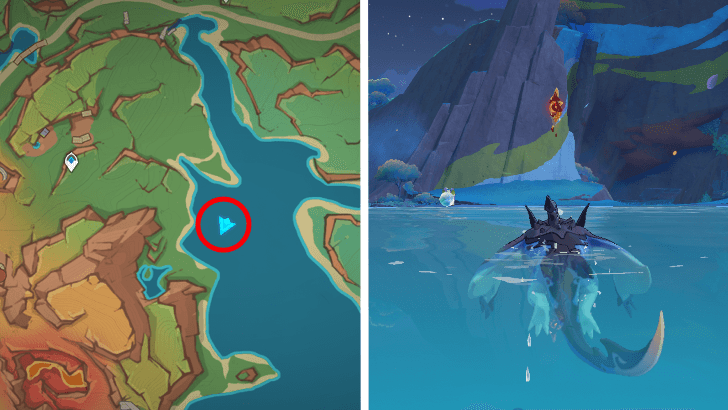 Location: Above the water east of Pyroculus #167, you can indwell a Koholasaurus and jump to get it. |
| Pyroculus 169 |
Atocpan Surface |  Location: High up near the tallest peak east of the Collective of Plenty. By the base of the mountain, indwell a Tatankasaurus and chase around the Matador Monetoo to summon platforms that lead right to the Pyroculus. |
| Pyroculus 170 |
Atocpan Surface | 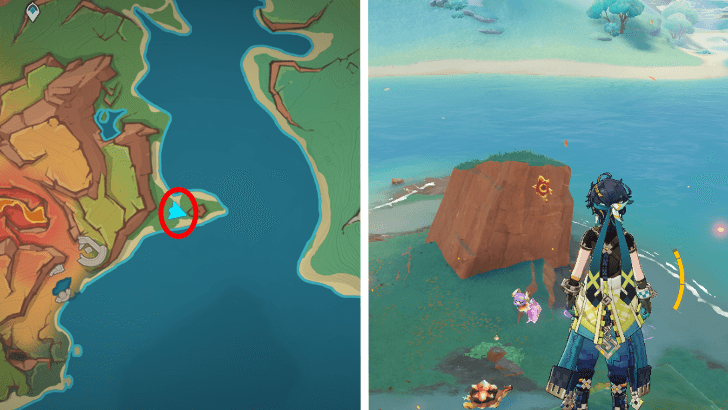 Location: Located above a Monetoo by the beach, east of Pyroculus #169. You can jump off the cliff to glide to it. |
| Pyroculus 171 |
Atocpan Surface | 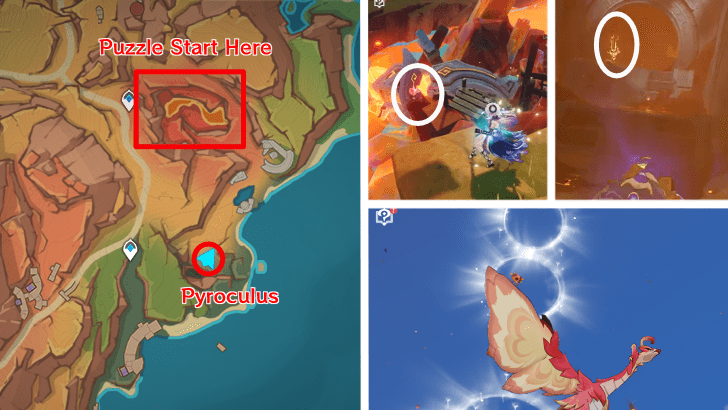 Location: Located east of Collective of Plenty, hovering far above. To obtain it, you must solve a series of puzzles to generate a wind gust to propel you up. |
| Pyroculus 172 |
Atocpan Surface | 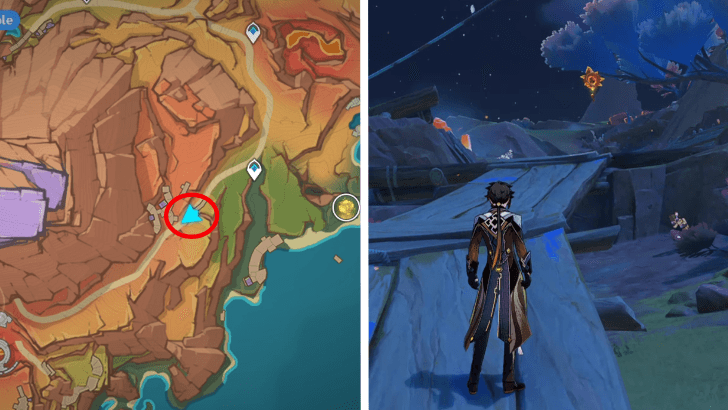 Location: Climb up the boulder and wooden board on the left side and glide from there. Look out for the moving boulders near the Pyroculus. |
| Pyroculus 173 |
Atocpan Surface |  Location: Located on top of a broken cart in the valley between two rock formations |
| Pyroculus 174 |
Atocpan Surface |  Location: Right next the Statue of the Seven. |
| Pyroculus 175 |
Atocpan Surface | 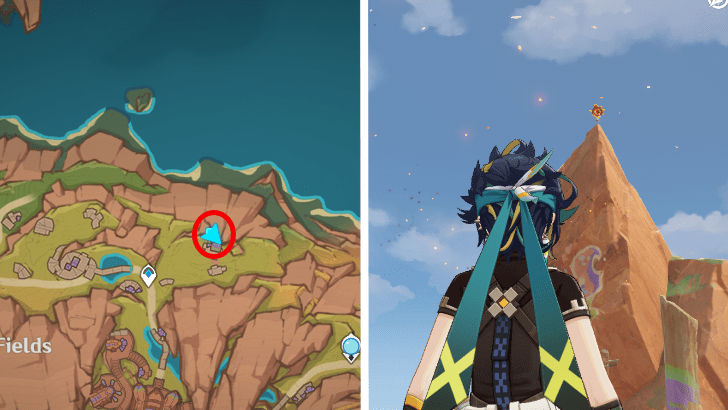 Location: On top of the giant painted rock in Varesa's orchard, north of the Collective of Plenty. You can approach from behind the rock to get the Pyroculus without being stopped by the Tatankasaur. |
| Pyroculus 176 |
Atocpan Surface | 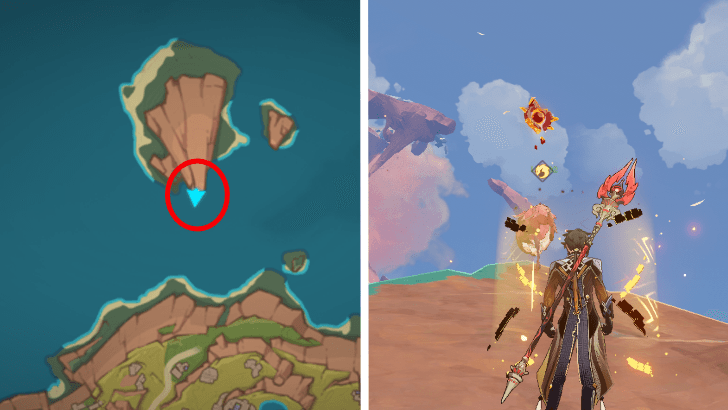 Location: Found at the top of the rock mountain, on an island north of Collective of Plenty, surrounded by Qucusaurus. Indwell one of the birds and just fly up to get it. |
| Pyroculus 177 |
Atocpan Surface | 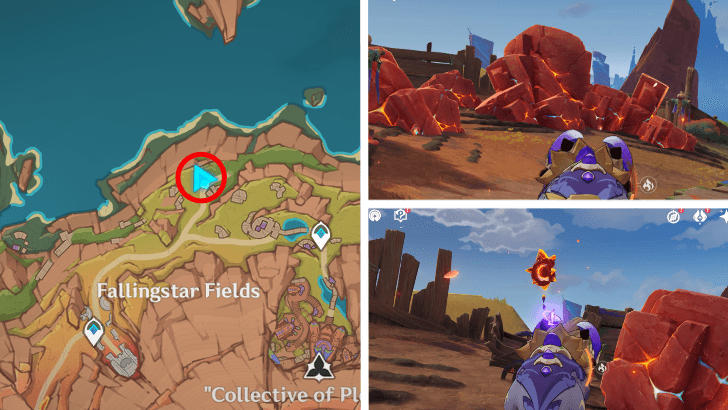 Location: Located north of the Fallingstar Fields hidden underneath the Pulverite. Indwell a Tatankasaurus from the nearby camp and break the rocks to get the Pyroculus. |
| Pyroculus 178 |
Atocpan Surface |  Location: By this watchtower near the Collective of Plenty Entrance Teleport Waypoint. |
| Pyroculus 179 |
Atocpan Surface |  Location: Located at the center of the Collective of Plenty. You can climb up the horns on the side of the arena and glide to get it, or indwell a Tatankasaur on the way and do a running jump to reach it. |
| Pyroculus 180 |
Atocpan Surface | 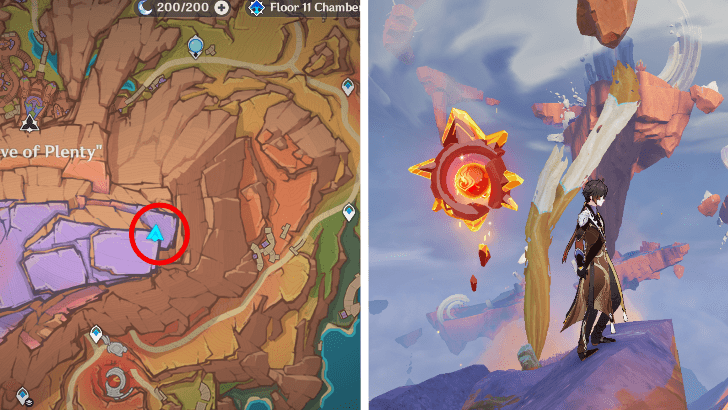 Location: Located at the highest point of the Great Volcano of Tollan, beside a tattered flag. |
| Pyroculus 181 |
Atocpan Surface |  Location: Located by the beach, east of the Remnants of Tetenanco, in a little rocky alcove. |
| Pyroculus 182 |
Atocpan Surface |  Location: Inside a wooden tower at the Remnants of Tetenanco. |
| Pyroculus 183 |
Atocpan Surface |  Location: Found north of the Remnants of Tetenanco. Use a Tatankasaur to break down the Phlogiston pillar blocking a cave entrance. Inside is the Pyroculus and a chest guarded by a Furnace Shell Mountain Weasel. |
| Pyroculus 184 |
Atocpan Surface |  Location: Located above the stone door ruins south of Fallingstar Fields. Indwell a Tatankasaur to break the falling rocks to the left of the door before heading up to find the Pyroculus. |
| Pyroculus 185 |
Atocpan Surface | 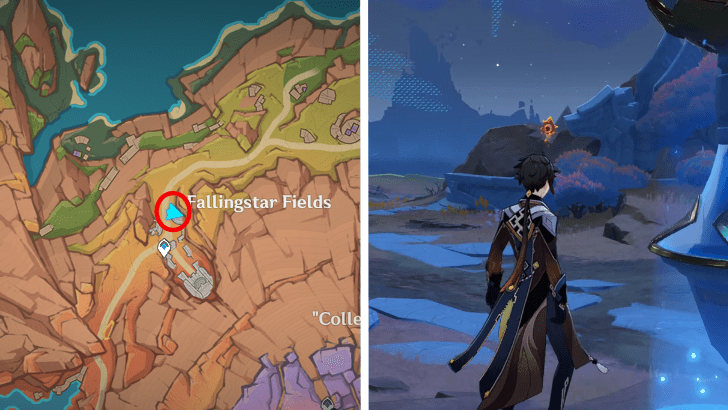 Location: Located in Fallingstar Fields, immediately across the Teleport Waypoint from the entrance to the Ancient Ruins. |
| Pyroculus 186 |
Atocpan Surface | 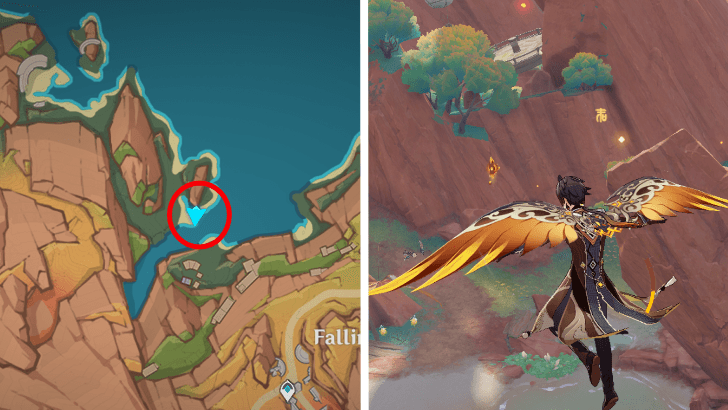 Location: From the Teleport Waypoint in Fallingstar Fields, head north and glide to the beach, where you will see the Pyroculus in the air. You can also climb the nearby boulder and jump from there to reach it. |
| Pyroculus 187 |
Atocpan Surface | 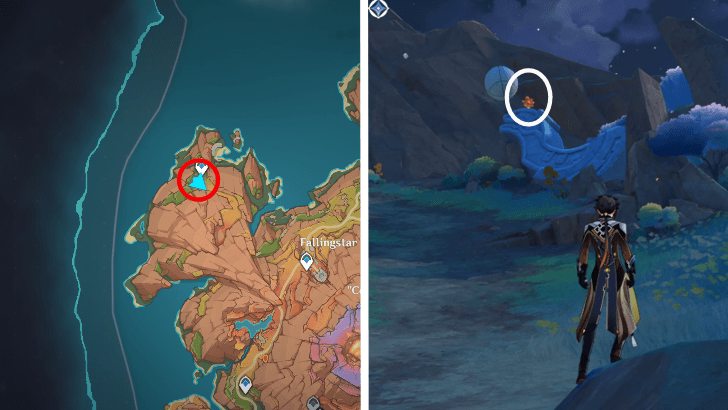 Location: Located north-west of Fallingstar Fields, perched on top of a ruin. |
| Pyroculus 188 |
Atocpan Surface |  Location: Located south of Fallingstar Field. You can either hit an adjacent vent to generate an updraft or climb the nearby rocks to obtain the pyroculus. |
| Pyroculus 189 |
Atocpan Surface |  Location: Found on top of a wooden ledge in the middle of a Fatui camp, west of the Remnants of Tetenanco. |
| Pyroculus 190 |
Atocpan Surface |  Location: Floating above a small island with a Thundering Wayob Manifestation. |
| Pyroculus 191 |
Atocpan Surface |  Location: Climb the boulder on the left side and glide off the wooden platform. |
| Pyroculus 192 |
Atocpan Surface |  Location: On a cliff close to the waypoint west of the volcano. |
| Pyroculus 193 |
Atocpan Surface | 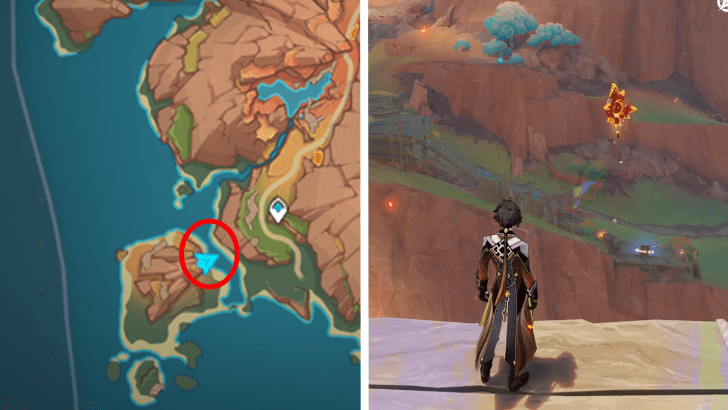 Location: Located west of the Remnants of Tetenanco on top of a cliff. |
| Pyroculus 194 |
Atocpan Surface | 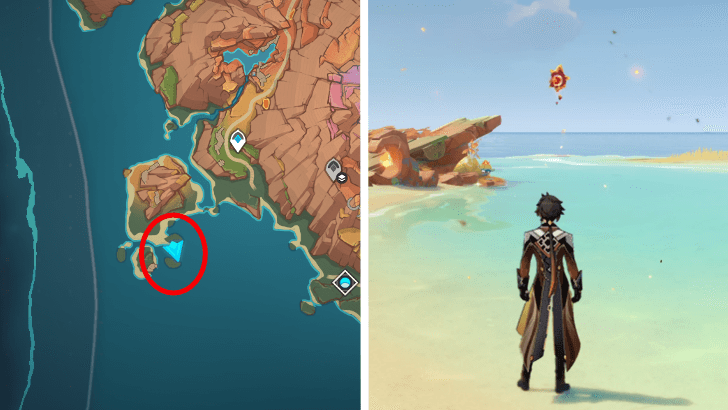 Location: On the Beach Southeast of the Remnants of Tetenanco. You need to jump on the platform to get it. |
| Pyroculus 195 |
Atocpan Surface |  Location: Located on the isolated Island southwest of the Derelict Masonry Dock domain. It sits on top of a high cliff, you only need to head up to get it. To get there, you simply need to swim towards the small island using a Koholasaur. |
| Pyroculus 196 |
Atocpan Underground | 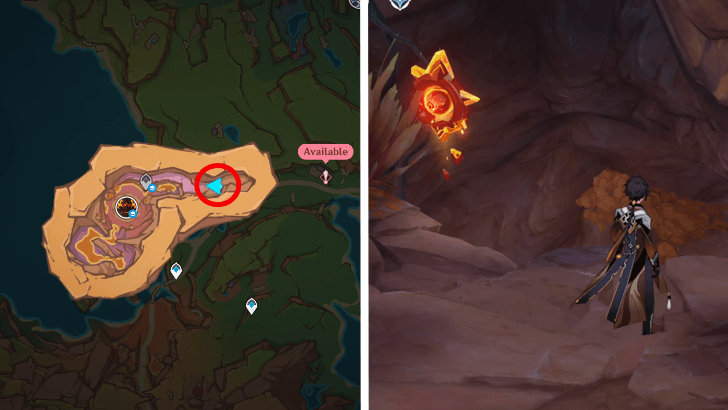 Location: Can be found on the entrance to the Lava Dragon Statue field boss. |
| Pyroculus 197 |
Atocpan Underground |  Location: Located underground in the Ancient Mechanical Path. |
| Pyroculus 198 |
Atocpan Underground |  Location: Found on a cave north of Remnants of Tetenanco. Break the Phlogiston wall by indwelling a Tatankasaurus. |
| Pyroculus 199 |
Atocpan Underground |  Location: Found within the Skyfire Circlet, floating in the center of a circular ruin |
| Pyroculus 200 |
Atocpan Underground |  Location: Floating above near the volcano's crater within the Skyfire Circlet. |
| Pyroculus 201 |
Ancient Sacred Mountain | 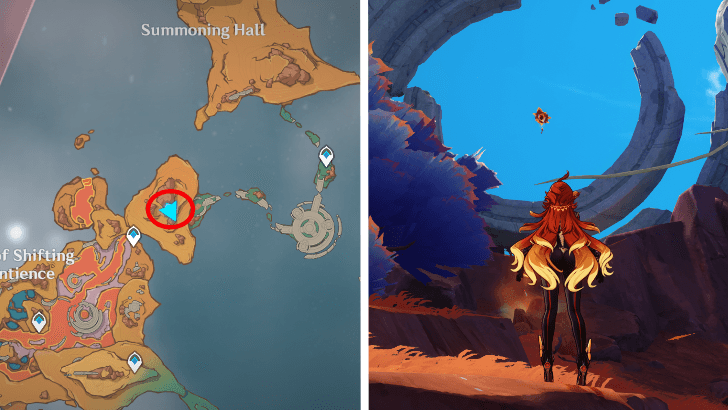 Location: On an island northeast of the Sea of Shifting Sentience. Need to transform into Qucusaur and use the Geothermal vent to get to the oculus. |
| Pyroculus 202 |
Ancient Sacred Mountain |  Location: Within the Sea of Shifting Sentience, floating over liquid Phlogiston near the Astral Assemblage. Ride the spiritway to get it. |
| Pyroculus 203 |
Ancient Sacred Mountain | 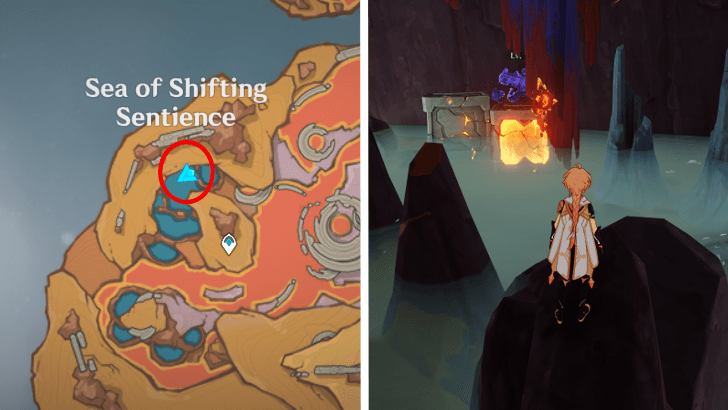 Location: Floating above a hot spring within the Sea of Shifting Sentience. |
| Pyroculus 204 |
Ancient Sacred Mountain | 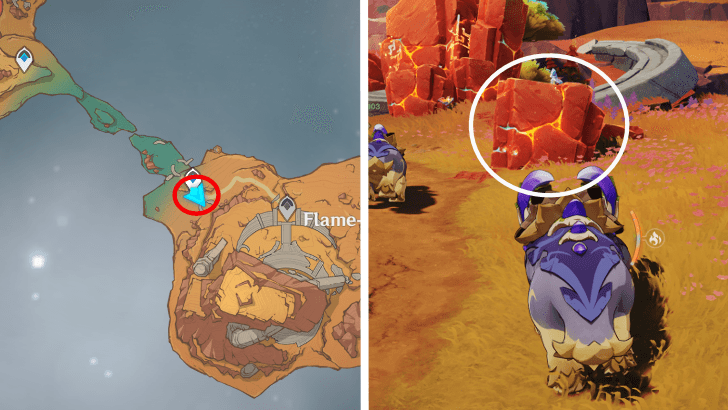 Location: Buried inside a Pulverite. Need to transform into Tatankasaurus and use its ability to break the Pulverite. |
| Pyroculus 205 |
Ancient Sacred Mountain |  Location: On the lower level of the Flame-Melding Ritual Grounds. |
| Pyroculus 206 |
Ancient Sacred Mountain |  Location: On top of the mountain within the Flame-Melding Ritual Grounds. |
| Pyroculus 207 |
Ancient Sacred Mountain |  Location: Found north-east of Flame-Melding Ritual Grounds, on top of a floating plant. |
| Pyroculus 208 |
Ancient Sacred Mountain | 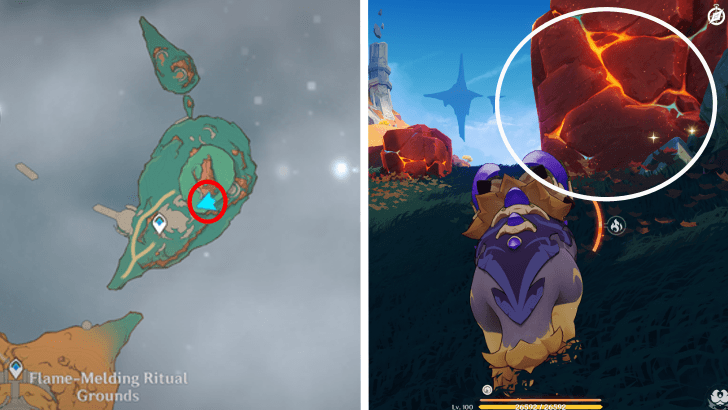 Location: Hidden beneath a Pulverite; use a Tatankasaur ability to break it. |
| Pyroculus 209 |
Dragons Residence B1 |  Location: Near a waypoint in the center of Dragons' Residence |
| Pyroculus 210 |
Dragons Residence B1 | 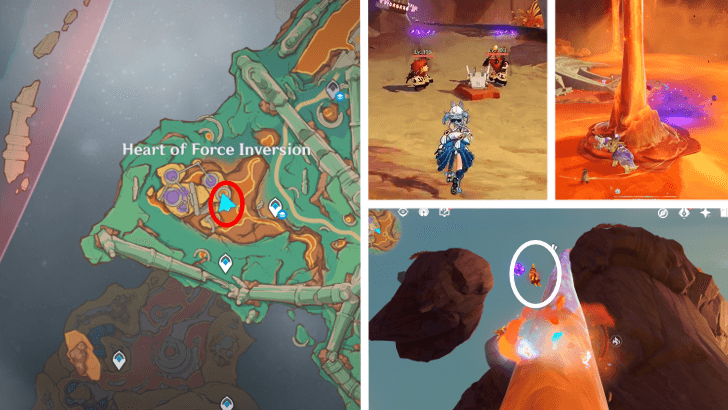 Location: Floating high above the liquid phlogiston lake in Heart of Force Inversion. |
| Pyroculus 211 |
Dragons Residence B1 | 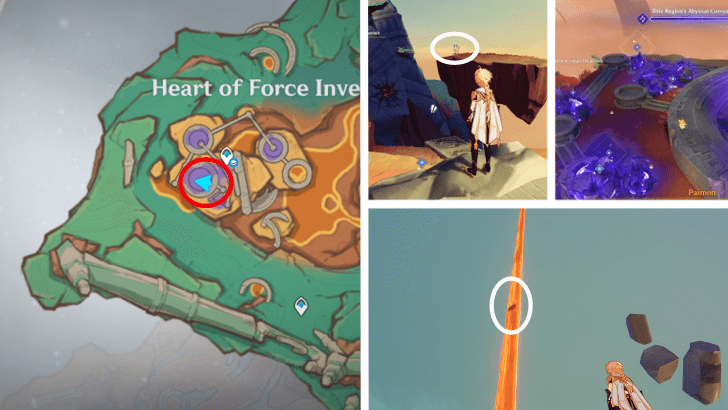 Location: Located on the highest island in Heart of Force Inversion. |
| Pyroculus 212 |
Dragons Residence B1 | 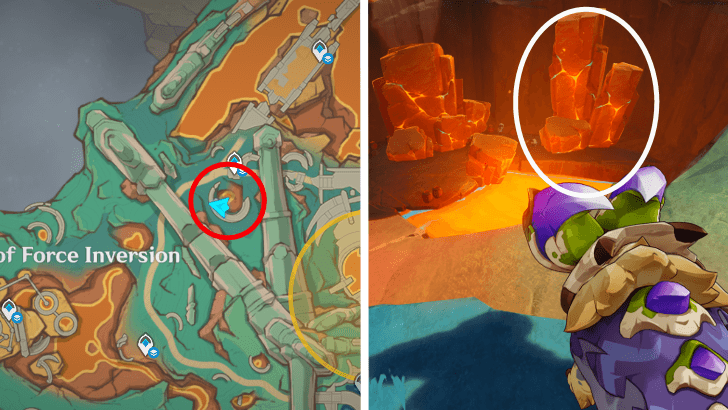 Location: North-east of the Heart of Force Inversion, buried under Pulverite. |
| Pyroculus 213 |
Dragons Residence B1 | 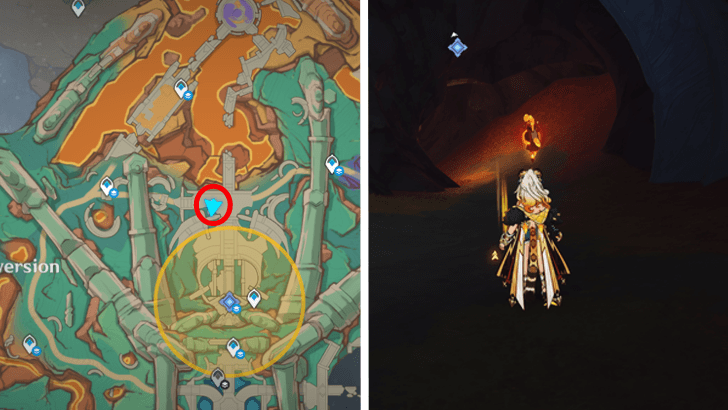 Location: Beneath the bridge, near the Ruined Armament Workshop. |
| Pyroculus 214 |
Dragons Residence B1 | 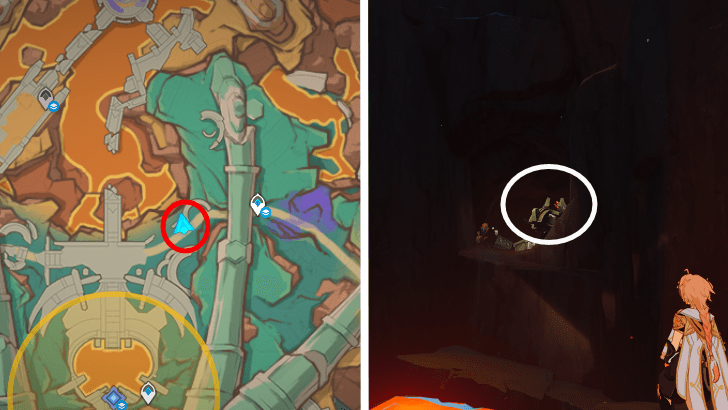 Location: In a cave south of Ruined Armament Workshop, perched on top of a Secret Source Dragon Idol. |
| Pyroculus 215 |
Dragons Residence B1 | 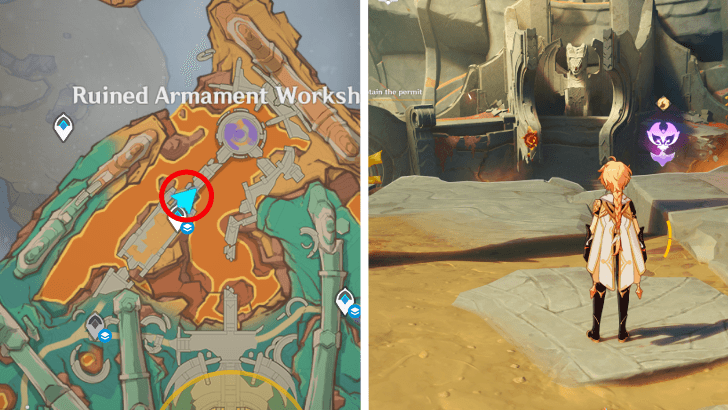 Location: On a broken bridge within the Ruined Armament Workshop. |
| Pyroculus 216 |
Dragons Residence B1 |  Location: Activate the Secret Source Dragon Idol from the Pyroculus #214 and continue riding it till this next Pyroculus. |
| Pyroculus 217 |
Dragons Residence B1 | 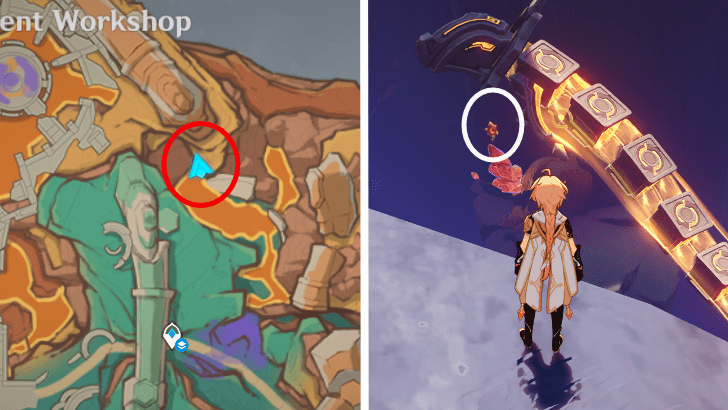 Location: South of the Ruined Armament Workshop, near a roaming Secret Source Dragon Idol. |
| Pyroculus 218 |
Dragons Residence B1 |  Location: Found beneath a twisted dark mud, you must play through the Chronicler of the Crumbling quest to obtain it. |
| Pyroculus 219 |
Dragons Residence B1 | 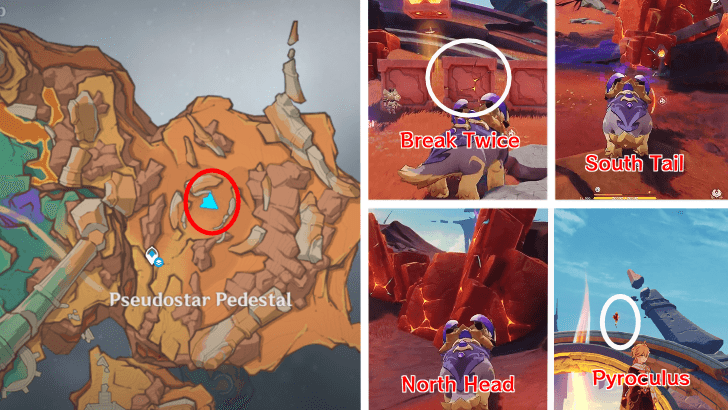 Location: Found within the Pseudostar Pedestal; though, you must first restore the Secret Source Dragon Idols to get it. |
| Pyroculus 220 |
Dragons Residence B1 | 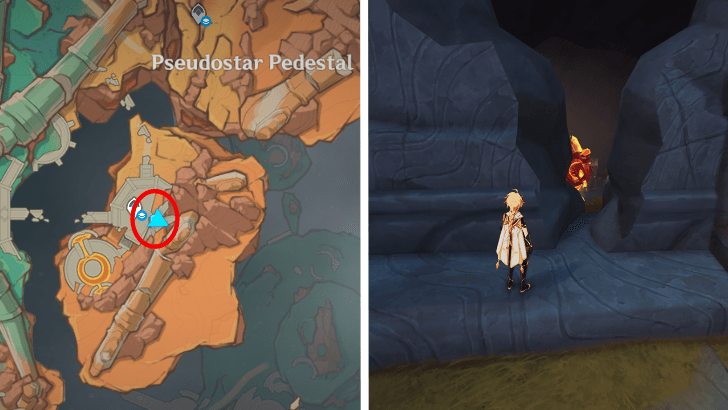 Location: Inside a cave south of the Pseudostar Pedestal. |
| Pyroculus 221 |
Dragons Residence B2 |  Location: Found within the Chamber of Deliberation during the Once, the Sacred Seat of Judgement quest. Break the Pulverite with the Fire Flamegranates to get the oculus |
| Pyroculus 222 |
Dragons Residence B2 | 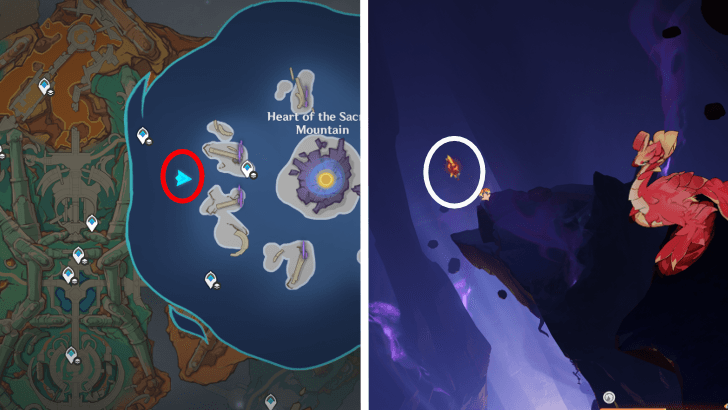 Location: Found within the Heart of the Sacred Mountain during the Chronicler of the Crumbling City quest. |
| Pyroculus 223 |
Easybreeze Resort |  Location: On a small island west of the Statue of the Seven, you can use an Asha to walk to it. |
| Pyroculus 224 |
Easybreeze Resort | 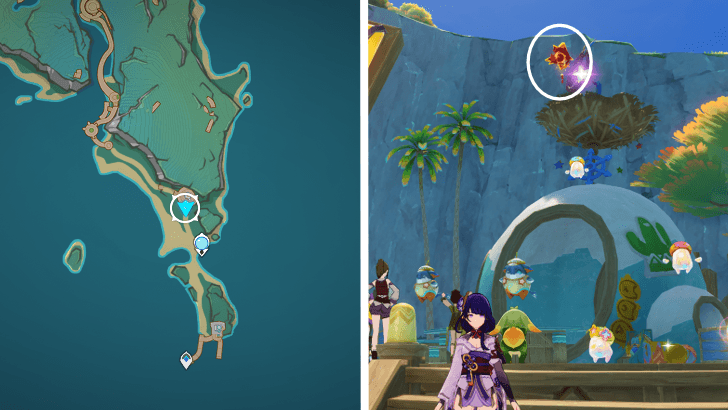 Location: Located north of the Statue of Seven, directly above the nest at the top of the Graffiti Zone. |
| Pyroculus 225 |
Easybreeze Underground | 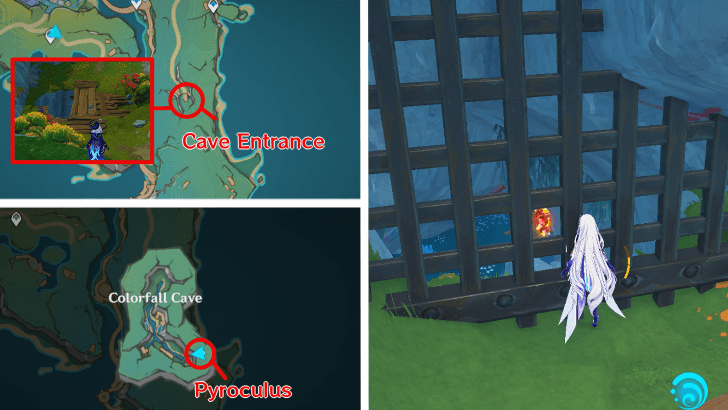 Location: Behind a locked gate in Colorfall Caves. The cave entrance is located near a group of Saurian Warriors guarding a remarkable chest. |
| Pyroculus 226 |
Easybreeze Resort |  Location: North of the Statue of Seven. On a big section of the wooden dock, between two hills. It is located on top of the enormous wooden display board. |
| Pyroculus 227 |
Easybreeze Resort | 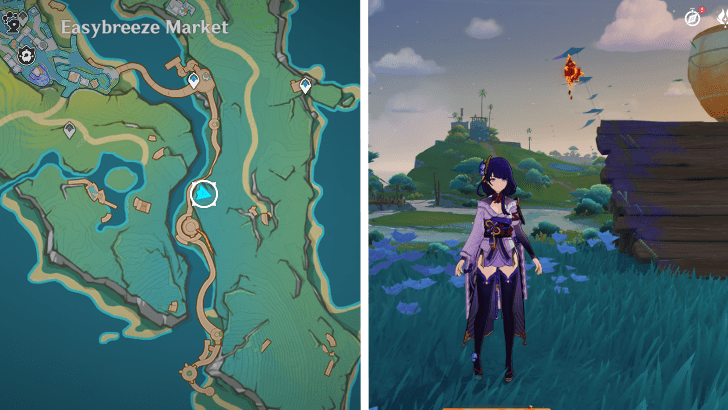 Location: Can be found by going up the hill, hovering in front of the ramp, adjacent to a hot air balloon. |
| Pyroculus 228 |
Easybreeze Resort |  Location: Turn into an Asha and use the Chroma Kite to get up to a Hot Air Balloon. Complete the challenge by gathering all the particles to reach the Pyroculus high up in the air. |
| Pyroculus 229 |
Easybreeze Resort |  Location: Above the floating cup signage, between two establishments near the coastline of Easybreezy Market. |
| Pyroculus 230 |
Easybreeze Resort |  Location: Located on top of one of the shops in Easybreezy Market, near to the giant star wearing aviator goggles. |
| Pyroculus 231 |
Easybreeze Resort |  Location: On top of a wooden shed behind the Easybreezy Market. |
| Pyroculus 232 |
Easybreeze Resort | 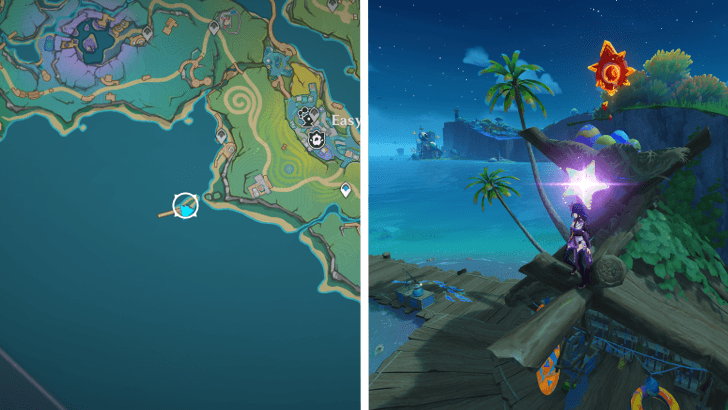 Location: Behind Easybreezy Market, on a tiny island near the beach. The pyroculus is placed on top of the surf shack, near the dock. |
| Pyroculus 233 |
Easybreeze Resort |  Location: West of Easybreezy Market, along the coast, beneath the cliffs. |
| Pyroculus 234 |
Easybreeze Resort |  Location: On top of a big tree just south of the giant float at Colorfall Cliffs. Climb the tree or use an Asha to hop around and get there. |
| Pyroculus 235 |
Easybreeze Resort | 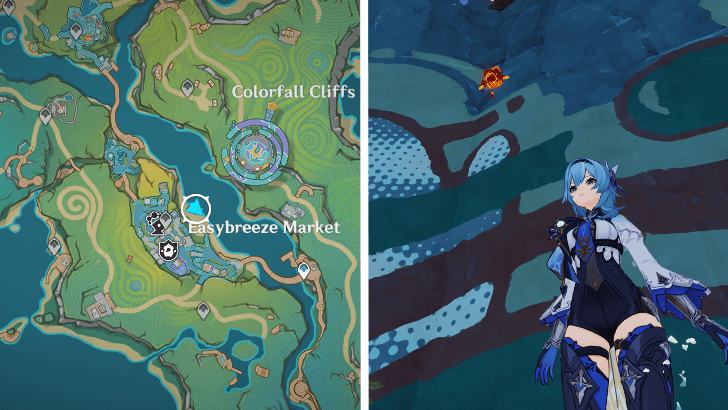 Location: Located beneath the rock with graffiti, across from a blue boat on the pier of the Easybreeze Market. |
| Pyroculus 236 |
Easybreeze Resort |  Location: Situated near the Teleport Waypoint north of the gigantic float in Colorfall Cliffs, on top of the entrance of a Fatui camp. |
| Pyroculus 237 |
Easybreeze Resort |  Location: On top of a palm tree east of Colorfall Cliffs. |
| Pyroculus 238 |
Easybreeze Resort | 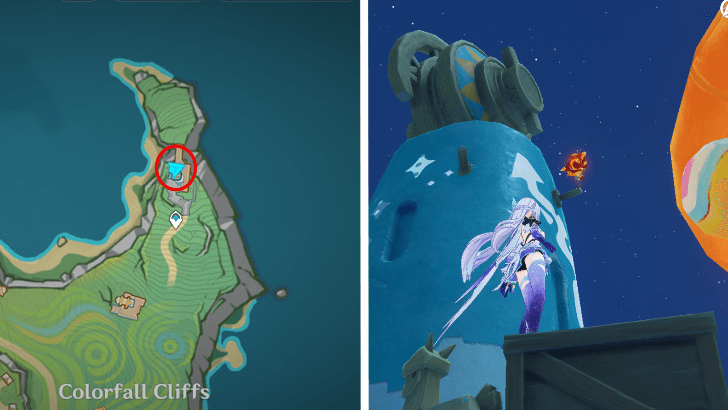 Location: Behind the building on the northernmost end of Colorfall Cliffs. |
| Pyroculus 239 |
Easybreeze Resort | 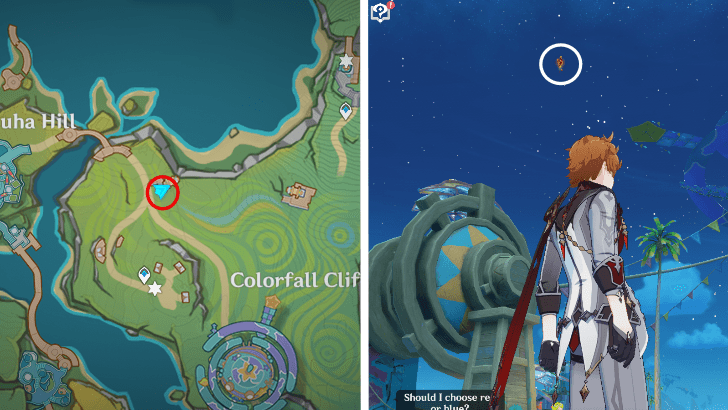 Location: High in the air, halfway between Huha Hill and Colorfall Cliffs. You can use an Asha to get up onto the Chroma Kites and reach it. |
| Pyroculus 240 |
Easybreeze Resort |  Location: Located on top of a palm tree down on the beach, left of Colorfall Cliffs. |
| Pyroculus 241 |
Easybreeze Resort | 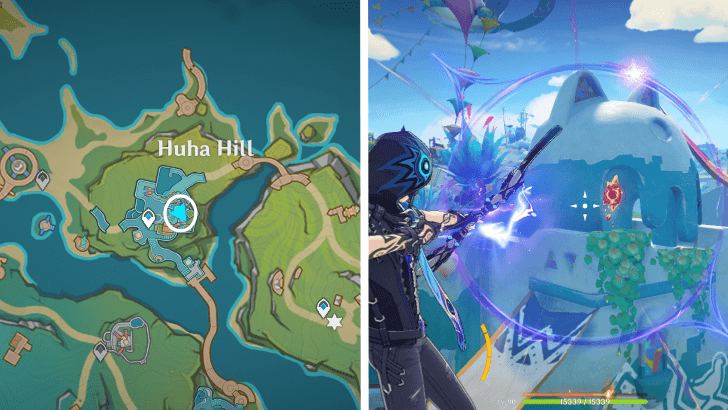 Location: Inside the covered roof of a house in Huha Hill. |
| Pyroculus 242 |
Easybreeze Resort |  Location: In the middle of the pool in Huha Hill. |
| Pyroculus 243 |
Easybreeze Resort |  Location: On top of a stage backdrop north of Huha Hill. |
| Pyroculus 244 |
Easybreeze Resort | 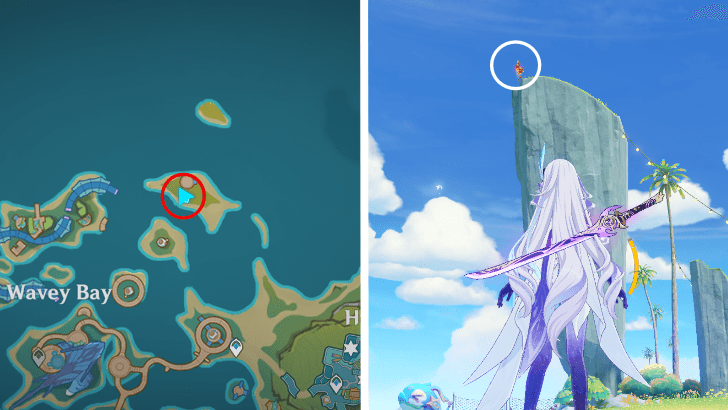 Location: On a giant rock formation north of Wavey Bay. |
| Pyroculus 245 |
Easybreeze Resort |  Location: On top of the egg house in the middle of Wavey Bay. |
| Pyroculus 246 |
Easybreeze Resort |  Location: On top of the giant Koholasaur in Wavey Bay. |
| Pyroculus 247 |
Easybreeze Resort |  Location: Inside the water slide at Wavey Bay. |
| Pyroculus 248 |
Easybreeze Resort | 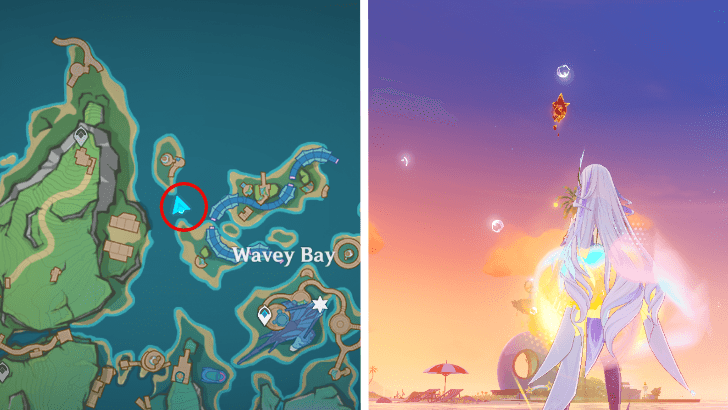 Location: Up above the water north of Wavey Bay, you can use an Asha to grapple to it. |
| Pyroculus 249 |
Easybreeze Resort |  Location: In between two palm trees, by the cliffs south of Wavey Bay. |
| Pyroculus 250 |
Easybreeze Resort | 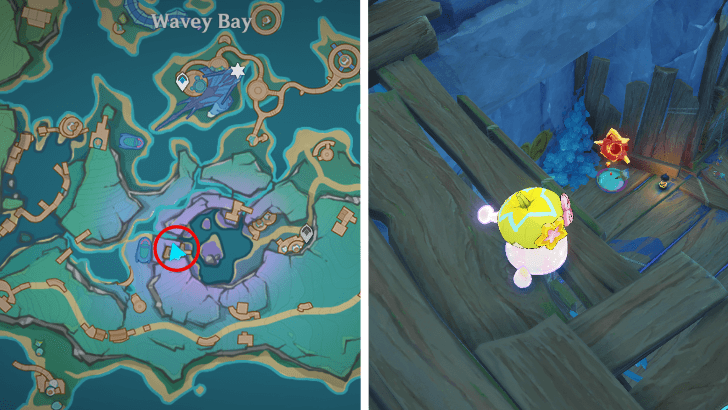 Location: Inside a hole with Saurian Warriors, south of Wavey Bay. |
| Pyroculus 251 |
Easybreeze Resort |  Location: Inside the taller egg house, with nearby hilichurls, far south of Wavey Bay. |
| Pyroculus 252 |
Easybreeze Resort |  Location: On top of a building, by the teleport waypoint south of Wavey Bay. |
| Pyroculus 253 |
Easybreeze Resort | 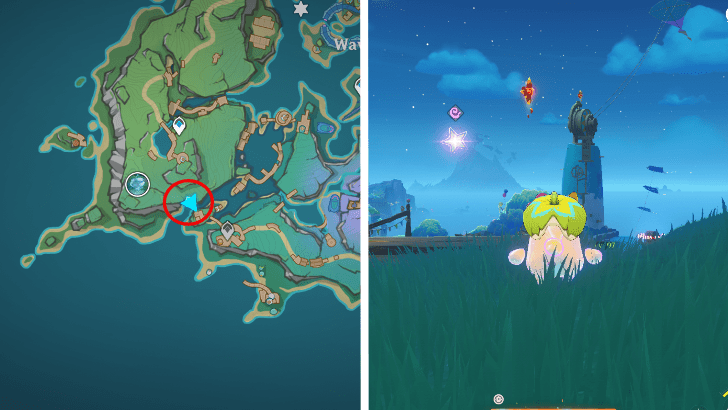 Location: In between two cliffs to the far right of Wavey Bay. |
| Pyroculus 254 |
Easybreeze Resort |  Location: On the very edge of the shore, southwest from Wavey Bay. |
| Pyroculus 255 |
Easybreeze Resort | 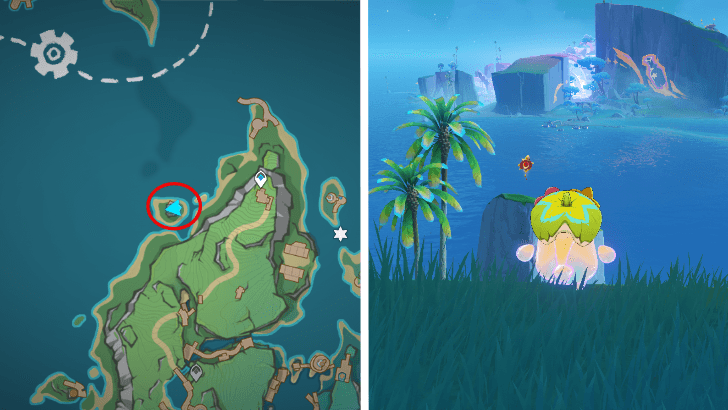 Location: Located on top of an outcrop, on an island to the left of the cliffs at Wavey Bay, in the direction of Tete Isle. |
| Pyroculus 256 |
Easybreeze Resort |  Location: On a hut in the middle of a Hilichurl camp, on the cliff in Guiztli Ridge. |
| Pyroculus 257 |
Easybreeze Resort |  Location: From the Hilichurl Camp, look for the Hot Air Balloon with a wooden npc. Use Asha to paint the NPC, then ride the Chroma Kites up. |
| Pyroculus 258 |
Easybreeze Underground |  Location: Situated at the base of a waterfall, immediately inside the entrance to Villa Guiztli in Guiztli Ridge. |
| Pyroculus 259 |
Easybreeze Underground | 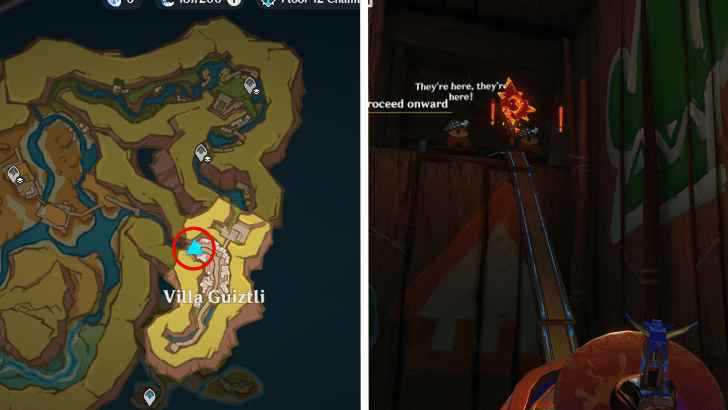 Location: Located on the path between Villa Guiztli and Castle Joquirato on Guiztli Ridge. Need to progress the The World is Your Canvas quest before you can access it. |
| Pyroculus 260 |
Easybreeze Underground |  Location: Found within the Guiztli Path. Progress ''The World is Your Canvas'' Quest to access the area. |
| Pyroculus 261 |
Easybreeze Underground | 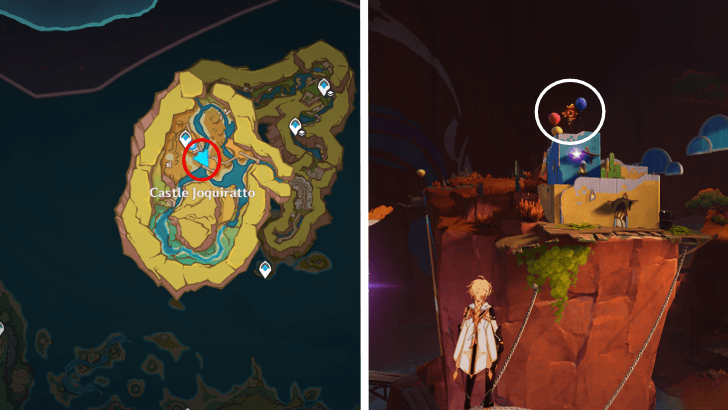 Location: Within Castle Joquiratto on top of the house, on the tallest stone pillar. Progress ''The World is Your Canvas'' Quest to access the area. |
| Pyroculus 262 |
Easybreeze Underground | 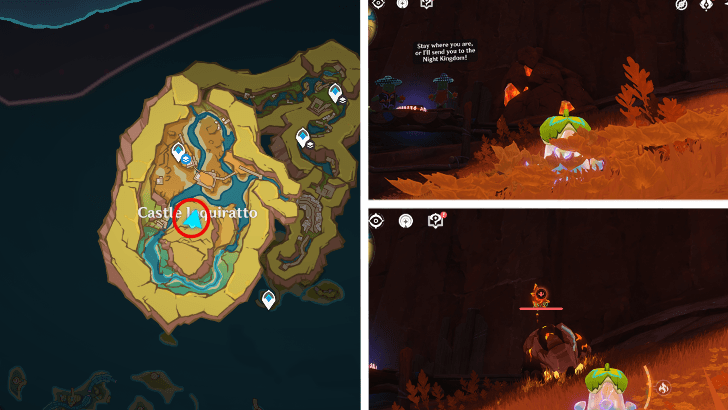 Location: Also found within Castle Joquiratto, behind a boulder. Progress ''The World is Your Canvas'' Quest to access the area. |
| Pyroculus 263 |
Easybreeze Underground |  Location: West of Castle Joquiratto on top of a stone pillar. Progress ''The World is Your Canvas'' Quest to access the area. |
| Pyroculus 264 |
Easybreeze Resort | 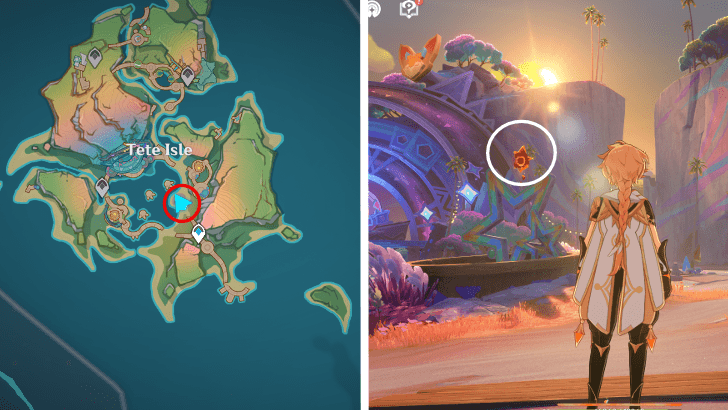 Location: On top of a star decoration near the entrance waypoint to Tete Isle. Progress ''The World is Your Canvas'' Quest to access. |
| Pyroculus 265 |
Easybreeze Resort | 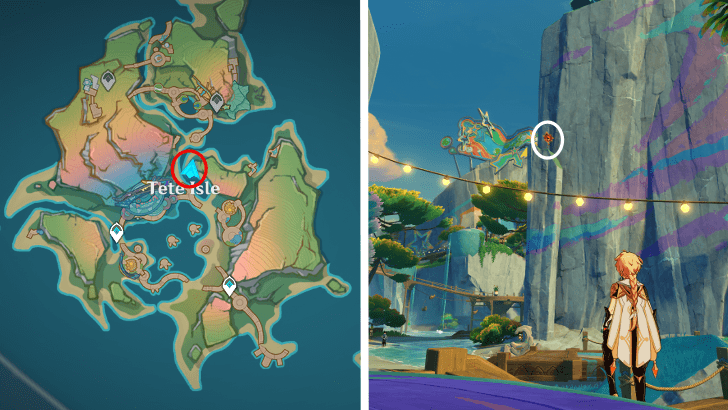 Location: On top of a stone pillar on the right side of the Dance-Off stage. Progress ''The World is Your Canvas'' Quest to access Tete Island. |
| Pyroculus 266 |
Easybreeze Resort | 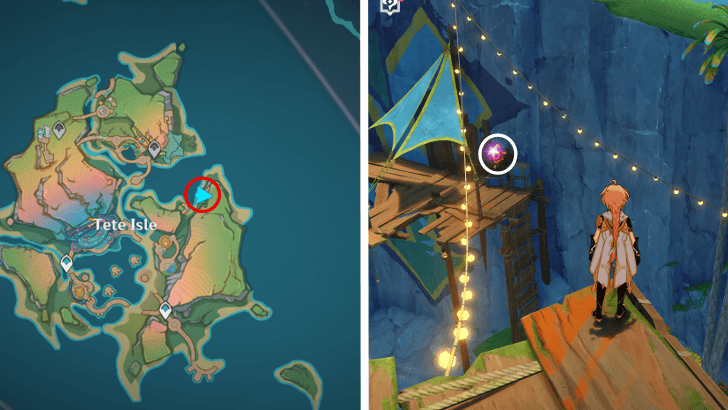 Location: On a platform east of Tete Isle, near an npc named Icahua. Progress ''The World is Your Canvas'' Quest to access Tete Island. |
| Pyroculus 267 |
Easybreeze Resort | 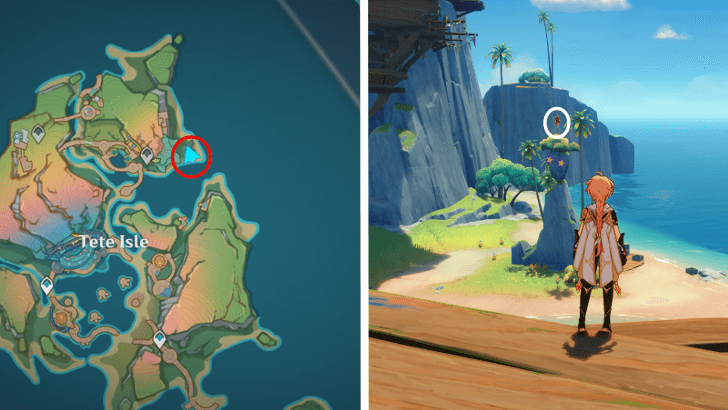 Location: Just across the previous Pyroculus, on top of the stone pillar. Progress ''The World is Your Canvas'' Quest to access Tete Island. |
| Pyroculus 268 |
Easybreeze Resort |  Location: Located north of Tete Isle, along the walkway that leads to the Aphimead nectar facility. Progress ''The World is Your Canvas'' Quest to access Tete Island. |
| Pyroculus 269 |
Easybreeze Resort |  Location: From the previous pyroculus, climb the cliff behind and cross the wooden bridge to reach this pyroculus on top of a house. Progress ''The World is Your Canvas'' Quest to access Tete Island. |
| Pyroculus 270 |
Easybreeze Resort | 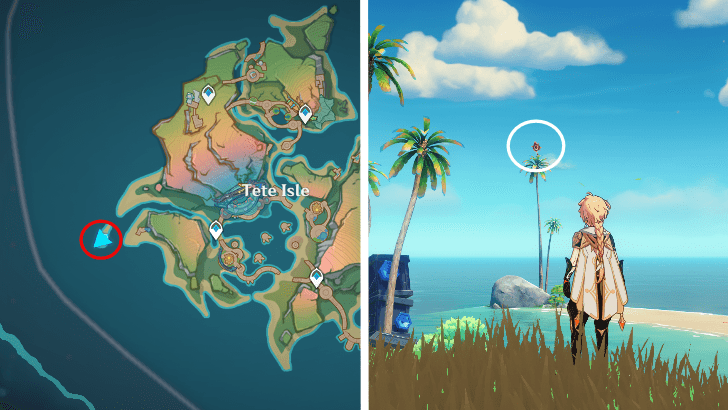 Location: West of Tete Isle, floating atop a palm tree. Progress ''The World is Your Canvas'' Quest to access Tete Island. |
| Pyroculus 271 |
Easybreeze Resort | 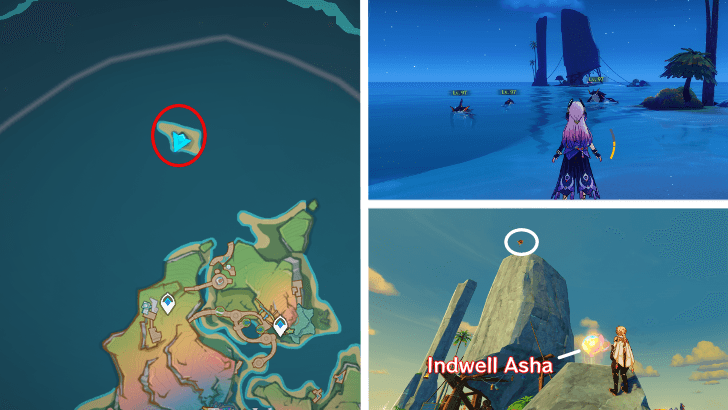 Location: On an island north of Tete Isle and can be reached by indwelling a Koholasaur. Indwell the Asha nearby and climb the stone pillar to get the Pyroculus. Progress ''The World is Your Canvas'' Quest to access Tete Island. |
There are 271 Pyroculus floating throughout Natlan, 49 of which are found in the new 5.8 area, the Easybreeze Holiday Resort!
60 Pyroculus are found in the 5.5 areas of Natlan, which includes the Atocpan and the Ancient Sacred Mountain. 54 Pyroculus can be found in the Natlan 5.2 map, which covers the Tezcatepetonco Range, Quahuacan Cliff, and Ochkanatlan Region. While the 5.0 areas contained 108 Pyroculus.
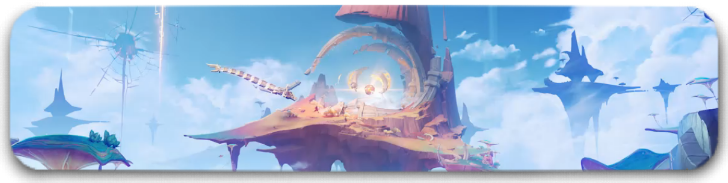
5.0 Pyroculi Locations
| 5.0 Pyroculi Locations |
|---|
 View Full Image in New Tab |
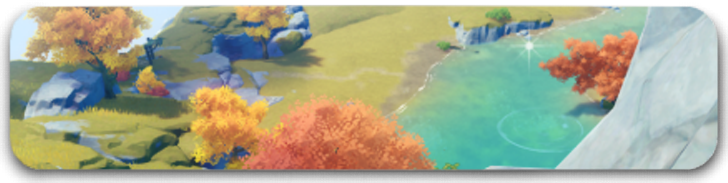
5.2 Pyroculi Locations
| 5.2 Pyroculi Locations |
|---|
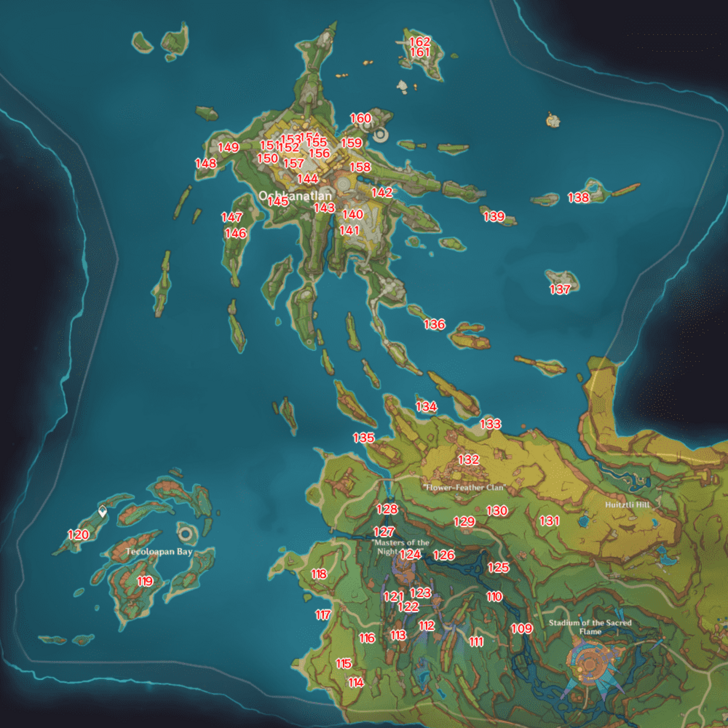 View Full Image in New Tab |
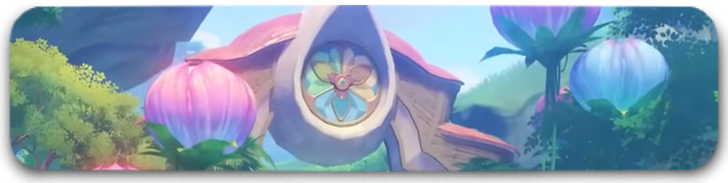
5.8 Pyroculi Locations
| 5.8 Pyroculi Locations |
|---|
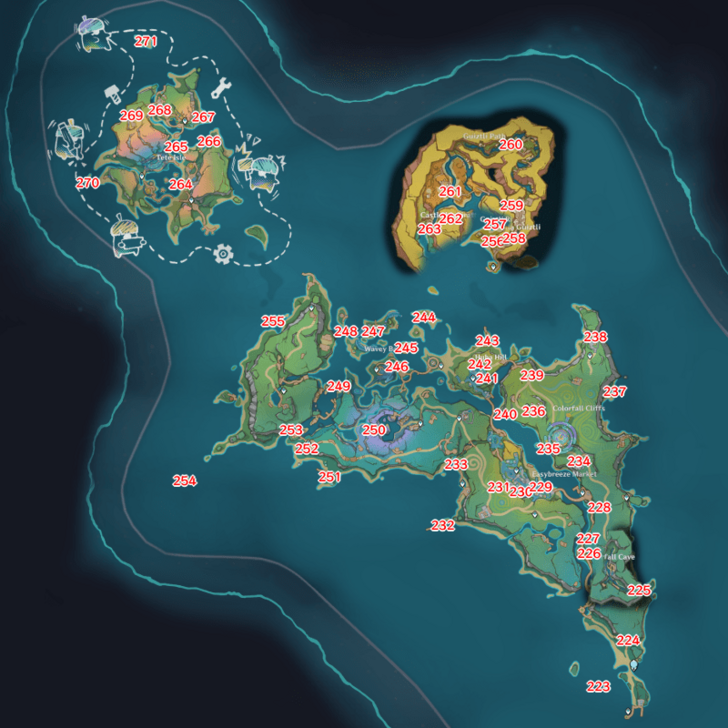 View Full Image in New Tab |
How to Use Pyroculus
Upgrade Natlan's Statue of the Seven

Like all other oculi, the Pyroculus is used to upgrade the Statue of the Seven in Natlan! Upgrading the Statue of the Seven rewards you with Primogems, Shrine of Depths Keys, and Adventure EXP.
How to Level Up Statues of the Seven
How Many Pyroculus are There in 5.8?
There are 271 Pyroculus total found in the Natlan region as of Version 5.8!
Search with Friends
If you're finding it hard to explore the various areas of Natlan, bring a friend or two to help you! Check out our friend request and co-op boards for potential exploration buddies:
| Genshin Co-Op Boards | ||
|---|---|---|
Rewards from Natlan Statue of the Seven
| Lvl. | Pyroculus Required | Rewards |
|---|---|---|
| 2 | 20 | |
| 3 | 22 | |
| 4 | 25 | |
| 5 | 28 | |
| 6 | 30 | |
| 7 | 32 | |
| 8 | 35 | |
| 9 | 38 | |
| 10 | 40 |
Note that players who have not reached Adventure Rank 60 can still gain Adventure EXP instead of Mora from the Statue of the Seven.
Genshin Impact Related Guides

Map Guides for Teyvat Nations
| List of Region Map Guides | |
|---|---|
 Mondstadt Map Guide Mondstadt Map Guide
|
 Liyue Map Guide Liyue Map Guide |
 Inazuma Map Guide Inazuma Map Guide |
 Sumeru Map Guide Sumeru Map Guide |
 Fontaine Map Guide Fontaine Map Guide |
 Natlan Map Guide Natlan Map Guide |
 Nod-Krai Map Guide Nod-Krai Map Guide |
|
Map Guides for Other Areas
| List of Map Guides | |
|---|---|
 Enkanomiya Enkanomiya |
 Golden Archipelago Golden Archipelago |
 Dragonspine Dragonspine |
 The Chasm The Chasm |
 Sumeru Rainforest Sumeru Rainforest |
 Sumeru Desert Sumeru Desert |
 Veluriyam Mirage Veluriyam Mirage |
 Chenyu Vale Chenyu Vale |
 Simulanka Simulanka |
 Sacred City of Tollan Sacred City of Tollan |
 Easybreeze Holiday Resort Easybreeze Holiday Resort |
|
Oculi Location Guides
| Teyvat Oculus Guides | |||
|---|---|---|---|
| All Oculi |
Anemoculus |
Geoculus |
Electroculus |
| Dendroculus |
Hydroculus |
Pyroculus |
Lunoculus |
Other Oculus Map Guides
| Dendroculus Guides | |
|---|---|
| Rainforest Dendroculus | All Desert Dendroculus |
| Hadramaveth Dendroculus | Girdle of the Sands Dendroculus |
Comment
is there an extra pyroculus, like in every other region?
Author

Pyroculus Locations and How to Use


Rankings
Gaming News


![The Liar Princess and the Blind Prince Review [PC] | Lovely to Look at but Tedious to Play](https://img.game8.co/4442586/8d95f5faf05780f1765ce7e0938bd825.jpeg/thumb)
![Marathon Cryo Archive Map Teased as [REDACTED] on Selection Screen](https://img.game8.co/4442236/6357203e58172f6de57f1991e7c39b22.png/thumb)

Popular Games

Genshin Impact Walkthrough & Guides Wiki
Umamusume: Pretty Derby Walkthrough & Guides Wiki
Pokemon Pokopia Walkthrough & Guides Wiki
Honkai: Star Rail Walkthrough & Guides Wiki
Monster Hunter Stories 3: Twisted Reflection Walkthrough & Guides Wiki
Arknights: Endfield Walkthrough & Guides Wiki
Wuthering Waves Walkthrough & Guides Wiki
Zenless Zone Zero Walkthrough & Guides Wiki
Pokemon TCG Pocket (PTCGP) Strategies & Guides Wiki
Monster Hunter Wilds Walkthrough & Guides Wiki


Recommended Games
Diablo 4: Vessel of Hatred Walkthrough & Guides Wiki
Cyberpunk 2077: Ultimate Edition Walkthrough & Guides Wiki
Fire Emblem Heroes (FEH) Walkthrough & Guides Wiki
Yu-Gi-Oh! Master Duel Walkthrough & Guides Wiki
Super Smash Bros. Ultimate Walkthrough & Guides Wiki
Pokemon Brilliant Diamond and Shining Pearl (BDSP) Walkthrough & Guides Wiki
Elden Ring Shadow of the Erdtree Walkthrough & Guides Wiki
Monster Hunter World Walkthrough & Guides Wiki
The Legend of Zelda: Tears of the Kingdom Walkthrough & Guides Wiki
Persona 3 Reload Walkthrough & Guides Wiki


All rights reserved
Copyright© 2012-2024 HoYoverse — COGNOSPHERE. All Rights Reserved.
The copyrights of videos of games used in our content and other intellectual property rights belong to the provider of the game.
The contents we provide on this site were created personally by members of the Game8 editorial department.
We refuse the right to reuse or repost content taken without our permission such as data or images to other sites.
already at max and no extra pyroculus here...