Chizhang Wall Puzzle and How to Solve
✉ Send your thoughts in our Genshin 6.4 Patch Survey!
★ Exclusive: Dive back in time with the Meta History
◆ Hot: Version 6.4, Luna 5 Codes
◆ Builds: Varka, Flins, Skirk, Escoffier
◆ Events: Travelers' Tales, He Who Caught the Wind
◆ Future: Linnea, Version 6.5 Luna VI
Solving the Chizhang Wall Puzzle will unlock the underground cavern of Chizhang Wall in Genshin Impact. Learn how to solve the Chizhang Wall Puzzle and see the puzzle location!
List of Contents
How to Solve Chizhang Wall Puzzle
| Solving Chizhang Wall Puzzles |
|---|
Collecting Fragrant Wood Chizhang
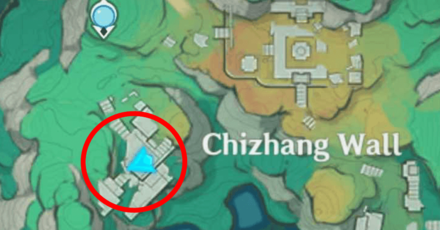
Teleport to the Statue of Seven in Chizhang Wall to locate the puzzle. You will also need to place different structures on their respective slots to open the mechanism and get Fragrant Wood Chizhang.
Fragrant Wood Chizhang Location
Chizhang First Pillar Piece
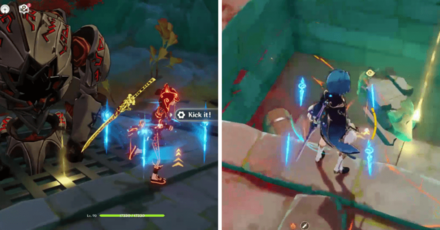 |
Interact with the Ruin Hunter twice that's sitting on a hatch and fight it. It will open up the hatch after defeating it containing the first structure and a Common Chest.
Get the structure and place it on the second level of the stairs that leads to the locked mechanism.
Chizhang Second Pillar Piece
Get the next structure in front of the Ruin Hunter's location. It's not hidden and you should be able to grab it without any worries. Place it on the slot behind the locked mechanism.
Chizhang Third Pillar Piece
The last structure is below one level behind a metal door. Enter through the gap on the left side (facing the door) to get the structure. You can also do the time trial challenge as it'll direct you to the hole too! Head upstairs and place it on the bottom part of the stairs.
You can loot Fragrant Wood Chizhang and a Precious Chest after placing the last structure.
Collecting Fragrant Wood Huangcong
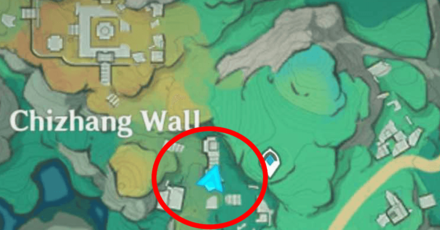
You need to get different sizes structures and put them on the structure slots to get Fragrant Wood Huangcong. You can find this puzzle near the Teleport Waypoint in Chizhang Wall.
Fragrant Wood Huangcong Location
Huangcong First and Second Pillar Piece
You can find the first pillar piece lying near its slot in front of the locked metal door at the bottom. Pick it up and place it on the slot to open the metal door and get the second pillar piece inside.
Huangcong Second Pillar Piece
The second piece is obtained inside a locked door opposite of where the first metal door is located. You will need two pillar pieces to get inside this door.
Get the pillar piece inside the first metal door you've just opened. Go outside and put it on the lower spot.
After that, grab the first ruin structure you used to open up the first door and place it on the slot nearest to the second door found in the opposite direction of where the first metal door is located.
Huangcong Placement for the Treasure Chest
Once you have all the pieces, place the following pillar pieces on the stairs where the treasure chest is located from highest to lowest:
- Broken pillar (first piece)
- Flat-top piece (second piece)
- Arch piece (third piece)
Offer Fragrant Wood to the Diffuser Inscription
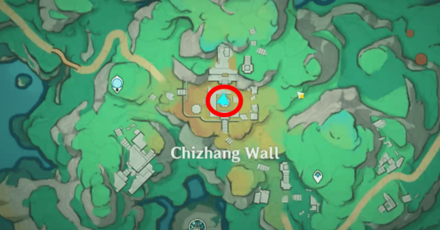
Once you have all the Fragrant Wood items from both locations, go to the Diffuser Inscription in the middle of Chizhang Wall and offer both items to it. This should open the final locked door where you can fight a Ruin Grader.
Defeating it by brute force, or by using your Adeptal Energy will gift you a Luxurious Chest!
This puzzle isn't over yet as there is a Jade mechanism in the middle of the room.
Acquire Jade Fragments
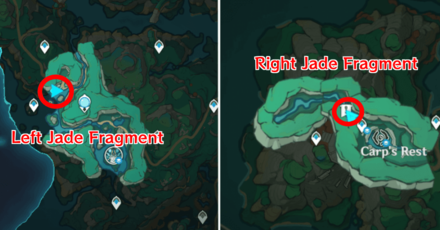
| Puzzle Solutions | ||
|---|---|---|
| Right Jade Fragment | Left Jade Fragments | |
You will need to acquire the Right and Left Jade Fragments next to enter the cave in Chizhang Wall. You can find one near the Teleport Waypoint west of the Statue of Seven in Chizhang Wall, while the other one is near the underground Teleport Waypoint in Carp's Rest, below Chiwang Terrace.
Jade Fragments Location in Chenyu Vale
Right Jade Fragment
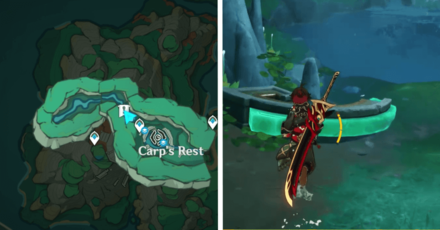
Fast travel to Carp's Rest using the underground Teleport Waypoint to get the Right Jade Fragment. Go to the opposite direction of where you spawned after teleporting and grab the fragment near a waterfall.
If you haven't unlocked this area, you will need the The Cloud-Padded Path to the Chiwang Repose quest for you to get to this location.
How to Unlock Carp's Rest and Location
Left Jade Fragment
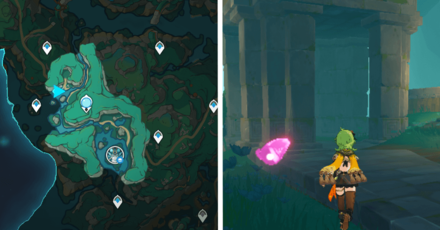
Teleport to the waypoint west of the Statue of Seven in Chizhang Wall. Head over to the small stone pavilion, northeast from the Teleport Waypoint to get the Left Jade Fragment.
Entering the Underground Cave
| # | How to Enter the Underground Cave |
|---|---|
| 1 | 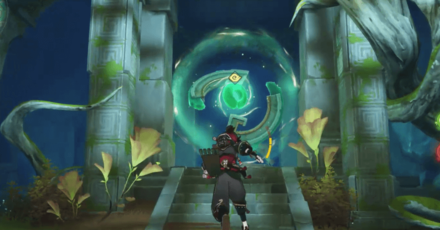 Next, place the two Jade Fragments onto the Ancient Jade Pendant. Use the pendant after placing the fragments to get into the cavern area of Chizhang Wall. |
| 2 | 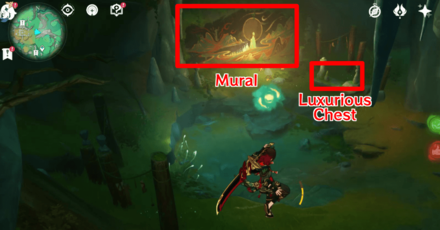 After that, run straight and interact with the mural below to get The Mural Veil achievement. You can also get a Luxurious Chest nearby! |
Chizhang Wall Puzzle Location
Fragrant Wood Locations
| Fragrant Wood Chizhang | Fragrant Wood Huangcong |
|---|---|
 |
 |
Fragrant Wood Huangcong and Fragrant Wood Chizhang are located in Chizhang Wall. You can find the puzzle for Fragrant Wood Huangcong near the Teleport Waypoint, while Fragrant Wood Chizhang is near the Statue of Seven.
Fragrant Wood Huangcong and Chizhang Location
Jade Fragment Locations
| Left Jade Fragment | Right Jade Fragment |
|---|---|
 |
 |
You can get the Left Jade Fragment on the Teleport Waypoint west of the Statue of Seven in Chizhang Wall. The Right Jade Fragment is in Carp's Rest, behind the Teleport Waypoint, near a waterfall.
These Jade Fragments are needed to enter the underground cavern of Chizhang Wall!
Jade Fragments Location in Chenyu Vale
Genshin Impact Related Guides
All Tips and Tricks Guides

All Version 4.4 Tips & Tricks
Other Regional Tips & Tricks
Comment
So, i've completed this puzzle, till the jade completed Then i teleported to the cave where there is a mural and a chest The problem is i forgot to collect the spirit carp at the jade location before we teleport to the cave, so i teleport out from the cave without thinking, and then collect the spirit carp When i try to teleport to the cave before, i cant. i cant press "T" any way to go back to the cave?
Author
Chizhang Wall Puzzle and How to Solve
improvement survey
03/2026
improving Game8's site?

Your answers will help us to improve our website.
Note: Please be sure not to enter any kind of personal information into your response.

We hope you continue to make use of Game8.
Rankings
Gaming News
Popular Games

Genshin Impact Walkthrough & Guides Wiki

Honkai: Star Rail Walkthrough & Guides Wiki

Umamusume: Pretty Derby Walkthrough & Guides Wiki

Pokemon Pokopia Walkthrough & Guides Wiki

Resident Evil Requiem (RE9) Walkthrough & Guides Wiki

Monster Hunter Wilds Walkthrough & Guides Wiki

Wuthering Waves Walkthrough & Guides Wiki

Arknights: Endfield Walkthrough & Guides Wiki

Pokemon FireRed and LeafGreen (FRLG) Walkthrough & Guides Wiki

Pokemon TCG Pocket (PTCGP) Strategies & Guides Wiki
Recommended Games

Diablo 4: Vessel of Hatred Walkthrough & Guides Wiki

Fire Emblem Heroes (FEH) Walkthrough & Guides Wiki

Yu-Gi-Oh! Master Duel Walkthrough & Guides Wiki

Super Smash Bros. Ultimate Walkthrough & Guides Wiki

Pokemon Brilliant Diamond and Shining Pearl (BDSP) Walkthrough & Guides Wiki

Elden Ring Shadow of the Erdtree Walkthrough & Guides Wiki

Monster Hunter World Walkthrough & Guides Wiki

The Legend of Zelda: Tears of the Kingdom Walkthrough & Guides Wiki

Persona 3 Reload Walkthrough & Guides Wiki

Cyberpunk 2077: Ultimate Edition Walkthrough & Guides Wiki
All rights reserved
Copyright© 2012-2024 HoYoverse — COGNOSPHERE. All Rights Reserved.
The copyrights of videos of games used in our content and other intellectual property rights belong to the provider of the game.
The contents we provide on this site were created personally by members of the Game8 editorial department.
We refuse the right to reuse or repost content taken without our permission such as data or images to other sites.


I also had similar issue, I teleported out as soon as I teleported in because there was something I wanted to get first and I figured the big jade that I ported in from was near a waypoint so I could get back quickly, but unable to use it again. :(