This survey will take about 1 minute.
Your answers will help us to improve our website.
Genshin Impact
Everlight Cell and Beam Transmission Puzzles in Sumeru
✉ Send your thoughts in our Genshin 6.4 Patch Survey!
★ Exclusive: Dive back in time with the Meta History
◆ Hot: Version 6.4, Luna 5 Codes
◆ Builds: Varka, Flins, Skirk, Escoffier
◆ Events: Travelers' Tales, He Who Caught the Wind
◆ Future: Linnea, Version 6.5 Luna VI

Everlight Cells are relay beam puzzles in Sumeru's Desert Ruins in Genshin Impact 3.1. See how to connect Everlight Cells with Beam Transmissions, how to solve Beam Transmission Puzzles in the ruins, and release date here!
List of Contents
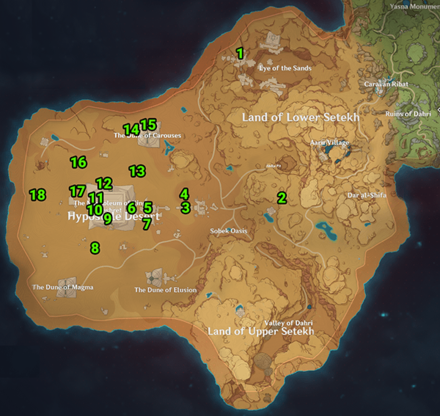
All Everlight Cell Locations
Everlight Cell Full Location Map
| All Everlight Cell Locations | ||
|---|---|---|
 |
||
| Click to Jump on an Everlight Cell Puzzle Solution | ||
| Everlight Cell #1 | Everlight Cell #2 | Everlight Cell #3 |
| Everlight Cell #4 | Everlight Cell #5 | Everlight Cell #6 |
| Everlight Cell #7 | Everlight Cell #8 | Everlight Cell #9 |
| Everlight Cell #13 | Everlight Cell #14 | Everlight Cell #16 |
| Everlight Cell #18 | ||
Everlight Cell #1 Puzzle Guide
Step on the two floor switches with blue aura. Touch the cell on the left side to open the door and solve the puzzle.
Back to All Locations ▲
Everlight Cell #2 Puzzle Guide
Step on the two floor switches with blue aura. Rotate the cell so that they are facing each other to solve the puzzle.
You can unlock this puzzle during the first part of the Golden Slumber world quest.
Everlight Cell #3 Puzzle Guide
Step on the floor switch with blue aura to spawn the missing Everlight Cell. Rotate the cells to solve the puzzle.
Everlight Cell #4 Puzzle Guide
Go inside Khemenu Temple and head east towards a room leading to an underground area. Jump on the ledge with two glowing eyes on the sides and drop down to find the book-shaped structure.
Operate the structure and touch the cell that appears behind it to spawn the chest.
Everlight Cell #5 Puzzle Guide
Find the Everlight Cell inside the boat structure and rotate the cell until it is facing the floating cell.
Everlight Cell #6 Puzzle Guide
These Everlight Cells are inside Sekhem Hall, deep underground the pyramids of the Great Red Sand. You will need to face two Everlight Cells to the monuments of the same color, with each color activating a certain effect as seen below.
Sekhem Hall Elemental Monuments
Aligning to both Hydro Monuments drains Sekhem Hall. |
Aligning to both Electro Monuments reveals a Treasure Chest, floating on an invisible bridge. |
Aligning to both Anemo monuments creates an updraft to a Dendroculus. |
Everlight Cell #7 Puzzle Guide
Step on the floor switch with blue aura to spawn the missing Everlight Cell inside the Khemenu Temple.
Rotate the cell so that the beam is facing the cell that spawned from the floor switch to solve the puzzle.
Everlight Cell #8 Puzzle Guide
Move the two cells in the area to connect the pairs of Everlight Cells together. Use a Pyro character to light up the stone structures with the fire icon to solve the puzzle.
Everlight Cell #9 Puzzle Guide
Rotate the cell so it faces the other cell on the right side. This creates a beam that unlocks the chest on the opposite side of the area.
Everlight Cell #13 Puzzle Guide
Rotate the cell northeast of the treasure chest so that it is not facing the cell on the right side. Then, activate the cell south of it to solve the puzzle.
Everlight Cell #14 Puzzle Guide
Step on the floor switch with blue aura to spawn a cell. Touch the cell to remove the wall, allowing the beam to connect to an Everlight Cell on the other side.
Everlight Cell #16 Puzzle Guide
Head to the area with the red glowing door and step on the floor switch with blue aura. Rotate the cell so it faces the cell on the other side to complete the puzzle.
Everlight Cell #18 Puzzle Guide
Activate the Everlight Cell and switch to a Pyro character to fire a flame arrow towards the stone structure.
Wait for the beam to move towards the other structure and fire a flame arrow again. Repeat this step for the last stone structure to spawn the chest.
How to Solve Everlight Cell Transmission Puzzles
Connect the Mechanism's Everlight Cells
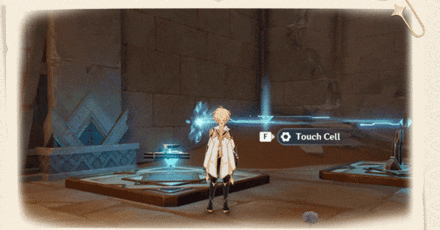
Connect the mechanisms found in the Desert ruins by producing Everlight Cells pointed to other mechanisms. Once connected, something special might just happen!
Use Obscuring Cell on Wall Blocks
Sometimes, the Beam Transmission can be blocked by walls inside the Ruins of King Deshret. You can touch nearby Obscuring Cells to turn the walls into transparent illusions, letting the Everlight Cell pass through.
What are Everlight Cells and Beam Transmissions?
Beam Puzzles in the Sumeru Desert

Similar to the Relay Stone Puzzles in Inazuma, or the Astral Puzzles in the 2.8 Golden Apple Archipelago, Sumeru's Desert area have certain mechanisms that can be connected through Everlight Cells.
Part of the Ruin Puzzles
| All Ruins of King Deshret Puzzles | |
|---|---|
| Primal Obelisk | Sacred Seal Locations |
| Plinth of the Secret Rites | Primal Ember & Torches |
| Beam Transmission | Verity Cell |
| Replicator Keystones | Forged Primal Lights |
| Primal Sandglass | Increasing Clearance |
| Obscuring Cell | |
Everlight Cell Transmissions are part of the Ruin puzzles in the Ruins of King Deshret. They include puzzles that will help you navigate around the ruins more efficiently!
Puzzle Release Date in Version 3.1
| Genshin Impact Version 3.1 | |
|---|---|
 |
|
| Release Date | September 28, 2022 |
Everlight Cells and Beam Transmission Puzzles will be released alongside the Ruins of King Deshret in Sumeru's Desert Area after the Version 3.1 update on September 28, 2022!
Version 3.1 Release Date and Patch Notes
Genshin Impact Related Guides
All Tips and Tricks Guides

All Version 3.1 Tips & Tricks
Other Regional Tips & Tricks
Comment
5  Anonymous about 3 years
why theses f*** things dont work for me? there's nothing to activate when i come close to the puzzles.
Author

Everlight Cell and Beam Transmission Puzzles in Sumeru
Please participate in our site
improvement survey
03/2026
improvement survey
03/2026
Would you assist in
improving Game8's site?
improving Game8's site?

×
We are listening to our users' valuable opinions and discussing how to act on them.
The information collected through this survey will be used for the purpose of improving our services. In addition, the information will only be disclosed a part of a statistic in a format that will not allow identification of personal information.
Begin Survey
Not Now
×
Please rate each item regarding Game8.co's Advertisements.
Amount of Ads
Very Dissatisfied
Somewhat Dissatisfied
Fine
Somewhat Satisfied
Highly Satisfied
Placement of Ads
Timing of Ad Display
Ad Loading Speed
Safeness of Ads
Content of Ads
×
Please rate each item regarding Game8.co's Quality of Articles.
Amount of information
Very Dissatisfied
Somewhat Dissatisfied
Fine
Somewhat Satisfied
Highly Satisfied
Frequency of updates
Speed of new information
Accuracy of articles
Understandibility of articles
Readability of sentences
×
Please rate each item regarding Game8.co's Usability of the Site.
Ease of finding information
Very Dissatisfied
Somewhat Dissatisfied
Fine
Somewhat Satisfied
Highly Satisfied
Loading Speed
Use of Color
Font Size
Visibility of Images
Easy to Understand Layout
×
Please rate each item regarding Game8.co's Message Boards, Comments.
Ease of Writing
Very Dissatisfied
Somewhat Dissatisfied
Fine
Somewhat Satisfied
Highly Satisfied
Readability
Ease in Finding Information
Comment Quality
Comment Quantity
Admin Response
×
Please rate each item regarding Game8.co's Site's new design.
Please rate our site's new design
Very Dissatisfied
Somewhat Dissatisfied
Fine
Somewhat Satisfied
Highly Satisfied
Do you think that the website's design change makes the site easier to use?
Has the new design made it easier for you to find information on the site?
Has the new design improved the overall visual appeal of the site?
How would you rate your overall satisfaction with the new design of the site?
×
How likely are you to recommend Game8 to someone you know?
Very Unlikely
0
1
2
3
4
5
6
7
8
9
10
Very Likely
If you have other opinions regarding potential improvement to the website, please share them with us. We would appreciate your honest opinion.
Note: This is a free response section, so you can proceed without entering anything.
Note: Please be sure not to enter any kind of personal information into your response.
Note: Please be sure not to enter any kind of personal information into your response.
×
Thank You
×
Thank you for participating in our survey! Your answers will help us to improve the quality of our website and services.
We hope you continue to make use of Game8.
We hope you continue to make use of Game8.
Close


Rankings
- We could not find the message board you were looking for.
Gaming News


![Monster Hunter Stories 3 Review [First Impressions] | Simply Rejuvenating](https://img.game8.co/4438641/2a31b7702bd70e78ec8efd24661dacda.jpeg/thumb)
Popular Games

Genshin Impact Walkthrough & Guides Wiki
Honkai: Star Rail Walkthrough & Guides Wiki
Umamusume: Pretty Derby Walkthrough & Guides Wiki
Pokemon Pokopia Walkthrough & Guides Wiki
Resident Evil Requiem (RE9) Walkthrough & Guides Wiki
Monster Hunter Wilds Walkthrough & Guides Wiki
Wuthering Waves Walkthrough & Guides Wiki
Arknights: Endfield Walkthrough & Guides Wiki
Pokemon FireRed and LeafGreen (FRLG) Walkthrough & Guides Wiki
Pokemon TCG Pocket (PTCGP) Strategies & Guides Wiki


Recommended Games
Diablo 4: Vessel of Hatred Walkthrough & Guides Wiki
Cyberpunk 2077: Ultimate Edition Walkthrough & Guides Wiki
Fire Emblem Heroes (FEH) Walkthrough & Guides Wiki
Yu-Gi-Oh! Master Duel Walkthrough & Guides Wiki
Super Smash Bros. Ultimate Walkthrough & Guides Wiki
Pokemon Brilliant Diamond and Shining Pearl (BDSP) Walkthrough & Guides Wiki
Elden Ring Shadow of the Erdtree Walkthrough & Guides Wiki
Monster Hunter World Walkthrough & Guides Wiki
The Legend of Zelda: Tears of the Kingdom Walkthrough & Guides Wiki
Persona 3 Reload Walkthrough & Guides Wiki


All rights reserved
Copyright© 2012-2024 HoYoverse — COGNOSPHERE. All Rights Reserved.
The copyrights of videos of games used in our content and other intellectual property rights belong to the provider of the game.
The contents we provide on this site were created personally by members of the Game8 editorial department.
We refuse the right to reuse or repost content taken without our permission such as data or images to other sites.
I think some of these are bugged for me. Everlight Cell #9 Puzzle Guide (inside deshret mausoleum) and Everlight Cell #4 Puzzle Guide (Khemenu temple) didn't do anything when the beams connected. Either I didn't get the chests or puzzles didn't work properly and I collected these chests before solving a puzzle.