Spiral Abyss Guide | How to Get to Musk Reef
✉ Send your thoughts in our Genshin 6.4 Patch Survey!
★ Exclusive: Dive back in time with the Meta History
◆ Hot: Version 6.4, 6.4 Codes, Linnea, Version 6.5
◆ Builds: Varka, Flins, Skirk, Escoffier
◆ Events: Travelers' Tales, Sightseeing With Friends
◆ Endgame: Spiral Abyss (March 2026)
The Spiral Abyss is a special endgame domain in Genshin Impact. Check out our recommended spiral abyss teams for each floor, as well as the different blessings and rewards here!
List of Contents
Spiral Abyss Guide
Floor 1 Walkthrough
| Enemy Level | Lv25 | |
|---|---|---|
| Rewards |
Upon Chamber Clear Star's Bounty |
|
Recommended Characters
| Main DPS | |
|---|---|
| Sub-DPS | |
| Support |
Spiral Abyss Floor 1 Walkthrough
Floor 2 Walkthrough
| Enemy Level | Lv40 | |
|---|---|---|
| Rewards |
Upon Chamber Clear Star's Bounty |
|
Recommended Characters
| Main DPS |
|
|---|---|
| Sub-DPS | |
| Support |
Spiral Abyss Floor 2 Walkthrough
Floor 3 Walkthrough
| Enemy Level | Lv45 | |
|---|---|---|
| Rewards |
Upon Chamber Clear Star's Bounty |
|
Recommended Characters
| Main DPS | |
|---|---|
| Sub-DPS | |
| Support |
Spiral Abyss Floor 3 Walkthrough
Receive Xiangling for Clearing 3-3!
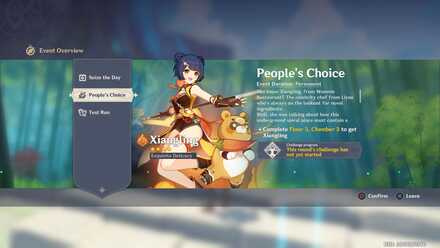
For the permanent event, People's Choice, you will receive Xiangling upon clearing Floor 3 Chamber 3. She's an easy to pick up Pyro elemental character!
If you've already received her from a wish you can receive one of her Stella Fortuna to upgrade her Constellation instead so it's a win-win.
Floor 4 Walkthrough
| Enemy Level | Lv50 | |
|---|---|---|
| Rewards |
Upon Chamber Clear Star's Bounty |
|
Recommended Characters
| Main DPS |
|
|---|---|
| Sub-DPS | |
| Support |
Receive Collei for Clearing 4-3!

For the permanent event, Curtain of Leaves, you will receive Collei upon clearing Floor 4 Chamber 3. She is one of the first Dendro characters released in Version 3.0.
If you've already received her from a wish you can receive one of her Stella Fortuna to upgrade her Constellation instead.
Spiral Abyss Floor 4 Walkthrough
Floor 5 Walkthrough
| Enemy Level | Lv55 | ||
|---|---|---|---|
| Rewards |
Upon Chamber Clear Star's Bounty |
||
Recommended Characters (First Half)
| Main DPS | |
|---|---|
| Sub-DPS | |
| Support |
Recommended Characters (Second Half)
| Main DPS |
|
|---|---|
| Sub-DPS | |
| Support |
Spiral Abyss Floor 5 Walkthrough
Floor 6 Walkthrough
| Enemy Level | Lv60 | ||
|---|---|---|---|
| Rewards |
Upon Chamber Clear Star's Bounty |
||
Recommended Characters (First Half)
| Main DPS | |
|---|---|
| Sub-DPS | |
| Support |
Recommended Characters (Second Half)
| Main DPS |
|
|---|---|
| Sub-DPS | |
| Support |
Spiral Abyss Floor 6 Walkthrough
Floor 7 Walkthrough
| Enemy Level | Lv65 | ||
|---|---|---|---|
| Rewards |
Upon Chamber Clear Star's Bounty |
||
Recommended Characters (First Half)
| Main DPS | |
|---|---|
| Sub-DPS | |
| Support |
Recommended Characters (Second Half)
| Main DPS |
|
|---|---|
| Sub-DPS | |
| Support |
Spiral Abyss Floor 7 Walkthrough
Floor 8 Walkthrough
| Enemy Level | Lv70 | ||
|---|---|---|---|
| Rewards |
Upon Chamber Clear Star's Bounty |
||
Recommended Characters (First Half)
| Main DPS | |
|---|---|
| Sub-DPS | |
| Support |
Recommended Characters (Second Half)
| Main DPS |
|
|---|---|
| Sub-DPS | |
| Support |
Spiral Abyss Floor 8 Walkthrough
Floor 9 Walkthrough
| Enemy Level | Lv. 72 - Lv. 76 | ||
|---|---|---|---|
| Rewards |
Upon Chamber Clear Star's Bounty |
||
Recommended Characters (First Half)
| Main DPS | |
|---|---|
| Sub-DPS |
|
| Support |
|
Recommended Characters (Second Half)
| Main DPS | |
|---|---|
| Sub-DPS |
|
| Support |
|
Spiral Abyss Floor 9 Walkthrough
Floor 10 Walkthrough
| Enemy Level | Lv. 72 - Lv. 76 | ||
|---|---|---|---|
| Rewards |
Upon Chamber Clear Star's Bounty |
||
Recommended Characters (First Half)
| Main DPS | |
|---|---|
| Sub-DPS |
|
| Support |
|
Recommended Characters (Second Half)
| Main DPS | |
|---|---|
| Sub-DPS |
|
| Support |
|
Spiral Abyss Floor 10 Walkthrough
Floor 11 Walkthrough
| Enemy Level | Lv. 88 - Lv. 92 | ||
|---|---|---|---|
| Rewards |
Upon Chamber Clear Star's Bounty |
||
Recommended Characters (First Half)
| Sample Teams | |||
|---|---|---|---|
|
|
|
|
|
|
|
|
|
|
| Other Recommendations | |||
| Main DPS | |||
| Sub DPS | |||
| Support | |||
Recommended Characters (Second Half)
| Sample Teams | |||
|---|---|---|---|
|
|
|
|
|
|
|
|
|
|
| Other Recommendations | |||
| Main DPS/ Driver |
|||
| Sub DPS | |||
| Support | |||
Spiral Abyss Floor 11 Walkthrough
Floor 12 Walkthrough
| Enemy Level | Lv. 95 - Lv. 100 | ||
|---|---|---|---|
| Rewards |
Upon Chamber Clear Star's Bounty |
||
Recommended Characters (First Half)
| Sample Teams | |||
|---|---|---|---|
|
|
|
|
|
|
|
|
|
|
| Other Recommendations | |||
| Main DPS | |||
| Sub DPS | |||
| Support | |||
Recommended Characters (Second Half)
| Sample Teams | |||
|---|---|---|---|
|
|
|
|
|
|
|
|
|
|
| Other Recommendations | |||
| Main DPS/ Driver |
|||
| Sub DPS | |||
| Support | |||
Spiral Abyss Floor 12 Walkthrough
How to Unlock Spiral Abyss
Reach Adventure Rank 20
Before you can enter Spiral Abyss you will need to be AR 20 so it's best to aim for that first. That said, the steps to unlocking the island can be done at any time.
How to Raise Your Adventure Rank
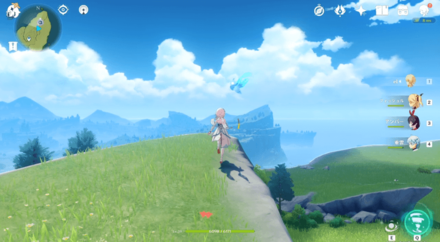
How to Get to Musk Reef
Cape Oath Portal
| Order | Explanation |
|---|---|
| ① |
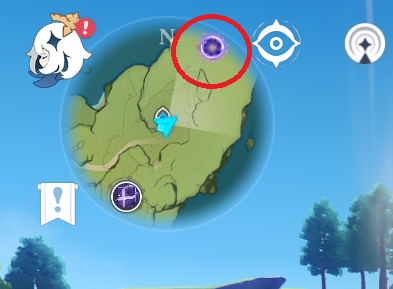
Mondstadt: Go to the Cape Oath Teleport Waypoint |
| ② |
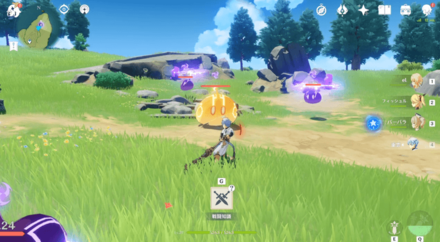
Defeat the nearby enemies |
| ③ |

Find the 3 Seelies |
| Seelie #1 |

To the west near an Apple tree |
| Seelie #2 |
To the west at the top of a cliff |
| Seelie #3 |
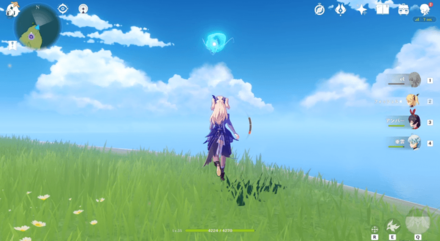
At the north edge of the cape |
| ④ |
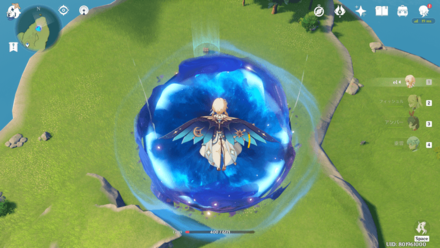
Ride the wind up and enter the portal |
| ⑤ |
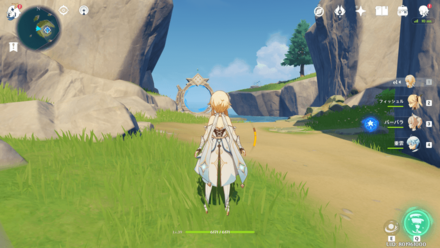
Arrive at Musk Reef where the entrance lies |
To get to Spiral Abyss you will first have to go through the portal in the sky above Cape Oath. Every subsequent time you can teleport directly there.
What is Spiral Abyss?
Repeatable Challenge Domain
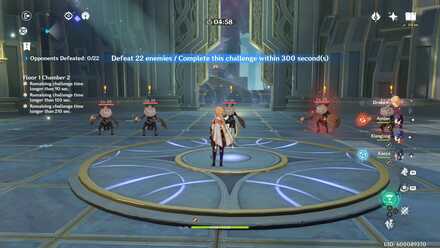
Spiral Abyss is similar to a Domain but instead you must clear 3 challenges per Floor. There are 8 floors in total and you can earn various rewards for completing the clear requirements.
Build Your Party Based on Ley Line Disorders
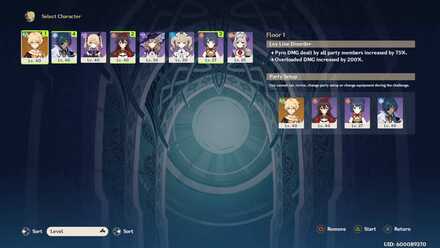
Each floor has a 75% damage buff or debuff Ley Line Disorder so you should prepare your party accordingly.
Choose Your Benediction of the Abyss
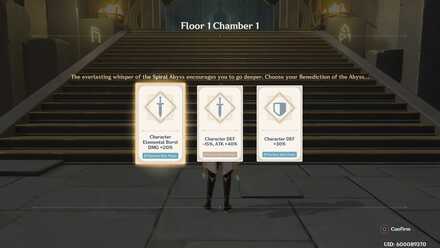
At the beginning of each Chamber you will be able to choose one of 3 buffs. This will persist through the rest of the Chamber so choose wisely.
Restrictions You Should Know About
| Things You Can't Do |
|---|
|
As you can't use items or change up your party mid floor, make sure your party is fully healed and prepared before challenging Spiral Abyss. Also, if you leave the designated area it is an automatic failure so be warned.
No Co-Op
In Spiral Abyss you are unable to challenge Chambers in Co-Op with friends. If you happen to be in Co-Op mode, however, you can still challenge it alone.
Blessing of the Abyssal Moon: Windlash Moon
| Blessing Effect | |
|---|---|
 When a character triggers a Swirl reaction on an opponent, they gain 1 stack fo Windlash, and when the stack count reaches 4, a shockwave is unleashed at the opponent's position, dealing True DMG and consuming all stacks of Windlash at the same time. Up to 1 stack of Windlash can be gained every 0.1s A shockwave can be unleashed this way every 6s. |
|
| Blessing Reset | 2026/04/16 04:00 (Server Time) |
Spiral Abyss Patch 5.7 Changes
Retry Challenge Button Feature
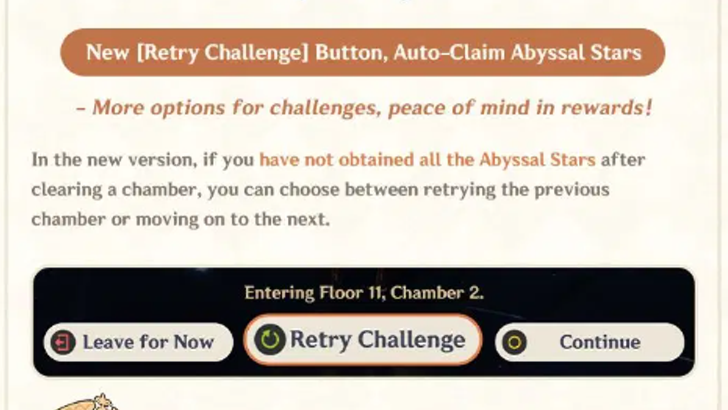
A new Retry Challenge feature has been added to the Spiral Abyss reset on the Version 5.7 update! Players who have not obtained all the Abyssal Stars after clearing a chamber can choose to retry the previous chamber or move to the next.
New Summary Screen

In Version 5.7, a new summary screen will show the maximum amount of Abyssal Stars you earned after clearing Floor 12 Chamber 3. Furthermore, players can also claim all the rewards from Floor 9 to Floor 12.
Spiral Abyss Patch 5.1 Changes
Skip Floor 9 & 10 Feature

Starting from the Spiral Abyss reset on October 16, 2024 during Version 5.1, players can skip having to complete Floor 9 if they previously full-cleared Floor 11, and can skip Floor 9 and 10 if they full-clear Floor 12.
Despite skipping Floors, they can still claim all previous Floor rewards as if they finished them manually, which saves a lot of time for players just wanting to get into the hardest Floor in the Spiral Abyss.
Genshin Impact 5.1 Release Date and Details
Open Artifact Chests in Bulk

This Quality-of-Life feature lets players open the acquired Artifact Chests from Spiral Abyss rewards in bulk, as opposed to opening each box one at a time, making it a more efficient and convenient system for frequent Abyss players.
Spiral Abyss Patch 1.4 Changes
Check Your Elemental Resonance

You can now check your Elemental Resonance while creating your party before tackling on a floor in Spiral Abyss.
Retry Function Added
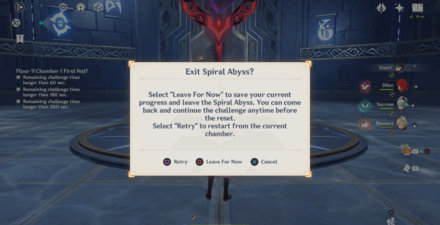
You can now restart the chamber on the current floor you are playing on without having to leave the Spiral Abyss Domain. You can do so by pausing during a fight and then press ''Retry''.
Upcoming Abyssal Moon Phases
| Upcoming Abyssal Moon Blessings |
|---|
|
Phase II: Converging Moon
After the character's Charged Attack hits an opponent, the character will receive a 20% Elemental or Physical DMG Bonus, corresponding to the Elemental or Physical DMG type of the Charged Attack, for 5s. This effect can be triggered once every 0.5s. Max 3 stacks. Charged Attack DMG bonuses from different Elemental types or Physical DMG are counted independently. . |
Spiral Abyss Tips and Tricks
Unlockable Achievement
Going through the portial in Cape Oath will give you the Initiating Warp Drive! Achievement, which will give you 5 Primogems!
Genshin Impact Related Guides
Genshin Impact Wiki Guide

Genshin Impact Wiki Front Page
Guides by Category
 Story Walkthrough
 News & Game Info
 Characters
 Gacha (Wishes)
 Rerolling
 Tier Lists
 Redeem Codes
 Versions
 Tips & Tricks
 Quests
 Weapons
 Artifacts
 Bosses
 Enemies
 Domains
 Items & Materials
 Events
 Achievements
 Message Boards
 Spiral Abyss
 Areas and Maps
 Archive
 Locations & Lore
 Housing
 Fishing
 Genius Invokation
 Imaginarium Theater
Exclusive Guides
| User-Exclusive Guides | |
|---|---|
 State of Meta: Nod-Krai State of Meta: Nod-Krai |
 A Deep Dive into the History of Meta A Deep Dive into the History of Meta |
Author

Spiral Abyss Guide | How to Get to Musk Reef
Rankings
- We could not find the message board you were looking for.
Gaming News


![Monster Hunter Stories 3 Review [First Impressions] | Simply Rejuvenating](https://img.game8.co/4438641/2a31b7702bd70e78ec8efd24661dacda.jpeg/thumb)

![The Seven Deadly Sins: Origin [First Impressions] | A Promising Start](https://img.game8.co/4440581/584e0bfb87908f12c4eab6e846eb1afd.png/thumb)
Popular Games

Genshin Impact Walkthrough & Guides Wiki
Umamusume: Pretty Derby Walkthrough & Guides Wiki
Pokemon Pokopia Walkthrough & Guides Wiki
Honkai: Star Rail Walkthrough & Guides Wiki
Monster Hunter Stories 3: Twisted Reflection Walkthrough & Guides Wiki
Arknights: Endfield Walkthrough & Guides Wiki
Wuthering Waves Walkthrough & Guides Wiki
Zenless Zone Zero Walkthrough & Guides Wiki
Pokemon TCG Pocket (PTCGP) Strategies & Guides Wiki
Monster Hunter Wilds Walkthrough & Guides Wiki


Recommended Games
Diablo 4: Vessel of Hatred Walkthrough & Guides Wiki
Cyberpunk 2077: Ultimate Edition Walkthrough & Guides Wiki
Fire Emblem Heroes (FEH) Walkthrough & Guides Wiki
Yu-Gi-Oh! Master Duel Walkthrough & Guides Wiki
Super Smash Bros. Ultimate Walkthrough & Guides Wiki
Pokemon Brilliant Diamond and Shining Pearl (BDSP) Walkthrough & Guides Wiki
Elden Ring Shadow of the Erdtree Walkthrough & Guides Wiki
Monster Hunter World Walkthrough & Guides Wiki
The Legend of Zelda: Tears of the Kingdom Walkthrough & Guides Wiki
Persona 3 Reload Walkthrough & Guides Wiki


All rights reserved
Copyright© 2012-2024 HoYoverse — COGNOSPHERE. All Rights Reserved.
The copyrights of videos of games used in our content and other intellectual property rights belong to the provider of the game.
The contents we provide on this site were created personally by members of the Game8 editorial department.
We refuse the right to reuse or repost content taken without our permission such as data or images to other sites.
I love your website!