Ancient Sacred Mountain Dragon Puzzles Guide
✉ Send your thoughts in our Genshin 6.4 Patch Survey!
★ Exclusive: Dive back in time with the Meta History
◆ Hot: Version 6.4, Luna 5 Codes
◆ Builds: Varka, Flins, Skirk, Escoffier
◆ Events: Travelers' Tales, He Who Caught the Wind
◆ Future: Linnea, Version 6.5 Luna VI
Here's a list of all the Dragon Puzzles found at the Ancient Sacred Mountain in Genshin Impact 5.5. Check out how to solve all the Ancient Sacred Mountain Dragon Puzzles in this guide!
List of Contents
Ancient Sacred Mountain Dragon Puzzle Solutions
Ancient Sacred Mountain Puzzle 1 - Sea of Shifting Sentience
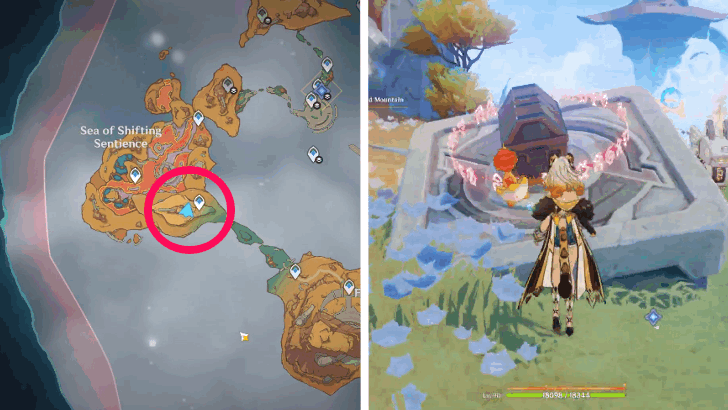
Located near the southeast waypoint of the Sea of Shifting Sentience in the Ancient Sacred Mountain. Teleport to the southeast waypoint and head towards the west until you see a chest in front of a cave with mechanical arches.
How to Solve Ancient Sacred Mountain Puzzle 1
| Ancient Sacred Mountain Puzzle 1 | |
|---|---|
| 1 | Indwell with a nearby Tatankasaurus and go around to the back of the cave. Then, use the Tatankasaurus ability to destroy the rocks to enter the cave. |
| 2 | Go to the cube where the locked chest is located and ride it until you reach the higher platform. Afterward, follow the two Secret Source Dragons to the switch. |
Ancient Sacred Mountain Puzzle 2 - Flame-Melding Ritual Grounds

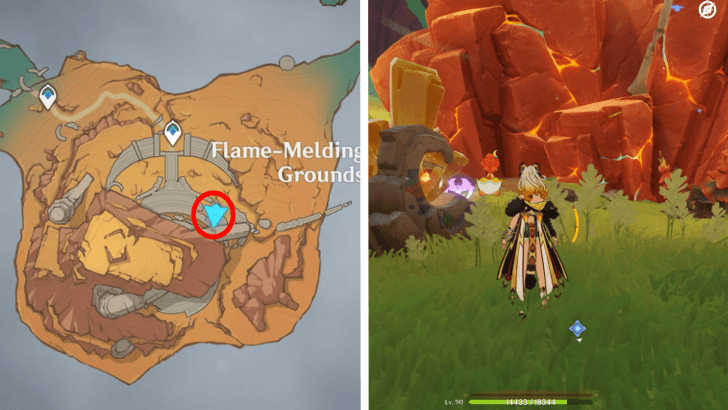
This puzzle is located at the northeast of the Flame-Melding Ritual Grounds in the Ancient Sacred Mountain.
Teleport to the center waypoint, indwell with a Tatanksaurus, and head towards the northeast until you find a glowing yellow cube on the ground.
How to Solve Ancient Sacred Mountain Puzzle 2
| Ancient Sacred Mountain Puzzle 2 | |
|---|---|
| 1 | Destroy the glowing yellow cube using the Tatankasaurus' ability and go down to the lower room. Then, destroy all the solidified Phlogiston underneath until a small square hole appears at the corner of the room. |
| 2 | Head down to the lower room once more and destroy all the solidified Phlosgiston until a chest appears. |
Ancient Sacred Mountain Puzzle 3 Location
The third Ancient Sacred Mountain Puzzle is located in the Flame-Melding Ritual Grounds. Use the left Teleport Waypoint and follow the path to the underground until you see a lot of Pulverite and some dragon bones.
Ancient Sacred Mountain Puzzle 3 Solution
| Puzzle Walkthrough | |
|---|---|
| 1 | Indwell into a Tatankasaur and use its charge to destroy all of the Pulverite in the vicinity. This reveals the dragon bones hidden underneath and spawns a Phlogiston orb. |
| 2 | A Mountain Weasel spawns after you infuse the orb with Phlogiston. Defeat it and you'll get a Precious Chest, as well as access to the Iridescent Legacy Part III. |
Ancient Sacred Mountain Puzzle 4 Location
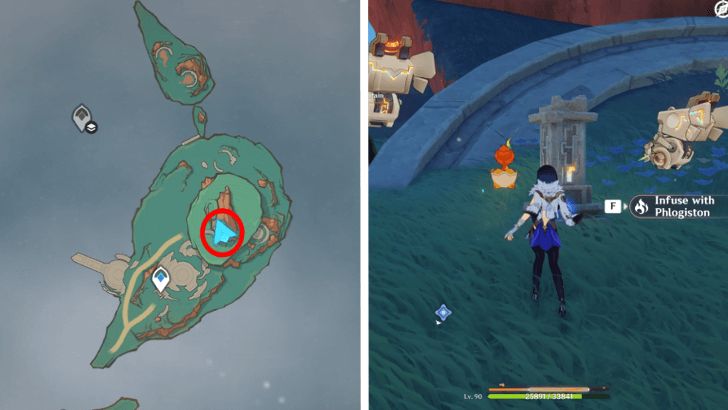
The fourth Ancient Sacred Mountain Puzzle is on the island north of the Flame-Melding Ritual Grounds. Use the Teleport Waypoint and follow the upper path until you see two servants and a Phlogiston Chiselith.
Ancient Sacred Mountain Puzzle 4 Solution
| Puzzle Walkthrough | |
|---|---|
| 1 | Interact with the Phlogiston Chiselith to activate the servants. Next, head to the right where you'll see some floating boxes and Pulverite. Indwell into a Tatankasaur and destroy the Pulverite to free one of the boxes. |
| 2 | On the left side, you'll see a red marking on the wall. Use the Tatankasaur and ram it to drop one of the boxes from the wall. This spawns in a Common Chest. |
| 3 | Open the Common Chest and the platform will rise which brings you to the upper area. Here, you'll see more Pulverite towards the left. |
| 4 | Destroy the Pulverite using the Tatankasaur and you'll reveal the dragon's head. It will then fly off back to the ground. This continues in Ancient Sacred Mountain Puzzle 5. |
Ancient Sacred Mountain Puzzle 5 - East of Ancient Sacred Mountain
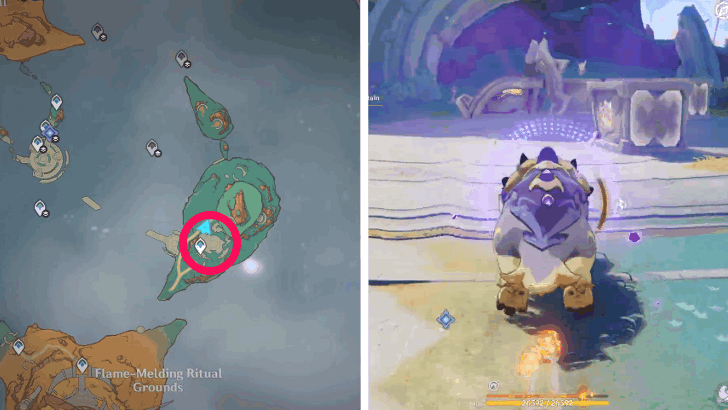
Located at the center of the east island in Ancient Sacred Mountain, northeast of the Flame-Melding Ritual Grounds. You will need to fend off two Matador Monetoos using a Tatankasaurus to complete this puzzle.
How to Solve Ancient Sacred Mountain Puzzle 5
| Ancient Sacred Mountain Puzzle 5 | |
|---|---|
| 1 | The first Matador Monetoo is located in the south of the east island. Indwell with a Tatankasaurus and use its ability to fend off the Matador Monetoo. |
| 2 | The second Matador Monetoo is located north of the east island. Simply, use a Tatankasaurus ability to fend it off. Afterward, the last block that you need will come with two Secret Source Servants, which will bring the block to the location of the puzzle. |
Ancient Sacred Mountain Puzzle 6 Location
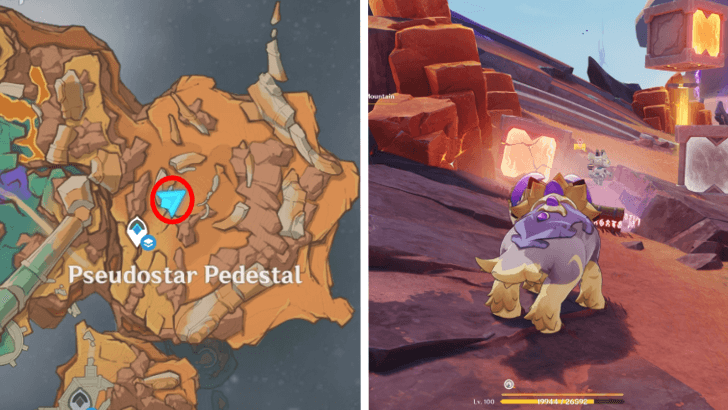
The sixth Ancient Sacred Mountain Puzzle is at the Pseudostar Pedestal area. Use the Teleport Waypoint and head northeast until you see two servants and some Common Chests.
Ancient Sacred Mountain Puzzle 6 Solution
| Puzzle Walkthrough | |
|---|---|
| 1 | In the area, you'll see lots of Pulverite. First, use the Tatankasaur and charge into the Pulverite to the right. This will reveal a glowing box. Charge into that box and it will attach a part to the dragon. |
| 2 | On the left side, you'll see more Pulverite and a glowing box. Use the Tatankasaur and destroy them. You'll also encounter an Avatar of Lava, so take it out. Once it's defeated, another box snaps in place for the dragon. |
| 3 | A bit further on the left side, you'll see even more Pulverite. Destroy them using the Tatankasaur and you'll encounter Rifthounds. Take them out and the last box will start to move. |
| 4 | The box will be stopped by Oozing Cores and spawn a Tenebrous Mimiflora, so you'll have to take it out also. After it's defeated, the box will snap into place for the dragon, and a Precious Chest will spawn. |
Ancient Sacred Mountain Puzzle 7 - Pseudostar Pedestal
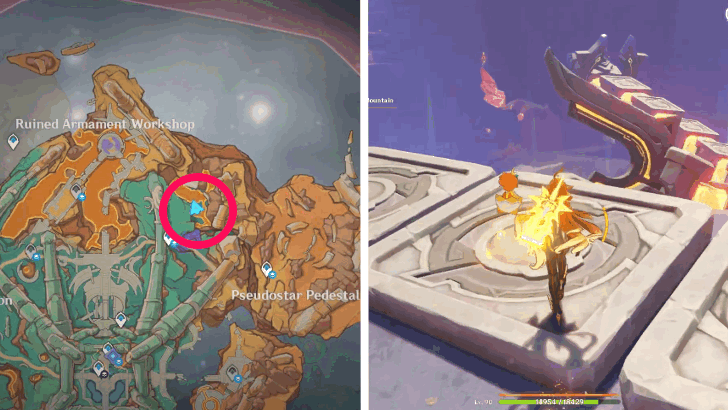
Located northwest of the Psuedostar Pedestal in the Ancient Sacred Mountain. The puzzle is located near the edge of a cliff, the chest is located on top of a cube, and a dragon is flying in circles above a huge pool of hot Phlogiston.
How to Solve Ancient Sacred Mountain Puzzle 7
| Ancient Sacred Mountain Puzzle 7 | |
|---|---|
| 1 | Jump on the floating dragon and activate the switch on top of its head to open the chest at the platform, at the edge of the cliff. |
| 2 | Afterward, jump on the dragon again, and flip the switch on its head, which completes the puzzle. |
Ancient Sacred Mountain Dragon Puzzle Rewards
Get Chests From Fixing the Dragons
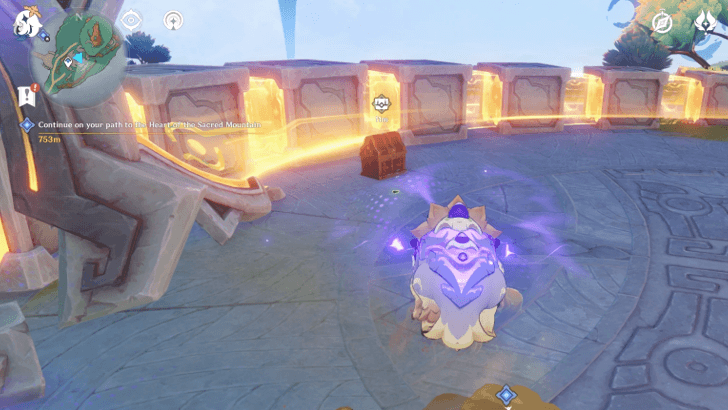
You'll unlock several chests as you complete each puzzle and fix the Secret Source Dragons. Once you finish all the Dragon Puzzles at the Ancient Sacred Mountain, you'll get a total of 7 Common Chests, 4 Exquisite Chests, and 3 Precious Chests!
Natlan Treasure Chest Map and Locations
Genshin Impact Related Guides
All Tips and Tricks Guides

All Version 5.5 Tips & Tricks
| Other Tips & Tricks | ||
|---|---|---|
| How to Clear The Twisted Dark Mud | That Which Was Once Ehecatl Guide | How to Destroy Oozing Core |
| How to Break Pulverite | Ancient Sacred Mountain Dragon Puzzles Guide | Sunset-Blue Obsidian Ring Location and How to Use |
Other Regional Tips & Tricks
Comment
Author
Ancient Sacred Mountain Dragon Puzzles Guide
improvement survey
03/2026
improving Game8's site?

Your answers will help us to improve our website.
Note: Please be sure not to enter any kind of personal information into your response.

We hope you continue to make use of Game8.
Rankings
Gaming News
Popular Games

Genshin Impact Walkthrough & Guides Wiki

Honkai: Star Rail Walkthrough & Guides Wiki

Umamusume: Pretty Derby Walkthrough & Guides Wiki

Pokemon Pokopia Walkthrough & Guides Wiki

Resident Evil Requiem (RE9) Walkthrough & Guides Wiki

Monster Hunter Wilds Walkthrough & Guides Wiki

Wuthering Waves Walkthrough & Guides Wiki

Arknights: Endfield Walkthrough & Guides Wiki

Pokemon FireRed and LeafGreen (FRLG) Walkthrough & Guides Wiki

Pokemon TCG Pocket (PTCGP) Strategies & Guides Wiki
Recommended Games

Diablo 4: Vessel of Hatred Walkthrough & Guides Wiki

Cyberpunk 2077: Ultimate Edition Walkthrough & Guides Wiki

Fire Emblem Heroes (FEH) Walkthrough & Guides Wiki

Yu-Gi-Oh! Master Duel Walkthrough & Guides Wiki

Super Smash Bros. Ultimate Walkthrough & Guides Wiki

Pokemon Brilliant Diamond and Shining Pearl (BDSP) Walkthrough & Guides Wiki

Elden Ring Shadow of the Erdtree Walkthrough & Guides Wiki

Monster Hunter World Walkthrough & Guides Wiki

The Legend of Zelda: Tears of the Kingdom Walkthrough & Guides Wiki

Persona 3 Reload Walkthrough & Guides Wiki
All rights reserved
Copyright© 2012-2024 HoYoverse — COGNOSPHERE. All Rights Reserved.
The copyrights of videos of games used in our content and other intellectual property rights belong to the provider of the game.
The contents we provide on this site were created personally by members of the Game8 editorial department.
We refuse the right to reuse or repost content taken without our permission such as data or images to other sites.


![Monster Hunter Stories 3 Review [First Impressions] | Simply Rejuvenating](https://img.game8.co/4438641/2a31b7702bd70e78ec8efd24661dacda.jpeg/thumb)


