Varesa Best Builds and Teams
★ Exclusive: Dive back in time with the Meta History
◆ Hot: Version 6.4, 6.4 Codes, Linnea, Version 6.5
◆ Builds: Varka, Flins, Skirk, Escoffier
◆ Events: Travelers' Tales, Sightseeing With Friends
◆ Endgame: Spiral Abyss (March 2026)

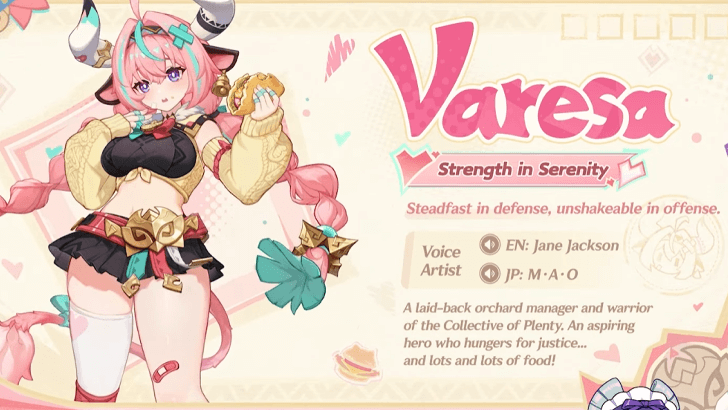
Varesa is a 5-star Electro Catalyst user that best functions as a Plunging DPS in Genshin Impact. See her best builds, recommended weapons and artifacts, materials, and our rating of this character in this guide!
| Varesa's Character Guides | |||
|---|---|---|---|
|
|
|
|
|
List of Contents
Varesa Rating and Info
Character Information
| Varesa | ||
|---|---|---|
 |
Rating |
|
| Rarity | ||
| Element | ||
| Weapon | ||
| Voice Actors |
Jane Jackson (EN)
M・A・O (JP) |
|
Tier List Rankings
| Main DPS | Sub-DPS | Support | Exploration |
|---|---|---|---|
|
|
- | - |
|
Tier Rating
|
As a Main DPS Varesa's damage ceiling and unique multipliers as a Plunging DPS have allowed her to keep up with the meta, as most of her damage is Frontloaded in terms of her Plunging strikes, which is what the current meta has shifted to. While her teams have not changed much in terms of composition, Varesa still rivals the damage output that other top DPS units can, and is one of the other top DPS units that have flexibility in both team composition and teammate choice without losing out on damage. |
Varesa's Stats
| Stat | Base Value |
|---|---|
| HP | 2564 |
| ATK | 72 |
| DEF | 158 |
| CRIT Rate% | 5.00% |
| Stat | Max Value |
|---|---|
| HP | 12699 |
| ATK | 356 |
| DEF | 782 |
| CRIT Rate% | 24.20% |
Base Stat Calculations
 | Stats indicated above are obtained from Varesa's base values. These numbers also exclude the character's equipped weapon, artifacts, talents, or other passive effects that are not innate to the character. |
|---|---|
 | All characters start with 5% CRIT Rate, 50% CRIT DMG, 100% Energy Recharge, 0 Elemental Mastery, 0% Healing Bonus, and 0% Elemental DMG bonus before any additional stats are applied. The table above includes such values. |
 | The Level 20 stats indicated for this character are calculated before their first ascension. |
Varesa's Ascension and Talent Material Summary
| All Ascension Materials Needed |
|---|
|
|
| All Talent Materials Needed |
|
|
Varesa Ascension and Talent Materials
Varesa Strengths and Weaknesses
| Strengths | |||
|---|---|---|---|
|
• High innate damage potential due to most of her attacks coming from Plunges, which are known to have high damage scalings. • Self-enabling DPS that can set herself up to utilize most of her kit, and having dedicated supports amplifies her damage and ease of use exponentially. • Plunge playstyle allows her to potentially avoid damage during normal combat without needing to go out of her way to dodge. • Nightsoul Transmission gives Varesa a way to quickly traverse within Natlan across land and sea. |
|||
| Weaknesses | |||
|
• Does not have access to amplifying reactions like Melt or Vaporize as a plunging attacker, although her base DMG compensates the fact. • Does not have a lot of synergistic weapon choices with good passives apart from her own Signature Weapon. |
Varesa Best Builds
Built As A Plunge CRIT DPS
Focus on building Varesa's CRIT and ATK to enhance her personal damage, with Energy Recharge for Burst convenience and optional Elemental Mastery stats for usage if run with Dendro allies.
Since Varesa's main source of damage comes from her plunge attacks, these normally deal high damage due to how Plunge DMG scales, so her default artifact is the new Long Night's Oath artifact.
Electro Plunge DPS
| Best Weapon | |
|---|---|
| Replacement Weapons |
3.
4.
6.
|
| Best Artifacts | |
| Artifact Main Stats | |
| Artifact Sub Stats | CRIT DMG, CRIT Rate, ATK%, Energy Recharge, Elemental Mastery |
| Sample Teams | Hypercarry:
Overload:
|
Varesa will normally run the Long Night's Oath plunge set, which means her CRIT ratio should be prioritized to be as close to 1:2 as possible. Proper investment into this set will likely result in the most personal damage for Varesa.
Alternatively, she can also make use of Obsidian Codex, which allows her to forego CRIT Rate in favor of more CRIT DMG or ATK, and can outperform a mediocre Long Night's Oath set with enough investment.
* These weapons are only used for the CRIT Main Stat as a stat stick, but their weapon effects do not necessarily work with Varesa.
Varesa Talent Priority
| 1st | 2nd | 3rd |
|---|---|---|
| Normal Attack | Elemental Burst | Elemental Skill |
While we should level up all Varesa's talents as the Main DPS, you can prioritize leveling up Varesa's Normal Attack talent first as her normal Plunging Attack damage scales with it.
Afterwards, we opt to level her Elemental Burst for the Burst damage it provides with the scalings the special Plunge has, then finally her Elemental Skill as it is mostly used as a way to activate and keep Varesa in Nightsoul's Blessing, but is used frequently.
Varesa Best Artifacts
Long Night's Oath for Varesa
For artifacts, running 4-pc. Long Night's Oath is Varesa's best bet for damage as it stacks her plunging damage by up to 100% more if all 5 stacks are triggered.
She can also run 4-pc. Obsidian Codex by virtue of being a Nightsoul-aligned character, but can also make use of a mix of 2-pc. Long Night's Oath and Electro DMG or ATK sets while farming for her optimal set.
Varesa Artifact Rankings
Electro Plunge DPS
| Artifact | Artifact Bonuses | |
|---|---|---|
| Best |
|
2-PC: Plunging Attack DMG increased by 25%. 4-PC: After the equipping character's Plunging Attack/Charged Attack/Elemental Skill hits an opponent, they will gain 1/2/2 stack(s) of "Radiance Everlasting." Plunging Attacks, Charged Attacks, or Elemental Skills can each trigger this effect once every 1s. Radiance Everlasting: Plunging Attacks deal 15% increased DMG for 6s. Max 5 stacks. Each stack's duration is counted independently. |
| 2nd |
|
2-PC: While the equipping character is in Nightsoul's Blessing and is on the field, their DMG dealt is increased by 15%. 4-PC: After the equipping character consumes 1 Nightsoul point while on the field, CRIT Rate increases by 40% for 6s. This effect can trigger once every second. |
| 3rd |
|
2-PC: Normal and Charged Attack DMG +15% 4-PC: When current HP increases or decreases, CRIT Rate will be increased by 12% for 5s. Max 3 stacks. |
|
|
2-PC: Electro DMG Bonus +15% 4-PC: Increases damage caused by Overloaded, Electro-Charged, Superconduct, and Hyperbloom by 40%, and the DMG Bonus conferred by Aggravate is increased by 20%. When Quicked or the aforementioned Elemental Reactions are triggered, Elemental Skill CD is decreased by 1s. Can only occur once every 0.8s |
Alternative 4-Star Artifact
| Artifact | Artifact Bonuses |
|---|---|
 Brave Heart Brave Heart
|
2-PC: ATK +18%. 4-PC: Increases DMG by 30% against enemies with more than 50% HP. |
List of Artifacts and Set Bonuses
Varesa Best Weapons
Choose CRIT Or ATK Weapons For Varesa
Due to Varesa's unique position as a Plunging DPS, Vivid Notions is tailor-made to be her weapon of choice, as it will likely have a passive that specifically synergizes with Varesa's kit.
Otherwise, Catalysts such as Lost Prayer to the Sacred Winds or The Widsith can work for Varesa due to their general benefits, but other Stat-Stick catalysts like Kagura's Verity or Cashflow Supervision can also work for her.
Varesa Weapon Rankings
| Weapon | Weapon Information | |
|---|---|---|
| 1st |
 Vivid Notions Vivid Notions
|
Base ATK: 674 Bonus Stat: CRIT DMG 44.10% Skill Effect: ATK is increased by 28%. When you use a Plunging Attack, you will gain the "Dawn's First Hue" effect: Plunging Attack CRIT DMG is increased by 28%. When you use an Elemental Skill or Burst, you will gain the "Twilight's Splendor" effect: Plunging Attack CRIT DMG is increased by 40%. The two effects above each last for 15s, and will be canceled 0.1s after the ground impact hits a target. |
| 2nd |
 Kagura's Verity Kagura's Verity
|
Base ATK: 608 Bonus Stat: CRIT DMG 66.2% Skill Effect: Gains the Kagura Dance effect when using an Elemental Skill, causing the Elemental Skill DMG of the character wielding this weapon to increase by 12% for 16s. Max 3 stacks. This character will gain 12% All Elemental DMG Bonus when they possess 3 stacks. |
| 3rd |
 Crane's Echoing Call Crane's Echoing Call
|
Base ATK: 741 Bonus Stat: ATK 16.5% Skill Effect: After the equipping character hits an opponent with a Plunging Attack, all nearby party members' Plunging Attacks will deal 28% increased DMG for 20s. When nearby party members hit opponents with Plunging Attacks, they will restore 2.5 Energy to the equipping character. Energy can be restored this way every 0.7s, and can be triggered off-field. |
Best Free-to-Play Weapons for Varesa
| Weapon | Weapon Information |
|---|---|
 The Widsith The Widsith
|
Base ATK: 510 Bonus Stat: CRIT DMG 55.1% Skill Effect: When a character takes the field, they will gain a random theme song for 10s. This can only occur once every 30s. Recitative: ATK is increased by 60%. Aria: Increases all Elemental DMG by 48%. Interlude: Elemental Mastery is increased by 240. |
All Recommended Weapons for Varesa
| Recommended Weapons | How to Get |
|---|---|
| Gacha | |
| Gacha | |
| Gacha | |
| Gacha | |
| Gacha | |
| Gacha | |
| Gacha | |
| Gacha | |
| Crafted | |
| Battle Pass | |
| Starglitter Exchange | |
| Crafted | |
| Crafted | |
| Crafted | |
| Chests | |
| Gacha | |
Varesa Best Team Comps
Varesa Slots Into Hypercarry Teams
Due to the explosive nature of Varesa's plunging attacks, she can slot best into Hypercarry teams with a dedicated plunge support like Xianyun, or in Dendro teams where she can make use of the amplified damage.
Otherwise, she can also slot into Overload or Electro-Charged teams where she can plunge and create space against multiple targets.
Notable Teammates
| Character | Explanation |
|---|---|
|
|
Support Varesa's Plunges can easily maintain and maximize Iansan's buff. Moreover, Iansan can equip 4pc Scroll to further buff Varesa |
|
|
Support The premier buffer for Plunge Attack DPS. Xianyun further buffs Varesa with 4pc Viridescent Venerer. It's important to note that Varesa would still prefer using her skill and Charged Attack to Plunge because of her A1 passive and Nightsoul points. |
|
|
Support Provides off-field Hydro DMG for Varesa to trigger Electro-Charged, but more importantly, Furina provides an insane amount of DMG% buff. Moreover, Varesa is often paired with Healer supports, so its generate fanfare consistently on her team. |
|
|
Support RES Shred and 4pc Scroll can heavily benefit Varesa's DMG. Xilonen also provides healing on top of that. |
|
|
Support Chevy is the premier Overload support and tends to have a team archetype with Varesa's Plunge playstyle. She provides an ATK bonus, RES Shred, Healing, and DMG% buff at C6, making her a valuable teammate for Varesa Overload. |
|
|
Support Columbina can enable Lunar-Charged for Varesa teams while also serving as the Hydro applicator, making her a great option if you want to pick up Lunar reactions on Varesa. |
|
|
Sub DPS Mavuika in Varesa teams will act more of Sub DPS than her usual Main DPS role. She functions as a quickswap and off-field damage dealer and is usually placed alongside Chevreuse for an Overload Team. |
|
|
Support The best ATK buffer that Varesa appreciates. However, Bennet's burst range limits Varesa, making it difficult to maximize it. |
Varesa Hypercarry Teams
| Main DPS | Sub-DPS | Sub-DPS/ Support |
Support |
|---|---|---|---|
|
|
|
|
|
|
|
|
|
|
You may opt to run Varesa as a solo carry with three supports that are meant to increase her own personal damage, relying solely on her ability to deal high Electro DMG to remove obstacles from the field.
Varesa Overload Teams
| Main DPS | Sub-DPS | Sub-DPS/ Support |
Support |
|---|---|---|---|
|
|
|
|
|
|
|
|
|
|
Against multiple opponents, Varesa also has the option of running an Overload comp against them as the Pyro application between her Electro Plunges can set up plenty of AoE damage opportunities.
Varesa Aggravate Teams
| Main DPS | Sub-DPS | Sub-DPS/ Support |
Support |
|---|---|---|---|
|
|
|
|
|
|
|
|
|
|
Varesa can frequently trigger Dendro reactions and deal even more enhanced Plunge damage due to Aggravate's strong Dendro application, improving her plunge damage even more.
Varesa Electro-Charged Teams
| Main DPS | Sub-DPS | Sub-DPS/ Support |
Support |
|---|---|---|---|
|
|
|
|
|
|
|
|
|
|
Varesa can also function in a Lunar-Charged or Electro-Charged team, with her Electro presence being able to trigger Electro-Charge procs, making it a good option for multi-target scenarios where Elite opponents are present.
Columbina in particular can activate the Lunar-Charged reaction for Varesa.
Varesa Best Constellations
| Mascara Luctatori |
|---|
 |
Constellation and Effects
| Varesa's Constellations | |
|---|---|
| C1 |
Undying Passion The effects of the Passive Talent "Tag-Team Triple Jump!" are enhanced: When performing the Special Plunging Attack "Thunderous Tornado Eruption," Varesa will also gain "Rainbow Crash" for 5s. When "Rainbow Crash" is in effect, Varesa's Plunging Attack ground impact DMG is increased by 180% of her ATK, whether she is in the Fiery Passion state or not. You must first unlock the Passive Talent "Tag-Team Triple Jump!" to access the above effect. Additionally, when Varesa is in the Sudden Onrush mode of her Nightsoul's Blessing, she consumes 30% less Nightsoul points or Phlogiston. |
| C2 |
Beyond the Edge of Light Varesa will enter Apex Drive after using a Plunging Attack, regardless of whether she is in the Fiery Passion state or not. When Apex Drive is active, Varesa's interruption resistance will also further increase. Additionally, Varesa will restore 11.5 Energy when her Plunging Attack ground impact hits an opponent. |
| C3 |
Unbowed Resolve Increases the Level of Guardian Vent! by 3. Maximum upgrade level is 15. |
| C4 |
The Courage to Press On Varesa will receive various buffs based on her state when using her Elemental Burst Guardian Vent! If Varesa: · Has neither Fiery Passion nor Apex Drive active, she will gain Diligent Refinement for 15s, which will increase her Plunging Attack ground impact DMG by 500% of her ATK, with a maximum increase of 20,000 DMG. This effect will be canceled once the ground impact hits an opponent, or if its duration ends. · If she has either Fiery Passion or Apex Drive active, this instance of her Elemental Burst Guardian Vent! deals 100% increased DMG. |
| C5 |
Thoughts Floating on the Warm Breeze Increases the Level of Normal Attack: By the Horns by 3. Maximum upgrade level is 15. |
| C6 |
A Hero of Justice's Triumph Varesa restores 30 Energy when she enters Apex Drive. Her Plunging Attacks and Elemental Burst Guardian Vent! gain 10% CRIT Rate and 100% CRIT DMG. Additionally, when Varesa uses the Hold version of her Elemental Skill Riding the Night-Rainbow, or Taps her Elemental Skill while in the Sudden Onrush mode, she will restore Nightsoul points up to her maximum." |
Best Constellations Rating and Explanation
| Rating | Constellation Effect / Merits | |
|---|---|---|
| C1 | ★★☆ |
• After using her Special Elemental Burst, increases the damage done by the succeeding Plunging Attack by 150%. • Consumes 30% less Nightsoul Points or Phlogiston if being used as a traversal tool. |
| C2 | ★★★ |
• Allows Varesa to use her Special Elemental Burst with a 100% uptime on it. • Restores energy upon striking an opponent with her Plunging Attacks, and can be spammed to regain energy quickly. |
| C4 | ★★☆ |
• Gives Varesa a 500% ATK increase on her Plunge if her Elemental Burst is cast without Fiery Passion or Apex Drive, which is often when she is in Nightsoul's Blessing. • Otherwise, gives her Elemental Burst a 100% DMG increase if she is in Fiery Passion or Apex Drive. |
C2 Is Varesa's Most Effective Constellation
Varesa's C2 is a great stop for most who are looking to maximize Varesa's DMG effectiveness, as she can pretty much use her Special Elemental Burst every 2 - 3 Plunge Attacks.
This is great in tandem with her C1, which increases the damage of her Plunge Attack after the Special Elemental Burst, and this damage boost can take in effect after every Special Elemental Burst.
Varesa Talents and How to Use
Plunging Attack Focused Character
Varesa's main source of damage comes from her Plunging Attacks, and Varesa herself has ways to trigger consistent and empowered plunges on her Charged Attack, Elemental Skill, and Elemental Burst.
If you're familiar with Gaming, she plays similarly in that she uses Elemental Burst then Elemental Skill to use her Plunge, although she's much smoother and easier to access.
Normal Attack
| Normal Attack: By the Horns |
|---|
| Gotta try... to do battle like the greatest champion luchadors do! Varesa launches up to 3 strikes, dealing Electro DMG. Charged Attack Consumes a certain amount of stamina to headbutt opponents in front, dealing Nightsoul-aligned Electro DMG and using the momentum to leap into the air. Plunge Attack Plunges from mid-air to strike the ground below, damaging opponents along the path and dealing Nightsoul-aligned AoE Electro DMG upon impact. If Varesa is in a combat state upon landing, or if the shockwave from her plunging attack hits an opponent, she will gain 25 Nightsoul points. She enters the Fiery Passion state upon reaching maximum Nightsoul points through this method. Fiery Passion In this state, Varesa's Normal, Charged, and Plunging attacks will gain corresponding buffs: Normal Attack Fight like a superstar champion luchador! Launches up to 3 fierce strikes, dealing greater Electro DMG. Charged Attack Consumes a certain amount of Stamina to slam into her opponents, dealing greater amounts of Nightsoul-aligned Electro DMG and using the momentum to leap into the air. Plunging Attack Consumes all her Nightsoul points and slams down on the ground from mid-air, dealing DMG to opponents in her path and dealing greater amounts of Nightsoul-aligned AoE Electro DMG upon hitting the ground. Fiery Passion · While not in the Fiery Passion state, Varesa can use Plunging Attacks to gain Nightsoul points. She will enter Fiery Passion when she reaches maximum Nightsoul points via this method, or when she uses her Elemental Burst Guardian Vent! · While in the Fiery Passion state, her Normal Attacks, Elemental Skill, and Elemental Burst will gain unique buffs. She can also use a special Elemental Burst shortly after using a Plunging Attack. · The Fiery Passion state lasts for up to 15s and will end when she runs out of Nightsoul points or after she leaves combat for a period of time. |
Charged Attacks Raise Her To The Air
In Varesa's normal state, using her Charged Attack sends her into the air after the initial Charged damage, allowing her to plunge down for a second, more powerful attack.
Elemental Skill
| Riding the Night-Rainbow |
|---|
| With footwork swift as lightning and fierce as thunder, Varesa displays the true spirit of lucha libre, rushing forward a certain distance and dealing Nightsoul-aligned Electro DMG to opponents in her path. Nightsoul's Blessing: Varesa When she runs out of Nightsoul points, her Nightsoul's Blessing state will be canceled. When Varesa is in the Sudden Onrush state or Fiery Passion state, she will always be counted as being in the Nightsoul's Blessing state. Has 2 charges. When Varesa enters the Fiery Passion state, she will obtain an additional Tap charge of her Elemental Skill and its DMG will be increased. After using this Skill, Varesa gains 20 Nightsoul points and gains the "Follow-Up Strike" effect: Varesa has increased interruption resistance during this time, and upon pressing her Normal Attack, she will quickly unleash a Charged Attack that does not consume Stamina. "Follow-Up Strike" will be canceled after Varesa uses a Charged Attack. She will use different techniques based on whether the kill is Tapped or Held. Tap Quickly rush a certain distance forward. Hold Varesa enters the Nightsoul's Blessing state and switches to Sudden Onrush mode. Sudden Onrush Continuously consumes Nightsoul points. In this state, Varesa's Movement SPD and interruption resistance are increased. She can use terrain to execute flying leaps or consume additional Nightsoul points to traverse atop water or liquid Phlogiston while remaining immune to DMG from the latter. |
Elemental Skill Activates Special State
Activating Varesa's Elemental Skill causes her to enter a special combat state that does a few things for her.
Normal Attacks Lead to Plunge Opportunities
Instead of having to use Plunge Attacks, Varesa can just tap the Normal Attack button and gain the same plunge opportunity as with her normal Charged Attack.
This effectively adds more convenience and movement to Varesa's kit.
Increases Attack Speed
In this state, Varesa's attack speed is increased, allowing her to output more damage quickly.
On its own, this does not do much for Varesa on the ground, but since she gets raised into the air with her Normal Attacks in this state, this attack speed buff increases her Plunging Attack frequency and DPS.
Special Elemental Burst at Full Nightsoul Points
Varesa gains Nightsoul Points through successful plunges, and can enter the "Fiery Passion" state, allowing her to partially use her Elemental Burst to perform an enhanced Plunge Attack.
This part of her kit can seemingly be repeated throughout her Elemental Skill's uptime, allowing you to perform enhanced Charged Attacks multiple times.
Can Be Held to Sprint at Great Speeds
As with most Natlan characters, Varesa is capable of using some part of her arsenal as a travesal tool, especially in Natlan's terrain.
When holding her Elemental Skill, Varesa sprints forward and is capable of breaking down obstacles, performing leaps, and treading across water. This act consumes her Nightsoul Points, then Phlogiston if it is available.
Elemental Burst
| Guardian Vent! |
|---|
| Leaps into the air before using the momentum of the drop to unleash a powerful flying kick, dealing Nightsoul-aligned AoE Electro DMG to opponents — just like those heroes of justice in woven scrolls for kids! After using this Skill, Varesa's Nightsoul points will be restored to maximum and she will enter the Fiery Passion state. Increases Varesa's interruption resistance. While affected by Apex Drive, Varesa can ignore her Elemental Burst CD and consume less Energy to use her special Elemental Burst, "Guardian Vent: Volcano Kablam": This causes her to use the especially powerful Plunging Attack, "Thunderous Tornado Eruption," which deals Nightsoul-aligned AoE Electro DMG upon landing before causing her to exit Apex Drive. This DMG is considered Plunging Attack DMG. Varesa will exit Apex Drive after using her Elemental Skill. In the Fiery Passion state, Varesa's Elemental Burst will deal a greater amount of Nightsoul-aligned AoE Electro DMG. Additionally, she will briefly activate Apex Drive after using a Plunging Attack while in her Fiery Passion state. |
Elemental Burst Extends Special Attack State
Apart from the Burst DMG that her Elemental Burst inflicts, it seems to immediately put her into her "Fiery Passion" state, allowing her immediate access to her enhanced Plunge Attacks.
Passive Talent 1
| Tag-Team Triple Jump! |
|---|
| After using the Elemental Skill Riding the Night-Rainbow, Varesa gains "Rainbow Crash" for 5s.
During this time, when Varesa uses a Plunging Attack, the shockwave DMG dealt when she hits the ground is increased by 50% of her ATK. If Varesa is in the Fiery Passion state, this ground impact DMG is increased by 180% of her ATK instead. The Rainbow Crash effect will be canceled once a ground impact hits an opponent, or when its duration expires. |
Passive Talent 2
| The Hero Twice-Returned! |
|---|
| When a nearby party member triggers a Nightsoul Burst, Varesa's ATK increases by 35% for 12s. Max 2 stacks. Each stack's duration is counted independently. |
Passive Talent 3
| Night Realm's Gift: A Torch That Incinerates Evil |
|---|
| After Nightsoul points have been fully depleted, Varesa will switch to using Phlogiston to maintain the Sudden Onrush mode from her Nightsoul's Blessing.
While in an area with Phlogiston Mechanics within Natlan, Nightsoul Transmission: Varesa can be used. When the current active character is sprinting or in movement modes caused by certain Talents, or at a certain height in the air, switching to Varesa will trigger the following: Varesa enters the Nightsoul's Blessing state, switches to Sudden Onrush mode, and obtains 20 Nightsoul points. Nightsoul Transmission can be triggered once every 10s by your own party. While in an area with Phlogiston Mechanics within Natlan, Varesa will not take fall DMG when using terrain differences to make leaps. |
Passive Talent 4
| Blazing Heart, Singular Advance! |
|---|
| Varesa's Sprint speed is increased. When she is not in combat, her Sprint Stamina consumption will also increase.
Additionally, while in an area with Phlogiston Mechanics within Natlan, your party members will restore 20 Phlogiston when consuming food. This effect can occur once every 10s and does not take effect in Domains, Trounce Domains, or the Spiral Abyss. |
Varesa Ascension and Talent Materials
Varesa Ascension Materials
Below are the ascension materials needed for Varesa:
| Lv.20→Lv.40 |
|
|---|---|
| Lv.40→Lv.50 |
|
| Lv.50→Lv.60 |
|
| Lv.60→Lv.70 |
|
| Lv.70→Lv.80 |
|
| Lv.80→Lv.90 |
|
Varesa Talent Level-Up Materials
Below are the talent materials needed for Varesa:
| Daily Domain Drops | Enemy Drops | Weekly Boss Drops |
|---|---|---|
| Wed/Sat/Sun |
Saurians |
Lord of Eroded Primal Fire Boss Challenge Reward |
|
|
|
|
|
|
|
How to Get Varesa
Pull on the Version 6.2 Luna III Phase 2 Banners

|
|
| Banner Status | Inactive |
|---|---|
Varesa was available in her rerun banner in Phase 2 of Version 6.2 from December 23, 2025 to January 13, 2026. Alongside her was Xilonen's rerun banner.
The 4-stars on both banners were Iansan, Chevreuse, and Gaming.
6.2 - Luna III Release Date and Characters
Related Wish Guides
| Click to view a Banner Guide! | ||
|---|---|---|
 Varesa Varesa |
 Wish Sim Wish Sim |
 All Wishes All Wishes |
Varesa In-Game Information
Varesa Character Profile
| Nation | Natlan |
|---|---|
| Title | Strength in Serenity |
| Vision | |
| Gender | Female |
| Race | Human |
| Height | Tall Girl |
| Faction | Collective of Plenty |
| Constellation | Mascara Luctatori |
| Birthday | November 15 |
| Special Dish | Mt. Mushroom For One |
| Story Quest |
Chapter: Mascara Luctatori Act 1: Mushroom Realm's Mystery |
Stalwart Warrior and Orchard Owner in Natlan

Not much is known about Varesa except that she is a very competitive eater in Natlan. According to Mavuika, she always covers the meals Varesa orders in the Weary Inn whenever she decides to eat there.
Varesa Voice Actor
Varesa is voiced by Jane Jackson in English, and MAO in Japanese!
Voice Actors List for All Languages
Varesa Voicelines
Thoughts About Varesa
| Character | In-Game Thoughts |
|---|---|
 Escoffier Escoffier
|
Oh, Varesa? The fruit from her orchard is amazing. Biting into one is like being transported to a lazy summer's day. She could charge me an extra twenty percent, and it would still be worth it! So, I always treat her to a meal after every purchase. Her appetite is astonishing. It may look like she scarfs it all down in one bite, but if you actually talk to her about the food, it's obvious she appreciates the subtle details. In other words, she has the appetite and palate to back it up - I love serving food to people like that! |
 Iansan Iansan
|
Attitude: Ah, Varesa ... She's my star student, my pride and joy. I hope she hasn't made a bad impression on you ... Oh - no, not like that. When push comes to shove, I'm sure she pulls her weight in battle, and I know she has things under control at the end of the day. It's just, she can be a little ... too relaxed, you know? I feel like if I'm not there constantly pushing her to stay focused, she'll lose all sense of time and treat every day like she's on vacation. Leave the house to run an errand, but then saunter along without a care in the world, letting herself get distracted by every morsel of food she passes along the way ... Once in a while that's fine, but you can't live like that when you're out adventuring, and the stakes are so high! Anyway, I've told her all this before, so hopefully I've gotten through to her by now. But ... the other thing that worries me is the amount of food she needs. I mean, you tell me - is it really practical to go hiking through the hills with a sack of food on your back the size of a baby tatankasaur?
Moderation: My biggest concern for Varesa right now is that her energy management seems out of control. Her metabolism seems like it's stuck on a high-burn mode, meaning she wastes an awful lot of energy, and I suspect that's the cause of her alarming appetite. I do hope she takes some time to look into what makes her this way. I'd love to see her gain the ability to manage her energy expenditure a little better, so she doesn't need to eat like a horse every single meal ... I mean, it's nice to see her thoroughly enjoy her food, but at the same time, I want to urge her to be more mindful of what she's putting in her body. It's never a good idea to just gorge yourself - you have to pay attention to nutrition and quantity, and especially limit your fat and sugar intake. Much better to get her diet under control now than have to deal with the consequences when she develops health issues later in life. |
 Mavuika Mavuika
|
During the Pilgrimage, I cover all the expenses at the Weary Inn, and without fail, there's always an order for a party tray for eighty. I used to assume it was someone ordering for a large group of friends, but as it turns out... Varesa ordered it all for herself. |
Varesa's Thoughts About Others
| Character | In-Game Thoughts |
|---|---|
 Citlali Citlali
|
About Citlali Oh, I've seen her name in the readers' letters column of some comic books. Granny Itztli is extremely well respected - she's the most powerful hero from the Masters of the Night-Wind! But I gotta say, I always assumed she'd look way older... I didn't recognize her at all when I found her in the tavern in a drunken stupor. She didn't have a single Mora on her and she was mumbling to herself, but the only words I could make out were "Masters of the Night-Wind." So, I paid her bill, threw her over my shoulder, carried her over to the Masters of the Night-Wind, and started asking around for "Granny Itztli." But whenever people turned to look at this person slumped over my shoulder, a look of horror would creep over their face... And then it slowly started to dawn on me that something wasn't quite right... |
 Dori Dori
|
About Dori Oh... Isn't she that... big boss lady who's surprisingly small... but still has infinitely deep pockets? Oof... she's a fierce haggler... Every time she comes to buy fruit from us, she manages to slash at least thirty to forty percent off the selling price, and that's on a good day! On the plus side, though, at least she buys huge amounts - multiple cartloads at a time. And she lets me pet her Shaggy Sumpter Beast. It's so fluffy, and such a big cutie... |
|
Escoffier
|
About Escoffier Miss Escoffier has really strict standards... Every time her restaurant places a bulk order for my fruit, she picks out a few for... what's it called... yeah, "sample analysis." If the sweetness or flavor is even slightly off, she rejects the whole batch... But then again, her cooking? Out of this world. Sooo delicious... Hehehe... If only I could eat it every day! I guess I'd probably have to be a god to afford that. |
|
Iansan
|
About Iansan Coach and Commander: Iansan is my coach. I look up to her the most out of anyone! She helped me discover my true strength, taught me how to fight, and even got me a job in our tribe's Patrol Team. She's pretty well respected in the patrol team, so most of the time she gives me my orders, and I go join the fighting wherever I'm needed. I guess that makes her both my coach and my commander, too! |
 Kinich Kinich
|
About Kinich I haven't entered the Pilgrimage that many times, but once, I came up against Kinich during the group stage. That guy is so nimble... He was just dodging all of my moves until I completely exhausted myself, then he knocked me out cold with one hit... By the time I realized that maybe I should get my teammates to help me pin him down... he and the Sacred Flame were long gone. |
|
Mavuika
|
About Mavuika I heard that the plates Mavuika uses on her barbell lifts are five times the weight of her flamestrider! And that she uses ten plates minimum just as a warmup... I also heard a rumor that she can lift a boulder the size of a Long-Necked Rhino with just two fingers! If anyone else was crazy strong like that, I'm sure I'd be too self-conscious to lift weights in front of them. But with Mavuika, it's different... I find the sound of her voice so reassuring, and the look in her eyes is so inspiring and encouraging. It makes me want to push myself as hard as I possibly can every single day. Sure, I may never catch up to her, but that's no excuse to give up. I'm gonna believe in myself, and be the best Varesa I can be! |
 Mualani Mualani
|
About Mualani There was this time when Coach Iansan noticed I'd overshot my target weight, and decided I needed a cutting phase. Since swimming's supposed to be good for fat-burning, she arranged for me to do an intensive program over at the People of the Springs territory. I'd be there swimming lengths, while Mualani was surfing around and towing Coach Iansan in a life preserver, so she could monitor my progress... Every day, she made me do pretty much the same distance as I do in my 30 thousand-step shuttle runs... *shudder*... Thank goodness Mualani was secretly slipping me some candy to keep my energy up. Otherwise, I don't know how I would have survived... I'm so grateful to her... |
 Xilonen Xilonen
|
About Xilonen When I was learning my crafting skills from the Children of Echoes, Muhuru's Gemporium is where I went to study. The craftspeople there talked about Xilonen all the time! I actually only saw her around once or twice, and I never got the chance to talk to her - but boy, did I get familiar with her music taste! She put together the playlist they have on in the shop, and all the tracks are super catchy. Really good beats - perfect for running, too. I swear, I can go for way longer on my shuttle runs when that stuff's playing! |
Varesa Release Date
| Genshin Impact Version 5.5 | |
|---|---|
 |
|
| Release Date | March 26, 2025 |
Varesa was released as part of the Version 5.5 update, which went live on March 26, 2025.
Version 5.5 Release Date and Details
Genshin Impact Related Guides

All Characters and Voice Actors
List of All Characters
| Characters by Element | |||
|---|---|---|---|
Playable Characters
 Chasca
 Faruzan
 Heizou
 Ifa
Ifa Jahoda
 Jean
Jean Kazuha
 Lan Yan
 Lynette
 Mizuki
 Sayu
Sayu Sucrose
 Traveler (Anemo)
 Varka
Varka Venti
Venti Wanderer
 Xianyun
 Xiao
Xiao Aloy
Aloy Ayaka
Ayaka Charlotte
 Chongyun
 Diona
Diona Eula
Eula Freminet
 Ganyu
Ganyu Kaeya
Kaeya Layla
Layla Mika
Mika Qiqi
Qiqi Rosaria
 Shenhe
 Skirk
Skirk Wriothesley
 Alhaitham
 Baizhu
 Collei
 Emilie
 Kaveh
Kaveh Kirara
 Lauma
Lauma Nahida
 Nefer
Nefer Tighnari
 Traveler (Dendro)
 Yaoyao
 Beidou
 Clorinde
 Cyno
Cyno Fischl
 Flins
Flins Ineffa
 Keqing
 Lisa
Lisa Ororon
 Raiden
 Razor
Razor Sara
Sara Sethos
 Shinobu
 Traveler (Electro)
 Varesa
 Yae Miko
 Albedo
 Chiori
 Gorou
Gorou Illuga
 Itto
Itto Kachina
 Navia
Navia Ningguang
 Noelle
 Traveler (Geo)
 Yun Jin
 Zhongli
 Zibai
Zibai Aino
Aino Ayato
Ayato Barbara
 Candace
 Columbina
 Dahlia
 Furina
 Kokomi
 Mona
Mona Neuvillette
 Nilou
Nilou Sigewinne
 Tartaglia
 Traveler (Hydro)
 Xingqiu
 Yelan
Yelan Amber
Amber Arlecchino
 Bennett
 Chevreuse
 Dehya
Dehya Diluc
Diluc Durin
Durin Gaming
 Hu Tao
 Klee
Klee Lyney
Lyney Thoma
Thoma Traveler (Pyro)
 Xiangling
 Xinyan
 Yanfei
 Yoimiya
Upcoming Characters
| All Upcoming Characters |
 Alice Alice
|
 Capitano Capitano
|
 Dainsleif Dainsleif
|
 Dottore Dottore
|
|---|---|---|---|
 Linnea Linnea
|
 Lohen Lohen
|
 Nicole Nicole
|
 Pantalone Pantalone
|
 Pierro Pierro
|
 Pulcinella Pulcinella
|
 Rerir Rerir
|
 Sandrone Sandrone
|
 Tsaritsa Tsaritsa
|
|||
Character Lists
| Characters by Rarity | |
|---|---|
| 5-Star Characters | 4-Star Characters |
| Free Characters | |
| Characters by Weapon Used | |
| Sword Users | Claymore Users |
| Polearm Users | Bow Users |
| Catalyst Users | |
| Characters by Role | |
| Main DPS Characters | Sub DPS Characters |
| Support Characters | Healers |
| Shield Characters | Buff Providers |
| Best for Exploration | Local Specialty Passives |
| Double Reward Passives | |
| Characters by Gender | |
| Male Characters | Female Characters |
| Short Male Characters | Short Female Characters |
| Medium Male Characters | Medium Female Characters |
| Tall Male Characters | Tall Female Characters |
| Characters by Height | |
| Short Characters | Medium Characters |
| Tall Characters | |
| Characters by Region | |
| Mondstadt Characters | Liyue Characters |
| Inazuma Characters | Sumeru Characters |
| Fontaine Characters | Natlan Characters |
| Nod-Krai Characters | |
Author

Varesa Best Builds and Teams


Rankings
- We could not find the message board you were looking for.
Gaming News

![Monster Hunter Stories 3 Review [First Impressions] | Simply Rejuvenating](https://img.game8.co/4438641/2a31b7702bd70e78ec8efd24661dacda.jpeg/show)
![Monster Hunter Stories 3 Review [First Impressions] | Simply Rejuvenating](https://img.game8.co/4438641/2a31b7702bd70e78ec8efd24661dacda.jpeg/thumb)
![The Seven Deadly Sins: Origin [First Impressions] | A Promising Start](https://img.game8.co/4440581/584e0bfb87908f12c4eab6e846eb1afd.png/thumb)

Popular Games

Genshin Impact Walkthrough & Guides Wiki
Umamusume: Pretty Derby Walkthrough & Guides Wiki
Pokemon Pokopia Walkthrough & Guides Wiki
Honkai: Star Rail Walkthrough & Guides Wiki
Monster Hunter Stories 3: Twisted Reflection Walkthrough & Guides Wiki
Arknights: Endfield Walkthrough & Guides Wiki
Wuthering Waves Walkthrough & Guides Wiki
Zenless Zone Zero Walkthrough & Guides Wiki
Pokemon TCG Pocket (PTCGP) Strategies & Guides Wiki
Monster Hunter Wilds Walkthrough & Guides Wiki


Recommended Games
Diablo 4: Vessel of Hatred Walkthrough & Guides Wiki
Cyberpunk 2077: Ultimate Edition Walkthrough & Guides Wiki
Fire Emblem Heroes (FEH) Walkthrough & Guides Wiki
Yu-Gi-Oh! Master Duel Walkthrough & Guides Wiki
Super Smash Bros. Ultimate Walkthrough & Guides Wiki
Pokemon Brilliant Diamond and Shining Pearl (BDSP) Walkthrough & Guides Wiki
Elden Ring Shadow of the Erdtree Walkthrough & Guides Wiki
Monster Hunter World Walkthrough & Guides Wiki
The Legend of Zelda: Tears of the Kingdom Walkthrough & Guides Wiki
Persona 3 Reload Walkthrough & Guides Wiki


All rights reserved
Copyright© 2012-2024 HoYoverse — COGNOSPHERE. All Rights Reserved.
The copyrights of videos of games used in our content and other intellectual property rights belong to the provider of the game.
The contents we provide on this site were created personally by members of the Game8 editorial department.
We refuse the right to reuse or repost content taken without our permission such as data or images to other sites.
Varesa, Fischl, Columbina, CR (Or Kokomi or Sucrose) = Who needs Flins lol