Expeditions Guide for All Regions
✉ Send your thoughts in our Genshin 6.4 Patch Survey!
★ Exclusive: Dive back in time with the Meta History
◆ Hot: Version 6.4, 6.4 Codes, Linnea, Version 6.5
◆ Builds: Varka, Flins, Skirk, Escoffier
◆ Events: Travelers' Tales, Sightseeing With Friends
◆ Endgame: Spiral Abyss (March 2026)
Expeditions are a hands-off way to farm valuable materials in Genshin Impact. Learn how to go on expeditions in all the current regions in Teyvat, which characters are the best for expeditions, expedition locations, and rewards in this guide!
List of Contents
Characters with Expedition Bonuses
All Characters with Expedition Talents
| Character | Talent |
|---|---|
|
|
It Should Be Safe... When dispatched on an expedition in Mondstadt, time consumed is reduced by 25%. |
|
|
Gallant Journey When dispatched on an expedition in Liyue, time consumed is reduced by 25%. |
|
|
The Gift of Silence Gains 25% more rewards when dispatched on a Sumeru Expedition for 20 hours. |
|
|
Tomes Light the Path Gains 25% more rewards when dispatched on a Sumeru Expedition for 20 hours. |
|
|
Mein Hausgarten When dispatched on an expedition in Mondstadt, time consumed is reduced by 25%. |
|
|
Land's Overseer When dispatched on an expedition in Liyue, time consumed is reduced by 25%. |
|
|
Painstaking Transaction Gain 25% more rewards when dispatched on a Fontaine Expedition for 20 hours. |
|
|
Land Survey When dispatched on an expedition in Inazuma, time consumed is reduced by 25%. |
|
|
Precise Comings and Goings Gain 25% more rewards when dispatched on a Liyue Expedition for 20 hours. |
|
|
Protracted Prayers Gain 25% more rewards when dispatched on an Inazuma Expedition for 20 hours. |
|
|
Necessary Calculation Gain 25% more rewards when dispatched on a Liyue Expedition for 20 hours. |
Characters with Bonus Reward Passives
All Areas with Expedition Rewards
Regions and Expedition Items
| Region | Expedition Rewards |
|---|---|
| Mondstadt | |
| Liyue | |
| Inazuma | |
| Sumeru | |
| Fontaine | |
| Natlan |
Mondstadt Expedition Rewards
List of Expedition Rewards
| Location | Rewards |
|---|---|
| Stormbearer Mountains | |
| Whispering Woods | |
| Windrise | |
| Dadaupa Gorge | |
| Wolvendom | |
| Stormterror's Lair |
Location, Times, and Rewards
Stormbearer Mountains
| Rewards | 4H | 8H | 12H | 20H |
|---|---|---|---|---|
|
|
1 | 2〜4 | 4〜6 | 8〜12 |
|
|
1 | 2〜4 | 4〜6 | 8〜12 |
Whispering Woods
| Rewards | 4H | 8H | 12H | 20H |
|---|---|---|---|---|
|
|
4〜5 | - | - | - |
|
|
2〜3 | 6〜7 | 6〜7 | 3〜4 |
|
|
- | 1〜2 | 2〜3 | 7〜8 |
Windrise
| Rewards | 4H | 8H | 12H | 20H |
|---|---|---|---|---|
|
|
1 | 2〜4 | 4〜6 | 8〜12 |
|
|
1 | 2〜4 | 4〜6 | 8〜12 |
Dadaupa Gorge
| Rewards | 4H | 8H | 12H | 20H |
|---|---|---|---|---|
|
|
4〜5 | - | - | - |
|
|
2〜3 | 6〜7 | 6〜7 | 3〜4 |
|
|
- | 1〜2 | 2〜3 | 7〜8 |
Wolvendom
| Rewards | 4H | 8H | 12H | 20H |
|---|---|---|---|---|
|
|
1 | 2〜4 | 4〜6 | 8〜12 |
|
|
1 | 2〜4 | 4〜6 | 8〜12 |
Stormterror's Lair
| Rewards | 4H | 8H | 12H | 20H |
|---|---|---|---|---|
|
|
625 | 1575 | 2500 | 5000 |
Back to List of Region Expeditions
Liyue Expedition Rewards
List of Expedition Rewards
| Locations | Rewards |
|---|---|
| Dihua Marsh | |
| Dunyu Ruins | |
| Yaoguang Shoal | |
| Guili Plains | |
| Guyun Stone Forest | |
| Jueyun Karst |
Location, Times, and Rewards
Dihua Marsh
| Rewards | 4H | 8H | 12H | 20H |
|---|---|---|---|---|
|
|
1 | 2〜4 | 4〜6 | 8〜12 |
|
|
1 | 2〜4 | 4〜6 | 8〜12 |
Dunyu Ruins
| Rewards | 4H | 8H | 12H | 20H |
|---|---|---|---|---|
|
|
1 | 2〜4 | 4〜6 | 8〜12 |
|
|
1 | 2〜4 | 4〜6 | 8〜12 |
Yaoguang Shoal
| Rewards | 4H | 8H | 12H | 20H |
|---|---|---|---|---|
|
|
4〜5 | - | - | - |
|
|
2〜3 | 6〜7 | 6〜7 | 3〜4 |
|
|
- | 1〜2 | 2〜3 | 7〜8 |
Guili Plains
| Rewards | 4H | 8H | 12H | 20H |
|---|---|---|---|---|
|
|
625 | 1575 | 2500 | 5000 |
Guyun Stone Forest
| Rewards | 4H | 8H | 12H | 20H |
|---|---|---|---|---|
|
|
1 | 2〜4 | 4〜6 | 8〜12 |
|
|
1 | 2〜4 | 4〜6 | 8〜12 |
Jueyun Karst
| Rewards | 4H | 8H | 12H | 20H |
|---|---|---|---|---|
|
|
625 | 1575 | 2500 | 5000 |
Back to List of Region Expeditions
Inazuma Expedition Rewards
List of Expedition Rewards
| Locations | Rewards |
|---|---|
| Jinren Island | |
| Byakko Plain | |
| Konda Village | |
| Nazuchi Beach | |
| Tatarasuna | |
| Musoujin Gorge |
Location, Times, and Rewards
Jinren Island
| Rewards | 4H | 8H | 12H | 20H |
|---|---|---|---|---|
|
|
625 | 1575 | 2500 | 5000 |
Byakko Plain
| Rewards | 4H | 8H | 12H | 20H |
|---|---|---|---|---|
|
|
1 | 2〜4 | 4〜6 | 8〜12 |
|
|
1 | 2〜4 | 4〜6 | 8〜12 |
Konda Village
| Rewards | 4H | 8H | 12H | 20H |
|---|---|---|---|---|
|
|
1 | 2〜4 | 4〜6 | 8〜12 |
|
|
1 | 2〜4 | 4〜6 | 8〜12 |
Nazuchi Beach
| Rewards | 4H | 8H | 12H | 20H |
|---|---|---|---|---|
|
|
1 | 2〜4 | 4〜6 | 8〜12 |
|
|
1 | 2〜4 | 4〜6 | 8〜12 |
Tatarasuna
| Rewards | 4H | 8H | 12H | 20H |
|---|---|---|---|---|
|
|
625 | 1575 | 2500 | 5000 |
Musoujin Gorge
| Rewards | 4H | 8H | 12H | 20H |
|---|---|---|---|---|
|
|
1 | 2〜4 | 4〜6 | 8〜12 |
|
|
1 | 2〜4 | 4〜6 | 8〜12 |
Back to List of Region Expeditions
Sumeru Expedition Rewards
List of Expedition Rewards
| Locations | Rewards |
|---|---|
| Ardravi Valley | |
| Mawtiyima Forest | |
| Chatrakam Cave | |
| Avidya Forest | |
| Chinvat Ravine | |
| Ashavan Realm |
Location Times and Rewards
Ardravi Valley
| Rewards | 4H | 8H | 12H | 20H |
|---|---|---|---|---|
|
|
625 | 1575 | 2500 | 5000 |
Mawtiyima Forest
| Rewards | 4H | 8H | 12H | 20H |
|---|---|---|---|---|
|
|
1 | 2〜4 | 4〜6 | 8〜12 |
|
|
1 | 2〜4 | 4〜6 | 8〜12 |
Chatrakam Cave
| Rewards | 4H | 8H | 12H | 20H |
|---|---|---|---|---|
|
|
1 | 2〜4 | 4〜6 | 8〜12 |
|
|
1 | 2〜4 | 4〜6 | 8〜12 |
Avidya Forest
| Rewards | 4H | 8H | 12H | 20H |
|---|---|---|---|---|
|
|
1 | 2〜4 | 4〜6 | 8〜12 |
|
|
1 | 2〜4 | 4〜6 | 8〜12 |
Chinvat Ravine
| Rewards | 4H | 8H | 12H | 20H |
|---|---|---|---|---|
|
|
1 | 2〜4 | 4〜6 | 8〜12 |
|
|
1 | 2〜4 | 4〜6 | 8〜12 |
Ashavan Realm
| Rewards | 4H | 8H | 12H | 20H |
|---|---|---|---|---|
|
|
1 | 2〜4 | 4〜6 | 8〜12 |
|
|
1 | 2〜4 | 4〜6 | 8〜12 |
Back to List of Region Expeditions
Fontaine Expedition Rewards
List of Expedition Rewards
| Locations | Rewards |
|---|---|
| Erinnyes | |
| Salacia Plain | |
| Mont Esus | |
| Beryl Mountains | |
| Elynas Ridge | |
| The Outskirts of Poisson |
Location Times and Rewards
Erinnyes
| Rewards | 4H | 8H | 12H | 20H |
|---|---|---|---|---|
|
|
625 | 1575 | 2500 | 5000 |
Salacia Plain
| Rewards | 4H | 8H | 12H | 20H |
|---|---|---|---|---|
|
|
1 | 2〜4 | 4〜6 | 8〜12 |
|
|
1 | 2〜4 | 4〜6 | 8〜12 |
Mont Esus
| Rewards | 4H | 8H | 12H | 20H |
|---|---|---|---|---|
|
|
1 | 2〜4 | 4〜6 | 8〜12 |
|
|
1 | 2〜4 | 4〜6 | 8〜12 |
Beryl Mountains
| Rewards | 4H | 8H | 12H | 20H |
|---|---|---|---|---|
|
|
1 | 2〜4 | 4〜6 | 8〜12 |
|
|
1 | 2〜4 | 4〜6 | 8〜12 |
Elynas Ridge
| Rewards | 4H | 8H | 12H | 20H |
|---|---|---|---|---|
|
|
1 | 2〜4 | 4〜6 | 8〜12 |
|
|
1 | 2〜4 | 4〜6 | 8〜12 |
The Outskirts of Poisson
| Rewards | 4H | 8H | 12H | 20H |
|---|---|---|---|---|
|
|
1 | 2〜4 | 4〜6 | 8〜12 |
|
|
1 | 2〜4 | 4〜6 | 8〜12 |
Back to List of Region Expeditions
Natlan Expedition Rewards
List of Expedition Rewards
| Locations | Rewards |
|---|---|
| Huitzli Hill | |
| Tepeacac Rise | |
| Ancestral Temple | |
| Coatepec Mountain | |
| Basin of Unnumbered Flames | |
| Ameyalco Waters |
Location Times and Rewards
Huitzli Hill
| Rewards | 4H | 8H | 12H | 20H |
|---|---|---|---|---|
|
|
1 | 2〜4 | 4〜6 | 8〜12 |
|
|
1 | 2〜4 | 4〜6 | 8〜12 |
Tepeacac Rise
| Rewards | 4H | 8H | 12H | 20H |
|---|---|---|---|---|
|
|
1 | 2〜4 | 4〜6 | 8〜12 |
|
|
1 | 2〜4 | 4〜6 | 8〜12 |
Ancestral Temple
| Rewards | 4H | 8H | 12H | 20H |
|---|---|---|---|---|
|
|
1 | 2〜4 | 4〜6 | 8〜12 |
|
|
1 | 2〜4 | 4〜6 | 8〜12 |
Coatepec Mountain
| Rewards | 4H | 8H | 12H | 20H |
|---|---|---|---|---|
|
|
1 | 2〜4 | 4〜6 | 8〜12 |
|
|
1 | 2〜4 | 4〜6 | 8〜12 |
Basin of Unnumbered Flames
| Rewards | 4H | 8H | 12H | 20H |
|---|---|---|---|---|
|
|
625 | 1575 | 2500 | 5000 |
Ameyalco Waters
| Rewards | 4H | 8H | 12H | 20H |
|---|---|---|---|---|
|
|
1 | 2〜4 | 4〜6 | 8〜12 |
|
|
1 | 2〜4 | 4〜6 | 8〜12 |
Back to List of Region Expeditions
How to Go On Expeditions
Expedition Walkthrough Guide
| Expedition Walkthrough | |
|---|---|
| 1 | 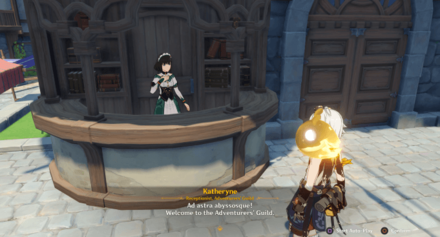 Speak to Katheryne at the Adventurer's Guild. |
| 2 | 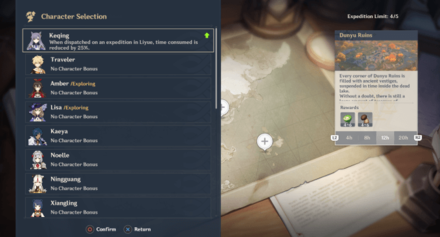 Select Dispatch Character on Expedition. |
| 3 | 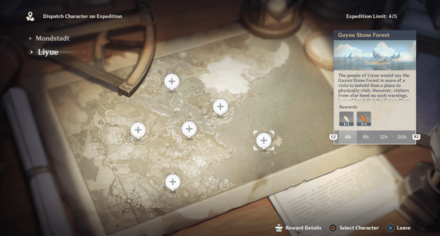 Choose the area you'd like to send a character to. |
| 4 | 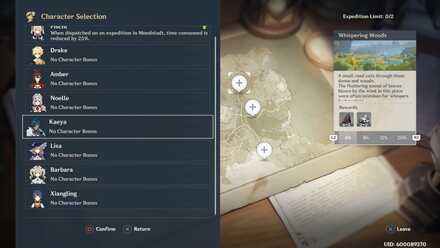 Select a character to begin the Expedition. |
| 5 | 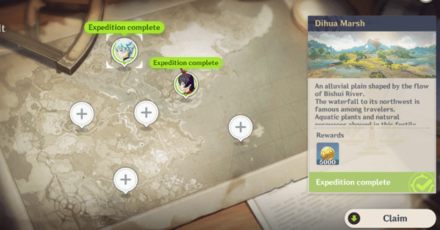 After a selected period of time the Expedition will be complete, and you can return to the Adventurer's Guild to receive your rewards. |
What are Expeditions?
Passive Item Collection Using Characters

Unlocks at Adventure Rank 14
In order to send your party members on Expeditions, you will first need to be Adventure Rank 14. If you're still on the lower side, take a look at our guide on how to raise your AR more efficiently!
How to Raise Your Adventure Rank
Can Be Started From Any Available Region

An Adventurer's Guild can be found in Mondstadt, Liyue, Inazuma, and Sumeru, all of which allow you to begin an Expedition. Simply speak with Katherine to start.
Use Characters With Expedition Buffs
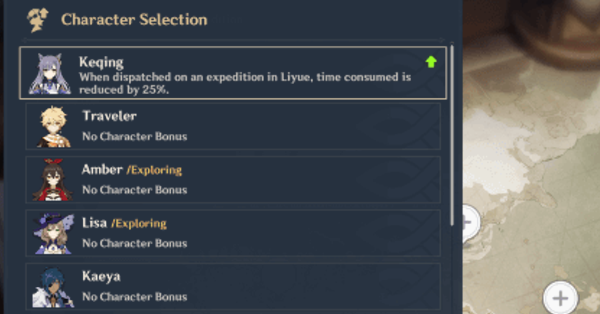
Like other features in the game, there are characters with unique buffs that will reduce the time of Expeditions or double the Expedition rewards received!
List of Characters with Double Reward Passives
Calling Back a Character Resets the Timer
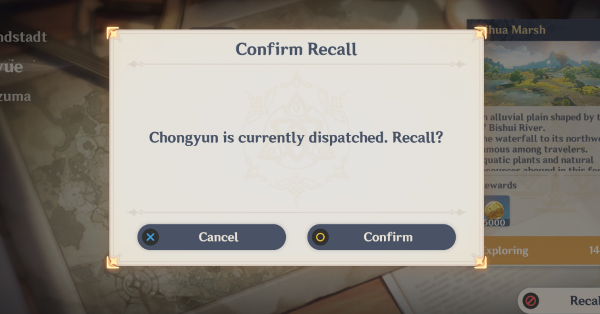
What happens when you recall an Expedition?
If you bring a character back before the Expedition is completed, not only will the character come back with zero rewards, but the timer will also reset. In case you want to switch Expedition characters, you should call them back as soon as possible.
Are Expeditions Worth It?

Worth It for Off-Field Farming
Expeditions are a good way to farm materials without having to spend time within the game. We recommend using Expeditions to farm for Mora, Crystal Chunks and White Iron Chunks while doing other things in-game!
Expedition Changelogs
One-Click Rewards Claim and Expedition Starting in 4.3
As shown in the Developers' Discussion for 4.3, quality-of-life improvements such as One-Click rewards claiming, and redispatch are in order once the 4.3 patch update hit the live servers on December 20, 2023!
This means Travelers won't have to click on each nation, and check which characters have completed their Expeditions. This one-click feature is also available in Ingredient Processing and Forging Screens, as well as Mystic Offering in the Crafting Bench!
Version 4.3 Release Date and Banners
Genshin Impact Related Guides
All Tips and Tricks Guides

All Version 1.0 Tips & Tricks
Other Game Mechanic Tips & Tricks
Author

Expeditions Guide for All Regions


Rankings
Gaming News

![Monster Hunter Stories 3 Review [First Impressions] | Simply Rejuvenating](https://img.game8.co/4438641/2a31b7702bd70e78ec8efd24661dacda.jpeg/show)
![The Liar Princess and the Blind Prince Review [PC] | Lovely to Look at but Tedious to Play](https://img.game8.co/4442586/8d95f5faf05780f1765ce7e0938bd825.jpeg/thumb)
![Marathon Cryo Archive Map Teased as [REDACTED] on Selection Screen](https://img.game8.co/4442236/6357203e58172f6de57f1991e7c39b22.png/thumb)

Popular Games

Genshin Impact Walkthrough & Guides Wiki
Umamusume: Pretty Derby Walkthrough & Guides Wiki
Pokemon Pokopia Walkthrough & Guides Wiki
Honkai: Star Rail Walkthrough & Guides Wiki
Monster Hunter Stories 3: Twisted Reflection Walkthrough & Guides Wiki
Arknights: Endfield Walkthrough & Guides Wiki
Wuthering Waves Walkthrough & Guides Wiki
Zenless Zone Zero Walkthrough & Guides Wiki
Pokemon TCG Pocket (PTCGP) Strategies & Guides Wiki
Monster Hunter Wilds Walkthrough & Guides Wiki


Recommended Games
Diablo 4: Vessel of Hatred Walkthrough & Guides Wiki
Cyberpunk 2077: Ultimate Edition Walkthrough & Guides Wiki
Fire Emblem Heroes (FEH) Walkthrough & Guides Wiki
Yu-Gi-Oh! Master Duel Walkthrough & Guides Wiki
Super Smash Bros. Ultimate Walkthrough & Guides Wiki
Pokemon Brilliant Diamond and Shining Pearl (BDSP) Walkthrough & Guides Wiki
Elden Ring Shadow of the Erdtree Walkthrough & Guides Wiki
Monster Hunter World Walkthrough & Guides Wiki
The Legend of Zelda: Tears of the Kingdom Walkthrough & Guides Wiki
Persona 3 Reload Walkthrough & Guides Wiki


All rights reserved
Copyright© 2012-2024 HoYoverse — COGNOSPHERE. All Rights Reserved.
The copyrights of videos of games used in our content and other intellectual property rights belong to the provider of the game.
The contents we provide on this site were created personally by members of the Game8 editorial department.
We refuse the right to reuse or repost content taken without our permission such as data or images to other sites.
I love your website!