This survey will take about 1 minute.
Your answers will help us to improve our website.
Genshin Impact
Primal Obelisk Locations and Puzzle Guide in Sumeru
✉ Send your thoughts in our Genshin 6.4 Patch Survey!
★ Exclusive: Dive back in time with the Meta History
◆ Hot: Version 6.4, Luna 5 Codes
◆ Builds: Varka, Flins, Skirk, Escoffier
◆ Events: Travelers' Tales, He Who Caught the Wind
◆ Future: Linnea, Version 6.5 Luna VI

Primal Obelisks are ancients monument puzzles found in the Sumeru Desert for Genshin Impact Version 3.1. See all locations and how to solve Primal Obelisks in this puzzle guide!
List of Contents
All Primal Obelisk Locations in the Desert
| Primal Obelisk Location Maps | |
|---|---|
 Click to Jump to this Section |
 Click to Jump to this Section |
There are 8 Primal Obelisks in the Hadramaveth Desert added in Version 3.4, while there are 10 Primal Obelisks in the Great Red Sand Desert area of Sumeru!
Primal Obelisk Great Red Sand Locations
Great Red Sand Primal Obelisk Locations
| All Primal Obelisk Locations | ||||
|---|---|---|---|---|
View Full Image |
||||
| Click to Jump to a Primal Obelisk Location | ||||
| 1 | 2 | 3 | 4 | 5 |
| 6 | 7 | 8 | 9 | 10 |
Primal Obelisk 1 Location
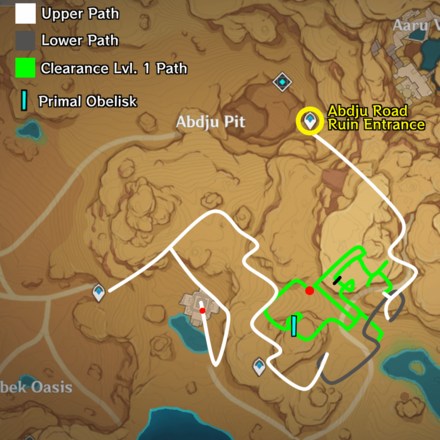
| Location | Inside Abdju Pit Ruins |
|---|---|
| Requirement | Level 1 Clearance |
| Seals Needed |
The first obelisk is hidden inside the Abdju Pit ruins, which is only accessible after progressing the Golden Slumber quests. However, you won't be able to access the obelisk yet until you have a Level 1 clearance from the Secret of Al-Ahmar quest!
Abdju Pit Obelisk Walkthrough
| Walkthrough | |
|---|---|
| 1 | Teleport back to Abdju Pit ruins and make your way to the first diverging room with a plinth book. You will need Clearance Level 1 to unlock the elevator. |
| 2 | Activate the elevator and descend down. If this is your first time exploring the ruins, make sure to interact all Primal Embers so you see along the way to further explore the area. |
| 3 | Upon encountering the Primal Constructs head to the right path and activate the elevator going down. Then proceed until you get to the greenish looking elevator. |
| 4 | After going up, continue going forward the corridor until you see the plinth on the door, which contains the obelisk! |
Primal Obelisk 2 Location
| Location | Khaj-Nisut |
|---|---|
| Requirement | None |
| Seals Needed |
The second primal obelisk is found below the ruins of Khaj-Nisut. While the hole may be intimidating, the pit is but a sea of sand, so you can safely use your plunging attacks down to the very bottom!
The floating ruins shown in the video is accessible by progressing the Dreams Beneath the Searing Sand quest in Golden Slumber.
Primal Obelisk 3 Location
| Location | Inside Lamb-Devourer Rock |
|---|---|
| Requirement | Password to Lamb-Devourer Rock |
| Seals Needed |
Get the Password from the Eremite

Accessing the Lamb-Devourer Rock cave requires you to get the password from a patrolling Eremite at the entrance of the hideout. You will have to sneak behind her until she says "Marg bar parvezravan...," then go to the mechanism at the entrance to open the cave!
Primal Obelisk 4 Location
| Location | Outside the Mausoleum of King Deshret |
|---|---|
| Requirement | None |
| Seals Needed |
Simply walk down the great pyramids of King Deshret and go south-east towards the obelisk in the open area of the desert.
Primal Obelisk 5 Location
| Location | Under Khemenu Temple |
|---|---|
| Requirement | Level 1 Clearance |
| Seals Needed |
Requires one clearance
It's recommended you complete Golden Slumber first to get clearance and unlock the locked door! Upon doing so, teleport back to Khemenu Temple's waypoint then proceed to the big room. Head towards the left door afterwards until you reach the plinth door.
Open the door to the underground
If you haven't opened the door to the second exit, destroy the breakable rock first on your left, then point the laser towards the mechanism hidden inside.
Primal Obelisk 6 Location
| Location | Inside the Mausoleum of King Deshret |
|---|---|
| Requirement | Complete Golden Slumber and Old Notes and New Friends quest chains |
| Seals Needed |
The elevator to the Primal Obelisk beneath the Mausoleum of King Deshret is locked until you complete all quests from the Golden Slumber and Old Notes and New Friends quest chains.
Primal Obelisk 7 Location
| Location | Underground in Opet Hall |
|---|---|
| Requirement | Progress through Golden Slumber's The Secret of Al-Ahmar quest. |
| Seals Needed |
Teleport to Opet Hall waypoint and head to the second floor. To the left of the multiple Everlight Cells room, you can find the Obelisk locked inside a door. Project the beams to the cells nearest to the left door to open this room!
Opet Hall is accessible while playing through the Secret of Al-Ahmar quest of Golden Slumber.
Primal Obelisk 8 Location
| Location | Underground from the Dune of Magma to Duat Hall |
|---|---|
| Requirement | Progress through Old Notes and New Friends' Dual Evidence quest. |
| Seals Needed |
Entrance from Dune of Magma to Duat Hall
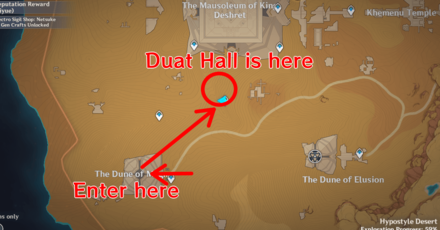
The Duat Hall ruins is locked behind the Dual Evidence quest, so you'll have to progress through Golden Slumber first before starting your journey from The Dune of Magma!
If you've already unlocked Duat Hall, simply teleport to the ruin's Teleport Waypoint and run back down the stairs.
Primal Obelisk 9 Location
| Location | Under the Mausoleum of King Deshret |
|---|---|
| Requirement | 5 Glinting Components, and complete Golden Slumber and Old Notes and New Friends quests. |
| Seals Needed |
Upon obtaining all 5 Glinting Components in the Sumeru Desert, head to the underground waypoint southwest of the Mausoleum of King Deshret and head forward to an entrance to the ruins.
Inside the small ruins, go left and climb down the stairs to the door. Offer all Glinting Components to open it and access the Obelisk!
Primal Obelisk 10 Location
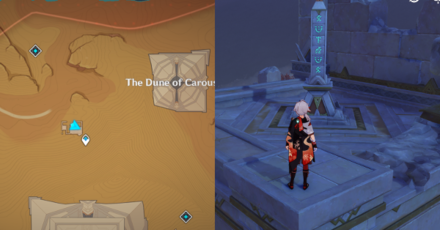
| Location | West of the Dune of Carouses |
|---|---|
| Seals Needed |
The last Primal Obelisk is on top of an unnamed ruin located between the Dune of Carouses and the Garden of Endless Pillars domain. Simply climb the walls to get to the obelisk.
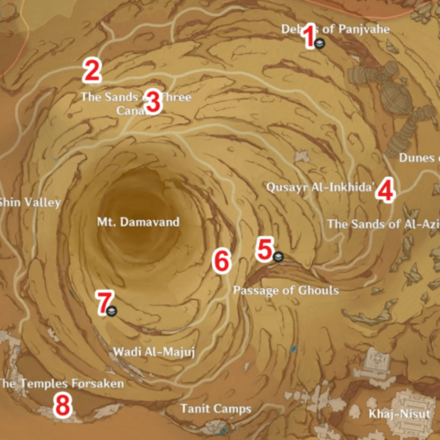
Primal Obelisks in Hadramaveth Locations
3.4 Primal Obelisk Location Map
| Primal Obelisks in the Hadramaveth Desert | |||
|---|---|---|---|
View Full Image |
|||
| Click to Jump to a Primal Obelisk Location | |||
| 1 | 2 | 3 | 4 |
| 5 | 6 | 7 | 8 |
Primal Obelisk 1 - Debris of Panjvahe
| Location | Debris of Panjvahe |
|---|---|
| Requirement | None |
| Seals Needed |
The first Primal Obelisk is found in the lower area of the canyons at the Debris of Panjvahe. This Primal Obelisk is just outside the ruins found there, and you can walk to it from the nearest Teleport Waypoint!
Primal Obelisk 2 - The Sands of Three Canals
| Location | The Sands of Three Canals |
|---|---|
| Requirement | None |
| Seals Needed |
From the Teleport Waypoint on a cliff to the left of the Sands of Three Canals, drop down and glide to the right, where the second Primal Obelisk would be amongst ruins on the ground level.
Primal Obelisk 3 - The Sands of Three Canals
| Location | The Sands of Three Canals |
|---|---|
| Requirement | None |
| Seals Needed |
From the rightmost Teleport Waypoint at The Sands of Three Canals, head to the left past a group of Weathered Obelisks and down the cliffside until you get to the ruins where the Primal Obelisk is located.
Primal Obelisk 4 - Qusayr Al-Inkhida'
| Location | Qusayr Al-Inkhida' |
|---|---|
| Requirement | None |
| Seals Needed |
Use the Teleport Waypoint located on a cliff at the Qusayr Al-Inkhida' area. From there, head south down the cliff until you get to the fourth Primal Obelisk beside a tree.
Primal Obelisk 5 - Passage of Ghouls
| Location | Temple of Buried Dominion |
|---|---|
| Requirement | None |
| Seals Needed |
Progress through the Dirge of the Bilqis quest chain to access the underground area in Qusayr Al-Inkhida' close to Mt. Damavand.
From the Underground Teleport Waypoint, head south until you come across a large, closed door. Defeat the Primal Construct guarding it to unlock the door mechanism and open the door.
Primal Obelisk 6 - Passage of Ghouls
| Location | Passage of Ghouls |
|---|---|
| Requirement | None |
| Seals Needed |
The sixth Primal Obelisk in the Hadramaveth Desert is in the Passage of Ghouls area.
From the Teleport Waypoint at the Wadi Al-Majuj, head north with the help of Four-Leaf Sigils, go down past a cliff, and keep to the perimeter of Mt. Damavand until you get to the ruins with the Primal Obelisk.
Primal Obelisk 7 - Wadi Al-Majuj
| Location | Wadi Al-Majuj |
|---|---|
| Requirement | None |
| Seals Needed |
From the northwest Teleport Waypoint in the Wadi Al-Majuj, jump down to the valley below and glide north until you come across a Four-Leaf Sigil. This is the platform where the seventh Primal Obelisk is located.
Primal Obelisk 8 - The Temples Forsaken
| Location | The Temples Forsaken |
|---|---|
| Requirement | None |
| Seals Needed |
From the rightmost Teleport Waypoint in The Temples Forsaken, head up and towards the center of the ruins where the last Primal Obelisk is located right in front of the entrance to The Temples Forsaken.
How to Solve Primal Obelisk Puzzles
Restore the Obelisk using the Required Sacred Seals
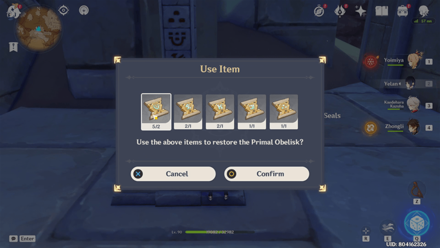
Solving the Primal Obelisk puzzles requires you to collect Sacred Seals scattered across the Sumeru desert.
Selecting Restore on the Primal Obelisk brings up the types of Sacred Seals that it needs. Clicking Confirm uses them to solve the puzzle and spawn a treasure chest nearby.
Primal Obelisk Rewards
Rewards Chests with Primogems
| Rewards | ||
|---|---|---|
|
|
|
|
Get an Achievement After Unlocking All Primal Obelisks

Once you completed all the Primal Obelisks, you will have the Achievement: A Well-Trained Archaeologist.
3.4 Second Primal Obelisk Achievement
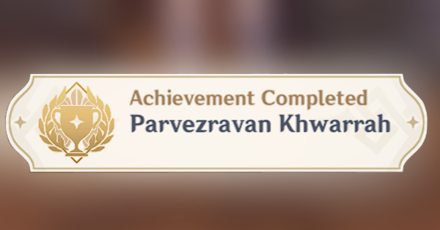
Just like in the Great Red Sand Desert, restoring all 8 Primal Obelisks in the Desert of Hadramaveth to life will grant you a new Achievement, Parvezravan Khwarrah, which is worth 5 Primogems!
Desert of Hadramaveth Map Guide
Primal Obelisk Puzzles Information
Part of the Ruin Puzzles
| All Ruins of King Deshret Puzzles | |
|---|---|
| Primal Obelisk | Sacred Seal Locations |
| Plinth of the Secret Rites | Primal Ember & Torches |
| Beam Transmission | Verity Cell |
| Replicator Keystones | Forged Primal Lights |
| Primal Sandglass | Increasing Clearance |
| Obscuring Cell | |
The Primal Obelisks are part of the Ruin puzzles in the Ruins of King Deshret. They include puzzles that will help you navigate around the ruins more efficiently!
Release Date in 3.1
| Genshin Impact Version 3.1 | |
|---|---|
 |
|
| Release Date | September 28, 2022 |
Primal Obelisk goes live as soon as the Desert area of Sumeru becomes available in Version 3.1 on September 28, 2022!
Version 3.1 Release Date and Banners
New Primal Obelisks in 3.4
New Primal Obelisks were revealed in the Desert of Hadramaveth, which released in Version 3.4 on January 18, 2023!
Version 3.4 Release Date and Patch Notes
Genshin Impact Related Guides
All Tips and Tricks Guides

All Version 3.1 Tips & Tricks
Other Regional Tips & Tricks
Comment
8  Anonymous about 3 years
Obelisk 10 actually requires 2 thunderstrike seals
Author

Primal Obelisk Locations and Puzzle Guide in Sumeru
Please participate in our site
improvement survey
03/2026
improvement survey
03/2026
Would you assist in
improving Game8's site?
improving Game8's site?

×
We are listening to our users' valuable opinions and discussing how to act on them.
The information collected through this survey will be used for the purpose of improving our services. In addition, the information will only be disclosed a part of a statistic in a format that will not allow identification of personal information.
Begin Survey
Not Now
×
Please rate each item regarding Game8.co's Advertisements.
Amount of Ads
Very Dissatisfied
Somewhat Dissatisfied
Fine
Somewhat Satisfied
Highly Satisfied
Placement of Ads
Timing of Ad Display
Ad Loading Speed
Safeness of Ads
Content of Ads
×
Please rate each item regarding Game8.co's Quality of Articles.
Amount of information
Very Dissatisfied
Somewhat Dissatisfied
Fine
Somewhat Satisfied
Highly Satisfied
Frequency of updates
Speed of new information
Accuracy of articles
Understandibility of articles
Readability of sentences
×
Please rate each item regarding Game8.co's Usability of the Site.
Ease of finding information
Very Dissatisfied
Somewhat Dissatisfied
Fine
Somewhat Satisfied
Highly Satisfied
Loading Speed
Use of Color
Font Size
Visibility of Images
Easy to Understand Layout
×
Please rate each item regarding Game8.co's Message Boards, Comments.
Ease of Writing
Very Dissatisfied
Somewhat Dissatisfied
Fine
Somewhat Satisfied
Highly Satisfied
Readability
Ease in Finding Information
Comment Quality
Comment Quantity
Admin Response
×
Please rate each item regarding Game8.co's Site's new design.
Please rate our site's new design
Very Dissatisfied
Somewhat Dissatisfied
Fine
Somewhat Satisfied
Highly Satisfied
Do you think that the website's design change makes the site easier to use?
Has the new design made it easier for you to find information on the site?
Has the new design improved the overall visual appeal of the site?
How would you rate your overall satisfaction with the new design of the site?
×
How likely are you to recommend Game8 to someone you know?
Very Unlikely
0
1
2
3
4
5
6
7
8
9
10
Very Likely
If you have other opinions regarding potential improvement to the website, please share them with us. We would appreciate your honest opinion.
Note: This is a free response section, so you can proceed without entering anything.
Note: Please be sure not to enter any kind of personal information into your response.
Note: Please be sure not to enter any kind of personal information into your response.
×
Thank You
×
Thank you for participating in our survey! Your answers will help us to improve the quality of our website and services.
We hope you continue to make use of Game8.
We hope you continue to make use of Game8.
Close


Rankings
Gaming News


![Monster Hunter Stories 3 Review [First Impressions] | Simply Rejuvenating](https://img.game8.co/4438641/2a31b7702bd70e78ec8efd24661dacda.jpeg/thumb)
Popular Games

Genshin Impact Walkthrough & Guides Wiki
Honkai: Star Rail Walkthrough & Guides Wiki
Umamusume: Pretty Derby Walkthrough & Guides Wiki
Pokemon Pokopia Walkthrough & Guides Wiki
Resident Evil Requiem (RE9) Walkthrough & Guides Wiki
Monster Hunter Wilds Walkthrough & Guides Wiki
Wuthering Waves Walkthrough & Guides Wiki
Arknights: Endfield Walkthrough & Guides Wiki
Pokemon FireRed and LeafGreen (FRLG) Walkthrough & Guides Wiki
Pokemon TCG Pocket (PTCGP) Strategies & Guides Wiki


Recommended Games
Diablo 4: Vessel of Hatred Walkthrough & Guides Wiki
Cyberpunk 2077: Ultimate Edition Walkthrough & Guides Wiki
Fire Emblem Heroes (FEH) Walkthrough & Guides Wiki
Yu-Gi-Oh! Master Duel Walkthrough & Guides Wiki
Super Smash Bros. Ultimate Walkthrough & Guides Wiki
Pokemon Brilliant Diamond and Shining Pearl (BDSP) Walkthrough & Guides Wiki
Elden Ring Shadow of the Erdtree Walkthrough & Guides Wiki
Monster Hunter World Walkthrough & Guides Wiki
The Legend of Zelda: Tears of the Kingdom Walkthrough & Guides Wiki
Persona 3 Reload Walkthrough & Guides Wiki


All rights reserved
Copyright© 2012-2024 HoYoverse — COGNOSPHERE. All Rights Reserved.
The copyrights of videos of games used in our content and other intellectual property rights belong to the provider of the game.
The contents we provide on this site were created personally by members of the Game8 editorial department.
We refuse the right to reuse or repost content taken without our permission such as data or images to other sites.
primal obelisk 4 needs 2 thunderstrike not 1..