Spiral Abyss Floor 11 Guide for Version 6.4 (March 2026)
✉ Send your thoughts in our Genshin 6.4 Patch Survey!
★ Exclusive: Dive back in time with the Meta History
◆ Hot: Version 6.4, 6.4 Codes, Linnea, Version 6.5
◆ Builds: Varka, Flins, Skirk, Escoffier
◆ Events: Travelers' Tales, Sightseeing With Friends
◆ Endgame: Spiral Abyss (March 2026)
Spiral Abyss Floor 11 is the second to the last floor of the Spiral Abyss domain in Genshin Impact. Check out Spiral Abyss Floor 11 in Version 6.4 (March 2026), the best teams and characters, chamber enemies and guides, and the rewards here!
Floor 11 Basic Information
Floor 11 Information and Rewards
| Ley Line Disorder |
• All party members gain a 60% Anemo DMG Bonus. • All party members gain a 60% Cryo DMG Bonus. |
|---|---|
| Enemy Level | Lv. 88 - Lv. 92 |
| Star Bounty (All 9★) |
|
| Rewards |
Blessing of the Abyssal Moon: Windlash Moon
| Blessing Effect | |
|---|---|
 When a character triggers a Swirl reaction on an opponent, they gain 1 stack fo Windlash, and when the stack count reaches 4, a shockwave is unleashed at the opponent's position, dealing True DMG and consuming all stacks of Windlash at the same time. Up to 1 stack of Windlash can be gained every 0.1s A shockwave can be unleashed this way every 6s. |
|
| Blessing Reset | 2026/04/16 04:00 (Server Time) |
Floor 11 Recommended Teams
Best Team Comps For Floor 11
First Half
| Swirl-Pyro | |||
|---|---|---|---|
|
|
|
Any | Any |
| Mono-Pyro | |||
|
|
|
|
Any |
Anemo and Pyro is favored on this floor due to the monolith and Cryo-shielded enemies especially for the first Chamber.
Second Half
| Freeze | |||
|---|---|---|---|
|
|
|
Any | Any |
| Lunar-Bloom | |||
| Moonsign Dendro | Moonsign Hydro | Any | Any |
| Bloom / Hyperbloom | |||
|
|
|
|
Any |
Do not bring Electro Main Carries or Electro DMG focused teams (Hyperbloom is fine as it deals Dendro DMG) as there's an Electro Abyss Lector and a Radiant Antelope in the second halves. The former also creates an Electro shield, in which Cryo, Dendro, and Pyro are the best elements to use.
Against Electro enemies, Freeze, Lunar-Bloom and other Dendro reactions are also great for this half, especially for the first chamber where Hydro Slimes create the Bloom cores for you.
Best Characters to Use
First Half
| Sample Teams | |||
|---|---|---|---|
|
|
|
|
|
|
|
|
|
|
| Other Recommendations | |||
| Main DPS | |||
| Sub DPS | |||
| Support | |||
Second Half
| Sample Teams | |||
|---|---|---|---|
|
|
|
|
|
|
|
|
|
|
| Other Recommendations | |||
| Main DPS/ Driver |
|||
| Sub DPS | |||
| Support | |||
Floor 11 - Chamber 1 Guide
Chamber Information
| Challenge |
Defeat 24 Opponents Defeat 24 Opponents |
||||
|---|---|---|---|---|---|
| Goal |
★ Target Defense progress greater than 20%. ★ Target Defense progress greater than 40%. ★ Target Defense progress greater than 60%. |
||||
Floor 11 - Chamber 1 First Half
Floor 11-1-1 Enemies
| Enemies | |
|---|---|
|
|
|
Floor 11-1-1 Strategy
One Ice Shieldwall Mitachurl and two Hilichurl Guard spawn in groups.
The main worry for this floor is the Ice Shieldwall Mitachurl charging as they spawn, make sure to face away from the monolith as they do this. For the Cryo shields, have your Pyro off-field or Pyro-infused character active at all times to disrupt their attacks.
If you have groupers like Venti or Kazuha, this should also take care of the small Hilichurls, or taunters like Mona to prevent the monolith from being targeted.
Floor 11 - Chamber 1 Second Half
Floor 11-1-2 Enemies
| Wave 1 | |
|---|---|
|
|
|
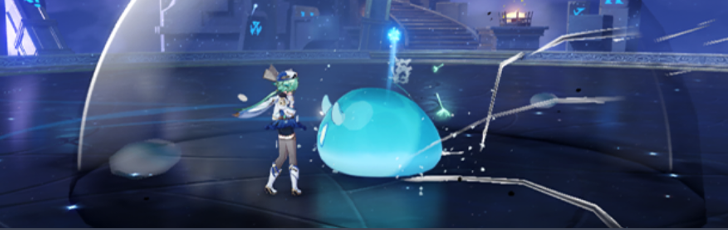
Floor 11-1-2 Strategy
Upon starting the timer, Large Hydro Slimes in waves of 3 appear on each cardinals as you defeat them. If you're using Freeze, you will be able to handle to clear this floor without worrying about the monolith HP going down as they're perma-frozen.
Floor 11 - Chamber 2 Guide
Chamber Information
| Challenge |
Defeat 5 Opponents Defeat 1 Opponent |
||||
|---|---|---|---|---|---|
| Goal |
★ Remaining challenge time longer than 60 sec. ★ Remaining challenge time longer than 180 sec. ★ Remaining challenge time longer than 300 sec. |
||||
Floor 11 - Chamber 2 First Half
Floor 11-2-1 Enemies
| Wave 1 | |
|---|---|
|
|
|
| Wave 2 | |
|
|
|
| Wave 3 | |
|
|
|
Floor 11-2-1 Strategy
This floor is a normal Elite fight where Pyro is favored. Be wary of the Fatui Cryo Cicin Mages as they might create a Cryo shield or teleport far away.
Floor 11 - Chamber 2 Second Half
Floor 11-2-2 Enemies
| Enemies |
|---|
|
|
Floor 11-2-2 Strategy
There is only one Abyss Lector for this chamber. Upon damaging it to around 10% health of its health, it will spawn an Electro shield on itself. Use Pyro, Cryo, or Dendro attacks to deplete this bar until the shield is destroyed.
Floor 11 - Chamber 3 Guide
Chamber Information
| Challenge |
Defeat 3 Opponents Defeat 1 Opponent |
||||
|---|---|---|---|---|---|
| Goal |
★Remaining challenge time longer than 180 sec. ★Remaining challenge time longer than 300 sec. ★Remaining challenge time longer than 420 sec. |
||||
Floor 11 - Chamber 3 First Half
Floor 11-3-1 Enemies
| Wave 1 |
|---|
|
|
| Wave 2 |
|
|
| Wave 3 |
|
|
Floor 11-3-1 Strategy
Watch out for the Geo and Cryo shield for the Lawachurl as they gain enhanced effects while it's active. Otherwise, this is a fairly normal single-target fight that you can just burst down.
Floor 11 - Chamber 3 Second Half
Floor 11-3-2 Enemies
| Wave 1 | |
|---|---|
|
|
Floor 11-3-2 Strategy
The Radiant Antelope is the sole enemy for this last chamber. After a bit of time, the Antelope will be enhanced and inflict Radiant Cocoon on your party, which decreases CRIT Rate and DMG dealt. Heal your party to remove this debuff. Otherwise, you can also simply defeat this enemy with your strongest team to prevent this from happening.
Floor 11 Clear Rewards
Chamber's Bounty
| Chamber 1 |
|
|---|---|
| Chamber 2 |
|
| Chamber 3 |
|
The Chamber's Bounty is the set of rewards you receive simply for clearing a Chamber for the first time. This can only be received once.
Star's Bounty
| 3★ |
|
|---|---|
| 6★ |
|
| 9★ |
|
The Star's Bounty can only be received if you clear the star requirements displayed during the challenge. Each Chamber has 3 stars each with 1 prize for every 3 earned. These can also only be received once.
Genshin Impact Related Guides
Spiral Abyss Guides
Spiral Abyss Floor Guides
| Spiral Abyss Floors | |||
|---|---|---|---|
 Floor 1 Floor 1 |
 Floor 2 Floor 2 |
 Floor 3 Floor 3 |
 Floor 4 Floor 4 |
 Floor 5 Floor 5 |
 Floor 6 Floor 6 |
 Floor 7 Floor 7 |
 Floor 8 Floor 8 |
 Floor 9 Floor 9 |
 Floor 10 Floor 10 |
 Floor 11 Floor 11 |
 Floor 12 Floor 12 |
Comment
i tried everything in floor 11-3-1, using venti, mavuika-furina-xilonen, literally nothing is enough,,, i just cant finish it fast enough to have time for the second chamber. i get they tried to make venti useful, but 60 enemies is WILD
Author

Spiral Abyss Floor 11 Guide for Version 6.4 (March 2026)


Rankings
Gaming News


Popular Games

Genshin Impact Walkthrough & Guides Wiki
Umamusume: Pretty Derby Walkthrough & Guides Wiki
Pokemon Pokopia Walkthrough & Guides Wiki
Honkai: Star Rail Walkthrough & Guides Wiki
Monster Hunter Stories 3: Twisted Reflection Walkthrough & Guides Wiki
Arknights: Endfield Walkthrough & Guides Wiki
Wuthering Waves Walkthrough & Guides Wiki
Zenless Zone Zero Walkthrough & Guides Wiki
Pokemon TCG Pocket (PTCGP) Strategies & Guides Wiki
Monster Hunter Wilds Walkthrough & Guides Wiki


Recommended Games
Diablo 4: Vessel of Hatred Walkthrough & Guides Wiki
Cyberpunk 2077: Ultimate Edition Walkthrough & Guides Wiki
Fire Emblem Heroes (FEH) Walkthrough & Guides Wiki
Yu-Gi-Oh! Master Duel Walkthrough & Guides Wiki
Super Smash Bros. Ultimate Walkthrough & Guides Wiki
Pokemon Brilliant Diamond and Shining Pearl (BDSP) Walkthrough & Guides Wiki
Elden Ring Shadow of the Erdtree Walkthrough & Guides Wiki
Monster Hunter World Walkthrough & Guides Wiki
The Legend of Zelda: Tears of the Kingdom Walkthrough & Guides Wiki
Persona 3 Reload Walkthrough & Guides Wiki


All rights reserved
Copyright© 2012-2024 HoYoverse — COGNOSPHERE. All Rights Reserved.
The copyrights of videos of games used in our content and other intellectual property rights belong to the provider of the game.
The contents we provide on this site were created personally by members of the Game8 editorial department.
We refuse the right to reuse or repost content taken without our permission such as data or images to other sites.
bro i have skirk-furina-xingqiu-charlotte team for the 11-3-1 and diluc-bennet-xiangling-xianyun for the 11-3-2 bcs i dont have any other fitting char and i cant beat the stupid electro thingg