Alhaitham Rating and Best Builds
✉ Send your thoughts in our Genshin 6.4 Patch Survey!
★ Exclusive: Dive back in time with the Meta History
◆ Hot: Version 6.4, 6.4 Codes, Linnea, Version 6.5
◆ Builds: Varka, Flins, Skirk, Escoffier
◆ Events: Travelers' Tales, Sightseeing With Friends
◆ Endgame: Spiral Abyss (March 2026)

Alhaitham is a Dendro sword user and a powerful damage dealer from Sumeru in Genshin Impact. See Alhaitham's best builds, weapon, artifacts, and our rating of this character in this guide!
| Alhaitham's Character Guides | |||
|---|---|---|---|
|
|
|
|
|
List of Contents
Alhaitham Rating and Info
Character Information
| Alhaitham | ||
|---|---|---|
 |
Rating |
|
| Rarity | ||
| Element | ||
| Weapon | ||
| Voice Actors |
Nazeeh Tarsha (EN)
Umehara Yuuichirou (JP) |
|
Tier List Rankings
| Main DPS | Sub-DPS | Support | Exploration |
|---|---|---|---|
|
|
- | - |
|
Tier Rating
|
As a Main DPS For a long time, Alhaitham has been the go-to choice as an On-Field Dendro DPS in all manners of Dendro teams, most notably Spread and Hyperbloom. As Dendro's meta shifts to Lunar-Bloom, Alhaitham has seen a decline in his effectiveness as other Dendro DPS units like Kinich and now Nefer can outscale him without requiring as much investment. For this reason, we are placing him down to A-tier. |
Alhaitham's Stats
| Stat | Base Value |
|---|---|
| HP | 2695 |
| ATK | 64 |
| DEF | 158 |
| Dendro DMG% | 0% |
| Stat | Max Value |
|---|---|
| HP | 13348 |
| ATK | 314 |
| DEF | 782 |
| Dendro DMG% | 28.8% |
Base Stat Calculations
 | Stats indicated above are obtained from Alhaitham's base values. These numbers also exclude the character's equipped weapon, artifacts, talents, or other passive effects that are not innate to the character. |
|---|---|
 | All characters start with 5% CRIT Rate, 50% CRIT DMG, 100% Energy Recharge, 0 Elemental Mastery, 0% Healing Bonus, and 0% Elemental DMG bonus before any additional stats are applied. The table above includes such values. |
 | The Level 20 stats indicated for this character are calculated before their first ascension. |
Alhaitham's Ascension and Talent Material Summary
| All Ascension Materials Needed |
|---|
|
|
| All Talent Materials Needed |
|
|
Alhaitham Strengths and Weaknesses
| Strengths | |||
|---|---|---|---|
|
• Can deal high single and multi-target DMG. • Flexible to perform all Dendro-related reactions on-field. • Extremely fast Dendro application. • Infusion cannot be overriden, and it's not tied to Burst. |
|||
| Weaknesses | |||
|
• Takes time to master due to strict timings and rotations. • Full damage potential requires investment into his other teammates. • No interruption resistance. |
Alhaitham Best Builds
Alhaitham Main DPS Builds
Dendro Main DPS
| Best Weapon | |
|---|---|
| Replacement Weapons |
3.
4.
|
| Best Artifacts | |
| Artifact Main Stats | |
| Artifact Sub Stats | Elemental Mastery, Energy Recharge, CRIT Rate, CRIT DMG, ATK% |
| Recommended Energy Recharge | ±130% Total Energy Recharge |
| Sample Teams | Quickbloom:
Spread:
|
Alhaitham needs as much Elemental Mastery and CRIT stats he can get with the Gilded Dreams build as a Dendro Main DPS. You will also need a Dendro support who can use the Deepwood Memories artifact set to provide the Dendro RES shred.
This build focuses on maximizing his Projection Attack damage from his Elemental Skill.
Solo Dendro DPS
| Best Weapon | |
|---|---|
| Replacement Weapons |
3.
4.
|
| Best Artifacts | |
| Artifact Main Stats | |
| Artifact Sub Stats | Elemental Mastery, Energy Recharge, CRIT Rate, CRIT DMG, ATK% |
| Recommended Energy Recharge | ±160% Total Energy Recharge |
| Sample Teams | Quickbloom:
Spread:
|
Alternatively, you can have Alhaitham equip the Deepwood Memories artifact set if there are no other characters in the party who can equip it.
Since he's alone, he will need more energy to recharge his burst. We recommend equipping your supports with Favonius weapons to fund his energy cost.
Alhaitham Talent Priority
| 1st | 2nd | 3rd |
|---|---|---|
| Elemental Skill | Normal Attack | Elemental Burst |
Alhaitham's Elemental Skill should be the main priority to level up as his Projection Attack damage scales with this talent. As with most Main DPS characters, you should also be leveling up your Normal Attack and Elemental Burst to increase his personal damage.
Alhaitham Best Artifacts
Alhaitham Artifact Rankings
| Artifact | Artifact Bonuses | |
|---|---|---|
| Best |
|
2-PC: Elemental Mastery +80 4-PC: Within 8s of triggering an Elemental Reaction, the character equipping this will obtain buffs based on the Elemental Type of the other party members. ATK is increased by 14% for each member whose Elemental Type is the same as the equipping character, and EM is increased by 50 for every member with a different Elemental Type. Each of the buffs will count up to 3 characters. This effect can be triggered once every 8s and even when not on the field. |
| 2nd |
|
2-PC: Dendro DMG Bonus +15% 4-PC: After Elemental Skills or Bursts hit opponents, the targets' Dendro RES will be decreased by 30% for 8s. This effect can be triggered even if the equipping character is not on the field. |
| 3rd |
|
2-PC: Elemental Mastery +80 |
|
|
2-PC: Elemental Mastery +80 |
Best 4-Star Artifact for Alhaitham
| Artifact | Artifact Bonuses |
|---|---|
 Instructor Instructor
|
2-PC: Increases Elemental Mastery by 80. 4-PC: Upon triggering an Elemental Reaction, increases all party members' Elemental Mastery by 120 for 8s. |
Alhaitham Best Weapons
Alhaitham Weapon Rankings
| Weapon | Weapon Information | |
|---|---|---|
| 1st |
 Light of Foliar Incision Light of Foliar Incision
|
Base ATK: 542 Bonus Stat: CRIT DMG 88.2% Skill Effect: CRIT Rate is increased by 4%. After Normal Attacks deal Elemental DMG, the Foliar Incision effect will be obtained, increasing DMG dealt by Normal Attacks and Elemental Skills by 120% of Elemental Mastery. This effect will disappear after 28 DMG instances or 12s. You can obtain Foliar Incision once every 12s. |
| 2nd |
 Uraku Misugiri Uraku Misugiri
|
Base ATK: 542 Bonus Stat: CRIT DMG 88.2% Skill Effect: Normal Attack DMG is increased by 16% and Elemental Skill DMG is increased by 24%. After a nearby active character deals Geo DMG, the aforementioned effects increase by 100% for 15s. Additionally, the wielder's DEF is increased by 20%. |
| 3rd |
 Wolf-Fang Wolf-Fang
|
Base ATK: 510 Bonus Stat: CRIT Rate 27.6% Skill Effect: DMG dealt by Elemental Skill and Elemental Burst is increased by 16%. When an Elemental Skill hits an opponent, its CRIT Rate will be increased by 2%. When an Elemental Burst hits an opponent, its CRIT Rate will be increased by 2%. Both of these effects last 10s separately, have 4 max stacks, and can be triggered once every 0.1s. |
Best Free-to-Play Weapon for Alhaitham
| Weapon | Weapon Information |
|---|---|
 Iron Sting Iron Sting
|
Base ATK: 510 Bonus Stat: Elemental Mastery 165 Skill Effect: Dealing Elemental DMG increases all DMG by 6% for 6s. Max 2 stacks. Can occur once every 1s. |
Substitute Iron Sting with Toukabou Shigure
You can replace Iron Sting with Toukabou Shigure for Alhaitham, but only if you are up against bosses. Iron Sting would still be better in AoE situations, and also as a generalist option in the overworld.
All Good Weapons for Alhaitham
| Recommended Weapons | How to Get |
|---|---|
| Gacha | |
| Gacha | |
| Gacha | |
| Gacha | |
| Gacha | |
| Battle Pass | |
| Event | |
| Crafted | |
| Gacha | |
| Battle Pass | |
| Starglitter Exchange | |
| Gacha | |
Alhaitham Best Teams
Alhaitham Quickbloom Teams
| Main DPS | Sub-DPS | Sub-DPS | Sub-DPS / Support |
|---|---|---|---|
|
|
|
|
|
|
|
|
|
|
|
|
|
|
|
|
|
|
|
|
This Alhaitham team comp focuses on applying as much Dendro as possible to cause or trigger a combination of Hyperbloom and Quicken. The Dendro in this team can be substituted with another Electro if you have enough Energy Recharge for Alhaitham.
If you do not have Nahida, Raiden, or Yelan, a more free to play option with Yaoyao, Xingqiu, and Shinobu are also good.
Alhaitham Furina Teams
| Main DPS | Sub-DPS | Sub-DPS | Support |
|---|---|---|---|
|
|
|
|
|
|
|
|
|
|
Furina is one of Alhaitham's best supports when it comes to increasing his damage, and perfectly slots into a traditional Alhaitham quickbloom team albeit losing out on some Hydro Application.
The tradeoff is worth it however, as the buffs that Furina offers in exchange for a lack of comfort can significantly increase the overall damage output of the team.
Alhaitham Spread Teams
| Main DPS | Sub-DPS | Sub-DPS | Support |
|---|---|---|---|
|
|
|
|
|
|
|
|
|
|
A party consisting of Dendro and Electro characters enables Alhaitham to focus on maximizing his own personal damage with Spread. Other supprortive characters like Zhongli, or buffers for Electro like Kazuha are okay alternatives.
Alhaitham Burgeon Teams
| Main DPS | Sub-DPS | Sub-DPS | Support |
|---|---|---|---|
|
|
|
|
|
This team comp for Alhaitham centers around him enabling the formation of cores for Thoma to trigger Bugeon. For the reaction to not cause Burning, two Hydro Characters (or an Anemo to swirl Hydro) are recommended to facilitate the reaction.
Alhaitham Free-to-Play Teams
| Main DPS | Sub-DPS | Sub-DPS | Support |
|---|---|---|---|
|
|
|
|
|
If you don't have premium characters, this free-to-play party that centers on Hyperbloom or Quicken can perform well for Alhaitham. Lisa, however, will need a lot of Energy Recharge to make her accessible.
Alhaitham Constellations
| Vultur Volans |
|---|
 |
Constellation and Effects
| Alhaitham's Constellations | |
|---|---|
| C1 |
Intuition When a Projection Attack hits an opponent, Universality: An Elaboration on Form's CD is decreased by 1.2s. This effect can be triggered once every 1s. |
| C2 |
Debate When Alhaitham generates a Chisel-Light Mirror, his Elemental Mastery will be increased by 50 for 8 seconds, max 4 stacks. Each stack's duration is counted independently. This effect can be triggered even when the maximum number of Chisel-Light Mirrors has been reached." |
| C3 |
Negation Increase the Level of Universality: An Elaboration on Form by 3. Maximum upgrade level is 15. |
| C4 |
Elucidation When Particular Field: Fetters of Phenomena is unleashed, the following effects will become active based on the number of Chisel-Light Mirrors consumed and created this time around: • Each Mirror consumed will increase the Elemental Mastery of all other nearby party members by 30 for 15s. • Each Mirror generated will grant Alhaitham a 10% Dendro DMG Bonus for 15s. The-pre-existing duration of the aforementioned effects will be cleared if you use Particular Field: Fetters of Phenomena while they are in effect. |
| C5 |
Sagacity Increase the Level of Particular Field: Fetters of Phenomena by 3. Maximum upgrade level is 15. |
| C6 |
Structuration Alhaitham gains the following effects: • 2 seconds after Particular Field: Fetters of Phenomena is unleashed, he will generate 3 Chisel-Light Mirrors regardless of the number of mirrors consumed. • If Alhaitham generates Chisel-Light Mirrors when their numbers have already maxed out, his CRIT Rate and CRIT DMG will increase by 10% and 70% respectively for 6s. If this effect is triggered again during its initial duration, the duration remaining will be increased by 6s. |
Best Constellations Rating and Explanation
| Rating | Constellation Effect / Merits | |
|---|---|---|
| C1 | ★★★ |
• Decreases Alhaitham's Elemental Skill cooldown. • Greatly improves his DPS rotation. |
| C2 | ★★☆ |
• Increases Elemental Mastery which translates to more damage. |
C0 is Good Enough for Alhaitham
Alhaitham's constellations simply increase his damage and comfortability, but they are not necessary if you can follow his rotations well.
Alhaitham Ascension and Talent Materials
Alhaitham Ascension Materials
| Lv.20→Lv.40 |
|
|---|---|
| Lv.40→Lv.50 |
|
| Lv.50→Lv.60 |
|
| Lv.60→Lv.70 |
|
| Lv.70→Lv.80 |
|
| Lv.80→Lv.90 |
|
Alhaitham Talent Level-Up Materials
| Daily Domain Drops | Enemy Drops | Weekly Boss Drops |
|---|---|---|
| Tue/Fri/Sun |
Eremites |
Scaramouche Boss Challenge Reward |
|
|
|
|
|
|
|
Alhaitham Talents and How to Use
Explaining the Chisel-Light Mirror
The Chisel-Light Mirror is Alhaitham's bread and butter mechanic for dealing damage. If he has at least 1 mirror, whenever he deals damage with his Normal, Charged, or Plunging Attacks, he will also do Projection Attacks with increasing intensity the more stacks he has.
He can gain stacks of Chisel-Light Mirrors from his Elemental Skill, Ascension Passive, and Elemental Burst.
Gains Dendro Infusion
In addition, having at least 1 Chisel-Light Mirror will infuse his attacks with Dendro, which cannot be overriden.
Alhaitham's Rotations
It's recommended to keep up his Chisel-Light Mirrors around 2-3 stacks. This means you will need to juggle around using his Elemental Burst, Elemental Skill, and Ascension Passive every 4 seconds.
Simple or No Burst Rotation
| Sample Simple Rotation |
|---|
| Elemental Skill → Charged/Plunge Attack → Projection Attacks for 8 to 12 seconds |
If you are looking for a simple rotation in the overworld, or if you have no burst, then using his Elemental Skill into Charged/Plunge Attack is his simplest rotation. Only switch when your mirrors decay to 1 stack.
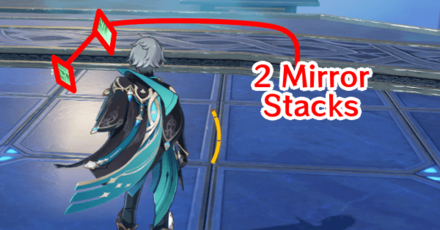
We recommended to fast hold your Elemental Skill then to do a Plunging Attack to get 3-Mirror stacks immediately.
Six 3 Mirror Projection Attacks Rotation
| Sample Long Rotation |
|---|
| Elemental Burst → Wait for Infusion → Two 3-Mirror Projection Attacks → Elemental Skill → Two 3-Mirror Projection Attacks → Charged Attack → Two 3-Mirror Projection Attacks |
The video above showcases how you can deal the 3-stack Projection Attack six times with this long rotation. Due to the tightness of the rotation, you will need practice to achieve at least four to six of said Projection Attacks!
Note that there is a 2 second delay of gaining mirrors after using your Elemental Burst. You can utilize that time for the next variant of rotation:
Low Ping Variant of Long Rotation
| Sample Low Ping Rotation |
|---|
| Elemental Burst → Switch Character to Elemental Skill → Switch back to Alhaitham -> Two 3-Mirror Projection Attacks → Elemental Skill → Two 3-Mirror Projection Attacks → Charged Attack → Two 3-Mirror Projection Attacks |
This is a variant of the long rotation above that lets you swap to one of your supports after using his Elemental Burst, then immediately swapping back to Alhaitham to get 3 Mirror stacks. This is to compensate the 2 second delay of gaining mirrors from his Burst.
Note that this rotation requires lower ping to do so.
Short Burst Rotation
| Sample Short Rotation |
|---|
| Elemental Skill → Charged/Plunge Attack → Two 3-Mirror Projection Attacks → Elemental Burst |
To get the most damage out of your Elemental Burst, only use it after getting 3 Mirror Stacks from your Elemental Skill and Charged/Plunge Attacks. Due to the energy cost and mirror removal, we recommend using this only when you're about to defeat a boss.
Normal Attack
| Normal Attack: Abductive Reasoning |
|---|
| Perform up to 5 rapid strikes.
Charge Attack Consumes a certain amount of Stamina to unleash 2 rapid sword strikes Plunge Attack: Plunges from mid-air to strike the ground below, damaging opponents along the path and dealing AoE DMG upon impact. |
| Attribute | Effect (Lvl 1) |
|---|---|
| 1-Hit DMG | 49.5% |
| 2-Hit DMG | 50.7% |
| 3-Hit DMG | 34.2%+34.2% |
| 4-Hit DMG | 66.80% |
| 5-Hit DMG | 83.9% |
| Charged Attack DMG | 55.3%+55.3% |
| Charged Attack Stamina Cost | 20 |
| Plunge DMG | 63.9% |
| Low/High Plunge DMG | 128%/160% |
Finds its Potential When Using Elemental Skill
Alhaitham flourishes a beautiful set of attacks that deal standard Physical DMG from Normal Attacks.
The true value of his Normal Attacks come when he receives Dendro Infusion from his Chisel-Light Mirrors, allowing him to perform Projection Attacks with his Normal Attacks on opponents, dealing Dendro DMG.
Elemental Skill
| Universality: An Elaboration on Form |
|---|
| Rushes forward, dealing Dendro DMG to nearby opponents when the rush ends, causing a Chisel-Light Mirror to form. Holding this Skill will cause it to behave differently. Hold Enters Aiming Mode to adjust the direction of Alhaitham's rush attack. Chisel-Light Mirrors When this skill is unleashed, Alhaitham will generate 1 Chisel-Light Mirror. If there are no Mirrors at this time, he will generate 1 additional Mirror. Chisel-Light Mirrors will have the following properties: • When attacks of the aforementioned kind hit opponents, the Chisel-Light Mirrors will unleash a Projection Attack that deals AoE Dendro DMG based on the number of Mirrors on the field. • A total of 3 Chisel-Light Mirrors can exist at once. The Chisel-Light Mirrors will disappear one after the other over time, and will all disappear when Alhaitham leaves the field. |
| Attribute | Effect (Lvl 1) |
|---|---|
| Rush Attack DMG | 193.6% ATK+154.9% Elemental Mastery |
| Projection Attack Interval | 1.6s |
| 1-Mirror Projection Attack DMG | 67.2% ATK+134.4% Elemental Mastery |
| 2-Mirror Projection Attack DMG | (67.2% ATK+134.4% Elemental Mastery) x2 |
| 3-Mirror Projection Attack DMG | (67.2% ATK+134.4% Elemental Mastery) x3 |
| Chisel-Light Mirror Removal Interval | 4s |
| CD | 18s |
Chisel Light Mirror Generator
His Elemental Skill can either be pressed or held. If pressed, Alhaitham will immediately teleport and damage enemies around him. If held, he can instead aim it.
When Alhaitham uses his Elemental Skill, he also gains 1 Chisel Light Mirror. If he doesn't have any stacks prior to activation, he'll also gain 1 additional mirror. The maximum mirrors he can have is 3.
Elemental Burst
| Particular Field: Fetters of Phenomena |
|---|
| Creates a Particular Binding Field and deals multiple instances of AoE Dendro DMG. If Chisel-Light Mirrors exist when this ability is unleashed, all such Mirrors will be consumed and increase the number of DMG instances dealt. 2s after this ability is unleashed, if 0/1/2/3 Mirrors were consumed, Alhaitham will generate 3/2/1/0 new Mirrors in turn. |
| Attribute | Effect (Lvl 1) |
|---|---|
| Single-Instance DMG | 121.6% ATK+97.3% Elemental Mastery |
| Basic Attack Instances | 4.0% |
| 1-Mirror Attack Instance | 6.00% |
| 2-Mirror Attack Instance | 8 |
| 3-Mirror Attack Instance | 10 |
| CD | 18s |
| Energy Cost | 70 |
Damage Scales off Mirror Amount
His Elemental Burst deals instances of damage and will vary in power depending on the number of Chisel-Light Mirrors he currently has. The more mirrors you have, the more times his burst will damage enemies.
Replenishes Chisel-Light Mirrors
His Elemental Burst creates more Chisel-Light Mirrors the fewer the stacks you had prior to activation. If you had no mirrors, you will gain 3 mirrors. If you had all three, you won't get any mirrors.
This means that if you want to prolong his Chisel-Light Mirrors and Dendro Infusion, you will need to burst with no mirror stacks.
Passive Talent 1
| Four-Causal Correction |
|---|
| When Alhaitham's Charged or Plunging Attacks hit opponents, they will generate 1 Chisel-Light Mirror. This effect can be triggered once every 12s. |
Prolongs his Combos
This allows Alhaitham to extend his combo during his rotations by weaving a plunge or charge attack in to keep up a 3-mirror uptime.
Passive Talent 2
| Mysteries Laid Bare |
|---|
| Each point of Alhaitham's Elemental Mastery will increase the DMG dealt by Projection Attacks and Particular Field: Fetters of Phenomena by 0.1%. The DMG of both aforementioned abilities can be increased by a maximum of 100% this way. |
Leans towards Elemental Mastery
This passive alone is the reason why Alhaitham is built towards Elemental Mastery as opposed to traditional ATK-scaling characters.
As Alhaitham's Projection Attacks make up the bulk of his damage, this passive ensures that Elemental Mastery becomes a top priority for him.
Passive Talent 3
| Law of Reductive Overdetermination |
|---|
| When Alhaitham crafts Weapon Ascension Materials, he has a 10% chance to receive double the product. |
Luck of the Draw
Alhaitham has the chance to double the amount of weapon materials you get per craft when selected as the crafting character, possibly saving up on resources!
How to Get Alhaitham
Pull on the 6.0 Luna I Chronicled Wish Banner
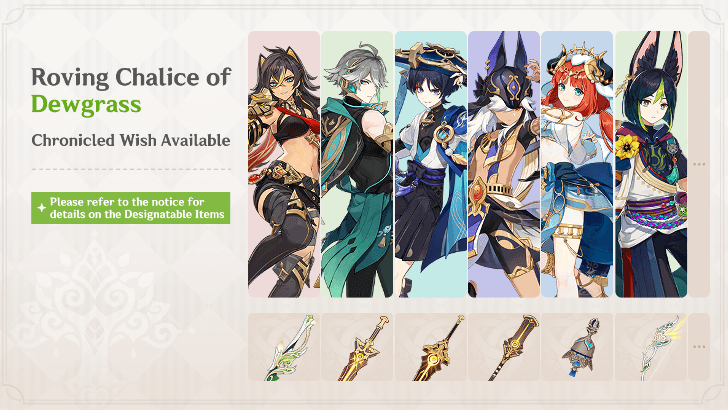
Alhaitham is available in the Chronicled Wish Banner in Phase 1 of Version 6.0 Luna I from September 10, 2025 to September 30, 2025. Alongside him are other 5-Star Sumeru characters and their signature weapons!
There is currently no other way to get Alhaitham from Wish Banners.
Chronicled Wish 6.0 Banner Guide
Related Wish Banner Guides
| Click to view a Banner Guide! | ||
|---|---|---|
 Banner Info Banner Info |
 Wish Sim Wish Sim |
 All Wishes All Wishes |
Alhaitham's In-Game Information
Alhaitham Character Profile
| Nation | |
|---|---|
| Title | Admonishing Instruction |
| Vision | |
| Gender | Male |
| Race | Human |
| Height | Tall Boy |
| Faction | Sumeru Akademiya |
| Constellation | Vultur Volans |
| Birthday | February 11 |
| Special Dish | Ideal Circumstance |
| Story Quest |
Chapter: Vultur Volans Act 1: Illusions of the Mob |
Alhaitham Voicelines
Thoughts About Alhaitham
| Character | In-Game Thoughts |
|---|---|
 Candace Candace
|
A truly unusual scholar, unlike any other I've ever met. He sees and thinks about things in his own unique way... I only hope he never wields his sharp mind against the peace of Aaru Village. |
 Cyno Cyno
|
I don't really like people who are too smart. They think they can control everything, and constantly venture to the fringes of danger. But Alhaitham is one of the more reliable ones. In most cases, he is actually in control of things and has the ability to avert potential disaster. |
 Dehya Dehya
|
He offered me a position in the Akademiya once. I declined — working in a place like that would bore me to death. He, on the other hand, is exactly the kind of person I can imagine working there... always talking in long, convoluted sentences, and in that snooty tone... Tsk. |
 Dori Dori
|
He once came nosing around, asking my minions some questions to see what he could find out. Like I said, those Akademiya people are just pig-headed and dishonest. Why should I take the risk of others prying into my business? Right, my young apprentice? |
 Kaveh Kaveh
|
Temperament: I guarantee you'll never meet anyone else who's as infuriating as him! And for the record, yes, I would say that to his face. Sure, he's smart, and sure, geniuses often come with a bad temper, but that's only half the story with him... He knows perfectly well how to appear friendly and likable to others, he just doesn't want to. If he ever gives you the impression that he doens't really have a temper, or that he's rigidly logical like a machine, then you just don't know him well enough yet. He definitely has a personality, it's just... too big a personality. Most people wouldn't get it. It's Complicated: Alhaitham helped me out a fair amount recently. If we were still as close as we were during our student days, then I'd be thanking him every chance I got. Now, though... I can't seem get a word of appreciation out of my mouth. Even if I could, I wouldn't want to give him the satisfaction. I guess you could say our relationship is something of a mixed bag these days? Honestly, with everything that's happened, it almost feels like the universe has been playing pranks on us... It's hard to make sense of it all... too much to process for one lifetime. I will say that it's not every day that you get to know someone like him — I just wish he could rein in some of the worst excesses of his personality. Okay, yeah, that's never gonna happen. |
 Layla Layla
|
I bet someone who's good enough to get a job like Scribe never has to worry about whether their projects will get approved or be successful. Wait... Oh shoot, if he's a Scribe, he probably doesn't have to do any projects in the first place. So lucky... |
 Nahida Nahida
|
He holds a body of knowledge more advanced than most could imagine, and his mind is constantly thinking, so maybe nothing in this world could ever fool him. But is the wise man truly wise to view the mediocre majority as defective? Because without them, there is no us. |
 Sethos Sethos
|
About Alhaitham and Kaveh I saw those two at the tavern once. And another time at the cafe...Actually, I think I saw them once at the Grand Bazaar, too. The architect guy, he's atways talking in a hushed tone — I guess he doesn't want people to hear, but uh... Okay, it's not like I purposely listen in, it's just... Something about those two guys hanging out together, you just can't look away. |
 Tighnari Tighnari
|
Be careful of Alhaitham. I'm not saying he's a bad guy, but he purely operates by rationality, so people often find his actions unacceptable. If you don't believe me, just ask his housemate - thanks to Alhaitham, he has more pent-up frustration than an angry Anemo Slime. |
Alhaitham's Thoughts About Others
| Character | In-Game Thoughts |
|---|---|
|
Dehya
|
About Dehya It's a waste for such a capable person to remain among the Eremites. If only she'd consider my suggestion to join the Akademiya... Our work would become a lot easier with someone like her around, but a predictable life isn't exactly her cup of tea - I can understand that. sigh What a pity. |
|
Dori
|
About Dori She's sharp and always keeps an eye out for herself. She knows how to take life by the reins and make her dreams a reality. I'm not condoning her actions, but just because we stand on different sides doesn't mean that I can't appreciate her attitude towards life. |
|
Kaveh
|
About Kaveh Overly Sensitive: Kaveh tends to be overly sensitive about everyone and everything he crosses paths with, and he's constantly making a fuss about nothing. Maybe it's because he's too emotionally fragile... Getting Duped: Someone set up a stand on the street saying that for each handmade keychain they sold, a child in poverty would be given a meal. Kaveh bought at least a dozen. ... This is Sumeru, where even healthcare is free. I needn't say more. |
|
Nahida
|
About Lesser Lord Kusanali One should neither dismiss nor overly revere the divine. Gods require followers, and they are also part of a biological hierarchy. That's why I don't take any pride in the fact that if helped rescue a god. I hope Lesser Lord Kusanali doesn't take offense. |
 Nilou Nilou
|
About Nilou The strengths and weaknesses of a performing artist are quite clear. Nilou Knows how to play to her strengths, which enables her to live a happy and simple life. |
|
Tighnari
|
About Tighnari Apparently, a lot of people think he has a bad temperament, but I don't think they're giving him a fair chance. When Kaveh built a house right over a Withering Zone and created a huge mess, it ended up being a real headache for the Forest Rangers. Even so, this Forest Ranger didn't hold it against Kaveh. He even invited Kaveh to his house for a meal. Hmm, maybe it's good people like him who allow people like Kaveh to survive. |
Alhaitham Release Date
| Genshin Impact Version 3.4 Phase 1 | |
|---|---|
 |
|
| Release Date | January 18, 2023 |
Alhaitham was released on January 18, 2023 in the first phase of Version 3.4.
Version 3.4 Release Date & Banners
Genshin Impact Related Guides

All Characters and Voice Actors
List of All Characters
| Characters by Element | |||
|---|---|---|---|
Playable Characters
 Chasca
 Faruzan
 Heizou
 Ifa
Ifa Jahoda
 Jean
Jean Kazuha
 Lan Yan
 Lynette
 Mizuki
 Sayu
Sayu Sucrose
 Traveler (Anemo)
 Varka
Varka Venti
Venti Wanderer
 Xianyun
 Xiao
Xiao Aloy
Aloy Ayaka
Ayaka Charlotte
 Chongyun
 Citlali
 Diona
Diona Escoffier
 Eula
Eula Freminet
 Ganyu
Ganyu Kaeya
Kaeya Mika
Mika Qiqi
Qiqi Rosaria
 Shenhe
 Skirk
Skirk Wriothesley
 Alhaitham
 Baizhu
 Collei
 Emilie
 Kinich
 Kirara
 Lauma
Lauma Nefer
Nefer Traveler (Dendro)
 Yaoyao
 Beidou
 Clorinde
 Fischl
 Flins
Flins Iansan
 Ineffa
 Keqing
 Lisa
Lisa Ororon
 Raiden
 Razor
Razor Sara
Sara Shinobu
 Traveler (Electro)
 Varesa
 Yae Miko
 Albedo
 Chiori
 Gorou
Gorou Illuga
 Itto
Itto Kachina
 Navia
Navia Ningguang
 Noelle
 Traveler (Geo)
 Xilonen
 Yun Jin
 Zhongli
 Zibai
Zibai Aino
Aino Ayato
Ayato Barbara
 Columbina
 Dahlia
 Furina
 Kokomi
 Mona
Mona Mualani
 Neuvillette
 Sigewinne
 Tartaglia
 Traveler (Hydro)
 Xingqiu
 Yelan
Yelan Amber
Amber Arlecchino
 Bennett
 Chevreuse
 Diluc
Diluc Durin
Durin Gaming
 Hu Tao
 Klee
Klee Lyney
Lyney Mavuika
 Thoma
Thoma Traveler (Pyro)
 Xiangling
 Xinyan
 Yanfei
 Yoimiya
Upcoming Characters
| All Upcoming Characters |
 Alice Alice
|
 Capitano Capitano
|
 Dainsleif Dainsleif
|
 Dottore Dottore
|
|---|---|---|---|
 Linnea Linnea
|
 Lohen Lohen
|
 Nicole Nicole
|
 Pantalone Pantalone
|
 Pierro Pierro
|
 Pulcinella Pulcinella
|
 Rerir Rerir
|
 Sandrone Sandrone
|
 Tsaritsa Tsaritsa
|
|||
Character Lists
| Characters by Rarity | |
|---|---|
| 5-Star Characters | 4-Star Characters |
| Free Characters | |
| Characters by Weapon Used | |
| Sword Users | Claymore Users |
| Polearm Users | Bow Users |
| Catalyst Users | |
| Characters by Role | |
| Main DPS Characters | Sub DPS Characters |
| Support Characters | Healers |
| Shield Characters | Buff Providers |
| Best for Exploration | Local Specialty Passives |
| Double Reward Passives | |
| Characters by Gender | |
| Male Characters | Female Characters |
| Short Male Characters | Short Female Characters |
| Medium Male Characters | Medium Female Characters |
| Tall Male Characters | Tall Female Characters |
| Characters by Height | |
| Short Characters | Medium Characters |
| Tall Characters | |
| Characters by Region | |
| Mondstadt Characters | Liyue Characters |
| Inazuma Characters | Sumeru Characters |
| Fontaine Characters | Natlan Characters |
| Nod-Krai Characters | |
Comment
Alhaitham and navia should be on lower S tier instead of higher A ier ngl
Author

Alhaitham Rating and Best Builds


Rankings
Gaming News


![The Liar Princess and the Blind Prince Review [PC] | Lovely to Look at but Tedious to Play](https://img.game8.co/4442586/8d95f5faf05780f1765ce7e0938bd825.jpeg/thumb)
![Marathon Cryo Archive Map Teased as [REDACTED] on Selection Screen](https://img.game8.co/4442236/6357203e58172f6de57f1991e7c39b22.png/thumb)

Popular Games

Genshin Impact Walkthrough & Guides Wiki
Umamusume: Pretty Derby Walkthrough & Guides Wiki
Pokemon Pokopia Walkthrough & Guides Wiki
Honkai: Star Rail Walkthrough & Guides Wiki
Monster Hunter Stories 3: Twisted Reflection Walkthrough & Guides Wiki
Arknights: Endfield Walkthrough & Guides Wiki
Wuthering Waves Walkthrough & Guides Wiki
Zenless Zone Zero Walkthrough & Guides Wiki
Pokemon TCG Pocket (PTCGP) Strategies & Guides Wiki
Monster Hunter Wilds Walkthrough & Guides Wiki


Recommended Games
Diablo 4: Vessel of Hatred Walkthrough & Guides Wiki
Cyberpunk 2077: Ultimate Edition Walkthrough & Guides Wiki
Fire Emblem Heroes (FEH) Walkthrough & Guides Wiki
Yu-Gi-Oh! Master Duel Walkthrough & Guides Wiki
Super Smash Bros. Ultimate Walkthrough & Guides Wiki
Pokemon Brilliant Diamond and Shining Pearl (BDSP) Walkthrough & Guides Wiki
Elden Ring Shadow of the Erdtree Walkthrough & Guides Wiki
Monster Hunter World Walkthrough & Guides Wiki
The Legend of Zelda: Tears of the Kingdom Walkthrough & Guides Wiki
Persona 3 Reload Walkthrough & Guides Wiki


All rights reserved
Copyright© 2012-2024 HoYoverse — COGNOSPHERE. All Rights Reserved.
The copyrights of videos of games used in our content and other intellectual property rights belong to the provider of the game.
The contents we provide on this site were created personally by members of the Game8 editorial department.
We refuse the right to reuse or repost content taken without our permission such as data or images to other sites.
Alhaitham + Nahida + Fischl is lethal