Genshin Impact

The Flying Outlander Achievement Guide

Add to Watchlist

Genshin Impact - The Flying Outlander Achievement Guide

The Flying Outlander Achievement can be unlocked by giving the Restored Score to Tailleferre in Genshin Impact 4.6. Learn how to obtain the Restored Score and other requirements to complete this achievement in this guide!

How to Get the Flying Outlander Achievement

Complete the Pre-Requisite Quests

The first thing that you need to do to get The Flying Outlander achievement is to make Tailleferre appear in Petrichor. This can be done by completing Echoes of the Ancient World and Canticles of Harmony.

Echoes of the Ancient World is a Melusine quest that can be started in Merusea Village while Canticles of Harmony is a new quest in Petrichor added in Version 4.6.

Pre-Requisite Quests for The Flying Outlander
Genshin - Echoes of the Ancient World QuestEchoes of the Ancient Genshin - Canitcles of Harmony World QuestCanticles of Harmony

Give the Restored Score to Tailleferre

Next, you must obtain the Restored Score by finding the Pages From a Lost Score and using them to fix the Damaged Score in the Faded Castle.

Once you have the Restored Score quest item, give it to Tailleferre to unlock The Flying Outlander achievement and obtain extra rewards!

How to Use the Restored Score

How to Get the Restored Score

Find the Pages From a Lost Scores

The two Pages From a Lost Score is found behind Mysterious Bookshelves, which require Lost Grimoires to open. You can start looking for the pages once you have at least two Lost Grimoires.

Pages From a Lost Score I Location

How to Get the Pages From a Lost Score I
1
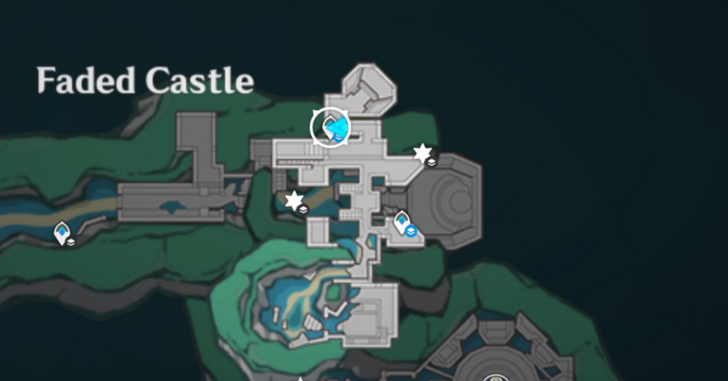
Fast travel to the Faded Castle's northern waypoint.
2
Head south until you reach a tunnel then continue following the path until you end up inside a study.
3
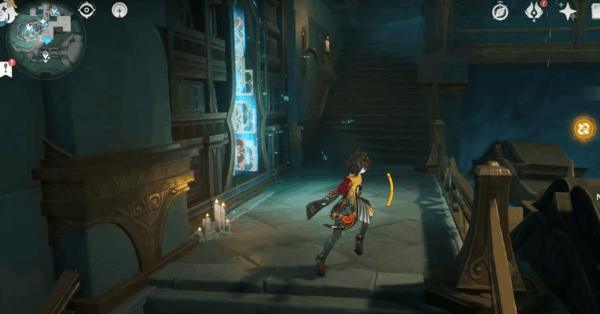
Go up the stairs to find one of the Mysterious Bookshelves on the south wall. Open it with one of the Lost Grimoires.
4
Grab the contents from the Exquisite Chest, including the Pages From a Lost Score I.

Pages From a Lost Score II Location

How to Get the Pages From a Lost Score II
1
From the previous Mysterious Bookshelf, go up another set of stairs to find a blue crystal. Hitting it will reveal floating platforms at the center of the room.
2
Use the platforms to reach another crystal at the top. More platforms and a portal will appear on your left after hitting it.
3
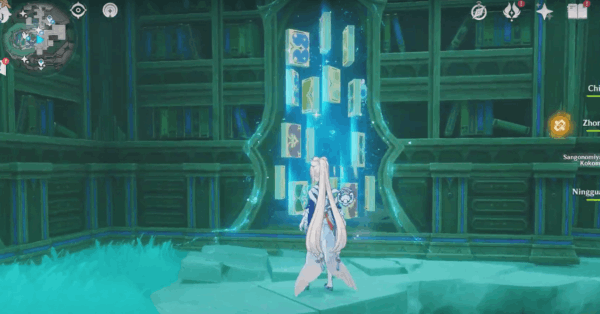
The portal will take you to another Mysterious Bookshelf that you can unlock with a Lost Grimoire.
4
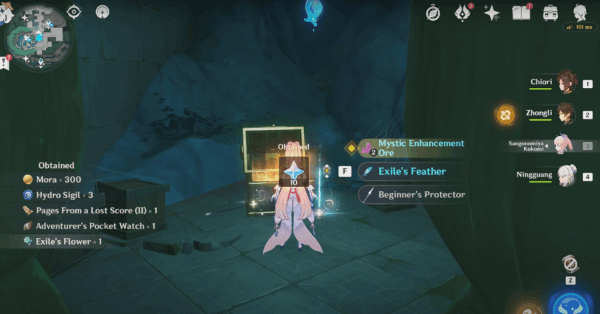
Open the Precious Chest inside the room to obtain the Pages From a Lost Score II.

Fix the Damaged Score

Genshin - Fixing the Damaged Score

Now that you have the necessary pages, jump down to the study and interact with the scroll on the table to find the Damaged Score.

Select the Combine option and use the items that you just found to obtain the Restored Score quest item! Bring this to Teailleferre back in town to receive your rewards, including The Flying Outlander achievement!

Rewards From Tailleferre

The Flying Outlander Achievement

Genshin - The Flying Outlander Achievement

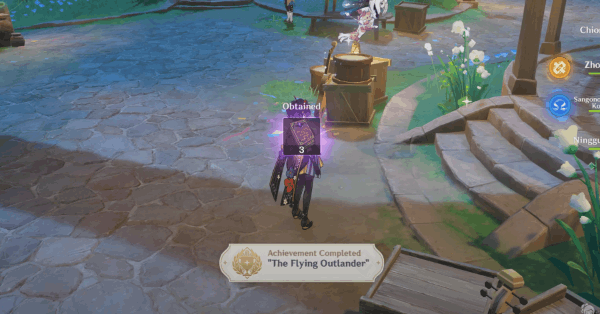
You will receive The Flying Outlander Achievement after delivering the Restored Score to Tailleferre. Open the Achievements menu to claim 5 Primogems as a reward!

Achievement List and Rewards

EXP Materials and Mora

EXP Materials and Mora will also be given for completing this mini side quest.

Additional Rewards From Tailleferre
Genshin - Hero Hero's Wit x3 Genshin - Mora Image Mora x30000

Genshin Impact Related Guides

All Tips and Tricks Guides

Genshin Impact - Tips and Tricks

All Tips & Tricks Guides

All Version 4.6 Tips & Tricks

Other Tips & Tricks
Scylla Details and How to Summon Currents Fontaine Viewpoints and Location What is the Might of the Ancient Symphony?
Washer Octopus Puzzle Guide Lost Grimoire Locations and Bookshelf Puzzle Guide The Flying Outlander Achievement Guide
How to Pet Osse Wonderchime Flowers and Allochromatic Anemones Puzzle Guide All Ancient Autoharmonic Music Box Score Locations
Lacrimosa Score Location and How to Use Confutatis Score Location and How to Use Dies Irae Location and How to Use
Rex Tremendae Location and How to Use Tuba Mirum Location and How to Use Locus Amoenus Score Location and How to Use
Auric Anglerfish Locations and Puzzle Guide

Other Regional Tips & Tricks

Other Tips & Tricks
How to Clear The Twisted Dark Mud That Which Was Once Ehecatl Guide How to Destroy Oozing Core
How to Break Pulverite Ancient Sacred Mountain Dragon Puzzles Guide Sunset-Blue Obsidian Ring Location and How to Use
Magnifico's Photoshoot Locations Woven Scroll Portals Puzzle Guide Mamull Challenge Puzzle Guide
Ancient Inscribed Rings Puzzle Guide Pale Mist Puzzle Guide Furnace of Fiery Embers Puzzle Guide
The Finishing Touch Achievement How to Get Crimson Obsidian Ring Location and How to Use Purple Obsidian Ring Location and How to Use
Phlogiston Wind Tunnel Guide Nightspirit Graffiti Puzzle Guide Nightspirit Sigils Puzzle Guide
Peculiar Monetoo Puzzle Guide Painted Stones Puzzle Guide Huitztli Hill Puzzle Guide and Luxurious Chests
Warrior Challenge Locations How to Unlock Natlan Reputation How to Use Coilgrass Sigils
How to Use Flamegranates How to Use Relay Balls How to Use Grappling Hooks
How to Use Spiritways How to Unlock Firethief's Secret Isle Luxurious Chest Strange Saurian Cart Key Location and How to Use
How to Get Blazing Flint Ore All Four Iridescent Inscription Locations and How to Use Wooden Model Alpaca Locations and How to Use
Broken, Graffiti-Marked Stone Locations Phlogiston Extraction Research Center Puzzle Guide Night Jade Location and How to Use
Key to Somewhere Location and How to Use Green Obsidian Ring Location and How to Use Azure Obsidian Ring Location and How to Use
Obsidian Fragment and Ring Locations Yellow Obsidian Ring Location and How to Use Nightsoul's Blessing and Burst Mechanic Guide
Phlogiston of Natlan Guide All 8 Eremite Camp Locations in Sumeru Replicator Keystones and How to Create Ruin Devices
Invisible Wall Puzzle Guide in Sumeru Forged Primal Lights Puzzles and How to Use Sekhem Hall Puzzles and Treasure Guide
Desert Mirage Puzzles Guide in Sumeru Aaru's Shut Puzzle Guide and Sacred Seal Locations Abdju Road Puzzles and Treasures Guide
Primal Obelisk Locations and Puzzle Guide in Sumeru Floral Throne Location and Puzzle Guide Wounded Shin Valley Luxurious Chest and Other Puzzles Guide
Gurabad's Ruin - Temple of Deshret Puzzles Guide All Wadi Al-Majuj Sacred Seals in Sumeru Desert 3.4 Dual-Phase Neverlight Cells in Hadramaveth Desert
How to Upgrade the Power of Jinni in the Magic Bottle Runic Window and Runic Pane Switch Puzzle Guide How to Break Weathered Rocks in the Desert
How to Get Rid of Small and Large Atmospheric Vortexes Passage of Ghouls Luxurious Chest and Pyro Totem Puzzle Guide Safhe Shatranj Sand Puzzle and Luxurious Chest Guide
How to Get the Final Clearance in Desert of Hadramaveth How to Solve Cascade Pools and Spouts Puzzle Guide How to Use Jinn Shrines Guide
Manifestation Mechanisms and Signal Spirits Puzzle Guide Primal Sandglass Puzzle Guide in Sumeru Weathered Obelisk Puzzle Solutions and Locations
Memories of the Eternal Oasis Location and Puzzle Guide Clearance Guide to Get More Special Levels How to Disperse the Purple Mist in Asipattravana Swamp
Hadramaveth Remarkable Chest Locations and How to Get Nirodha Fruit Locations and Puzzle Guide Khvarena Mayfly Locations and Puzzle Guide
Asipattravana Swamp Luxurious Chest Puzzle Ruebright Blooms Puzzle Guide All Time Trials in Gavireh Lajavard and Realm of Farakhkert
Burgeoning Spirit Puzzle Guide How to Destroy Gray Crystals with Khvarena How to Jump Over the Corresponding Floating Mushrooms
All Elemental Totems in Gavireh Lajavard and Realm of Farakhkert All Torch Puzzle Solutions in 3.6 Girdle of the Sands All Plume of Purifying Light Locations
Possible Door to Khaenri'ah Location in Gavireh Lajavard Amrita Mayflies Puzzle Guide Sunyata Flower Locations and Puzzle Guide
Bright Flame Altar Puzzle Guide How to Use the Power of Khvarena Passage of the Ghouls Torch Puzzle Guide
Great Hall of Truths Location and Puzzle Guide How to Unlock and Use Obscuring Cells All 76 Aranara Locations in Sumeru and Puzzle Guide
Desert Illusory Murals Guide in Sumeru Vanarana Luxurious Chest Puzzle and 3 Seelies Locations Strange Energy Extraction Device Puzzles and Key Locations Guide
Broken Monuments in Sumeru Locations and Puzzle Guide Strange Parchment Locations and Puzzle Guide Unsealed Parchment Locations and Puzzle Guide
Guiding Parchment Locations and Puzzle Guide Whispering Parchment Locations and Puzzle Guide Sumeru Arrow Rune Puzzle Locations and Guide
Chizhang Wall Puzzle and How to Solve What are Allogravity-Condensed Water Bodies? How to Destroy Red Meanies
Fixed Storage and Energy Transfer Device How to Destroy the Thorny Cyst How to Stop the Strange Eels
Pneumousia Relay Guide Pneumousia Storage Box Guide Fantastical Floating Ball Guide
Sonar Resonance Points Guide High-Pressure Water Vent Guide How to Solve Fontaine Echoing Conches
Water Volume Detection Crystal Puzzle Guide Locked Underwater Dome in Fontaine Puzzle Guide How to Destroy Bullet Barnacles
Transoceanic Sourcewater Guide Knocking Vases Locations in Chenyu Vale Cube Device Puzzle Guide | Inazuma Cube Pattern Puzzle
Aranyaka Mysterious Clipboard Locations and Aranara Painting Guide How to Collect the Carp Spirit Orb How to Get the Secret Miracle Achievement
Strange Phenomenon: Miasma Puzzle Guide How to Solve Millennia of History Puzzles Scenes of Flowing Lotuses Puzzle Guide
How to Get the Adeptus's Repose Luxurious Chest How to Find the Secret Stashed in the Arcane Archive All Ancient Swordsman's Inscription Locations
Xuanji Chest and How to Open Jade Incense Cauldron Locations and Puzzle Guide Golden Carp's Leap Puzzle Guide
Sacred Simulacrum Types and Puzzles Guide Stone Pillar Seal Puzzle Locations and Guide Where to Get the Ancient Stone Key
Mysterious Clipboard 1 Location and Aranara Painting Mysterious Clipboard 13 Location and Aranara Painting Mysterious Clipboard 12 Location and Aranara Painting
Mysterious Clipboard 9 Location and Aranara Painting Mysterious Clipboard 10 Location and Aranara Painting Mysterious Clipboard 3 Location and Aranara Painting
Mysterious Clipboard 2 Location and Aranara Painting Mysterious Clipboard 4 Location and Aranara Painting Mysterious Clipboard 5 Location and Aranara Painting
Mysterious Clipboard 6 Location and Aranara Painting Mysterious Clipboard 8 Location and Aranara Painting Mysterious Clipboard 7 Location and Aranara Painting
Mysterious Clipboard 11 Location and Aranara Painting How to Solve Pipe Diverter Valve Puzzles in the Sumeru Desert 3.4 All Chess Piece Locations and How to Use
Safhe Shatranj Chess Puzzle Guide Everlight Cell and Beam Transmission Puzzles in Sumeru Lightcall Path Puzzle Guide
Cipher Letter Puzzle and Locations Not So Strait is the Gate in Bravais' Hidden Study How to Retrieve All 4 Replica Anchors
Remains of the Day Secret Achievement and Chest Guide Khemenu Temple Puzzle Guide Look For A Fravashi Tree Locations and Puzzle Guide
How to Play Kory Drums and Locations How to Search for Nurseries in the Wild and All Locations in the Forest How to Solve Floating Crystal Flowers and Platforms
Potential Energy Orbs How to Solve and Locations Humongous Hat Jellyfish How to Solve and Locations How to Solve Harmonious Reed Pipes and Locations
How to Solve Dew Bubbles and Branches How to Remove Contaminated Bacterial Mats Water Barrier Seelie Luxurious Chest
How to Use Energy Transfer Terminals How to Go to the Abandoned Production Zone Gear Drivetrain and Drive Valve Puzzle
How to Solve the Forging Press Puzzle Flying Energy Thief Guide How to Operate the Drive Valve to Open Access to Supply Warehouse 1
Stabilizer Puzzle Guide How to Avoid the Searchlight's Detection Range How to Get to Narzissenkreuz Ordo
Opera Epiclese Heart Plant Co-Op Chest Underwater Combat and Exploration Guide Mysterious Parchment Locations and Puzzle Guide
How to Get and Use the Twin-Horned Chaplet How to Get the Lumenspar Behind the Chasm Locked Gate Vourukasha Oasis Heart Pool Co-Op Chest
How To Find The Great Songs of Khvarena Guide How to Use Scarlet Quartz and Break Ancient Rime "You do not have enough clearance" Guide
How to Go Through the Passage and Reach the Balladeer | Deus Foundry Domain and Chest Guide How to Try to Open the Coffin in Mausoleum of King Deshret How to Enter Thutmose's Secret Base in Lamb-Devourer Rock
How to Collect Sumeru Rose Seeds Follow the Stone Slate's Guidance and Obtain Full Clearance Drusus's Riddle and Sumeru Bulletin Board Puzzle Guide
How to Go to the Fane of Ashvattha Location and Lower the Water Level How to Proceed to the Location Shown in the Painting in Static Views How to Look for the Head Mushroom
Where to Find Xinyue Kiosk's Location in Liyue Harbor How to Purify the Large Crystal in The Chasm How to Ring the Two Bells on Either Side of the Ruins
Nameless Treasure Locations, Rewards, and Where to Sell How to Follow the Water's Flow and Search for the Source in The Chasm How to Look for the Ring Stolen from Taliesin
How to Avoid Balethunder Damage | Balethunder Guide Electric Lamp Puzzle Guide How to Get to Heart Island | Secret Island Location and Rewards
Dandy's Time Trial Challenge | Locations and Rewards

    All rights reserved

    Guide Index