Thoma Rating and Best Builds
✉ Send your thoughts in our Genshin 6.4 Patch Survey!
★ Exclusive: Dive back in time with the Meta History
◆ Hot: Version 6.4, 6.4 Codes, Linnea, Version 6.5
◆ Builds: Varka, Flins, Skirk, Escoffier
◆ Events: Travelers' Tales, Sightseeing With Friends
◆ Endgame: Spiral Abyss (March 2026)
Thoma is a 4-Star Pyro Polearm character in Genshin Impact. He's a support that can provide shields and can easily trigger Burgeon reactions with his Elemental Burst. See his best builds, and our rating of this character in this guide!
| Thoma's Character Guides | |||
|---|---|---|---|
|
|
|
|
|
List of Contents
Thoma Rating and Info
Character Information
| Thoma | ||
|---|---|---|
 |
Rating | |
| Rarity | ||
| Element | ||
| Weapon | ||
| Voice Actors |
Christian Banas (EN)
Morita Masakazu (JP) |
|
Tier List Rankings
| Main DPS | Sub-DPS | Support | Exploration |
|---|---|---|---|
| - |
|
|
|
Character Tier List | Best Characters
Thoma's Stats
| Stat | Base Value |
|---|---|
| HP | 2225 |
| ATK | 43 |
| DEF | 162 |
| ATK% | 0% |
| Stat | Max Value |
|---|---|
| HP | 10331 |
| ATK | 202 |
| DEF | 751 |
| ATK% | 24.0% |
Base Stat Calculations
 | Stats indicated above are obtained from Thoma's base values. These numbers also exclude the character's equipped weapon, artifacts, talents, or other passive effects that are not innate to the character. |
|---|---|
 | All characters start with 5% CRIT Rate, 50% CRIT DMG, 100% Energy Recharge, 0 Elemental Mastery, 0% Healing Bonus, and 0% Elemental DMG bonus before any additional stats are applied. The table above includes such values. |
 | The Level 20 stats indicated for this character are calculated before their first ascension. |
Thoma's Ascension and Talent Material Summary
| All Ascension Materials Needed |
|---|
|
|
| All Talent Materials Needed |
|
|
Thoma's Strengths and Weaknesses
| Strengths | |||
|---|---|---|---|
|
• Provide shields with Elemental Skill and Burst. • Can apply off-field Pyro reactions with Elemental Burst. • C6 provides a boost to party's Normal, Charged, and Plunge Attacks. |
|||
| Weaknesses | |||
|
• High Energy Cost for his Elemental Burst. • Long Elemental Skill CD. • Lackluster DMG scaling outside of Burgeon. |
Best Builds for Thoma
Support and Sub-DPS Builds for Thoma
Shielder Support
| Best Weapon | |
|---|---|
| Replacement Weapons |
2.
|
| Best Artifacts | |
| Artifact Main Stats | |
| Artifact Sub Stats | Energy Recharge, HP% |
| Sample Teams | |
This Thoma Support build is all about the shields he generates to protect the entire party. Focus on getting HP, and Energy Recharge stats of more than 200%, for stronger shields and faster energy renegeration for his Elemental Burst.
You may also equip Noblesse Oblige instead should you wish for more offensive buffs.
Burgeon Sub-DPS
| Best Weapon | |
|---|---|
| Replacement Weapons |
2.
|
| Best Artifacts | |
| Artifact Main Stats | |
| Artifact Sub Stats | Elemental Mastery, Energy Recharge |
| Sample Teams | |
One of Thoma's most popular Sub-DPS role is in a Burgeon Team Comp with him as the triggerer. He will need to use as much Elemental Mastery as possible in order to max out his Burgeon damage, and Energy Recharge to refill his Elemental Burst as soon as possible especially if he's not at C4.
Paradise Lost is only slightly better then Gilded Dreams, so feel free to choose whichever artifact set has the better substats for you.
Thoma's Talent Priority
| Sub-DPS & Support | |
|---|---|
| 1st | Elemental Skill |
| 2nd | Elemental Burst |
| 3rd | Normal Attack |
Thoma's shields are his most important tools to bring out to the party. Prioritize his Elemental Skill first to strengthen your shields followed by your Elemental Burst to increase overall DMG.
Best Artifacts for Thoma
Thoma Artifact Rankings
Burgeon Artifacts
| Artifact | Artifact Bonuses | |
|---|---|---|
| 1st |
|
2-PC: Elemental Mastery +80 4-PC: The equipping character's Bloom, Hyperbloom, and Burgeon reaction DMG are increased by 40%. Additionally, after the equipping character triggers Bloom, Hyperbloom, or Burgeon, they will gain another 25% bonus to the effect mentioned prior. Each stack of this lasts 10s. Max 4 stacks simultaneously. This effect can only be triggered once per second. The character who equips this can still trigger its effects when not on the field. |
| 2nd |
|
2-PC: Elemental Mastery +80 4-PC: Within 8s of triggering an Elemental Reaction, the character equipping this will obtain buffs based on the Elemental Type of the other party members. ATK is increased by 14% for each member whose Elemental Type is the same as the equipping character, and EM is increased by 50 for every member with a different Elemental Type. Each of the buffs will count up to 3 characters. This effect can be triggered once every 8s and even when not on the field. |
| 3rd |
|
2-PC: Elemental Mastery +80 |
|
|
2-PC: Elemental Mastery +80 |
Support Artifacts
| Artifact | Artifact Bonuses | |
|---|---|---|
| 1st |
|
2-PC: Energy Recharge +20% |
|
|
2-PC: HP +20% | |
| 2nd |
|
2-PC: Elemental Burst DMG +20%. 4-PC: Using an Elemental Burst increases all party members' ATK by 20% for 12s. This effect cannot stack. |
| 3rd |
|
2-PC: HP +20% |
|
|
2-PC: HP +20% |
Best 4-Star Artifact for Thoma
| Artifact | Artifact Bonuses |
|---|---|
 Instructor
Burgeon Instructor
Burgeon |
2-PC: Increases Elemental Mastery by 80. 4-PC: Upon triggering an Elemental Reaction, increases all party members' Elemental Mastery by 120 for 8s. |
 The Exile
Support The Exile
Support |
2-PC: Energy Recharge +20% 4-PC: Using an Elemental Burst regenerates 2 Energy for all party members (excluding the wearer) every 2s for 6s. This effect cannot stack. |
List of Artifacts and Set Bonuses
Thoma Best Weapons
Thoma Weapon Rankings
Weapons for Burgeon Builds
| Weapon | Weapon Information | |
|---|---|---|
| 1st |
 Kitain Cross Spear Kitain Cross Spear
|
Base ATK: 565 Bonus Stat: Elemental Mastery 110 Skill Effect: Increases Elemental Skill DMG by 6%. After Elemental Skill hits an opponent, the character loses 3 Energy but regenerates 3 Energy every 2s for the next 6s. This effect can occur once every 10s. Can be triggered even when the character is not on the field. |
| 2nd |
 Dragon's Bane Dragon's Bane
|
Base ATK: 454 Bonus Stat: Elemental Mastery 221 Skill Effect: Increases DMG against enemies affected by Hydro or Pyro by 20%. |
| 3rd |
 Moonpiercer Moonpiercer
|
Base ATK: 565 Bonus Stat: Elemental Mastery 110 Skill Effect: After triggering Burning, Quicken, Aggravate, Spread, Bloom, Hyperbloom, or Burgeon, a Leaf of Revival will be created around the character for a maximum of 10s. When picked up, the Leaf will grant the character 16% ATK for 12s. Only 1 Leaf can be generated this way every 20s. This effect can still be triggered if the character is not on the field. |
Weapons for Support Builds
| Weapon | Weapon Information | |
|---|---|---|
| 1st |
 Favonius Lance Favonius Lance
|
Base ATK: 565 Bonus Stat: Energy Recharge 30.6% Skill Effect: CRIT Hits have a 60% chance to generate a small amount of Elemental Particles, which will regenerate 6 Energy for the character. Can only occur once every 12s. |
| 2nd |
 Rightful Reward Rightful Reward
|
Base ATK: 565 Bonus Stat: HP 27.6% Skill Effect: When the wielder is healed, restore 8 Energy. This effect can be triggered once every 10s, and can occur even when the character is not on the field. |
| 3rd |
 Black Tassel Black Tassel
|
Base ATK: 354 Bonus Stat: HP 46.9% Skill Effect: Increases DMG against slimes by 40%. |
All Recommended Weapons for Thoma
| Recommended Weapons | How to Get |
|---|---|
| Gacha | |
| Crafted | |
| Crafted | |
| Gacha | |
| Crafted | |
| Inazuma Fishing Association | |
| Gacha | |
| Gacha | |
| Battle Pass | |
| Gacha | |
Thoma Best Team Comp
Thoma Sub-DPS Team Comps
Thoma Burgeon Team Comp
| Support | Main DPS | Sub-DPS | Sub-DPS/ Support |
|
|
|
|
|---|---|---|---|
|
|
|
|
|
|
|
|
|
|
|
|
|
|
|
This Burgeon Team comp has Thoma acting as the Pyro Trigger for the reaction. You'll have to use powerful Hydro applications from characters like Xingqiu to prevent Thoma from accidentally Burning the enemy instead.
As of Version 6.0 Luna I, Burgeon self-damage has been nerfed from 5% to 2%, making Thoma's value as a Burgeon trigger increase as he further reduces the damage due to his shields. Lauma's arrival has allowed a more consistent Dendro application in the team, producing more Blooms for Thoma to trigger.
Thoma Support Team Comps
Thoma Overloaded Team Comp
| Support | Main DPS | Sub-DPS | Sub-DPS/ Support |
|---|---|---|---|
|
|
|
|
|
|
|
|
|
|
Overloaded teams with Chevreuse as its staple can have Thoma especially when slotted-in on teams where shields are better as a defensive option to characters who are already self-sufficient with their health, like Arlecchino or Clorinde.
Thoma Burning Team Comp
| Support | Main DPS | Sub-DPS | Sub-DPS/ Support |
|---|---|---|---|
|
|
|
|
|
|
|
|
|
|
As Burning has the tendency to also damage the user, especially in the Overworld, Thoma's shield in a Burning team like that of Kinich or Emilie can help mitigate its negative effects.
Thoma Pyro Shielder Support
| Support | Main DPS | Sub-DPS | Sub-DPS/ Support |
|---|---|---|---|
|
|
|
|
|
|
|
|
|
|
On any other team comp where you require a shield, Thoma can be a useful option especially if you have his C6 which enables him to buff Normal and Charged Attacks as well.
Thoma Best Constellations
| Rubeum Scutum |
|---|
 |
Constellation and Effects
| Thoma's Constellations | |
|---|---|
| C1 |
A Comrade's Duty When a character protected by Thoma's own Blazing Barrier (Thoma excluded) is attacked, Thoma's own Blazing Blessing CD is decreased by 3s, while his own Crimson Ooyoroi's CD is decreased by 3s. This effect can be triggered once every 20s. |
| C2 |
A Subordinate's Skills Crimson Ooyoroi's Duration is increased by 3s. |
| C3 |
Fortified Resolve Increases the Level of Blazing Blessing by 3. Maximum upgrade level is 15. |
| C4 |
Long-Term Planning After using Crimson Ooyoroi, 15 Energy will be restored to Thoma. |
| C5 |
Raging Wildfire Increases the Level of Crimson Ooyoroi by 3. Maximum upgrade level is 15. |
| C6 |
A Burning Heart When a Blazing Barrier is obtained or refreshed, the DMG dealt by all party members' Normal, Charged, and Plunging Attacks is increased by 15% for 6s. |
Best Constellations Rating and Explanation
| Rating | Constellation Effect / Merits | |
|---|---|---|
| C4 | ★★☆ | • 15 Energy will be restored to Thoma after using his Elemental Burst, making him more viable as a Sub-DPS. |
| C6 | ★★★ | • Thoma can increase the party's Normal, Charged, and Plunge Attacks, resulting in stronger overall DPS. |
C6 Unlocks Thoma's Full Potential
Thoma's full support capabilities are unlocked in his sixth constellation as he will be able to increase your Normal and Charged Attack DMG whenever he summons a shield.
Thoma Ascension and Talent Materials
Thoma Ascension Materials
| Lv.20→Lv.40 | |
|---|---|
| Lv.40→Lv.50 | |
| Lv.50→Lv.60 | |
| Lv.60→Lv.70 | |
| Lv.70→Lv.80 |
|
| Lv.80→Lv.90 |
|
Thoma Talent Level-Up Materials
| Daily Domain Drops | Enemy Drops | Weekly Boss Drops |
|---|---|---|
| Mon/Thu/Sun |
Treasure Hoarders |
La Signora Challenge Reward |
|
|
|
|
|
|
|
Thoma Talents and How to Use
Normal Attack
| Normal Attack: Swiftshatter Spear |
|---|
| Performs up to four consecutive spear strikes.
Charge Attack Consumes a certain amount of Stamina to lunge forward, dealing damage to opponents along the way. Plunge Attack: Plunges from mid-air to strike the ground below, damaging opponents along the path and dealing AoE DMG upon impact. |
| Attribute | Effect (Lvl 1) |
|---|---|
| 1-Hit DMG | 44.4% |
| 2-Hit DMG | 43.6% |
| 3-Hit DMG | 26.8%x2 |
| 4-Hit DMG | 67.4% |
| Charged Attack DMG | 113% |
| Charged Attack Stamina Cost | 25.0 |
| Plunge DMG | 63.9% |
| Low/High Plunge DMG | 128%/160% |
Standard Physical Strikes and a way to Trigger Scorching Ooyoroi
Thoma's Normal Attacks are often used as a way to refresh the shield made by his Elemental Burst, or to trigger a Polearm's passive, such as Favonius Lance!
Elemental Skill
| Blazing Blessing |
|---|
| Thoma vaults forward with his polearm and delivers a flame-filled flying kick that deals AoE Pyro DMG, while also summoning a Blazing Barrier. At the moment of casting, Thoma's Elemental Skill applies Pyro to himself. The DMG Absorption of the Blazing Barrier scales off of Thoma's Max HP. Blazing Barrier ・Absorbs Pyro DMG 250% more effectively. ・When a new Blazing Barrier is obtained, the remaining DMG Absorption of an existing Blazing Barrier will stack and its duration will be refreshed. The maximum DMG Absorption of the Blazing Barrier will not exceed a certain percentage of Thoma's Max HP. Flavor Text: As a guest from afar, only the most burning passion would allow one to master the pure and precise spear arts of Inazuma. Thoma's mastery, indeed, is not limited to being the ''swiftest-studying student'' or ''a master of the spear,'' but he has imbued his will to protect others and fend off foes into his art as well. |
| Attribute | Effect (Lvl 1) |
|---|---|
| Skill DMG | 146% |
| Shield DMG Absorption | 7.2 Max HP+693 |
| Shield Duration | 8.0s |
| Max Shield DMG Absorption | 19.6% Max HP+1,887 |
| CD | 15.0s |
Elemental Skill Shields Character
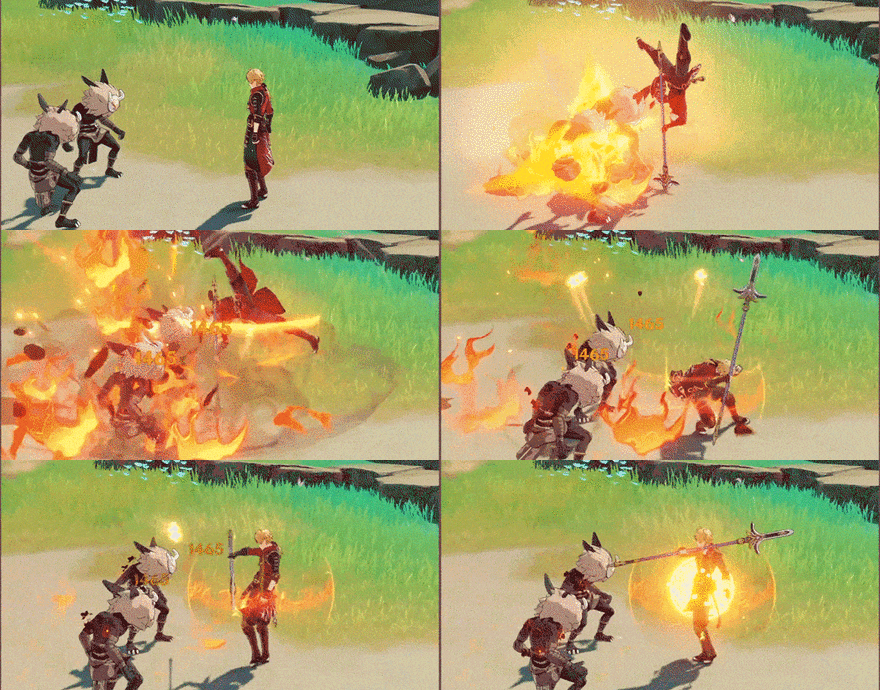 Elemental Skill: Blazing Blessing |
Thoma's Elemental Skill, Blazing Blessing, deals AoE Pyro DMG to enemies while providing a shield. Thoma's shield is unique as its DMG Absorption can stack based on the remaining Absorption of the previous barrier.
In addition, Thoma will apply Pyro to himself, cleansing certain deterimental effects on him.
Elemental Burst
| Crimson Ooyoroi |
|---|
| Thoma spins his polearm, slicing at his foes with roaring flames that deal AoE Pyro DMG and weave themselves into a Scorching Ooyoroi.
Scorching Ooyoroi While Scorching Ooyoroi is in effect, the active character's Normal Attacks will trigger Fiery Collapse, dealing AoE Pyro DMG and summoning a Blazing Barrier. Fiery Collapse can be triggered once every 1s. Except for the amount of DMG they can absorb, the Blazing Barriers created in this way are identical to those created by Thoma's Elemental Skill, Blazing Blessing. If Thoma falls, the effects of Scorching Ooyoroi will be cleared. Flavor Text: ''I will not forget my initial promise. Let this burning flame protect those I cherish, and may it never be extinguished.'' |
| Attribute | Effect (Lvl 1) |
|---|---|
| Skill DMG | 88% |
| Fiery Collapse DMG | 58% |
| Shield DMG Absorption | 1.1% Max HP+110 |
| Shield Duration | 8.0s |
| Scorching Ooyoroi Duration | 15.0s |
| CD | 20.0s |
| Energy Cost | 80 |
Elemental Burst Provides Off-Field Pyro DMG
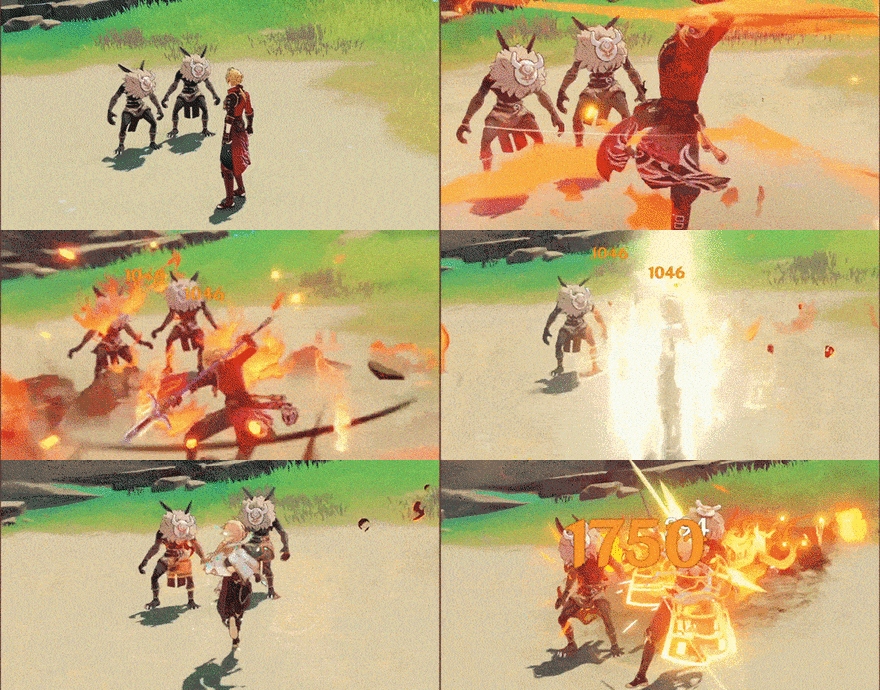 Elemental Burst: Crimson Ooyoroi |
Thoma's Elemental Burst, Crimson Ooyoroi, also deals AoE Pyro DMG to enemies while also surrounding the party with a Scorching Ooyoroi buff.
What is Scorching Ooyoroi?
Scorching Ooyoroi functions similarly as Xingqiu's Rainswords as it can deal Pyro DMG even if Thoma isn't on the field. It can also provide Blazing Barriers when using Normal Attacks once every 1s.
Refreshes Existing Barrier
A Blazing Barrier has a duration of 8 sec, and it refreshes every time your active character uses your normal attacks! The shield also stacks, which means that for every Scorching Ooyoroi proc, you refresh both duration and shield effectivity!
Passive Talent 1
| Imbricated Armor |
|---|
| When your current active character obtains or refreshes a Blazing Barrier, this character's Shield Strength will increase by 5% for 6s. This effect can be triggered once every 0.35 seconds. Max 5 stacks. |
Stronger Shields
This simply increases the Shield Strength of the character when Thoma's shield is applied onto them, making his and any other character's shields stronger.
Passive Talent 2
| Flaming Assault |
|---|
| DMG dealt by Crimson Ooyoroi's Fiery Collapse is increased by 2.2% of Thoma's Max HP. |
Increases Thoma's Elemental Burst Damage
By allowing Thoma's Elemental Burst damage to scale off of his Max HP, it incentivizes building him with HP as it improves his overall damage.
Passive Talent 3
| Snap and Swing |
|---|
| When you fish successfully in Inazuma, Thoma's help grants a 20% chance of scoring a double catch. |
Can Catch Twice the Amount of Fish
 Passive Talent: Snap and Swing |
After acquiring Thoma, he provides you a 20% chance to double the amount of fish caught in Inazuma, making it effective in collecting more fish than usual.
Thoma does not have to be in the party for his passive to take effect.
How to Get Thoma
Pull from Any Active Banner
| Version 5.6 Phase 2 Banners | |
|---|---|
 Reign of Serenity Reign of Serenity
|
 Seeker of Flame-Wrought Secrets Seeker of Flame-Wrought Secrets
|
Kujou Sara is available at a normal rate in all active banners except the Beginner's Wish.
Thoma received a rate-up during Raiden Shogun and Kinich's reruns in Version 5.6 Phase 2, from May 27, 2025 to June 17, 2025. Featured alongside him were Lynette and Kujou Sara!
Related Wish Banner Guides
| Click to view a Banner Guide! | ||
|---|---|---|
 Banner Info Banner Info |
 Wish Sim Wish Sim |
 All Wishes All Wishes |
 Banner Info Banner Info |
 Wish Sim Wish Sim |
|
Thoma's In-Game Information
Thoma Character Profile
| Nation | |
|---|---|
| Title | Protector From Afar |
| Vision | |
| Gender | Male |
| Race | Human |
| Height | Tall Boy |
| Faction | Yashiro Commission |
| Constellation | Rubeum Scutum |
| Birthday | January 9 |
| Special Dish | "Warmth" |
| Story Quest |
|
Thoma Voicelines
Thoughts About Thoma
| Character | In-Game Thoughts |
|---|---|
 Ayaka Ayaka
|
Thoma is a dear friend. He always lifts my spirits with his sunny disposition. In a sense, I think of him as another brother, and as a full member of the Kamisato Clan. |
 Ayato Ayato
|
There is no doubt in my mind about Thoma's loyalty to the Kamisato Clan. A long time ago, partly to see where he stood, I advised him that he would be better off leaving if he didn't want to get drawn into the never-ending disputes that plague public life. Still, he chose to stay, and in all the time he's been with us, he's spared me much worry. There are very few people I trust completely these days, but Thoma is one of them. |
 Itto Itto
|
Some of the boys have been telling me that he was the star of the show at the Vision Hunt Ceremony. I'm like — are you kidding me??? How come he gets his own special ceremony!? Was the hundredth Vision supposed to be, like, stronger than the other ninety-nine, or something? Pff, nah, it can't have been that, 'cause, uh, hello! They would've chosen me if that's what they were going for. |
 Raiden Raiden
|
I can’t deny that I am somewhat culpable in the events that lead to him being almost stripped of his vision, but I rather think the Shogun should be the one to extend a formal apology to him… Okay, fine. I’ll give it some thought... |
 Sara Sara
|
The Tenryou Commission’s estate is very large. It would serve us well to have a fine housekeeper like Thoma who could keep all the numerous and disparate household affairs in order. If he ever tires of working for the Kamisato Clan, I would very much like for him to come to us… though I doubt that day will ever come. |
 Sayu Sayu
|
He's got a Vision, and yet for some reason he pesters me about learning ninjutsu every time I run into him. I don't know what his deal is. It's not like I'd have the time to teach him anyway, I barely get enough sleep as it is. |
 Yoimiya Yoimiya
|
He's quite the talker and has reasons behind every word that he says. Sometimes, it might seem like there's no connection, but as he goes on, everything will eventually dovetail nicely towards a single purpose. It's... quite different from how I do things. I ask him for help whenever I encounter a matter I can't settle. |
Thoma's Thoughts About Others
| Character | In-Game Thoughts |
|---|---|
 Ayaka Ayaka
|
About Ayaka Milady is in all respects a well-rounded person: erudite, compassionate, well-mannered, and elegant... The one thing she could do better is to speak her mind more. In fact, watch out for this the next time you're talking to her — sometimes, she looks like she's about to say something, but then she holds back. If that happens, keep asking her opinion, see if you can encourage her to open up a little. |
 Ayato Ayato
|
About Ayato As head of the Kamisato Clan, he's in a tough position. With all the political upheaval, he has to contend with public disquiet on one hand and a bunch of self-serving, degenerate public officials on the other. It's best not to dwell on it. All I can do is make sure to look out for him when he's at home. |
 Beidou Beidou
|
About Beidou The captain of The Crux — a formidable woman indeed. She once promised to take me out onto the open ocean to get a look at the thunderstorm that seals off Inazuma from the outside world. It's a shame that to this day, I've never had the chance to take her up on the offer... |
 Eula Eula
|
About Eula You've had a run-in with Eula Lawrence before, huh? All I know is that their whole family are about the worst-tempered people you could ever meet. You're better off steering clear of them if you can help it. Ah, now I'm in a Mondstadt mood again... The memories. |
 Heizou Heizou
|
About Heizou Ho, that guy is a detective for the Tenryou Commission. He seems to have his own way of doing things — not the easiest person to get along with. Also... Any situation that involves a detective is probably not one that's going to end well. I think I'll keep on giving him a wide berth. |
 Itto Itto
|
About Itto Hmm... Word on the street is that he's quite a character — apparently, he even has youkai heritage. Have you met him? If you two are close, maybe you could introduce me sometime. It's good to make friends from all walks of life... youkai included! |
 Jean Jean
|
About Jean Oh, so Jean from the Gunnhildr Clan is the Master of the Knights of Favonius now? She definitely deserves it, she's known all over for her impeccable conduct... Oh, just the ''Acting'' Grand Master? Haha, well, someone of her standing won't care about titles. |
 Raiden Raiden
|
About Raiden Comparison: In my homeland of Mondstadt, almost everyone has great reverence for the Anemo Archon, Barbatos. But people in Inazuma feel a little differently toward the Shogun. How can I put this... They fell love, respect, gratitude... but also fear. The Unknown: Honestly, I don't harbor any resentment toward the Shogun. Yes, she almost took my Vision away, but ultimately that's just because of her unique perspective. Everyone has their own perspective, there's nothing strange about that. The only thing I don't understand is her goal in doing so. What does she imagine eternity really look like for Inazuma? And why is sacrificing her people's aspirations so necessary to achieve it? I can neither understand nor agree with her approach. |
 Sara Sara
|
About Sara The Tenryou Commission General... Mm... Make sure to be extra careful if you have any dealings with her. She has a lot of power in her hands, and she's not very open to persuasion. Smiling and batting your eyelids certainly won't get you anywhere with her. |
 Sayu Sayu
|
About Sayu Ah Sayu, stubborn Sayu. I've asked her countless times to teach me ninjutsu, but she always refuses. She even goes out of her way to avoid me now... I'm just a student looking for a teacher, am I really that out of line? |
 Yae Miko Yae Miko
|
About Yae Miko Lady Miko? Wh—What about her? 'sigh' Every time Miss Kamisato sends me out to deliver messages, my least-favorite destination is Grand Narukami Shrine... Oh! N—Not because Lady Miko scares the bejeebers out of me, it's, uh... respect. Yes! She strikes respect deep into my heary, ahahahaha... |
 Yoimiya Yoimiya
|
About Yoimiya Of Naganohara Fireworks fame? She's so easy to get along with. Super straightforward, just says whatever she thinks. Oh, and Naganohara fireworks are just incredible, you should take every chance you get to see them in action. Ah, on that note — here, have a coupon! |
Genshin Impact Character Guides

All Characters and Voice Actors
List of All Characters
| Characters by Element | |||
|---|---|---|---|
Playable Characters
Upcoming Characters
| All Upcoming Characters |
 Alice Alice
|
 Capitano Capitano
|
 Dainsleif Dainsleif
|
 Dottore Dottore
|
|---|---|---|---|
 Linnea Linnea
|
 Lohen Lohen
|
 Nicole Nicole
|
 Pantalone Pantalone
|
 Pierro Pierro
|
 Pulcinella Pulcinella
|
 Rerir Rerir
|
 Sandrone Sandrone
|
 Tsaritsa Tsaritsa
|
|||
Character Lists
| Characters by Rarity | |
|---|---|
| 5-Star Characters | 4-Star Characters |
| Free Characters | |
| Characters by Weapon Used | |
| Sword Users | Claymore Users |
| Polearm Users | Bow Users |
| Catalyst Users | |
| Characters by Role | |
| Main DPS Characters | Sub DPS Characters |
| Support Characters | Healers |
| Shield Characters | Buff Providers |
| Best for Exploration | Local Specialty Passives |
| Double Reward Passives | |
| Characters by Gender | |
| Male Characters | Female Characters |
| Short Male Characters | Short Female Characters |
| Medium Male Characters | Medium Female Characters |
| Tall Male Characters | Tall Female Characters |
| Characters by Height | |
| Short Characters | Medium Characters |
| Tall Characters | |
| Characters by Region | |
| Mondstadt Characters | Liyue Characters |
| Inazuma Characters | Sumeru Characters |
| Fontaine Characters | Natlan Characters |
| Nod-Krai Characters | |
Comment
I would switch Jean to Kuki and have a hyperblurgeon disco 💃
Author
Thoma Rating and Best Builds
Rankings
Gaming News
Popular Games

Genshin Impact Walkthrough & Guides Wiki

Umamusume: Pretty Derby Walkthrough & Guides Wiki

Pokemon Pokopia Walkthrough & Guides Wiki

Honkai: Star Rail Walkthrough & Guides Wiki

Monster Hunter Stories 3: Twisted Reflection Walkthrough & Guides Wiki

Arknights: Endfield Walkthrough & Guides Wiki

Wuthering Waves Walkthrough & Guides Wiki

Zenless Zone Zero Walkthrough & Guides Wiki

Pokemon TCG Pocket (PTCGP) Strategies & Guides Wiki

Monster Hunter Wilds Walkthrough & Guides Wiki
Recommended Games

Diablo 4: Vessel of Hatred Walkthrough & Guides Wiki

Cyberpunk 2077: Ultimate Edition Walkthrough & Guides Wiki

Fire Emblem Heroes (FEH) Walkthrough & Guides Wiki

Yu-Gi-Oh! Master Duel Walkthrough & Guides Wiki

Super Smash Bros. Ultimate Walkthrough & Guides Wiki

Pokemon Brilliant Diamond and Shining Pearl (BDSP) Walkthrough & Guides Wiki

Elden Ring Shadow of the Erdtree Walkthrough & Guides Wiki

Monster Hunter World Walkthrough & Guides Wiki

The Legend of Zelda: Tears of the Kingdom Walkthrough & Guides Wiki

Persona 3 Reload Walkthrough & Guides Wiki
All rights reserved
Copyright© 2012-2024 HoYoverse — COGNOSPHERE. All Rights Reserved.
The copyrights of videos of games used in our content and other intellectual property rights belong to the provider of the game.
The contents we provide on this site were created personally by members of the Game8 editorial department.
We refuse the right to reuse or repost content taken without our permission such as data or images to other sites.
 Chasca
 Faruzan
 Ifa
Ifa Jahoda
 Kazuha
 Lan Yan
 Lynette
 Mizuki
 Sucrose
 Traveler (Anemo)
 Varka
Varka Venti
Venti Wanderer
 Xianyun
 Xiao
Xiao Aloy
Aloy Charlotte
 Chongyun
 Citlali
 Diona
Diona Escoffier
 Freminet
 Ganyu
Ganyu Kaeya
Kaeya Layla
Layla Mika
Mika Qiqi
Qiqi Rosaria
 Shenhe
 Skirk
Skirk Wriothesley
 Alhaitham
 Baizhu
 Collei
 Emilie
 Kaveh
Kaveh Kirara
 Lauma
Lauma Nahida
 Nefer
Nefer Tighnari
 Traveler (Dendro)
 Yaoyao
 Clorinde
 Cyno
Cyno Dori
Dori Fischl
 Flins
Flins Iansan
 Ineffa
 Keqing
 Lisa
Lisa Ororon
 Razor
Razor Sethos
 Shinobu
 Traveler (Electro)
 Varesa
 Albedo
 Chiori
 Gorou
Gorou Illuga
 Kachina
 Navia
Navia Ningguang
 Noelle
 Traveler (Geo)
 Xilonen
 Yun Jin
 Zhongli
 Zibai
Zibai Aino
Aino Barbara
 Candace
 Columbina
 Dahlia
 Furina
 Kokomi
 Mona
Mona Mualani
 Neuvillette
 Nilou
Nilou Sigewinne
 Tartaglia
 Traveler (Hydro)
 Xingqiu
 Yelan
Yelan Amber
Amber Arlecchino
 Bennett
 Chevreuse
 Dehya
Dehya Diluc
Diluc Durin
Durin Gaming
 Hu Tao
 Klee
Klee Lyney
Lyney Mavuika
 Thoma
Thoma
 Traveler (Pyro)
 Xiangling
 Xinyan
 Yanfei


![The Liar Princess and the Blind Prince Review [PC] | Lovely to Look at but Tedious to Play](https://img.game8.co/4442586/8d95f5faf05780f1765ce7e0938bd825.jpeg/thumb)
![Marathon Cryo Archive Map Teased as [REDACTED] on Selection Screen](https://img.game8.co/4442236/6357203e58172f6de57f1991e7c39b22.png/thumb)


Does Snap and Swing help with finding the pages?