Mona Best Builds and Teams
✉ Send your thoughts in our Genshin 6.4 Patch Survey!
★ Exclusive: Dive back in time with the Meta History
◆ Hot: Version 6.4, Luna 5 Codes
◆ Builds: Varka, Flins, Skirk, Escoffier
◆ Events: Travelers' Tales, He Who Caught the Wind
◆ Future: Linnea, Version 6.5 Luna VI

Mona is a 5-Star Hydro Catalyst character that best functions as a Hydro Flex unit in Genshin Impact. See Mona's best builds, recommended weapons and artifacts, materials, talent priority, and kit details here!
| Mona's Character Guides | |||
|---|---|---|---|
|
|
|
||
List of Contents

|
|---|
 under the page title to be notified of more updates!
Mona Rating and Info
Character Information
| Mona | ||
|---|---|---|
 |
Rating |
|
| Rarity | ||
| Element | ||
| Weapon | ||
| Voice Actors |
Felecia Angelle (EN)
Kohara Konomi (JP) |
|
Tier List Rankings
| Main DPS | Sub-DPS | Support | Exploration |
|---|---|---|---|
| - |
|
|
|
Character Tier List | Best Characters
Mona's Stats
| Stat | Base Value |
|---|---|
| HP | 2102 |
| ATK | 58 |
| DEF | 132 |
| Energy Recharge% | 100% |
| Stat | Max Value |
|---|---|
| HP | 10409 |
| ATK | 287 |
| DEF | 653 |
| Energy Recharge% | 132.0% |
Base Stat Calculations
 | Stats indicated above are obtained from Mona's base values. These numbers also exclude the character's equipped weapon, artifacts, talents, or other passive effects that are not innate to the character. |
|---|---|
 | All characters start with 5% CRIT Rate, 50% CRIT DMG, 100% Energy Recharge, 0 Elemental Mastery, 0% Healing Bonus, and 0% Elemental DMG bonus before any additional stats are applied. The table above includes such values. |
 | The Level 20 stats indicated for this character are calculated before their first ascension. |
Mona's Ascension and Talent Material Summary
| All Ascension Materials Needed |
|---|
|
|
| All Talent Materials Needed |
|
|
Mona's Strengths and Weaknesses
| Strengths | |||
|---|---|---|---|
|
• Elemental Burst is still one of the best teamwide buffs in the game, and only scales with talent level. • Generally only needs ER to be effective as a support, but can be a good Sub-DPS unit with proper CRIT stats. • Offers crowd control through Elemental Skill and Burst. • Elemental Burst duration can be artificially extended via crowd control, which allows her to slot into Freeze teams. • More potent and uptime for her Elemental Burst with Hexerei. |
|||
| Weaknesses | |||
|
• Alternate sprint may be off-putting for some players. • Requires elemental reactions to maximize damage output. • Subpar Hydro application may stunt her damage contribution in teams like Hyperbloom if off-field. • Requires Hexerei Members to utilize Buffs. |
Mona Best Builds
Hexerei Support Build
Burst Support
| Best Weapon | |
|---|---|
| Replacement Weapons |
1.
|
| Best Artifacts | |
| Artifact Main Stats | |
| Artifact Sub Stats | Energy Recharge, CRIT Rate, CRIT DMG, ATK% |
| Sample Teams | Mualani Hexerei:
Vaporize:
|
This Support build for Mona sacrifices her DMG for more team-wide utility by stacking as much Energy Recharge (~200-300%) as she can for her to have her Elemental Burst ready off-cooldown.
With enough Energy Recharge, she can also gain enough Hydro DMG Bonus to the point where ATK Goblet would be a better slot.
For Hexerei Build, you would still want a relatively the same artifacts and weapons. However, it does differ based on your team needs. Prototype Amber for weapons and Song of Days Past can be her best-in-slot in a healer role since Hexerei Members don't have a healer.
Mona Sub-DPS Build
Hydro and Burst Sub-DPS
| Best Weapon | |
|---|---|
| Replacement Weapons |
2.
4.
|
| Best Artifacts | |
| Artifact Main Stats | |
| Artifact Sub Stats | Energy Recharge, CRIT DMG, CRIT Rate, ATK% |
| Sample Teams | Morgana:
Vaporize:
|
This Sub-DPS build for Mona will provide her with the highest Elemental Burst DMG without Elemental Reactions. For Emblem of Severed Fate users, we recommend meeting your Energy Recharge needs (+150%) through substats.
For non-Emblem users, the 2nd build is best used when Mona only requires her base Energy Recharge to use her Burst off-cooldown. Between our two Sub-DPS builds, choose the one you have better substats for!
Mona Goal Stat Values
| Stat | Goal Value |
|---|---|
| Energy Recharge | 200 - 300% |
| CRIT Rate | 50% or above |
| CRIT DMG | 100% or above |
| ATK | 2,000 or above |
Mona's main and arguably only priority is to have as much Energy Recharge as possible as that translates to higher Elemental Burst uptime by having it at the ready, as well as the Energy Recharge converting into Hydro DMG Bonus for Mona.
Next is to chase after a decent 1:2 CRIT Ratio, with emphasis on it depending on whether or not you want Mona to be a heavy hitter in your teams. Lastly, ATK should be boosted for her Personal DMG.
Mona's Talent Priority
| 1st | 2nd | 3rd |
|---|---|---|
| Elemental Burst | Normal Attack | Elemental Skill |
Mona's Elemental Burst is the key trait in what makes her a top tier character in Genshin Impact, so leveling it up first is a priority. Her Normal Attacks and Elemental Skill can be left for 2nd and 3rd respectively.
Mona Best Artifacts
Noblesse Oblige for Mona's Burst-Oriented Style
Mona is a character centered around the usage of her Elemental Burst, making her one of the best carriers of Noblesse Oblige due to its selfish 20% DMG bonus for her Elemental Burst, and the universal ATK buff it provides for her team.
Song of Days Past is an incredibly niche pick and works if Mona is using Prototype Amber, as that boosts the DMG done by her kit if she can proc Prototype Amber's passive.
Best Artifacts Ranked
| Artifact | Artifact Bonuses | |
|---|---|---|
| 1st |
|
2-PC: Elemental Burst DMG +20%. 4-PC: Using an Elemental Burst increases all party members' ATK by 20% for 12s. This effect cannot stack. |
| 2nd |
|
2-PC: Healing Bonus +15% 4-PC: When the equipping character heals a party member, the Yearning effect will be created for 6s, which records the total amount of healing provided (including overflow healing). When the duration expires, the Yearning effect will be transformed into the Waves of Days Past effect: When your active party member hits an opponent with a Normal Attack, Charged Attack, Plunging Attack, Elemental Skill, or Elemental Burst, the DMG dealt will be increased by 8% of the total healing amount recorded by the Yearning effect. The Waves of Days Past effect is removed after it has taken effect 5 times or after 10s. A single instance of the Yearning effect can record up to 15,000 healing, and only a single instance can exist at once, but it can record the healing from multiple equipping characters. Equipping characters on standby can still trigger this effect. |
| 3rd |
|
2-PC: Hydro DMG Bonus +15%. |
|
|
2-PC: Elemental Burst DMG +20% |
Best 4-Star Artifact for Mona
| Artifact | Artifact Bonuses |
|---|---|
 The Exile The Exile
|
2-PC: Energy Recharge +20% 4-PC: Using an Elemental Burst regenerates 2 Energy for all party members (excluding the wearer) every 2s for 6s. This effect cannot stack. |
List of Artifacts and Set Bonuses
Best Weapons for Mona
Quickswap Off-Field Weapons for Mona
Mona values quickswap weapons such as Thrilling Tales of Dragon Slayers and Skyward Atlas due to how well you can easily put it on her and reap its effects without much action required.
Prototype Amber specifically works if Mona is run with Song of Days Past, as that escalates her into a very niche healing role that can use the artifact set as a damaging option.
Top 3 Mona Weapons
| Weapon | Weapon Information | |
|---|---|---|
| 1st |
 Thrilling Tales of Dragon Slayers Thrilling Tales of Dragon Slayers
|
Base ATK: 401 Bonus Stat: HP 35.2% Skill Effect: When switching characters, the new character taking the field has their ATK increased by 24% for 10s. This effect can only occur once every 20s. |
| 2nd |
 Prototype Amber Prototype Amber
|
Base ATK: 510 Bonus Stat: HP 41.3% Skill Effect: Using an Elemental Burst regenerates 4 Energy every 2s for 6s. Additionally, all party members will regenerate 4% HP every 2s for this duration. |
| 3rd |
 Skyward Atlas Skyward Atlas
|
Base ATK: 674 Bonus Stat: ATK 33.1% Skill Effect: Increases Elemental DMG Bonus by 12%. Normal attack hits have a 50% chance to earn the favor of the clouds, which actively seeks out nearby enemies to attack for 15s. Dealing 160% ATK DMG. Can only occur once every 30s. |
Best Free-to-Play Weapon for Mona
| Weapon | Weapon Information |
|---|---|
 Mappa Mare Mappa Mare
|
Base ATK: 565 Bonus Stat: Elemental Mastery 110 Skill Effect: Triggering an Elemental reaction grants a 8% Elemental DMG Bonus for 10s. Max 2 stacks. |
All Recommended Weapons for Mona
| Recommended Weapons | How to Get |
|---|---|
| Gacha | |
| Crafted | |
| Gacha | |
| Gacha | |
| Gacha | |
| Gacha | |
| Gacha | |
| Event | |
| Battle Pass | |
| Crafted | |
| Gacha | |
| Crafted | |
Mona Best Team Comps
Flex Unit For Most Situations
Mona can easily be slotted in any teams that need a damage buff for a massive instance of damage, as most teams welcome the increase to DMG that she provides with her Elemental Burst.
However, she finds a special place in Freeze teams due to the reaction's innately low damage and need for DMG amplification, and is a special pairing for characters with frontloaded Elemental Bursts.
Notable Teammates
| Character | Explanation |
|---|---|
|
|
DPS Skirk is the prime example of both being a Cryo unit that benefits from Mona's Hydro presence and her Elemental Burst to boost both Skirk's regular and frontloaded damage. |
|
|
DPS Mona is one of Ayaka's best teammates when it comes to frontloading the damage of her Elemental Burst as Mona can guarantee increased DMG for Ayaka. |
|
|
DPS Wriothesley can also benefit from Mona to increase his extended combo damage but not. |
|
|
DPS Ganyu is grouped in the same vein as Wriothesley but gains more utility from Mona due to two damage sources in the form of her Normal Attacks and Elemental Burst. |
|
|
DPS Mavuika is one of the people that greatly benefits from Mona's Elemental Burst due to her frontloaded Burst, in which Mona can also allow Mavuika's Burst to crit. |
|
|
DPS Part of Eula's damage is frontloaded in the form of her Elemental Burst, which Mona can supplement with her own abilities. |
|
|
Support Citlali benefits Mona's Elemental DMG by RES shredding Hydro from opponents, which Mona appreciates. |
|
|
Sub-DPS Escoffier functions in the same group as Citlali by shredding Hydro, but also synergizes fully with Mona as both parties increase each other's damage. |
|
|
DPS Xiao's Elemental Burst can be boosted by Mona's own Elemental Burst, boosting his damage by a significant amount. |
|
|
DPS Tartaglia's Elemental Burst can be turned into a powerful frontloaded nuke using Mona's Elemental Burst. |
|
|
DPS Raiden also benefits from Mona's Elemental Burst in the same way that Tartaglia does, but the damage amplification is not as potent as with Tartaglia. |
Hexerei Teams
| Support Sub-DPS |
Main DPS | Sub-DPS | Sub-DPS Support |
|---|---|---|---|
|
|
|
|
|
|
|
|
|
|
Generally, you want another Hexerei Member to utilize her buffs. She remains in a Sub-DPS role for the most part.
However, she can be slotted in a Healer role depending on the team with Protatype Amber.
Freeze Team
| Sub-DPS | Main DPS | Support | Support |
|---|---|---|---|
|
|
|
|
|
|
|
|
|
|
Freeze remains one of Mona's best options for a team because of how Freeze interacts with her Elemental Burst.
Using Freeze can keep enemies in their place, as well as artificially extending her buff duration, hereby increasing the overall DPS of the Freeze team.
Vaporize Team
| Main DPS | Sub-DPS | Support | Support |
|---|---|---|---|
|
|
|
|
|
| Support | Main DPS | Sub-DPS | Support |
|
|
|
|
|
Mona can either function as the on-field DPS in a Xiangling vaporize team, or as a buffer when paired with another On-Field Pyro DPS like Gaming or Diluc.
As an On-Field DPS, it is generally recommended to build her with Elemental Mastery in mind for more vaporize damage.
Electro-Charged Team
| Support (Driver) | Main DPS | Sub-DPS | Support |
|---|---|---|---|
|
|
|
|
|
|
|
|
|
|
This team strives in sustained damage as each member of the team can amplify the Electro-charged reaction ensuring greater ticks of damage against enemies.
Mona can easily apply Hydro consistently as long as both of her Electro teammates are able to apply their element.
Hyperbloom Team
| Support (Driver) | Sub-DPS | Sub-DPS | Support |
|---|---|---|---|
|
|
|
|
|
With Dendro being added to the mix, Mona quickswap teams have seen more success, as each member is capable of doing great on-field and off-field damage.
Since Mona's off-field hydro application is not as frequent, she takes the role of an on-field driver, using a mix of her attacks and dashes to generate bloom cores.
Mona Best Constellations
| Astrolabos |
|---|
 |
Constellation and Effects
| Mona's Constellations | |
|---|---|
| C1 |
Prophecy of Submersion When any of your own party members hits an opponent affected by an Omen, the effects of Hydro-related Elemental Reactions are enhanced for 8s: • Electro-Charged DMG increases by 15%. • Lunar-Charged DMG increases by 15%. • Vaporize DMG increases by 15%. • Hydro Swirl DMG increases by 15%. • Frozen duration is extended by 15%. Additionally, when your off-field party members trigger the above effect, the DMG Bonus to the above Hydro-related Elemental Reactions is enhanced to 160% of its original effect. |
| C2 |
Lunar Chain When a Normal Attack hits, there is a 20% chance that it will be automatically followed by a Charged Attack. Additionally, within 5s after Mona unleashes her Elemental Burst Stellaris Phantasm, her next Normal Attack that hits an enemy will automatically trigger a Charged Attack. This Charged Attack effect can only occur once every 5s. When Mona's Charged Attack hits an opponent, all nearby party members will have their Elemental Mastery increased by 80 for 12s. |
| C3 |
Restless Revolution Increases the Level of Stellaris Phantasm by 3. |
| C4 |
Prophecy of Oblivion When any party member attacks an opponent affected by an Omen, their CRIT Rate is increased by 15%. When any Hexerei party member attacks an opponent affected by an Omen, their CRIT DMG is increased by 15%. |
| C5 |
Mockery of Fortuna Increases the Level of Mirror Reflection of Doom by 3. |
| C6 |
Rhetorics of Calamitas While Mona is the active character, when she enters Illusory Torrent or there are opponents affected by an Omen nearby, she gains a 60% increase to the DMG of her next Charged Attack per second. A maximum DMG Bonus of 180% can be achieved in this manner. The effect lasts for no more than 8s. Additionally, the DMG Mona's Charged Attacks deal to opponents affected by an Omen will be increased to 200% of the original DMG. |
Best Constellations Rating and Explanation
| Rating | Constellation Effect / Merits | |
|---|---|---|
| C1 | ★★★ | • Overall amazing Constellation for Elemental Reaction based teams. |
| C4 | ★★☆ |
• Huge CRIT Rate buff. • Limited by the duration of the Omen Buff. • Works great in Freeze teams since Omen Buff extends its duration while enemies are frozen. |
C1 for More Support Buffs
Mona's 1st Constellation is a huge buff to her as a support for Elemental Reaction-based teams. What makes it so good is that the buff applies as long as you're hitting an Omen-affected enemy, meaning if you hit an enemy just before her Omen buff expires, you will still get a full 8s Elemental Reaction buff!
With Hexerei Buffs, the constellation also has value for Mona's Main DPS capabilities.
Mona Talents and How to Use
Normal Attack
| Normal Attack: Ripple of Fate |
|---|
| Perform up to 4 water splash attacks that deal Hydro DMG.
Charge Attack Consumes a certain amount of Stamina to deal AoE Hydro DMG after a short casting time. Plunge Attack: Gathering the might of Hydro, Mona plunges towards the ground from mid-air, damaging all enemies in her path. Deals AoE Hydro DMG upon impact with the ground. |
| Attribute | Effect (Lvl 1) |
|---|---|
| 1-Hit DMG | 37.6% |
| 2-Hit DMG | 36% |
| 3-Hit DMG | 44.8% |
| 4-Hit DMG | 56.2% |
| Charged Attack DMG | 150% |
| Charged Attack Stamina Cost | 50.0 |
| Plunge DMG | 56.8% |
| Low / High Plunge DMG | 114% / 142% |
Elemental Skill
| Mirror Reflection of Doom |
|---|
| Creates an illusory Phantom of fate from coalesced waterspouts. The Phantom has the following special properties: ・Continuously taunts nearby enemies, attracting their fire. ・Continuously deals Hydro DMG to nearby enemies. ・When its duration expires, the Phantom explodes, dealing AoE Hydro DMG. Hold Attack: Utilizes water currents to move backwards swiftly before conjuring a Phantom. Only on Phantom created by Mirror Reflection of Doom can exist at any time. Flavor Text: Skilled astrologers have always dreamed of using a phantom facsimile of themselves to ward off imminent ill fate, but Mona must be the first to make such a mockery of it in all of Teyvat. |
| Attribute | Effect (Lvl 1) |
|---|---|
| DoT | 32% |
| Explosion DMG | 133% |
| CD | 12s |
Direct Enemy Aggro to Decoy
 Elemental Skill: Mirror Reflection of Doom |
Her Elemental Skill, Mirror Reflection of Doom, will leave behind a decoy that taunts nearby enemies, and using the hold version makes Mona backstep upon cast.
Combining Mona's unique dash and her Elemental Skill allows for some quick emergency escape for safety.
Elemental Burst
| Stellaris Phantasm |
|---|
| Mona summons the sparkling waves and creates a reflection of the starry sky, applying the Illusory Bubble status to opponents in a large AoE.
Illusory Bubble Traps opponents inside a pocket of destiny and also makes them Wet. Renders opponents immobile. When an opponent affected by Illusory Bubble sustains DMG, the following effects are produced: ・Applies Omen to the opponent, which gives a DMG Bonus, also increasing the DMG of the attack that causes it. ・Removes the Illusory Bubble, dealing Hydro Elemental DMG in the process. The DMG Bonus does not apply to the Hydro Elemental DMG dealt in this instance. Omen During its duration, increases DMG taken by enemies. Flavor Text: It was from the time that gods first traced the lights in the heavens with their eyes that the notion of "fate" was born. |
| Attribute | Effect (Lvl 1) |
|---|---|
| Illusory Bubble Duration | 8s |
| Illusory Bubble Explosion DMG | 442% |
| DMG Bonus | 42% |
| Omen Duration | 4s |
| CD | 15s |
| Energy Cost | 60 |
Amplify Elemental Reaction Damage
 Elemental Burst: Stellaris Phantasm |
Mona's key focus is her ability to drastically amplify Elemental DMG with her Elemental Burst, Stellaris Phantasm.
Mona's ability places a debuff bubble on enemies that not only amplifies the damage dealt to them but also deals an explosion of Hydro damage when the bubble is popped. Using the Hydro explosion to trigger Melt or Vaporize will deal massive amounts of damage.
Passive Talent 1
| Come 'n' Get Me, Hag! |
|---|
| After she has used Illusory Torrent for 2s, if there are any enemies nearby, Mona will automatically create a Phantom. A Phantom created in this manner lasts for 2s, and its explosion DMG is equal to 50% of Mirror Reflection of Doom. |
Passive Talent 2
| Waterborne Destiny |
|---|
| Increases Mona's Hydro DMG Bonus by a degree equivalent to 20% of her Energy Recharge rate. |
Passive Talent 3
| Principium of Astrology |
|---|
| When Mona crafts Weapon Ascension Materials, she has a 25% chance to refund a portion of the crafting materials used. |
Select Mona When Crafting Ascension Materials
Mona's Passive Talent “Principium of Astrology” has the potential to refund 25% of the materials used when crafting Ascension Materials. This will allow you to save time on hunting for rare crafting materials, so be sure to always choose Mona when crafting these items.
Alternate Sprint
| Illusory Torrent |
|---|
| When under the effect of Illusory Torrent, Mona can move at high speed on water. Applies the Wet status to nearby enemies when she reappears. When Mona is hit, she can use Illusory Torrent more quickly, as is the case with sprinting for other characters. Flavor Text: This is something that Mona can do, but her teacher cannot. Well, but it's not as if her teacher would pursue any matter concerning Hydro Visions anyway... |
| Attribute | Effect (Lvl 1) |
|---|---|
| Activation Stamina Consumption | 10 |
| Stamina Drain | 15/s |
Able to Dash Across Water
 |
Unlike most characters, Mona is able to continue dashing across the surface of the water, making it significantly easier to traverse. Although it doesn't last much longer than a standard Dash, it proves long enough to cross most rivers smoothly.
Mona cannot dash while already on water, so be sure to start dashing when you are still on land. Also, watch your stamina bar while dashing – Mona will drown just like other characters if she runs out of stamina in the water.
Mona Hexerei: Secret Rite Buff
Vaporize DMG Boost and Longer Burst Duration

Mona receives an increased DMG when she triggers the Vaporize reaction, and her Elemental Burst's duration can be extended, which applies the Omen state, when she hits enemies with her Normal and Charged Attacks.
This can be triggered when Mona is paired up with one more Hexerei character, preferably Durin or Klee, which can both easily trigger Vaporize reaction and activate their own Hexerei buff.
Hexerei: Secret Rite Buffs Explained
Enhanced Constellations for DPS Capability
Furthermore, the Hexerei enhancements also affect her constellation levels 1, 2, 4, and 6, giving her increased Hydro Reaction DMG boost, Party-wide Elemental Mastery boost, CRIT DMG boost, and increased Elemental Burst DMG.
Mona Ascension and Talent Materials
Mona Ascension Materials
| Lv.20→Lv.40 | |
|---|---|
| Lv.40→Lv.50 | |
| Lv.50→Lv.60 | |
| Lv.60→Lv.70 | |
| Lv.70→Lv.80 |
|
| Lv.80→Lv.90 |
|
Mona Talent Level-Up Materials
| Daily Domain Drops | Enemy Drops | Weekly Boss Drops |
|---|---|---|
| Tue/Fri/Sun |
Whopperflowers |
Lupus Boreas Challenge Reward |
|
|
|
|
|
|
|
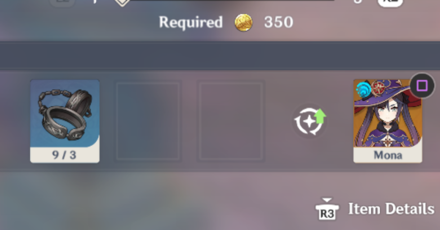
How to Get Mona
Roll on the 6.4 Chronicled Wish Banner
| Banner Date | Sometime in Version 6.4 |
|---|
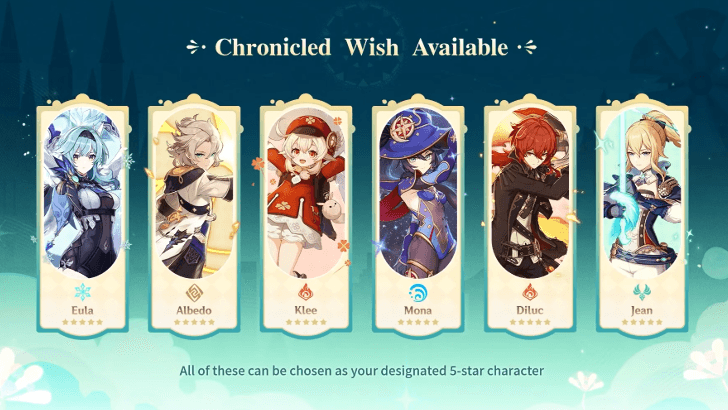
Mona is one of the characters featured in the 6.4 Mondstadt Chronicled Wish banner! You can choose her as your designated 5-star character in this banner.
6.4 Luna V Chronicled Wish Mondstadt
Pull from All Character Banners

|
|
| Banner Status | Active |
|---|---|
Mona is a permanently available 5-star character you can get in both the limited banners as well as the standard banner.
Mona Character Skins
Mona's Alternate Outfit
| Side by Side Comparison of Outfits | |
|---|---|
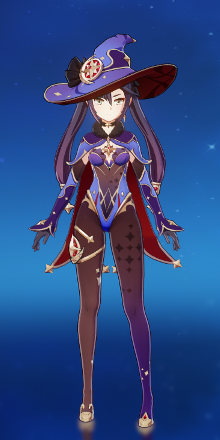 Mona's Original Outfit |
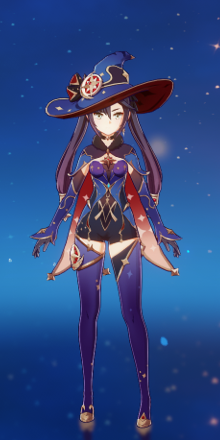 Mona's Alternate Outfit |
Mona's In-Game Information
Mona Character Profile
| Nation | |
|---|---|
| Title | Astral Reflection |
| Vision | |
| Gender | Female |
| Race | Human |
| Height | Medium Girl |
| Faction | Mondstadt |
| Constellation | Astrolabos |
| Birthday | August 31 |
| Special Dish | Der Weisheit Letzter Schluss (Life) |
| Story Quest |
Chapter: Astrolabos Act 1: Beyond This World's Stars |
Character Thoughts About Mona
| Character | In-Game Thoughts |
|---|---|
 Diluc Diluc
|
The land of Mondstadt, by the Anemo Archon's grace, is bountiful. I see no need for the harvest forecasts of astrologers. |
 Fischl Fischl
|
Fischl: Aha, yes, Mona, the mighty astrologer... Mona, who once had the vanity to probe the fate of the Prinzessin der Verurteilung herself! She wound up a trembling wreck, overborne and overmastered. Oz: 'whispering' The poor lass was trying desperately not to laugh. It was no easy task. |
 Klee Klee
|
Mona is the best! It's so much fun when she comes to play with me and Albedo. She talks about all these amazing things, and I don't understand most of it but... Ah, I just love it when Mona comes round! |
 Layla Layla
|
Mona Megistus, the Astrologist... Her astrology column in The Steambird is well-known among Rtawahist scholars. Her articles always cover super specialized topics, but can still be appreciated by non-academics. That's no easy feat... Huh? Her name seems to just roll off my tongue? Uh, that's just because... I have a lot of respect for... amazing people. |
 Lisa Lisa
|
Mona? She seems to be an excellent mage, but I'm not a part of their Hexenzirkel. The idea of Irminsul exploration and formal tea parties just leaves me cold. |
 Venti Venti
|
Oh, that astrologer? How should I put it? Fortune-telling and my singing are the same: Both lead to you being so poor you can't even cough up the money for a drink! ... You think that astrology is a cultural tradition, so at least still has some value? Hmph, so rude. In that case, so too is singing, so it still has its value too! |
Mona's Thoughts About Others
| Character | In-Game Thoughts |
|---|---|
 Albedo Albedo
|
About Albedo Albedo? Ah... I envy his ability to solely focus on his research without getting bogged down in mundane worldly affairs. What a wonderful life! If that batty old lady hadn't had one too many screws loose, perhaps that's the life I'd be living by now myself... |
|
Diluc
|
About Diluc Diluc Ragnvindr. His constellation, Noctua, represents vigilance in the darkness of night... A lone guardian keeping watch, longing for the splendor of dawn, yet destined to solitude in the dark days preceding its arrival. ...Or, wait, maybe Noctua's the one tied to wealth...? |
 Jean Jean
|
About Jean You mean the Acting Grand Master of the Knights of Favonius? her constellation is Leo Minor, which represents strength and responsibility shouldered too young... Though the lioness has been separated from her ride for a long time, she grows from strength to strength, and the day will come when she is ready to return as its glorious leader. |
 Kaeya Kaeya
|
About Kaeya Kaeya Alberich? He's a Pavo Ocellus. Destined for greatness and grandeur... and to hide ugly realities behind a layer of charm and elegance. He believes he has made a clean break with his past, but one day fate will catch up with him. When it does, he will have a major decision to make. |
|
Klee
|
About Klee Ah yes, Alice's daughter. She's in the custody of the Knights of Favonius, and Albedo looks after her too. She's blessed to have Trifolium as her constellation, which represents good luck. I'm slightly envious... 'smirk' Although, if I'd been blessed with good luck, I suppose I never would have had the great honor of running into that old woman, would I... |
|
Lisa
|
About Lisa A Tempus Fugit... The constellation derives its name from the hourglass, and stands for knowledge and time - or rather, the trade-off between them. As each grain of sand falls down, a moment of time - of life, even dies for good. To stop the unrelenting flow of sand, one would have to turn the hourglass on its side. But once the sand comes to rest, it remains motionless forever... Hmm, maybe 'becomes lazy' is more accurate than 'comes to rest,' in this case. |
|
Venti
|
About Venti Venti? The bard that sits around doing nothing all day? What's so interesting about him? Sure, I guess I can take a look... Huh, that's weird, the scryglass, it's... I can't see a thing... this wind... i can't... open my eyes! No, my hat! Ah! My clothes, stop! The wind's going to strip all my clothes off! Make it stop, make it stop! ... Alright! I'll never do this again! |
Genshin Impact Character Guides

All Characters and Voice Actors
List of All Characters
| Characters by Element | |||
|---|---|---|---|
Playable Characters
 Chasca
 Faruzan
 Heizou
 Ifa
Ifa Jahoda
 Kazuha
 Lan Yan
 Lynette
 Mizuki
 Sayu
Sayu Sucrose
 Traveler (Anemo)
 Varka
Varka Wanderer
 Xianyun
 Xiao
Xiao Aloy
Aloy Ayaka
Ayaka Charlotte
 Chongyun
 Citlali
 Diona
Diona Escoffier
 Eula
Eula Freminet
 Ganyu
Ganyu Mika
Mika Qiqi
Qiqi Rosaria
 Shenhe
 Skirk
Skirk Wriothesley
 Alhaitham
 Baizhu
 Collei
 Emilie
 Kaveh
Kaveh Kinich
 Kirara
 Lauma
Lauma Nahida
 Nefer
Nefer Tighnari
 Traveler (Dendro)
 Yaoyao
 Beidou
 Clorinde
 Cyno
Cyno Dori
Dori Flins
Flins Iansan
 Ineffa
 Keqing
 Ororon
 Raiden
 Razor
Razor Sara
Sara Sethos
 Shinobu
 Traveler (Electro)
 Varesa
 Yae Miko
 Chiori
 Gorou
Gorou Illuga
 Itto
Itto Kachina
 Navia
Navia Ningguang
 Noelle
 Traveler (Geo)
 Xilonen
 Yun Jin
 Zhongli
 Zibai
Zibai Aino
Aino Ayato
Ayato Barbara
 Candace
 Columbina
 Dahlia
 Furina
 Kokomi
 Mona
Mona Mualani
 Neuvillette
 Nilou
Nilou Sigewinne
 Tartaglia
 Traveler (Hydro)
 Xingqiu
 Yelan
Yelan Amber
Amber Arlecchino
 Bennett
 Chevreuse
 Dehya
Dehya Durin
Durin Gaming
 Hu Tao
 Lyney
Lyney Mavuika
 Thoma
Thoma Traveler (Pyro)
 Xiangling
 Xinyan
 Yanfei
 Yoimiya
Upcoming Characters
| All Upcoming Characters |
 Alice Alice
|
 Capitano Capitano
|
 Dainsleif Dainsleif
|
 Dottore Dottore
|
|---|---|---|---|
 Linnea Linnea
|
 Lohen Lohen
|
 Nicole Nicole
|
 Pantalone Pantalone
|
 Pierro Pierro
|
 Pulcinella Pulcinella
|
 Rerir Rerir
|
 Sandrone Sandrone
|
 Tsaritsa Tsaritsa
|
|||
Character Lists
| Characters by Rarity | |
|---|---|
| 5-Star Characters | 4-Star Characters |
| Free Characters | |
| Characters by Weapon Used | |
| Sword Users | Claymore Users |
| Polearm Users | Bow Users |
| Catalyst Users | |
| Characters by Role | |
| Main DPS Characters | Sub DPS Characters |
| Support Characters | Healers |
| Shield Characters | Buff Providers |
| Best for Exploration | Local Specialty Passives |
| Double Reward Passives | |
| Characters by Gender | |
| Male Characters | Female Characters |
| Short Male Characters | Short Female Characters |
| Medium Male Characters | Medium Female Characters |
| Tall Male Characters | Tall Female Characters |
| Characters by Height | |
| Short Characters | Medium Characters |
| Tall Characters | |
| Characters by Region | |
| Mondstadt Characters | Liyue Characters |
| Inazuma Characters | Sumeru Characters |
| Fontaine Characters | Natlan Characters |
| Nod-Krai Characters | |
Comment
Is Mona after her buffs worth using the selector and getting her c2? I've heard she's only meta relevant for Mualani and I don't enjoy that team. I have her c1 and enough characters to do Imaginarium Theater and I've rarely used her before.
Author

Mona Best Builds and Teams


Rankings
Gaming News


![Monster Hunter Stories 3 Review [First Impressions] | Simply Rejuvenating](https://img.game8.co/4438641/2a31b7702bd70e78ec8efd24661dacda.jpeg/thumb)
Popular Games

Genshin Impact Walkthrough & Guides Wiki
Honkai: Star Rail Walkthrough & Guides Wiki
Umamusume: Pretty Derby Walkthrough & Guides Wiki
Pokemon Pokopia Walkthrough & Guides Wiki
Resident Evil Requiem (RE9) Walkthrough & Guides Wiki
Monster Hunter Wilds Walkthrough & Guides Wiki
Wuthering Waves Walkthrough & Guides Wiki
Arknights: Endfield Walkthrough & Guides Wiki
Pokemon FireRed and LeafGreen (FRLG) Walkthrough & Guides Wiki
Pokemon TCG Pocket (PTCGP) Strategies & Guides Wiki


Recommended Games
Diablo 4: Vessel of Hatred Walkthrough & Guides Wiki
Cyberpunk 2077: Ultimate Edition Walkthrough & Guides Wiki
Fire Emblem Heroes (FEH) Walkthrough & Guides Wiki
Yu-Gi-Oh! Master Duel Walkthrough & Guides Wiki
Super Smash Bros. Ultimate Walkthrough & Guides Wiki
Pokemon Brilliant Diamond and Shining Pearl (BDSP) Walkthrough & Guides Wiki
Elden Ring Shadow of the Erdtree Walkthrough & Guides Wiki
Monster Hunter World Walkthrough & Guides Wiki
The Legend of Zelda: Tears of the Kingdom Walkthrough & Guides Wiki
Persona 3 Reload Walkthrough & Guides Wiki


All rights reserved
Copyright© 2012-2024 HoYoverse — COGNOSPHERE. All Rights Reserved.
The copyrights of videos of games used in our content and other intellectual property rights belong to the provider of the game.
The contents we provide on this site were created personally by members of the Game8 editorial department.
We refuse the right to reuse or repost content taken without our permission such as data or images to other sites.
i think it depends. First of all, Mona very much is capable outside Mualani comps. For the Selector: Do you have limited 5 star char cons in the Selector? I'd consider them first before Standard char like Mona, as we can get Standard regardless of banner. If you're a f2p, don't forget Tighnari too. But hes a dps. if you already have a limited dendro dps or plan of pulling one, forget him. Comparing the cons among Standard 5 star chars, Mona's are some of the best. Imho worth it!