This survey will take about 1 minute.
Your answers will help us to improve our website.
Genshin Impact
How to Unlock Firethief's Secret Isle
✉ Send your thoughts in our Genshin 6.4 Patch Survey!
★ Exclusive: Dive back in time with the Meta History
◆ Hot: Version 6.4, Luna 5 Codes
◆ Builds: Varka, Flins, Skirk, Escoffier
◆ Events: Travelers' Tales, He Who Caught the Wind
◆ Future: Linnea, Version 6.5 Luna VI
Firethief's Secret Isle is a hidden island in Natlan that can be unlocked after completing all four of the island's challenges in Genshin Impact 5.0. See how to complete the four challenges, how to get the Luxurious Chest, and all known info about it here!
List of Contents
How to Unlock Firethief's Secret Isle
Go to the Waypoint South of Ancestral Temple
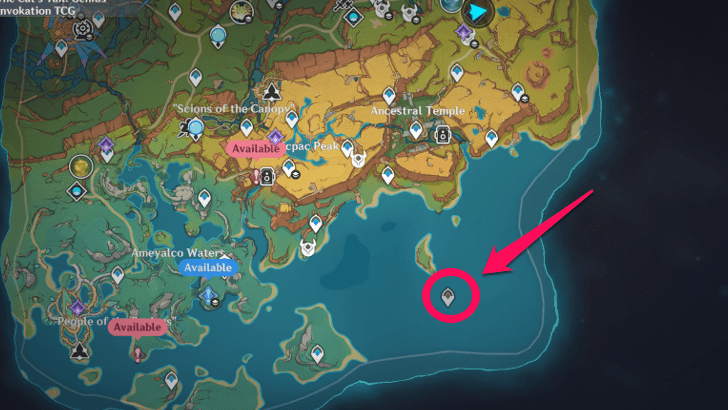
The Firethief's Secret Isle can be unlocked by going to the waypoint south of Ancestral Temple. We recommend indwelling with a Koholasaurus in the shores south of Ancestral Temple as well.
Natlan Interactive Map and Location
Complete All Firethief's Secret Isle's Challenges

Upon reaching the Firethief's Secret Isle, players need to complete four challenges that are located around the area to make the hidden island appear on the map. Players also need to complete all the challenges in order.
The first three challenges involve indwelling with a Saurian and going through obstacle courses. The last challenge requires players to defeat three different Wayobs.
Firethief's Secret Isle Challenges Walkthrough
Disable the Iridescent Beam
Once players arrive on Firethief's Secret Isle, they will be greeted with an Iridescent Beam who will shoot laser beams nonstop. Try to dodge all of its attacks while approaching and disabling it completely.
Complete the First Challenge

Complete the first challenge located beside the waypoint. This challenge requires players to indwell with the Yumkasaurs Spiritsconces beside it and disable all Iridescent Beams throughout the obstacle course.
How to Complete the First Challenge
| Objectives | |
|---|---|
| 1 | Once the challenge starts, a string will come from above. This indicates that players can zip upward towards to disable the first Iridescent Beam |
| 2 | Another string will appear from behind which should lead the player to the second Iridescent Beam. Players should be careful not to overspam their zip-skill or they will fall. |
| 3 | A string will appear from behind which would lead the player to the last Iridescent Beam. Since there are no sigils, players can aim their zip-skill anywhere as long as its towards the Iridescent Beam. |
| 4 | 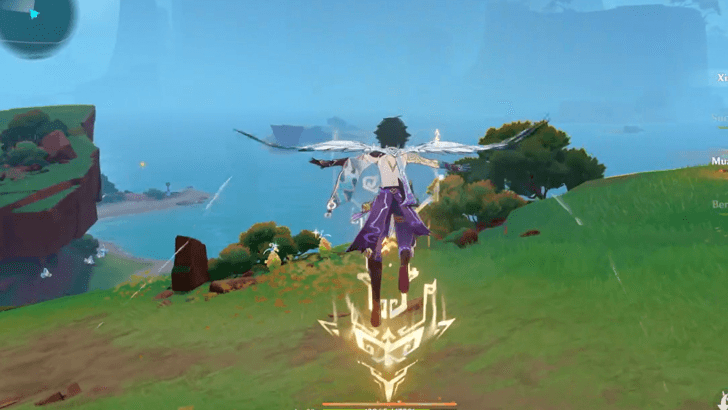 The camera will then shift to a glowing symbol on the ground. Players should interact with it to activate the second challenge and get some rewards |
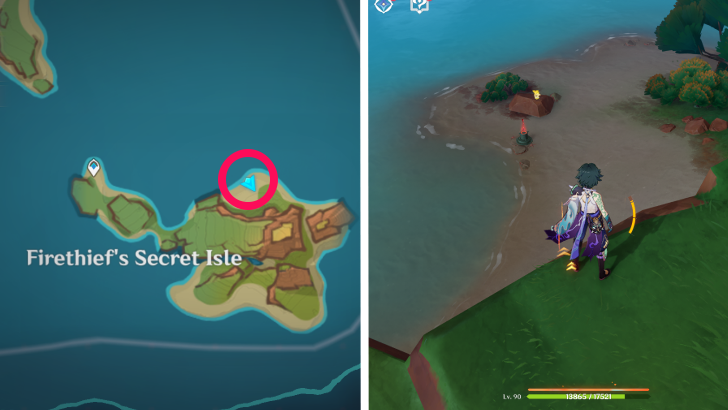
Go to the Second Challenge
The second challenge is a bit forward and to the left of where the first challenge started. It is resting on a tiny island next to some Koholasaur.
Players are required to turn into a Koholasaur using the Saurian Spiritsconces nearby. This is so they could traverse the waters easily to complete the second challenge.
How to Complete the Second Challenge
| Objectives | |
|---|---|
| 1 | Once the challenge starts, an Iridescent Beam can be seen from afar. Players should swim as a Koholasaurs and use its ability to swim faster. Simply interacting with the Iridescent Beam will disable it. |
| 2 | The next Iridescent Beam is also up ahead. However players shouldn't go forward as there are strong winds that push them back. Staying will also give the Iridescent Beam more openings to shoot the player. |
| 3 | Players should head left and jump over the obstacle to find the another Iridescent Beam on the way. |
| 4 | The last Iridescent Beam should also be up ahead, with no winds to stop the player. |
| 5 | 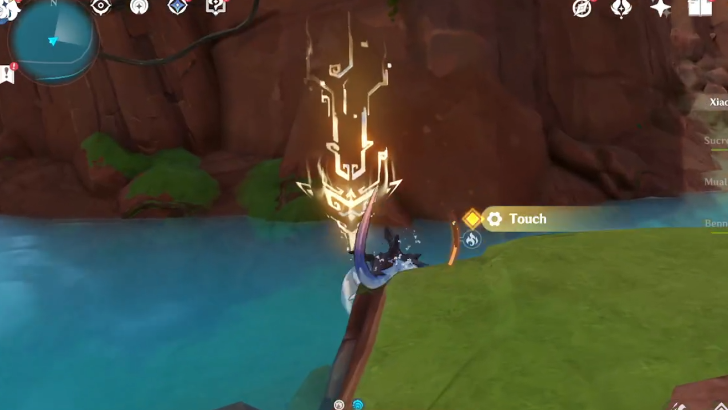 Once players finish the challenge, another sigil and chest will spawn. Players should interact with both of them to continue. |
Go to the Third Challenge
The third challenge is located at the other side of the island, opposite of where the second challenge is. The players are required to turn into a Tepetlisaur to destroy rocks and climb through the mountains by using the Saurian Spiritsconces nearby.
How to Complete the Third Challenge
| Objectives | |
|---|---|
| 1 | 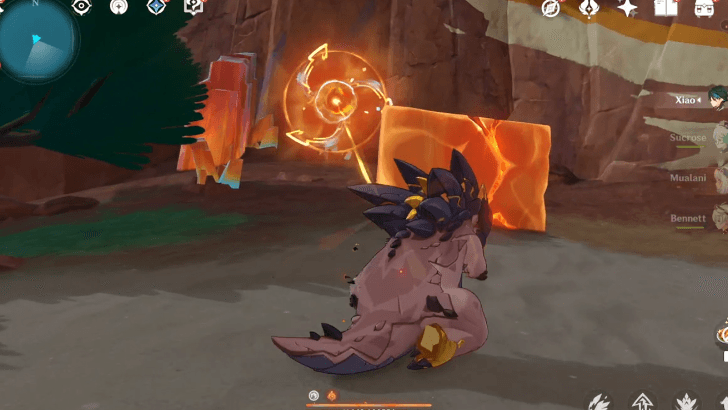
After turning into a Tepetlisaurs, players could simply walk towards the Iridescent beam due to the Saurian's tanky health. However, an easier way would be to use the Tepetlisaur's ability to go underground to dodge the beams. |
| 2 | Quickly enter the orange hole to unlock a short cutscene of the Tepetlisaurs dodging every beam |
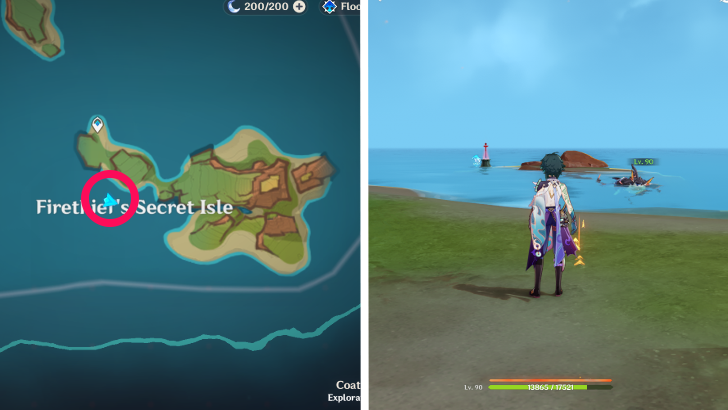
Go to the Fourth Challenge
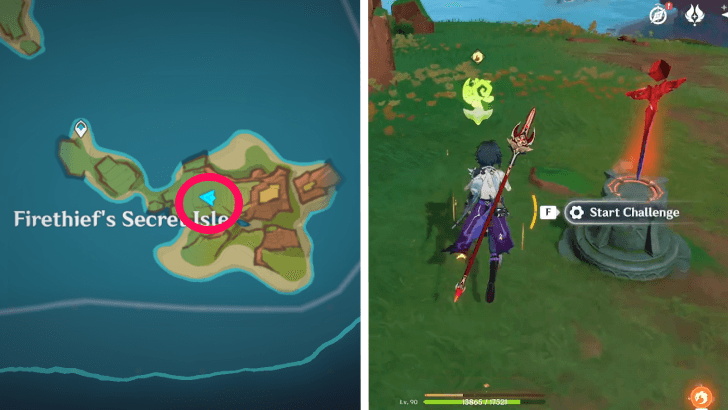
The fourth challenge is located on top of the Firethief's Secret Isle in the middle. The players will need to defeat three different elemental Wayobs to complete the fourth challenge.
Completing the challenge will also reward you with a Luxurious Chest that can reward you with an Iridescent Inscription Fragment.
Wayob Manifestation Enemy Faction Guide
How to Complete the Fourth Challenge
| Objectives | |
|---|---|
| 1 | Activating the fourth challenge will summon a Foliar-Swift Wayob Manifestation. This Wayob's attacks are made of Dendro, as well as its shield. |
| 2 | After defeating the first Wayob, two more Wayobs will appear. There will be a Rock-Cavernous Wayob Manifestation and Flow-Inverted Wayob Manifestation, which will have Geo and Hydro related attacks, respectively. |
| 3 | Defeating all the Wayobs will finish the fourth challenge and will spawn a Luxurious Chest nearby. The Luxurious Chest will also reward you with an Iridescent Inscription Fragment. |
All Four Iridescent Inscription Locations
Genshin Impact Related Guides
All Tips and Tricks Guides

All Version 5.0 Tips & Tricks
Other Regional Tips & Tricks
Comment
Author

How to Unlock Firethief's Secret Isle
Please participate in our site
improvement survey
03/2026
improvement survey
03/2026
Would you assist in
improving Game8's site?
improving Game8's site?

×
We are listening to our users' valuable opinions and discussing how to act on them.
The information collected through this survey will be used for the purpose of improving our services. In addition, the information will only be disclosed a part of a statistic in a format that will not allow identification of personal information.
Begin Survey
Not Now
×
Please rate each item regarding Game8.co's Advertisements.
Amount of Ads
Very Dissatisfied
Somewhat Dissatisfied
Fine
Somewhat Satisfied
Highly Satisfied
Placement of Ads
Timing of Ad Display
Ad Loading Speed
Safeness of Ads
Content of Ads
×
Please rate each item regarding Game8.co's Quality of Articles.
Amount of information
Very Dissatisfied
Somewhat Dissatisfied
Fine
Somewhat Satisfied
Highly Satisfied
Frequency of updates
Speed of new information
Accuracy of articles
Understandibility of articles
Readability of sentences
×
Please rate each item regarding Game8.co's Usability of the Site.
Ease of finding information
Very Dissatisfied
Somewhat Dissatisfied
Fine
Somewhat Satisfied
Highly Satisfied
Loading Speed
Use of Color
Font Size
Visibility of Images
Easy to Understand Layout
×
Please rate each item regarding Game8.co's Message Boards, Comments.
Ease of Writing
Very Dissatisfied
Somewhat Dissatisfied
Fine
Somewhat Satisfied
Highly Satisfied
Readability
Ease in Finding Information
Comment Quality
Comment Quantity
Admin Response
×
Please rate each item regarding Game8.co's Site's new design.
Please rate our site's new design
Very Dissatisfied
Somewhat Dissatisfied
Fine
Somewhat Satisfied
Highly Satisfied
Do you think that the website's design change makes the site easier to use?
Has the new design made it easier for you to find information on the site?
Has the new design improved the overall visual appeal of the site?
How would you rate your overall satisfaction with the new design of the site?
×
How likely are you to recommend Game8 to someone you know?
Very Unlikely
0
1
2
3
4
5
6
7
8
9
10
Very Likely
If you have other opinions regarding potential improvement to the website, please share them with us. We would appreciate your honest opinion.
Note: This is a free response section, so you can proceed without entering anything.
Note: Please be sure not to enter any kind of personal information into your response.
Note: Please be sure not to enter any kind of personal information into your response.
×
Thank You
×
Thank you for participating in our survey! Your answers will help us to improve the quality of our website and services.
We hope you continue to make use of Game8.
We hope you continue to make use of Game8.
Close


Rankings
Gaming News


Popular Games

Genshin Impact Walkthrough & Guides Wiki
Honkai: Star Rail Walkthrough & Guides Wiki
Umamusume: Pretty Derby Walkthrough & Guides Wiki
Pokemon Pokopia Walkthrough & Guides Wiki
Resident Evil Requiem (RE9) Walkthrough & Guides Wiki
Monster Hunter Wilds Walkthrough & Guides Wiki
Wuthering Waves Walkthrough & Guides Wiki
Arknights: Endfield Walkthrough & Guides Wiki
Pokemon FireRed and LeafGreen (FRLG) Walkthrough & Guides Wiki
Pokemon TCG Pocket (PTCGP) Strategies & Guides Wiki


Recommended Games
Diablo 4: Vessel of Hatred Walkthrough & Guides Wiki
Fire Emblem Heroes (FEH) Walkthrough & Guides Wiki
Yu-Gi-Oh! Master Duel Walkthrough & Guides Wiki
Super Smash Bros. Ultimate Walkthrough & Guides Wiki
Pokemon Brilliant Diamond and Shining Pearl (BDSP) Walkthrough & Guides Wiki
Elden Ring Shadow of the Erdtree Walkthrough & Guides Wiki
Monster Hunter World Walkthrough & Guides Wiki
The Legend of Zelda: Tears of the Kingdom Walkthrough & Guides Wiki
Persona 3 Reload Walkthrough & Guides Wiki
Cyberpunk 2077: Ultimate Edition Walkthrough & Guides Wiki


All rights reserved
Copyright© 2012-2024 HoYoverse — COGNOSPHERE. All Rights Reserved.
The copyrights of videos of games used in our content and other intellectual property rights belong to the provider of the game.
The contents we provide on this site were created personally by members of the Game8 editorial department.
We refuse the right to reuse or repost content taken without our permission such as data or images to other sites.