List of All Armor Decorations
★ Arkveld Gamma Armor | MH Stories 3 Collab
☆ Version 1.041: Sororal α Armor | Shatterseal
★ How to Unlock Proof of a Hero Quest
☆ Omega Planetes | Savage Omega | Builds vs Omega
★ Armor Set Search updated for Ver 1.041
☆ HR50+ Builds | Tier List | Weapon Guides
Armor Decorations are Decorations that are slotted into Armor pieces. Check out the list of all Armor Decorations and their skills, as well as how to equip and obtain them here!
List of All Armor Decorations
※ Enter the Decoration or Skill in the input box and then hit Search to narrow down the results.
How to Equip Armor Decorations
Access the Change Equipment Menu
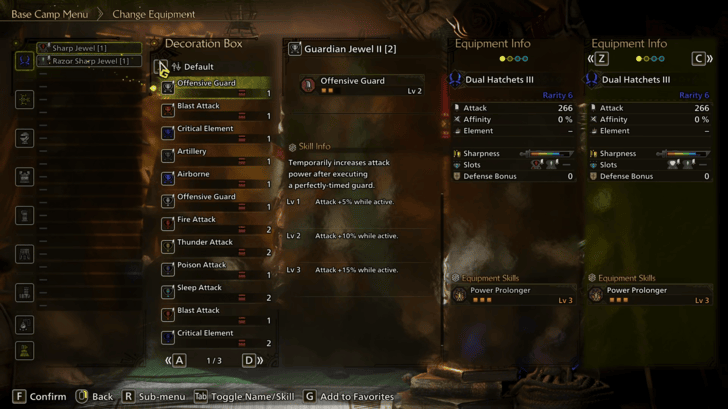
You can equip Decorations by going to the Smithy or your Tent and then selecting "Change Equipment" in the menu.
Select a piece of equipment that has an available Decoration slot and then hit Right on the D-Pad (D Key on the keyboard) to select from your available Decorations.
How to Get Armor Decorations
Bonus Quest Reward
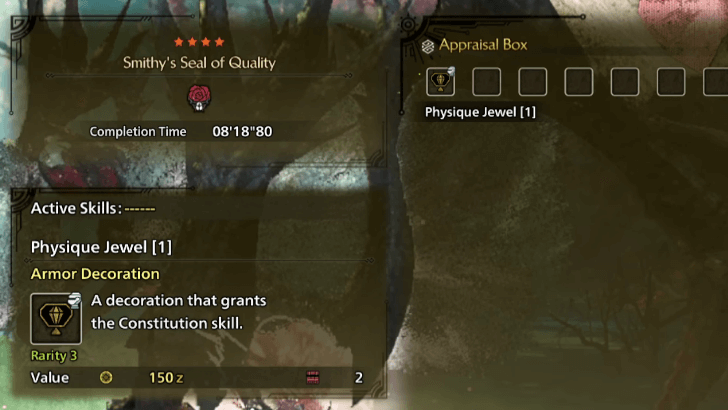
You can get Armor Decorations as a potential Bonus Reward from quests in the form of Orbs. The type of decoration depends on the type of Orb. For example, Mystery Orbs typically give 1-slot skills.
Players Can Meld Decorations

Wyverian Melding is also available and allows you to give up unwanted decorations into new ones.
Unlock More Melding Options
| Melding Pot Feature | How to Unlock |
|---|---|
| Meld Decorations (Tier 1) | Complete What Lies Ahead |
| Meld Decorations (Tier 2) | Reach HR 100 |
As you progress through the game, more Melding Options can be accessed by reaching certain milestones, like completing Side Quests or reaching certain a Hunter Rank!
Monster Hunter Wilds Related Guides
| Decorations | |
|---|---|
| Armor Decorations | Weapon Decorations |
Comment
Author

List of All Armor Decorations
Premium Articles

Rankings
Gaming News


![Monster Hunter Stories 3 Review [First Impressions] | Simply Rejuvenating](https://img.game8.co/4438641/2a31b7702bd70e78ec8efd24661dacda.jpeg/thumb)
Popular Games

Genshin Impact Walkthrough & Guides Wiki
Honkai: Star Rail Walkthrough & Guides Wiki
Umamusume: Pretty Derby Walkthrough & Guides Wiki
Pokemon Pokopia Walkthrough & Guides Wiki
Resident Evil Requiem (RE9) Walkthrough & Guides Wiki
Monster Hunter Wilds Walkthrough & Guides Wiki
Wuthering Waves Walkthrough & Guides Wiki
Arknights: Endfield Walkthrough & Guides Wiki
Pokemon FireRed and LeafGreen (FRLG) Walkthrough & Guides Wiki
Pokemon TCG Pocket (PTCGP) Strategies & Guides Wiki


Recommended Games
Diablo 4: Vessel of Hatred Walkthrough & Guides Wiki
Cyberpunk 2077: Ultimate Edition Walkthrough & Guides Wiki
Fire Emblem Heroes (FEH) Walkthrough & Guides Wiki
Yu-Gi-Oh! Master Duel Walkthrough & Guides Wiki
Super Smash Bros. Ultimate Walkthrough & Guides Wiki
Pokemon Brilliant Diamond and Shining Pearl (BDSP) Walkthrough & Guides Wiki
Elden Ring Shadow of the Erdtree Walkthrough & Guides Wiki
Monster Hunter World Walkthrough & Guides Wiki
The Legend of Zelda: Tears of the Kingdom Walkthrough & Guides Wiki
Persona 3 Reload Walkthrough & Guides Wiki


All rights reserved
©CAPCOM
The copyrights of videos of games used in our content and other intellectual property rights belong to the provider of the game.
The contents we provide on this site were created personally by members of the Game8 editorial department.
We refuse the right to reuse or repost content taken without our permission such as data or images to other sites.