Photo Mode Guide
★ Arkveld Gamma Armor | MH Stories 3 Collab
☆ Version 1.041: Sororal α Armor | Shatterseal
★ How to Unlock Proof of a Hero Quest
☆ Omega Planetes | Savage Omega | Builds vs Omega
★ Armor Set Search updated for Ver 1.041
☆ HR50+ Builds | Tier List | Weapon Guides
Photo Mode lets you take the best shots of your hunts in Monster Hunter Wilds! See how to take a photo, all the Photo Mode tips and features here.
List of Contents
How to Take a Photo
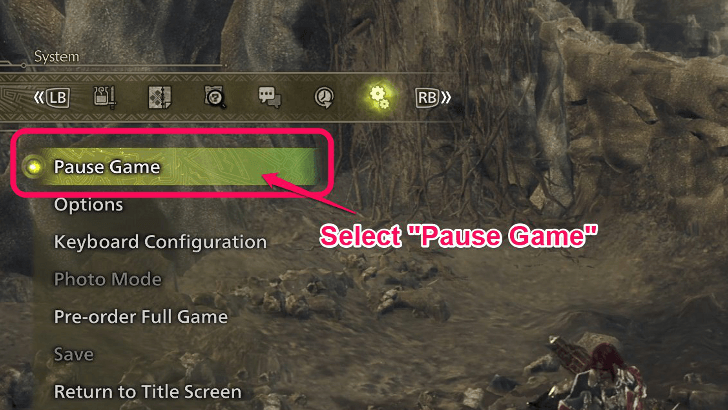
Select ‘Photo Mode’ in the Start Menu Under Settings
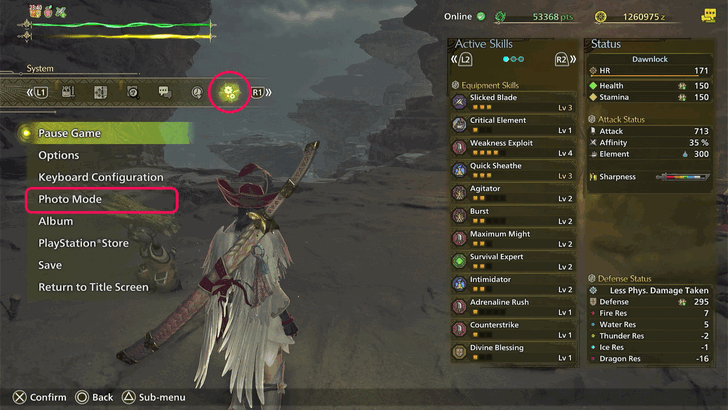
Head to the Start Menu and look for Settings signified by a cogwheel on the far right of the start menu tab. This should open a list of options where Photo Mode can be seen as the 4th option from the top.
All Photo Mode Features
| All Photo Mode Features |
|---|
|
|
Customize Filter and Effects
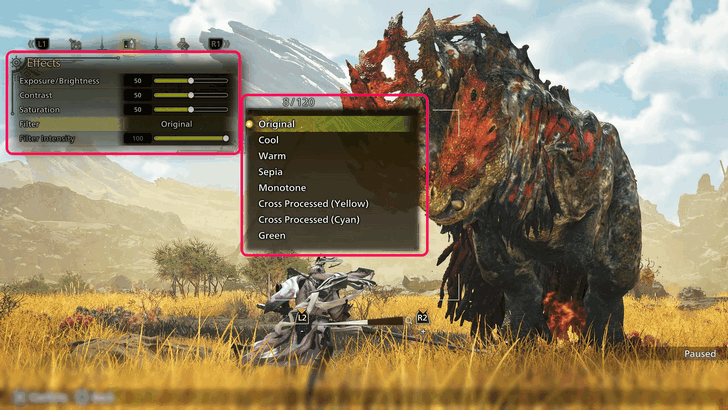
Title Update 2 added a new "Effects" tab that will allow you to edit the photo's brightness and exposure, contrast, and saturation, along with a list of filters that you can apply to your images!
Title Updates Roadmap and Schedule
Access Through Edit Menu While in Photo Mode

The Edit Menu can be seen on the upper right side of your screen while in Photo Mode. Choosing this option will open the various editing options that you can apply to your photo.
Choose Which Characters are Visible
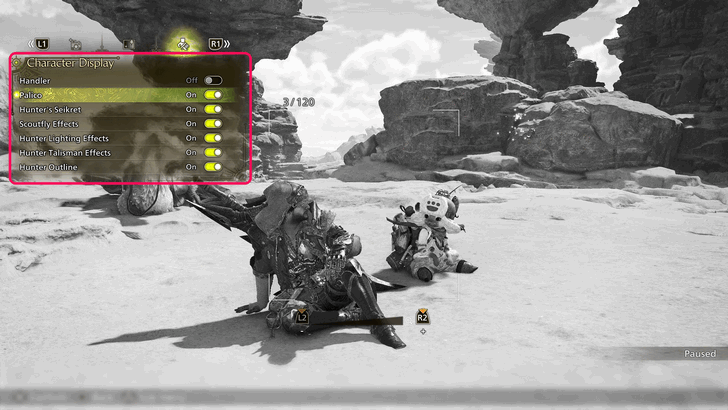
"Character Display" is another feature that Title Update 2 brought, and can be accessed through Edit Menu. In this tab, you can choose which characters will stay visible in your photo by toggling on or off!
Switch View Mode
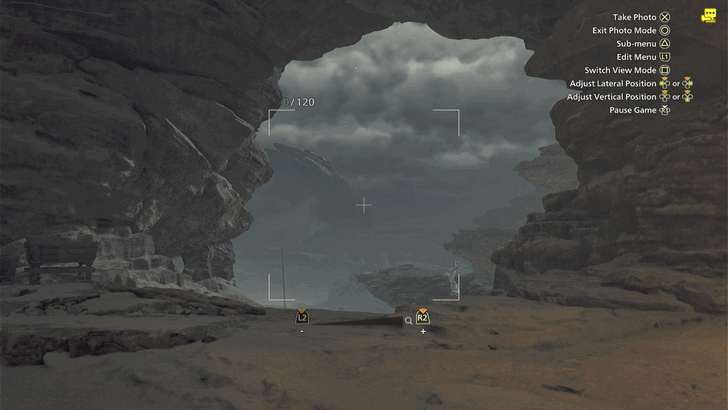
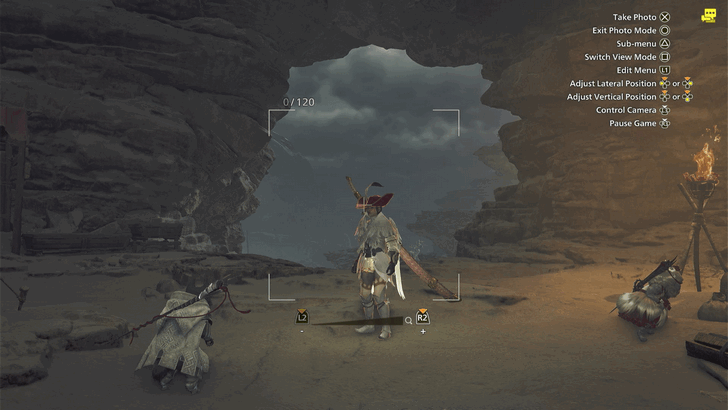
| Default View Mode | Second Viewing Mode |
|---|---|
|
|
Upon entering Photo Mode, you can choose which view the camera would take. The default view would be in a first person like view where your hunter is "holding" the camera. In this viewing mode, you can pause the game by pressing the Right Thumbstick.
Pressing Square in PS4/5 or X in Xbox will switch the view, transitioning into a third person like point of view. This second view mode is excellent for photos that will include your hunter.
Control Camera or Control Character in Second View
In the second view mode, you can choose whether to control the camera or your character. You can toggle to control the camera or your character by pressing the Right Thumbstick.
Use Poses and Gestures
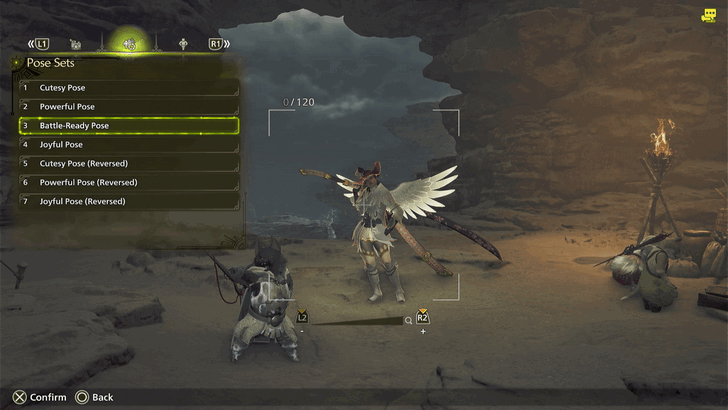
While in the second view mode, you can choose poses and gestures that your character and palico will do.
Camera View
Camera View allows you to zoom in and out so you would have a control over how much the camera covers.
Camera Rotation
You can tilt the camera to the left or right using the Camera Rotation.
Depth of Focus
Depth of Field gives you reigns over which part of the photo should be sharpened and blurred.
Essentially, if the Depth of Field is low, only the objects in front would be sharpened while the rest are blurred. Raise it higher so the objects in the middle or even at the back would be sharped, while the ones in front are blurred
Other Features
The Camera features don't stop there! There is still Depth of Field, and Focal Ratio. Both of these features can be explored in the game.
Photo Mode Tips
Pause the Game
When you know you have a perfect shot, you can instantly pause the game. This eradicates the danger of any monsters nearby, giving you the time and freedeom to edit the shot you just took.
Note that you can only pause quests in Single Player Mode.
How to Pause Quests
Photo Mode Save Location
PC: ScreenShots Folder of the MH Wilds Local Files
Locating your photos on the PC is a little tricky, and will require you to access your local game files on the PC. You can access this folder by following these steps:
| Accessing Your Local Directory | |
|---|---|
| 1 | 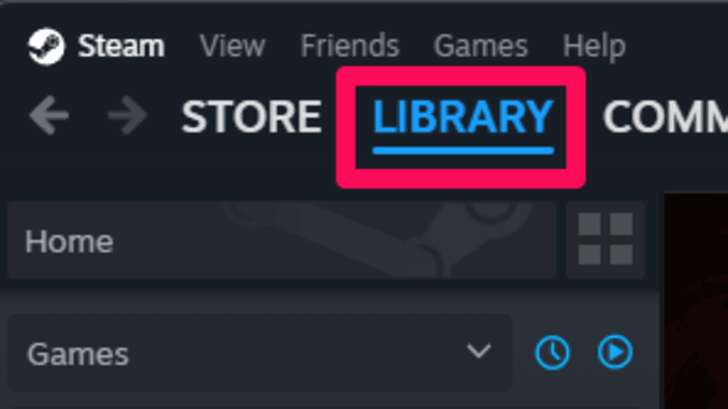 Open Steam. |
| 2 | 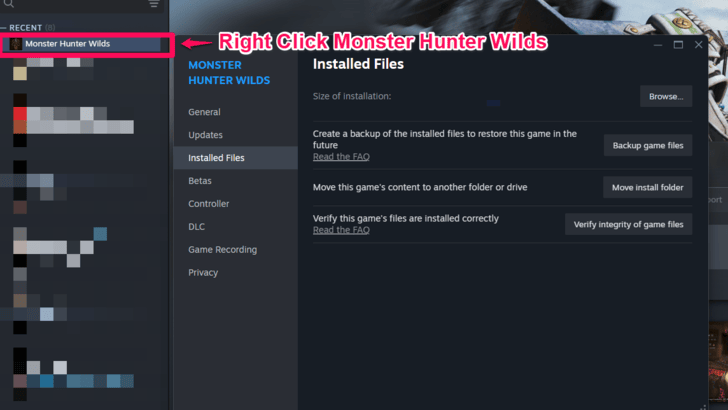 Go to your Library and right click Monster Hunter Wilds from the games list. |
| 3 | 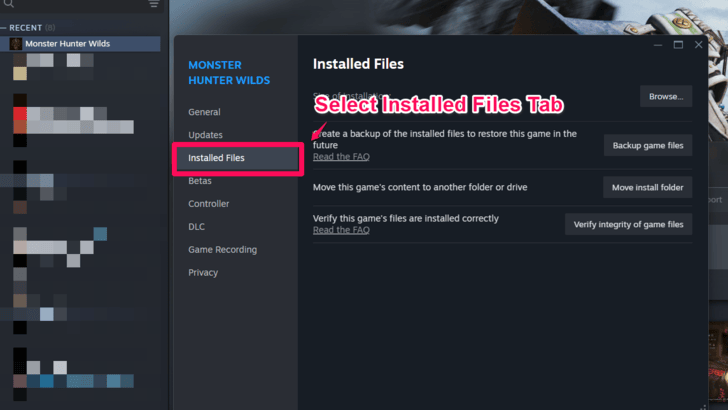 After right clicking select Properties, and from the window that pops up, select Installed Files tab. |
| 4 | 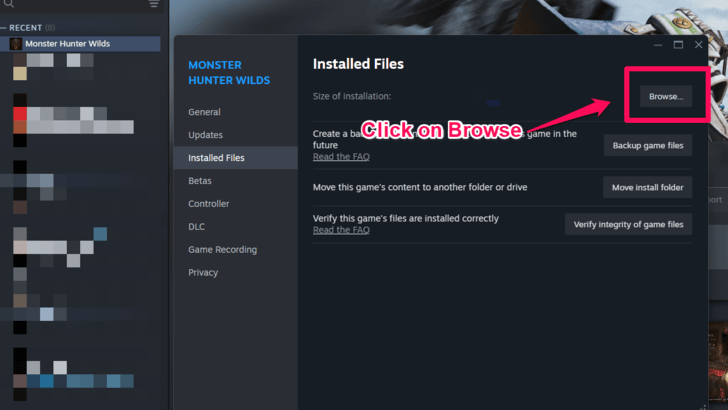 Click on the Browse button and this will open a window to your game's Local File Directory |
| 5 | 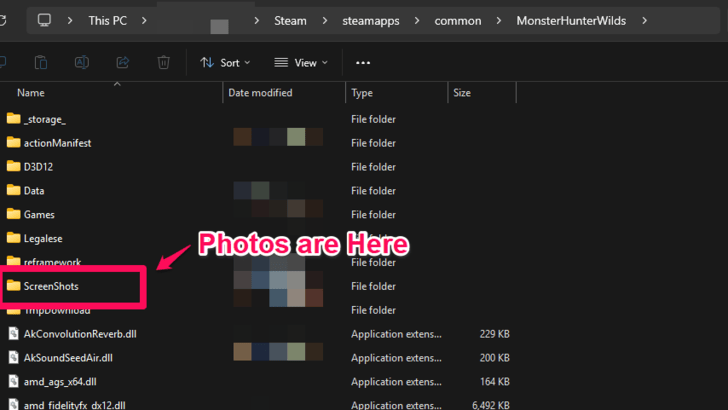 Look for the ScreenShot folder and enjoy your photos. |
Console: Saved in the Media Gallery
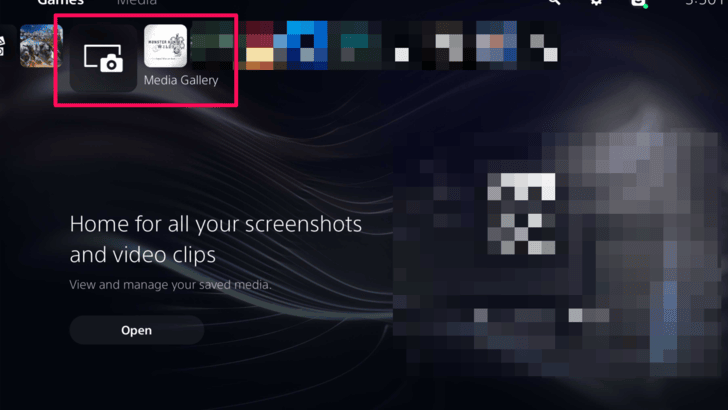
On the console, photos taken in-game are automatically saved in the device's Media Gallery. After taking a photo exit the game and access the gallery from the main menu to preview and share your shots.
Monster Hunter Wilds Related Guides
All Tips and Tricks Guides
Comment
Author

Photo Mode Guide
Premium Articles

Rankings
Gaming News


![Monster Hunter Stories 3 Review [First Impressions] | Simply Rejuvenating](https://img.game8.co/4438641/2a31b7702bd70e78ec8efd24661dacda.jpeg/thumb)
Popular Games

Genshin Impact Walkthrough & Guides Wiki
Honkai: Star Rail Walkthrough & Guides Wiki
Umamusume: Pretty Derby Walkthrough & Guides Wiki
Pokemon Pokopia Walkthrough & Guides Wiki
Resident Evil Requiem (RE9) Walkthrough & Guides Wiki
Monster Hunter Wilds Walkthrough & Guides Wiki
Wuthering Waves Walkthrough & Guides Wiki
Arknights: Endfield Walkthrough & Guides Wiki
Pokemon FireRed and LeafGreen (FRLG) Walkthrough & Guides Wiki
Pokemon TCG Pocket (PTCGP) Strategies & Guides Wiki


Recommended Games
Diablo 4: Vessel of Hatred Walkthrough & Guides Wiki
Cyberpunk 2077: Ultimate Edition Walkthrough & Guides Wiki
Fire Emblem Heroes (FEH) Walkthrough & Guides Wiki
Yu-Gi-Oh! Master Duel Walkthrough & Guides Wiki
Super Smash Bros. Ultimate Walkthrough & Guides Wiki
Pokemon Brilliant Diamond and Shining Pearl (BDSP) Walkthrough & Guides Wiki
Elden Ring Shadow of the Erdtree Walkthrough & Guides Wiki
Monster Hunter World Walkthrough & Guides Wiki
The Legend of Zelda: Tears of the Kingdom Walkthrough & Guides Wiki
Persona 3 Reload Walkthrough & Guides Wiki


All rights reserved
©CAPCOM
The copyrights of videos of games used in our content and other intellectual property rights belong to the provider of the game.
The contents we provide on this site were created personally by members of the Game8 editorial department.
We refuse the right to reuse or repost content taken without our permission such as data or images to other sites.