Switch Axe Weapon Guide and Best Combos
★ Arkveld Gamma Armor | MH Stories 3 Collab
☆ Version 1.041: Sororal α Armor | Shatterseal
★ How to Unlock Proof of a Hero Quest
☆ Omega Planetes | Savage Omega | Builds vs Omega
★ Armor Set Search updated for Ver 1.041
☆ HR50+ Builds | Tier List | Weapon Guides
The Switch Axe is a versatile weapon that swaps between Axe and Sword Mode in Monster Hunter Wilds. See all the new moves for the Switch Axe, its mechanics, controls, best combos, advanced tips, and how good it is!
| Switch Axe Guides | ||
|---|---|---|
| Weapon Guide | Builds | Tree |
List of Contents
Switch Axe Balance Adjustment
Switch Axe Update in Version 1.021
| Switch Axe Changes (Version 1.021) |
|---|
|
・(Buff) Relaxed the offset detection for Axe: Offset Rising Slash, making it easier to trigger an offset attack. ・(Buff) The offset buildup for Axe: Offset Rising Slash has been increased. |
The Switch Axe has received buffs allowing for easier Offset Attacks in Version 1.021 which released on August 12, 2025.
Switch Axe Mechanics Explained
| Switch Axe Mechanics |
|---|
|
|
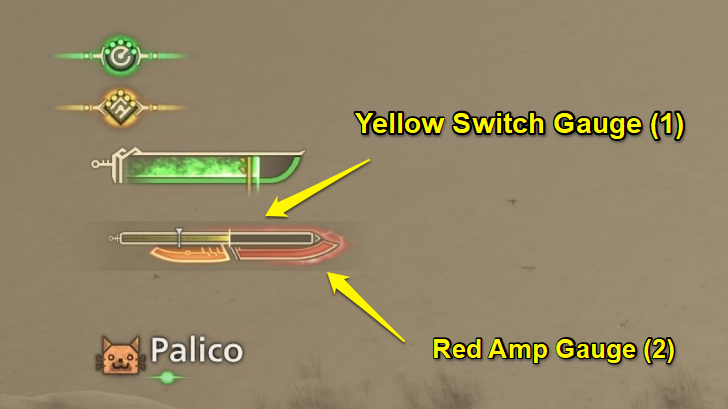
Learn How The Gauge Works
| Gauge Name | Explanation |
|---|---|
| Switch Gauge | Can morph into Sword Mode once it reaches 30%. Attacks in this form will consume the gauge. |
| Amp Gauge + Amped State | Gets filled when you land attacks in Sword Mode. Enter the Amped State once the Amp Gauge is full. |
The Switch Axe comes a three-segment indicator found at the upper left of the screen that players will need to manage while fighting. The Switch Gauge (1) charges when landing attacks in Axe Mode, or when reloading, and is consumed when attacking in Sword Mode. You need to maintain a balance between building and using the switch gauge to avoid reloading your Axe.
The Amp Gauge (2) fills up when landing attacks in Sword Mode. Filling the Amp Gauge causes Hunters to enter the Amped State, adding phial explosions to their Sword Mode attacks and enabling new moves.
Axe Mode Charges, Sword Mode Expends
Axe Mode is responsible for charging the switch gauge, while the Sword Mode expends the charge in exchange for more damage. You'd want to balance the switch game by morphing between Sword and Axe to maximize your DPS.
Use Axe Mode for Mobility and Reach
The weapon's Axe Mode boasts greater reach with its sweeping attacks. This is perfect for hitting enemies with tall bodies, or hard to hit body parts that you need to aim for, like tails.
Axe Mode is also relatively more mobile than Sword, so consider using Axe Mode for evasion and mobility while the weapon is unsheathed.
Use Sword Mode for Higher Damage
Sword Mode's attacks decrease the Switch Gauge on-hit, but the hits are faster and do more damage equalling to an obvious damage-per-second increase. Sword Mode also charges the Amp Gauge which enables Amped State!
Filling the Amp Gauge grants access to stronger moves, like the Elemental Discharge, and entering the Amped State enables the Full Release Slash. Sword attacks in the Amped State also cause phial explosions on-hit.
Activate Power Axe Mode to Boost Axe Attacks

The last segment is the Power Axe Mode (3) indicator. It shows that Axe Mode currently deals more damage and charges the Switch Gauge faster. Power Axe Mode activates with certain attacks:
Use Explosion Moves on Huge Openings
| Input |
|---|
| |
| Move Input |
|---|
| |
| Input |
|---|
| |
Two new moves for the Switch Axe, the Full Release Slash and the Unbridled Slash are both capable of dealing big damage in a small amount of time. This is extremely solid to use when you have a huge opening, when a monster is down for example. The only caveat is it eats a lot of your Switch Gauge, so make sure to use it carefully!
Full Release Slash Has Knockback Negation
When doing Full Release Slash, make sure to remember that Full Release Slash has knockback negation. You will still get chip damage though, so be sure to not use it haphazardly.
Counterattack with Offset & Counter Rising Slash
The Switch Axe gains two counterattack moves with the Offset Rising Slash and the Counter Rising Slash. Offset Rising Slash is done while in Axe Mode, while Counter Rising Slash is done while in Sword Mode. Know which counterattack move to use based on what mode you're in because they have different inputs!
Also, note that Counter Rising Slash is a hyperarmor counterattack move, so the skills Counterstrike will trigger whenever you execute the move!
Offset Rising Slash
| Combo Input |
|---|
| |
| Combo Input |
|---|
| |
| Combo Input |
|---|
| |
Counter Rising Slash
| Combo Input |
|---|
| |
| Combo Input |
|---|
| |
| Combo Input |
|---|
| |
Use Focus Attacks on Wounds
| Combo Input |
|---|
| |
| Combo Input |
|---|
| |
| Combo Input |
|---|
| |
Switch Axe also gains a new move unique to Monster Hunter Wilds called Focus Mode: Morph Combination. Use this whenever a wound opens up to deal big damage!
Also note that you can morph mid-combo so you can choose to either end it with the Axe or Sword. We recommend ending it with the Sword though so you can deal an explosion which can then be chained into an Unbridled Slash / Full Release Slash!
Switch Axe Controls
Axe Mode Action and Inputs
| Input | |
|---|---|
| Overhead Smash | |
| Wild Swing Heavy Slam | |
| Offset Rising Slash | |
| Follow-up Heavy Slam | |
| Follow-up Morph Slam | |
| Fade Slash | |
| Reload/Morph | |
| Focus Mode: Morph Combination Elemental Discharge Finisher | |
| Input | |
|---|---|
| Overhead Smash | |
| Wild Swing Heavy Slam | |
| Offset Rising Slash | |
| Follow-up Heavy Slam | |
| Follow-up Morph Slam | |
| Fade Slash | ↓ |
| Reload/Morph | |
| Focus Mode: Morph Combination Elemental Discharge Finisher | |
| Input | |
|---|---|
| Overhead Smash | |
| Wild Swing Heavy Slam | |
| Offset Rising Slash | |
| Follow-up Heavy Slam | |
| Follow-up Morph Slam | |
| Fade Slash | ↓ |
| Reload/Morph | |
| Focus Mode: Morph Combination Elemental Discharge Finisher | |
Sword Mode Action and Inputs
| Input | |
|---|---|
| Overhead Slash | |
| Double Slash | |
| Counter Rising Slash Heavenward Flurry | |
| Element Discharge Element Discharge Finisher | |
| Zero Sum Discharge Zero Sum Discharge Finisher | |
| Unbridled Slash | |
| Full Release Slash | |
| Input | |
|---|---|
| Overhead Slash | |
| Double Slash | |
| Counter Rising Slash Heavenward Flurry | |
| Element Discharge Element Discharge Finisher | |
| Zero Sum Discharge Zero Sum Discharge Finisher | |
| Unbridled Slash | |
| Full Release Slash | |
| Input | |
|---|---|
| Overhead Slash | |
| Double Slash | |
| Counter Rising Slash Heavenward Flurry | |
| Element Discharge Element Discharge Finisher | |
| Zero Sum Discharge Zero Sum Discharge Finisher | |
| Unbridled Slash | |
| Full Release Slash | |
Recommended Switch Axe Combos
| List of Recommended Combos |
|---|
|
|
Full-Release Spam Combo
| Combo Input |
|---|
| In Amped Sword Mode: → (repeat) |
| Combo Input |
|---|
| In Amped Sword Mode: → (repeat) |
| Combo Input |
|---|
| In Amped Sword Mode: → (repeat) |
Considered to be the Switch Axe's most powerful combo, the Full Release Slash is a move that can be spammed whenever a monster is down!
There are quite a few requirements for you to execute this move, but it can be done as long as you can hit the Spiral Burst Slash that comes after the Full Release Slash because it maintains your Switch Gauge above the required level for Sword Mode.
It is also required that you are in the Amped State, so either invest in Power Prolonger to make sure your are in the amped state when the monster is down.
Bread-and-Butter Wild Swing Morph Combo
| Combo Input |
|---|
| While standing, mid-way after 1 Swing: |
| Combo Input |
|---|
| While standing, mid-way after 1 Swing: |
| Combo Input |
|---|
| While standing, mid-way after 1 Swing: |
The combo utilizes the high damage move generated by the Morph Sweep after a Wild Swing. It will require quite a bit of animation commitment though, so try to use it when you have an opening. You'd always want to use this combo by default to maximize your damage and easily manage your switch gauge.
Also, this combo will switch to a Sword mid-combo, so make sure you have ample switch gauge charge to avoid a forced reload.
Switch Gauge Maintenance Combo
| Combo Input |
|---|
| From Axe Mode or Sheathed Weapon: |
| Combo Input |
|---|
| From Axe Mode or Sheathed Weapon: |
| Combo Input |
|---|
| From Axe Mode or Sheathed Weapon: |
This combo aims to utilize the switching mechanic of the Switch Axe, making sure that you are dealing damage from both the Sword and the Axe mode. This combo will go through some high damage moves of the Axe while weaving in the Sword mode to charge the Amp gauge.
Power Axe Activation Combos
Quick Power Axe Activation
| Combo Input |
|---|
| |
| Combo Input |
|---|
| |
| Combo Input |
|---|
| |
So far, the quickest way to activate the Power Axe mode is to use the follow up attack of the Offset Rising Slash. This will require a perfect parry though, so it may take skill and timing to pull off.
Wild Swing to Heavy Slam
| Combo Input |
|---|
Repeatedly Tap |
| Combo Input |
|---|
Repeatedly Tap |
| Combo Input |
|---|
Repeatedly Tap |
For longer openings, attacking with Axe Mode's Wild Swing and finishing with a Heavy Slam is a good way to generate Switch Gauge charge. Though slower in reaching the Power Axe combo, it does not require you to counter an attack with the Offset attack.
Sword Mode Amp Charge Combo
| Combo Input |
|---|
| In Sword Mode: |
| Combo Input |
|---|
| In Sword Mode: |
| Combo Input |
|---|
| In Sword Mode: |
This combo is the best one to use for charging your Amp Gauge from zero to maximum. It also gives you the fastest route to Heavensward Flurry which is the move that can charge the Amp Gauge the most. You can then opt to cancel out the move if the situation does not permit the long animation commitment of Heavensward Flurry.
Do note that this eats up a lot of your switch gauge so we still suggest going for the Bread-and-Butter Morph Combo more than this for charging the amp gauge.
Quick Elemental Discharge Combo
| Combo Input |
|---|
| Combo Input |
|---|
| Combo Input |
|---|
This is one of the highest damaging combos for Switch Axe that is relatively fast and is perfect when used against downed monsters - at the cost of using up *a lot of the Switch Gauge.
The follow up axe attack is pretty important because by this time your Switch gauge may be depleted, and the subsequent axe attack will recharge is pretty significantly. In addition, the first two slashes is required at the start to reduce the wind-up time of the elemental discharge.
Switch Gauge Charge Combo
| Combo Input |
|---|
| Combo Input |
|---|
| Combo Input |
|---|
This is the simplest Axe Mode combo that can be used to charge your switch gauge from zero the quickest way possible. The combo ends with a Spiral Burst Slash, a move that charges the switch gauge by a lot!
Be sure to use Fade Slash or a dodge to reposition according to the situation.
Switch Axe Advanced Tips
| Switch Axe Advanced Tips |
|---|
|
|
Build Around Phial Types and Effects
| Phial Type | Phial Effects |
|---|---|
| Power Phial | Does Raw Damage |
| Element Phial | Does Elemental Damage |
| Status Effect Phial | Inflicts Status Buildup |
Switch Axes come with different Phial types that affect the explosions that appear during Amped State attacks. Using a weapon with the right phial to target a monster's weakness can give hunters the upper hand in the fight.
In addition, some phial types also provide inherent increase in damage when used. In Monster Hunter World, using Switch Axes with Power Phials provide an increase in raw damage. This may be coming back in Monster Hunter Wilds.
Utilize Morph Attacks for Fluid Combat
Using Morph Slash in combos is key to having a fluid combat experience while using the Switch Axe. Morph Slash allows for a quick transition between modes, while also doing damage and filling up both the Axe and Sword gauges.
Though unsure from the beta, Rapid Morph could be a skill that is coming to Wilds which would enable quicker morphing while increasing the damage dealt by moprh attacks. This will definitely bolster your damage output.
How Good is the Switch Axe?
Tier List Ranking
| Weapon Ranking | ||
|---|---|---|
| Damage Type | Entry Barrier | Difficulty to Master |
| Medium | ★★☆☆☆ | |
| Weaknesses and Strengths | ||
|
|
||
Entry Barrier pertains to how easy it is to learn the weapon from scratch, while Difficulty to Master is a rating on how difficult it is to perfectly execute the weapon mechanics.
The Switch Axe uses powerful attacks that takes advantage of its long reach and access to knockback immunity. It can be a bit hard for beginners to grasp the mechanics of the Switch Axe though - mostly due to the need to manage multiple gauges all at once, but you will get better at it as you use it more. However, if you do not want to play it mechanically, a play-style that revolves around Full Release Slash is easy and viable, but it will fall off in the late game as you encounter more mobile monsters.
A lot of the problems in the Open Beta Test has since been fixed including the addition of knockback immunity during Full Release Slash, better overall counterattack timings, and more. It is a weapon that is fun to use, but expect a bit of a learning curve!
Monster Hunter Wilds Related Guides
All Weapon Guides
| All Weapon Tutorials | |||||
|---|---|---|---|---|---|
 Great Sword Great Sword |
 Long Sword Long Sword |
 Sword & Shield Sword & Shield |
|||
 Dual Blades Dual Blades |
 Hammer Hammer |
 Hunting Horn Hunting Horn |
|||
 Lance Lance |
 Gunlance Gunlance |
 Switch Axe Switch Axe |
|||
 Charge Blade Charge Blade |
 Insect Glaive Insect Glaive |
 Light Bowgun Light Bowgun |
|||
 Heavy Bowgun Heavy Bowgun |
 Bow Bow |
||||
All Weapon Trees
| All Weapon Trees | |||||
|---|---|---|---|---|---|
 Great Sword Great Sword |
 Long Sword Long Sword |
 Sword & Shield Sword & Shield |
|||
 Dual Blades Dual Blades |
 Hammer Hammer |
 Hunting Horn Hunting Horn |
|||
 Lance Lance |
 Gunlance Gunlance |
 Switch Axe Switch Axe |
|||
 Charge Blade Charge Blade |
 Insect Glaive Insect Glaive |
 Kinsects Kinsects |
|||
 Light Bowgun Light Bowgun |
 Heavy Bowgun Heavy Bowgun |
 Bow Bow |
|||
Comment
SA combos aren't too long, theyre infinite. Other weapons require specific combos to use their finishers, but almost all SA attacks combo together, and you can directly use a finisher when ready. By "momentum" I assume you mean difficulty with positioning. Sword mode is mostly for stationary DPS while axe mode runs/rolls faster and attacks move you further, so switch as needed. The axe counter is awfully slow, but the sword counter comes out frame 1 and blocks anything. Hope this helps!
Author

Switch Axe Weapon Guide and Best Combos
Premium Articles

Rankings
Gaming News


![Monster Hunter Stories 3 Review [First Impressions] | Simply Rejuvenating](https://img.game8.co/4438641/2a31b7702bd70e78ec8efd24661dacda.jpeg/thumb)
Popular Games

Genshin Impact Walkthrough & Guides Wiki
Honkai: Star Rail Walkthrough & Guides Wiki
Umamusume: Pretty Derby Walkthrough & Guides Wiki
Pokemon Pokopia Walkthrough & Guides Wiki
Resident Evil Requiem (RE9) Walkthrough & Guides Wiki
Monster Hunter Wilds Walkthrough & Guides Wiki
Wuthering Waves Walkthrough & Guides Wiki
Arknights: Endfield Walkthrough & Guides Wiki
Pokemon FireRed and LeafGreen (FRLG) Walkthrough & Guides Wiki
Pokemon TCG Pocket (PTCGP) Strategies & Guides Wiki


Recommended Games
Diablo 4: Vessel of Hatred Walkthrough & Guides Wiki
Cyberpunk 2077: Ultimate Edition Walkthrough & Guides Wiki
Fire Emblem Heroes (FEH) Walkthrough & Guides Wiki
Yu-Gi-Oh! Master Duel Walkthrough & Guides Wiki
Super Smash Bros. Ultimate Walkthrough & Guides Wiki
Pokemon Brilliant Diamond and Shining Pearl (BDSP) Walkthrough & Guides Wiki
Elden Ring Shadow of the Erdtree Walkthrough & Guides Wiki
Monster Hunter World Walkthrough & Guides Wiki
The Legend of Zelda: Tears of the Kingdom Walkthrough & Guides Wiki
Persona 3 Reload Walkthrough & Guides Wiki


All rights reserved
©CAPCOM
The copyrights of videos of games used in our content and other intellectual property rights belong to the provider of the game.
The contents we provide on this site were created personally by members of the Game8 editorial department.
We refuse the right to reuse or repost content taken without our permission such as data or images to other sites.
The combos videos are all kind of dark compared to the others...