Charge Blade Weapon Guide and Best Combos
★ Arkveld Gamma Armor | MH Stories 3 Collab
☆ Version 1.041: Sororal α Armor | Shatterseal
★ How to Unlock Proof of a Hero Quest
☆ Omega Planetes | Savage Omega | Builds vs Omega
★ Armor Set Search updated for Ver 1.041
☆ HR50+ Builds | Tier List | Weapon Guides
The Charge Blade is a weapon that balances offense and defense and can morph between two modes in Monster Hunter Wilds. See what new actions the Charge Blade can perform, how to use it, sample and recommended combos, and what its controls are in this guide!
| Charge Blade Guides | ||
|---|---|---|
| Weapon Guide | Builds | Tree |
List of Contents
Charge Blade Balance Adjustment
Charge Blade Weapon Update in Version 1.021
| Charge Blade Changes (Version 1.021) |
|---|
|
・(Buff) The raw damage for Axe: Element Discharge I and II has been increased. ・(Buff) The raw damage for multi-hit attacks while in Power Axe Mode has been increased. ・(Fixed) Adjusted Axe: Element Discharge I and II so that, when an enhanced phial is used during Power Axe Mode, the explosion damage properly reflects the enhanced phial's effect. |
The Charge Blade has received a few buffs to Power Axe Mode in Version 1.021 which released on August 12, 2025.
Charge Blade Mechanics
| How to Use Charge Blade |
|---|
|
|
All Charge Blade Modes and Gauge
Charge Blade Gameplay Loop
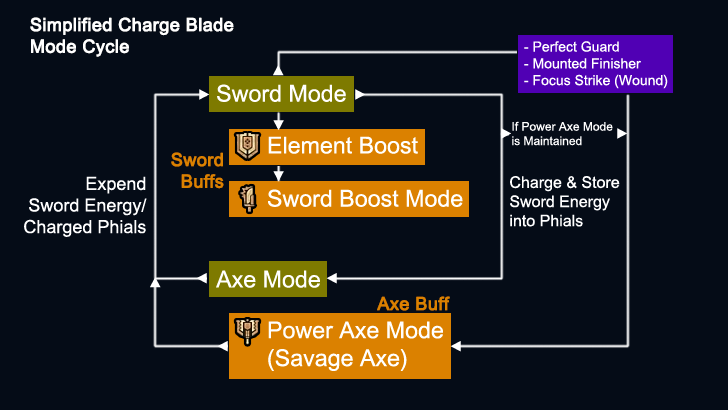
Using the Charge Blade effectively requires rotating between its two main modes, Sword Mode and Axe Mode. Below is the ideal loop for maximizing DPS with this weapon:
- From Sword Mode, transition to Axe Mode when you have filled your Charge Gauge phials with Sword Energy via attacks, charged attacks, and receiving hits on guards.
- In Axe Mode, expend Sword Energy phials through AEDs/SAED to deal extra phial damage.
- Repeat the cycle. Buffs can be added to this loop through other Boosted Modes: Sword Boost Mode, Element Boost, and Power Axe Mode (Savage Axe).
Additionally, Power Axe Mode (or Savage Axe) is also good to transition into when the opportunity presents itself for extra damage.
Charge Blade Modes
| Standard Modes | |
|---|---|
| Sword Mode | ・Attack with your sword.
・Allows you to perform manual Guards. ・Allows you to use Charge for storing Sword Energy into your phials. ・Hits on Guards also contribute to charging Sword Energy. Morph into Axe Mode with Sword: Morph Slash. |
| Axe Mode | ・Attack with your axe.
・Allows Axe: Element Discharges and Axe: Amped Element Discharges (AEDs). ・Cannot manually guard during this mode. Morph back into Sword Mode with Axe: Morph Slash or Super Amped Element Discharge (SAED). |
| Boosted Modes | |
| How to Activate:
ⓘ Requires Element Boost ┗ Sword: Condensed Element Slash Gives your sword attacks phial effects, boosts damage, and prevents weapon deflection. |
|
| How to Activate:
┣ Charge → Shield: Element Boost ┗ Amped Element Discharge → Elemental Roundslash Guard is enhanced while in Sword Mode and allows you to perform SAED after an AED. |
|
| How to Activate:
┣ Perfect Guard → Savage Axe Slash ┣ Mounted Finisher ┗ Focus Strike: Double Rend (on wound hit) Reduces phials consumed on Element Discharges and, by holding down your attack button, lets you deal tick damage on axe swing hitstops. Also enables the use of Savage Axe. |
Charge Blade Charge Gauge
| Charge Gauge States | |
|---|---|
 |
No Charge |
 |
Charge 3 Phials |
 |
Charge 5 Phials |
 |
Overcharged Your attacks will bounce off when overcharged. To remove it, Charge immediately to transfer the energy to your phials. |
 |
Enhanced Phial attack damage is boosted. Phial enchancement happens when charging exceeds 4 or more phials with stored energy.
Extends the duration of
|
Charge Phials with Sword Mode
The main gimmick of Charge Blade is accumulating Sword Energy by attacking enemies or taking hits while guarding in Sword Mode (includes Guard Points), charging the phials with the Sword Energy, and using them to enhance Axe Mode attacks.
Check the phial icons on the top left of your screen to see how much Sword Energy you've accumulated, which also indicates how many phials will be filled after charging.
Activating Axe Mode and Savage Axe
Once you have charged phials ready, head into Axe Mode and start unleashing Element Discharge attacks. Phial charges are consumed and add phial explosions whenever you use Element Discharge attacks, including Amped Element Discharge (AED) or Super Amped Element Discharge (SAED).
The number of phials consumed by these attacks depends on the move used, as some Axe Mode attacks, like the SAED, empties all five phials in one go. When you're out of phials, make sure to switch back to Sword Mode to charge them again.
Buff with Power Axe Mode for More Damage
Axe Mode can be buffed by going into Power Axe Mode via Perfect Guard, Mounted Finisher, or a successful Focus Strike: Double Rend.
While Savage Axe is activated, axe swings get an additional 'chainsaw effect', allowing you to apply extra tick damage and hitstop when you hold down your attack button as you hit the monster with an Element Discharge attack.
Focus Slash Can Activate Savage Axe
Focus Slash: Double Rend is the Charge Blade's new Focus Attack that you can use as an alternative to Perfect Guard and Mounted Finisher for activate Savage Axe. Your character will perform a double slash that will transition into Power Axe Mode (also known as Savage Axe) if it successfully hits a wound.
How to Use Focus Mode and Focus Strike
Understand Different Phial Types
| Phial Type | Effect |
|---|---|
| Impact Phial | Enhances raw damage in Axe Mode. Impact Phial damage scales according to your Attack stat (raw damage) and only benefits from the skill Artillery. SAED is unleashed in a straight-line pattern. |
| Element Phial | Enhances elemental attacks in Axe Mode, scaling according to your CB's Element stat. Element Phials benefit from its matching element skill such as Fire Attack, Thunder Attack, etc. It is unaffected by Artillery. SAED is unleashed in a cone-like pattern. |
There are two known types of Charge Blade phials that appear across Monster Hunter titles: Impact Phials and Element Phials. These return in Monster Hunter: Wilds.
Impact Phials deal raw damage on phial explosions and allows you to knock out monsters similar to a blunt weapon like the Hammer and Hunting Horn.
Charge Blades with Element Phials deal more elemental damage on phial explosions in Axe Mode and usually have playstyles that revolve around SAED spams. They're best used against monsters that have hitzones highly weak to a specific element, such as Gravios's underside which is weak to Water.
Perfect Guards and Guard Points
| Guard Type Use Cases | |
|---|---|
| Perfect Guard |
・Gives access to
・Gives immediate access to SAED.
・Deals phial damage with
・Has a Boosted Guard level, more noticeably so than a Guard Point with
・Must be performed at neutral (outside a combo). |
| Guard Point | ・Gives access to
・Gives immediate access to SAED. ・Deals phial damage with
・Can be used in the middle of combos. ・Counts as a Perfect Guard (as of Title Update 2). ・Has a Boosted Guard level, but is still noticeably susceptible to strong levels of knockback from attacks and roars. |
Perfect Guards and Guard Points are special defensive mechanics that you can use with the Charge Blade. Each guard type provides more benefits than a regular guard, such as faster recovery from knockback, reduced stamina consumption, and reduced damage taken.
The fast recovery from greater knockback resistance is one of the key benefits most aim for when making use of these guard types with the Charge Blade, since having it means you can react faster to a monster who just made its move (giving you safer openings for slow attacks like SAED).
Charge Blade Perfect Guard
Perfect Guards allow access to Savage Axe Slash and activates Power Axe Mode, which increases the overall damage of Axe Mode.
Perfect Guards are performed by blocking just before an attack hits you and have the following distinctions:
- Produces a noticeable 'clank' sound and visual spark (different from Element Boost phial explosions).
- Indicates in the control tooltip that you can follow up with a Savage Axe Slash.
Charge Blade Guard Points and Timing
| 1 | Sword: Morph Slash Axe: Smash At the beginning of the move when your shield is raised. |
|---|---|
| 2 | Axe: Morph Slash Sword: Fade Slash Sword: Roundslash Elemental Roundslash At the end of the move when your shield is raised. |
| 3 | Shield: Element Boost While the shield is in front. |
Know that a move has an available Guard Point if the shield glows white.
Guard Points, also known as 'Attacks That Block' in Weapon Controls, return as a mechanic for the Charge Blade. Guard Points also feature increased knockback resistance, especially when charged with Element Boost.
Well-timed Guard Points can perform a Perfect Guard, allowing you to chain into Savage Axe Slash and activate Power Axe Mode.
Morphing Draw Attack for Easy Guard Point
The Charge Blade's morphing draw attack is the quickest and most reliable way of executing a Guard Point. This is performed by pressing R2/RT/R key (default controls for PS, Xbox, and PC respectively) while the weapon is sheathed just before an attack would hit you.
This makes it easier to fish for Perfect Guards to activate Power Axe Mode, since you now have the mobility to reposition freely.
Guard Point Indicators
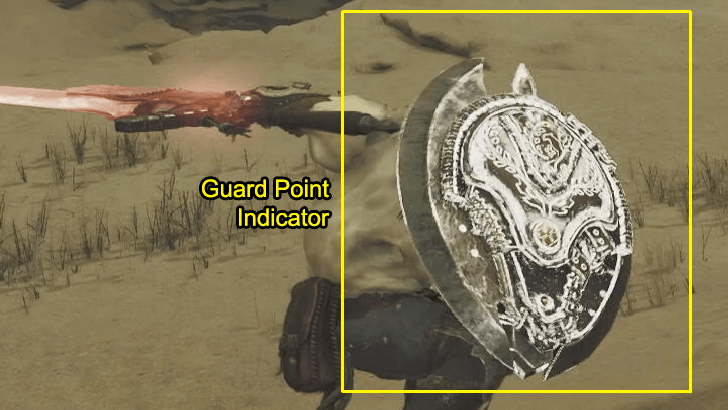
Guard Point indicators are now available and much easier to see for the Charge Blade. The Charge Blade's guard point timings will now cause the shield to glow which indicates that these specific set of frames are Guard Points or frames where the the player can block enemies when hit.
Charge Blade Controls
Sword Mode Controls
| Input | |
|---|---|
| Weak Slash | |
| Forward Slash | |
| Morph Slash | Transitions to Axe Mode |
| Charge | |
| Guard | |
| Charged Rising Slash | Press and Hold |
| Charged Double Slash | Press and Hold |
| Fade Slash | (Direction Modifiable) |
| Shield Thrust | After Slash/Charge |
| Return Stroke | After Dodge or Weak/Forward Slash |
| Roundslash | After Charged Rising/Double Slash |
| Focus Slash: Double Rend | Focus Mode Press and Hold Activates |
| | During Charge, Hold (Needs Phial Charges) Activates |
| | During Charge, Hold (Needs Element Boost) Activates |
| Input | |
|---|---|
| Weak Slash | |
| Forward Slash | |
| Morph Slash | Transitions to Axe Mode |
| Charge | |
| Guard | |
| Charged Rising Slash | Press and Hold |
| Charged Double Slash | Press and Hold |
| Fade Slash | (Direction Modifiable) Buffer |
| Shield Thrust | After Slash/Charge |
| Return Stroke | After Dodge or Weak/Forward Slash |
| Roundslash | After Charged Rising/Double Slash |
| Focus Slash: Double Rend | Focus Mode Press and Hold Activates |
| | During Charge, Hold (Needs Phial Charges) Activates |
| | During Charge, Hold (Needs Element Boost) Activates |
Axe Mode Controls
| Input | |
|---|---|
| Rising Slash | |
| Fade Slash | (Direction Modifiable ) Forward: Axe Slam Left or Right: Lateral Slash Backward: Backstep Slash |
| Morph Slash | Transitions to Sword Mode |
| Element Discharge I | |
| Rushing Element Discharge I | |
| Element Discharge II | After Element Discharge I |
| Amped Element Discharge (AED) | |
| Amped Element Discharge Follow-up | After Amped Element Discharge (AED) |
| Super Amped Element Discharge (SAED) | After AED with Also available after: Perfect Guard Guard Point |
| | After Perfect Guard, Mounted Punisher, or Guard Point Activates |
| | During Amped Element Discharge (AED) (Needs Phial Charges) Activates |
| Input | |
|---|---|
| Rising Slash | |
| Fade Slash | (Direction Modifiable) Buffer Forward: Axe Slam Left or Right: Lateral Slash Backward: Backstep Slash |
| Morph Slash | Transitions to Sword Mode |
| Element Discharge I | |
| Rushing Element Discharge I | |
| Element Discharge II | After Element Discharge I |
| Amped Element Discharge (AED) | |
| Amped Element Discharge Follow-up | After Amped Element Discharge (AED) |
| Super Amped Element Discharge (SAED) | After AED with Also available after: Perfect Guard Guard Point |
| | After Perfect Guard, Mounted Punisher, or Guard Point Activates |
| | During Amped Element Discharge (AED) (Needs Phial Charges) Activates |
During Element Discharge attacks while in Power Axe Mode, you can hold down the button to deal extra damage and hitstop.
Charge Blade Combos
| Mode Charging Combos |
|---|
|
|
| AED and SAED Combos |
| Perfect Guard Combos Combos |
|
|
Fast 5-Phial Charge Combo
| Combo Input |
|---|
( Sword: Forward Slash → Sword: Charged Double Slash → Sword: Shield Thrust → Sword: Double Slash → Charge |
| Combo Input |
|---|
(Forward Sword: Forward Slash → Sword: Charged Double Slash → Sword: Shield Thrust → Sword: Double Slash → Charge |
| Combo Input |
|---|
(Forward Sword: Forward Slash → Sword: Charged Double Slash → Sword: Shield Thrust → Sword: Double Slash → Charge |
This is a quick and easy 6-second combo that allows you to charge 5 phials quickly. This combo can serve as a quick damage deal to monster.
5-Phial Charge Combo into Element Boost
| Combo Input |
|---|
( Sword: Forward Slash → Sword: Charged Double Slash → Sword: Shield Thrust → Sword: Charged Double Slash → Sword: Shield Thrust → Charge ▶︎ |
| Combo Input |
|---|
(Forward Sword: Forward Slash → Sword: Charged Double Slash → Sword: Shield Thrust → Sword: Charged Double Slash → Sword: Shield Thrust → Charge ▶︎ |
| Combo Input |
|---|
(Forward Sword: Forward Slash → Sword: Charged Double Slash → Sword: Shield Thrust → Sword: Charged Double Slash → Sword: Shield Thrust → Charge ▶︎ |
This is an 8-second combo that lets you add an Element Boost to your shield at the end. Using Element Boost will strengthen your Guard and allow you to later perform SAEDs after AEDs.
5-Phial Charge Combo into Sword Boost Mode
| Combo Input |
|---|
Hold Sword: Charged Double Slash → Sword: Roundslash → Sword: Charged Double Slash → Charge ▶︎ |
| Combo Input |
|---|
Hold Sword: Charged Double Slash → Sword: Roundslash → Sword: Charged Double Slash → Charge ▶︎ |
| Combo Input |
|---|
Hold Sword: Charged Double Slash → Sword: Roundslash → Sword: Charged Double Slash → Charge ▶︎ |
This is a 9-second high-damage combo that lets you activate Sword Boost Mode with Condensed Element Slash. This will buff your sword attacks, giving it additional phial damage on hit.
Basic Morph Slash to AED Combo
| Combo Input |
|---|
Sword: Morph Slash → Axe: Rushing Element Discharge I → Axe: Element Discharge II → Axe: Amped Element Discharge |
| Combo Input |
|---|
Sword: Morph Slash → Axe: Rushing Element Discharge I → Axe: Element Discharge II → Axe: Amped Element Discharge |
| Combo Input |
|---|
Sword: Morph Slash → Axe: Rushing Element Discharge I → Axe: Element Discharge II → Axe: Amped Element Discharge |
This can be your basic 9-second Morph Slash into Axe Mode combo and your bread and butter for repeating high-damage swings not yet inclusive of AEDs and SAEDs.
Basic AED with Follow-Up Combo
| Combo Input |
|---|
( Axe: Dash Slam → Axe: Amped Element Discharge → Axe: Amped Element Discharge Follow-up |
| Combo Input |
|---|
(Forward Axe: Dash Slam → Axe: Amped Element Discharge → Axe: Amped Element Discharge Follow-up |
| Combo Input |
|---|
(Forward Axe: Dash Slam → Axe: Amped Element Discharge → Axe: Amped Element Discharge Follow-up |
This is another Axe Mode combo variation that makes use of AEDs within 7-seconds. This can serve as a good fast high-damage combo when you're attacking from neutral in Axe Mode.
Basic AED to SAED Combo
| Combo Input |
|---|
( Axe: Amped Element Discharge → Axe: Super Amped Element Discharge |
| Combo Input |
|---|
( Axe: Amped Element Discharge → Axe: Super Amped Element Discharge |
| Combo Input |
|---|
( Axe: Amped Element Discharge → Axe: Super Amped Element Discharge |
Note that SAEDs take up all phials even in an Enhanced state.
This is a 6-7 second fast AED to SAED combo and is can be the most consistent tool for getting into SAED.
Feel free to add another combo string of Elemental Discharge attacks before getting to this combo, as this is best used as an offensive tool against toppled monsters or during large windows after a Perfect Guard.
Perfect Guard into Savage Axe Combo
| Combo Input |
|---|
| Perfect Guard → |
| Combo Input |
|---|
| Perfect Guard → |
| Combo Input |
|---|
| Perfect Guard → |
This is a go-to 6-second combo for moving from Perfect Guard into Savage Axe and is potentially one of the most damaging combos you can have in a short window.
You should be able to at least fit those 2 high-damage moves most of the time before facing monster retaliation. If you have a larger window, you can add in an AED at the end for more damage.
Note: This combo can also be executed off a well-timed Guard Point!
Perfect Guard into SAED Combo
| Combo Input |
|---|
| Perfect Guard → Axe: Super Amped Element Discharge |
| Combo Input |
|---|
| Perfect Guard → Axe: Super Amped Element Discharge |
| Combo Input |
|---|
| Perfect Guard → Axe: Super Amped Element Discharge |
Note that SAEDs take up all phials even in an Enhanced state.
This is a fast 5-second combo that is best utilized with Perfect Guard. It is also very simple: use Perfect Guard and directly transition into SAED. This is also doable when starting with Guard Point.
This move is best done when you have Element Boost for your shield already, as well as 5 phials for maximum damage.
Charge Blade Advanced Tips
| Charge Blade Gameplay Tips |
|---|
|
|
Perfect Guard or Guard Point?
Title Update 2 significantly buffed Guard Points, allowing them to be considered as Perfect Guards and activating Power Axe Mode. Prior to TU2, Guard Points were at a slight disadvantage due to the lack of Perfect Guard detection.
It is now encourage to make use of both guards due to the buff, and has become much easier to make Perfect Guards even from held guard by making another Perfect Guard window with Morph Slash. Previously, players had to choose between only Perfect Guard or Guard Point.
You Can Perfect Guard Roars
Like every other weapon that can Guard, you can also Perfect Block monster roars. This gives a lot of benefit to the Charge Blade since it will allow you to start your Savage Axe or SAED combos early.
Always Take Advantage of Savage Axe
Power Axe Mode or Savage Axe is the ideal DPS-boosting option when using the Charge Blade. You will want to take advantage of this mode due to the additional damage deals on hitstops, in addition to the phial damage you already use.
During this mode, you will also have significantly reduced phial consumption on Element Discharge attacks including AED. The only exception is that SAED will still take up all of your phials.
Savage Axe Mode is activated by Perfect Guards, Mounted Finishers, successful Focus Strikes, and Guard Points.
You Don't Need to Complete Axe Hits from Focus Strikes
Savage Axe will always activate as long as you trigger your Savage Axe animation from the first successful hit of your Focus Strike, so you'll still have a chance to do some big damage if you miss the rest of your attack.
Just take note that you'll be in animation lock during this time, however, and you will still take damage you're caught in a monster's attack.
Use Vertical Swings
| Vertical Axe Swings | ・Axe: Rising Slash
・Axe: Dash Slam ・Axe: Backstep Slash ・Savage Axe Slash (slightly angled/diagonal) ・Focus Slash: Double Rend (Savage Axe upswing on successful wound hit) ・Axe: Super Amped Elemental Discharge (SAED) (2nd swing) |
|---|
Some monsters, especially those that raise their heads/tails, or fly, can be hard to reach with just regular swings. Take note of the Charge Blade's vertical swings above to deal precise hits on a hard-to-reach monster part.
Charge Transition is Faster When Charging Phials
Transitioning out of your Charge move is always the fastest when charging with Sword Energy. If you use Charge without any reserve Sword Energy, you'll be stuck in a vulnerable animation lock for a short time.
Try to keep an eye out if you have Sword Energy for charging or not, since using the Charge move accidentally can prove fatal against an oncoming monster attack.
Control Axe Swing Angles with Focus Mode
Focus Mode is your best friend in guiding the circular motions of your Axe Swings, especially the swings done with AED and SAED. The steering is generous enough that you can do 180 degree turns with the Charge Blade, so make use of it whenever possible!
For more guidance on the distance of your swings, you briefly angle your camera for a top-down view to check and correct your spacing.
Phial Damage is Unaffected by Sharpness
Damage from phial tick explosions is constant and unaffected by sharpness. The frequency that the tick explosions happen, however, is more noticeably less at lower sharpness levels.
Make sure to keep your sharpness level up at all times for its bonus damage multiplier!
Best Savage Axe Rotation
| High-Damage Savage Axe Rotation | |
|---|---|
| Element Discharge I + Element Discharge II Alternate between the 2 above moves when using |
|
| Rotation Enders | |
| Axe: Rising Slash ・Can infinite combo
・Stationary ・Loops back to Element Discharge combo the fastest ・Ideal for small openings |
Axe: Amped Element Discharge (AED) + AED Follow Up ・Fast Option
・Phial Charge-Efficient ・Easy to Restart Combo ・Good for moderate openings |
| Axe: Amped Element Discharge (AED + Axe: Super Amped Element Discharge (SAED)
・Strongest Option
・Uses All Phial Charges ・Requires Recharge ・Good for large openings |
|
Start the rotation from top to bottom.
To get the most out of the Savage Axe's damage, you can follow the attack rotation above from top to bottom. A good combo to repeat would be alternating between any of the first 2 Element Discharge attacks repeatedly.
When you are about to end a rotation, one great option would be using one final AED with an AED follow-up if you plan to restart the combo quickly at a later time since it doesn't use up all your phials. If you plan to go all-in (such as against toppled monsters), ending with an SAED is most often the preferred option.
Cancel AED into Elemental Roundslash
You can cancel an Amped Elemental Discharge by pressing R Key/R2/RT during the animation to perform an Elemental Roundslash. The Elemental Roundslash deals decent damage while also executing an Element Boost.
This allows you to remain flexible, whether you commit to the long wind up of the AED or by cancel to get out of harm's way.
Cancel SAED into AED from Guard
You can cancel a Super Amped Elemental Discharge that is followed up from any Guard into an Amped Elemental Discharge by pressing Back + LMB/Triangle/Y before it goes off.
This is incredibly useful if you know you'll whiff the SAED, letting you save Phial charges.
Note: Only SAEDs that come after a Guard, Guard Point, or Perfect Guard can be cancelled. SAEDs from regular combos cannot be cancelled!
Is Charge Blade Good?
Tier List Ranking
| Weapon Ranking | ||
|---|---|---|
| Damage Type | Entry Skill Requirement | Difficulty to Master |
| High | ★★★★☆ | |
| Pros and Cons | ||
|
|
||
Entry Skill Requirement pertains to how easy it is to learn the weapon from scratch, while Difficulty to Master is a rating on how difficult it is to perfectly execute the weapon mechanics.
The Charge Blade is currently an S Tier weapon due to its high DPS potential and guarding capabilities. It's a great weapon to have solo and fine one to hold on to also when hunting with others.
Despite the Charge Blade's high damage potential, it is definitely not an easy weapon to pick as much as the Hunting Horn, and weapons like the Long Sword are still capable of delivering lots of damage through simpler means.
Monster Hunter Wilds Related Guides
All Weapon Guides
| All Weapon Tutorials | |||||
|---|---|---|---|---|---|
 Great Sword Great Sword |
 Long Sword Long Sword |
 Sword & Shield Sword & Shield |
|||
 Dual Blades Dual Blades |
 Hammer Hammer |
 Hunting Horn Hunting Horn |
|||
 Lance Lance |
 Gunlance Gunlance |
 Switch Axe Switch Axe |
|||
 Charge Blade Charge Blade |
 Insect Glaive Insect Glaive |
 Light Bowgun Light Bowgun |
|||
 Heavy Bowgun Heavy Bowgun |
 Bow Bow |
||||
All Weapon Trees
| All Weapon Trees | |||||
|---|---|---|---|---|---|
 Great Sword Great Sword |
 Long Sword Long Sword |
 Sword & Shield Sword & Shield |
|||
 Dual Blades Dual Blades |
 Hammer Hammer |
 Hunting Horn Hunting Horn |
|||
 Lance Lance |
 Gunlance Gunlance |
 Switch Axe Switch Axe |
|||
 Charge Blade Charge Blade |
 Insect Glaive Insect Glaive |
 Kinsects Kinsects |
|||
 Light Bowgun Light Bowgun |
 Heavy Bowgun Heavy Bowgun |
 Bow Bow |
|||
Comment
the best guide I could find on the net. It must have been a lot of work, well done and thank you.
Author

Charge Blade Weapon Guide and Best Combos
Premium Articles

Rankings
- We could not find the message board you were looking for.
Gaming News


![Monster Hunter Stories 3 Review [First Impressions] | Simply Rejuvenating](https://img.game8.co/4438641/2a31b7702bd70e78ec8efd24661dacda.jpeg/thumb)
Popular Games

Genshin Impact Walkthrough & Guides Wiki
Honkai: Star Rail Walkthrough & Guides Wiki
Umamusume: Pretty Derby Walkthrough & Guides Wiki
Pokemon Pokopia Walkthrough & Guides Wiki
Resident Evil Requiem (RE9) Walkthrough & Guides Wiki
Monster Hunter Wilds Walkthrough & Guides Wiki
Wuthering Waves Walkthrough & Guides Wiki
Arknights: Endfield Walkthrough & Guides Wiki
Pokemon FireRed and LeafGreen (FRLG) Walkthrough & Guides Wiki
Pokemon TCG Pocket (PTCGP) Strategies & Guides Wiki


Recommended Games
Diablo 4: Vessel of Hatred Walkthrough & Guides Wiki
Cyberpunk 2077: Ultimate Edition Walkthrough & Guides Wiki
Fire Emblem Heroes (FEH) Walkthrough & Guides Wiki
Yu-Gi-Oh! Master Duel Walkthrough & Guides Wiki
Super Smash Bros. Ultimate Walkthrough & Guides Wiki
Pokemon Brilliant Diamond and Shining Pearl (BDSP) Walkthrough & Guides Wiki
Elden Ring Shadow of the Erdtree Walkthrough & Guides Wiki
Monster Hunter World Walkthrough & Guides Wiki
The Legend of Zelda: Tears of the Kingdom Walkthrough & Guides Wiki
Persona 3 Reload Walkthrough & Guides Wiki


All rights reserved
©CAPCOM
The copyrights of videos of games used in our content and other intellectual property rights belong to the provider of the game.
The contents we provide on this site were created personally by members of the Game8 editorial department.
We refuse the right to reuse or repost content taken without our permission such as data or images to other sites.
Hello Eolyss! Thanks for using our guide. Stay tuned for more as we continue covering the game and updating our pages upon release. We look forward to your continued support!