 Adapt Jewel【1】 Adapt Jewel【1】
Rarity 3
|
1 |
|
Antiblast Jewel【1】
Rarity 3
|
1 |
|
Antidote Jewel【1】
Rarity 3
|
1 |
|
Antipara Jewel【1】
Rarity 3
|
1 |
|
Artillery Jewel【1】
Rarity 3
|
1 |
|
Attack Jewel【1】
Rarity 3
|
1 |
|
Bandolier Jewel【1】
Rarity 3
|
1 |
|
Blast Jewel【1】
Rarity 3
|
1 |
|
Blaze Jewel【1】
Rarity 3
|
1 |
|
Blunt Jewel【1】
Rarity 3
|
1 |
|
Bolt Jewel【1】
Rarity 3
|
1 |
|
Bomber Jewel【1】
Rarity 3
|
1 |
|
Botany Jewel【1】
Rarity 3
|
1 |
|
Brace Jewel【1】
Rarity 3
|
1 |
|
Charge Jewel【1】
Rarity 3
|
1 |
|
Climber Jewel【1】
Rarity 3
|
1 |
|
Crit Element Jewel【1】
Rarity 3
|
1 |
|
Crit Status Jewel【1】
Rarity 3
|
1 |
|
Critical Jewel【1】
Rarity 3
|
1 |
|
Def Lock Jewel【1】
Rarity 3
|
1 |
|
Defense Jewel【1】
Rarity 3
|
1 |
|
Dive Jewel【1】
Rarity 3
|
1 |
|
Dragon Jewel【1】
Rarity 3
|
1 |
|
Dragon Res Jewel【1】
Rarity 3
|
1 |
|
Drain Jewel【1】
Rarity 3
|
1 |
|
Draw Jewel【1】
Rarity 3
|
1 |
|
Enduring Jewel【1】
Rarity 3
|
1 |
|
Enhancer Jewel【1】
Rarity 3
|
1 |
|
Escape Jewel【1】
Rarity 3
|
1 |
|
Expert Jewel【1】
Rarity 3
|
1 |
|
Fire Res Jewel【1】
Rarity 3
|
1 |
|
Flash Jewel【1】
Rarity 3
|
1 |
|
Focus Jewel【1】
Rarity 3
|
1 |
|
Footing Jewel【1】
Rarity 3
|
1 |
|
Friendship Jewel【1】
Rarity 3
|
1 |
|
Frost Jewel【1】
Rarity 3
|
1 |
|
Gambit Jewel【1】
Rarity 3
|
1 |
|
Geology Jewel【1】
Rarity 3
|
1 |
|
Gobbler Jewel【1】
Rarity 3
|
1 |
|
Grinder Jewel【1】
Rarity 3
|
1 |
|
Growth Jewel【1】
Rarity 3
|
1 |
|
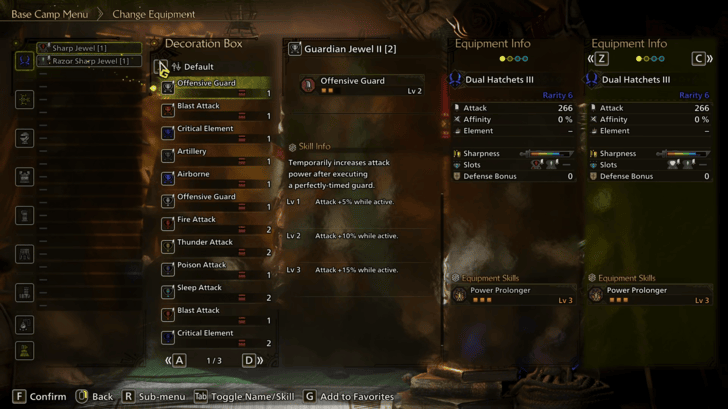
Guardian Jewel【1】
Rarity 3
|
1 |
|
Handicraft Jewel【1】
Rarity 3
|
1 |
|
Hungerless Jewel【1】
Rarity 3
|
1 |
|
Ice Res Jewel【1】
Rarity 3
|
1 |
|
Intimidator Jewel【1】
Rarity 3
|
1 |
|
Ironwall Jewel【1】
Rarity 3
|
1 |
|
KO Jewel【1】
Rarity 3
|
1 |
|
Leap Jewel【1】
Rarity 3
|
1 |
|
Magazine Jewel【1】
Rarity 3
|
1 |
|
Medicine Jewel【1】
Rarity 3
|
1 |
|
Mind's Eye Jewel【1】
Rarity 3
|
1 |
|
Mirewalker Jewel【1】
Rarity 3
|
1 |
|
Opener Jewel【1】
Rarity 3
|
1 |
|
Paralyzer Jewel【1】
Rarity 3
|
1 |
|
Pep Jewel【1】
Rarity 3
|
1 |
|
Perfume Jewel【1】
Rarity 3
|
1 |
|
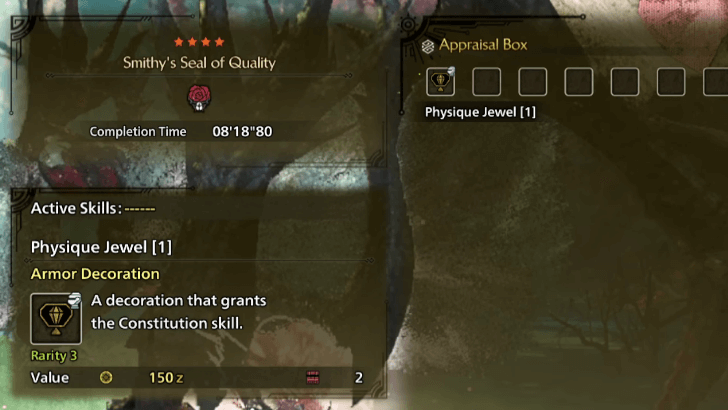
Physique Jewel【1】
Rarity 3
|
1 |
|
Precise Jewel【1】
Rarity 3
|
1 |
|
Protection Jewel【1】
Rarity 3
|
1 |
|
Quickswitch Jewel【1】
Rarity 3
|
1 |
|
Ranger Jewel【1】
Rarity 3
|
1 |
|
Razor Sharp Jewel【1】
Rarity 3
|
1 |
|
Recovery Jewel【1】
Rarity 3
|
1 |
|
Sane Jewel【1】
Rarity 5
|
1 |
|
Satiated Jewel【1】
Rarity 3
|
1 |
|
Sharp Jewel【1】
Rarity 3
|
1 |
|
Sheath Jewel【1】
Rarity 3
|
1 |
|
Shield Jewel【1】
Rarity 3
|
1 |
|
Shockproof Jewel【1】
Rarity 3
|
1 |
|
Sleep Jewel【1】
Rarity 3
|
1 |
|
Specimen Jewel【1】
Rarity 3
|
1 |
|
Sprinter Jewel【1】
Rarity 3
|
1 |
|
Steadfast Jewel【1】
Rarity 3
|
1 |
|
Stream Jewel【1】
Rarity 3
|
1 |
|
Survival Jewel【1】
Rarity 3
|
1 |
|
Suture Jewel【1】
Rarity 3
|
1 |
|
Thunder Res Jewel【1】
Rarity 3
|
1 |
|
Trueshot Jewel【1】
Rarity 3
|
1 |
|
Venom Jewel【1】
Rarity 3
|
1 |
|
Water Res Jewel【1】
Rarity 3
|
1 |
|
Wind Resist Jewel【1】
Rarity 3
|
1 |
|
Ambush Jewel【2】
Rarity 4
|
2 |
|
Artillery Jewel II【2】
Rarity 4
|
2 |
|
Attack Jewel II【2】
Rarity 4
|
2 |
|
Bandolier Jewel II【2】
Rarity 4
|
2 |
|
Blast Jewel II【2】
Rarity 4
|
2 |
|
Blastcoat Jewel【2】
Rarity 4
|
2 |
|
Blaze Jewel II【2】
Rarity 4
|
2 |
|
Blunt Jewel II【2】
Rarity 4
|
2 |
|
Bolt Jewel II【2】
Rarity 4
|
2 |
|
Charge Jewel II【2】
Rarity 4
|
2 |
|
Charge Up Jewel【2】
Rarity 4
|
2 |
|
Counter Jewel【2】
Rarity 4
|
2 |
|
Crit Element Jewel II【2】
Rarity 4
|
2 |
|
Crit Status Jewel II【2】
Rarity 4
|
2 |
|
Critical Jewel II【2】
Rarity 4
|
2 |
|
Destroyer Jewel【2】
Rarity 4
|
2 |
|
Dragon Jewel II【2】
Rarity 4
|
2 |
|
Drain Jewel II【2】
Rarity 4
|
2 |
|
Draincoat Jewel【2】
Rarity 4
|
2 |
|
Draw Jewel II【2】
Rarity 4
|
2 |
|
Earplugs Jewel【2】
Rarity 4
|
2 |
|
Enhancer Jewel II【2】
Rarity 4
|
2 |
|
Evasion Jewel【2】
Rarity 4
|
2 |
|
Expert Jewel II【2】
Rarity 4
|
2 |
|
Flawless Jewel【2】
Rarity 4
|
2 |
|
Flight Jewel【2】
Rarity 4
|
2 |
|
Focus Jewel II【2】
Rarity 4
|
2 |
|
Frost Jewel II【2】
Rarity 4
|
2 |
|
Fungiform Jewel【2】
Rarity 4
|
2 |
|
Furor Jewel【2】
Rarity 4
|
2 |
|
Gambit Jewel II【2】
Rarity 4
|
2 |
|
Grinder Jewel II【2】
Rarity 4
|
2 |
|
Guardian Jewel II【2】
Rarity 4
|
2 |
|
Handicraft Jewel II【2】
Rarity 4
|
2 |
|
Ironwall Jewel II【2】
Rarity 4
|
2 |
|
Jumping Jewel【2】
Rarity 4
|
2 |
|
KO Jewel II【2】
Rarity 4
|
2 |
|
Magazine Jewel II【2】
Rarity 4
|
2 |
|
Maintenance Jewel【2】
Rarity 4
|
2 |
|
Mighty Jewel【2】
Rarity 4
|
2 |
|
Mind's Eye Jewel II【2】
Rarity 4
|
2 |
|
Opener Jewel II【2】
Rarity 4
|
2 |
|
Paralyzer Jewel II【2】
Rarity 4
|
2 |
|
Phoenix Jewel【2】
Rarity 7
|
2 |
|
Poison Jewel【2】
Rarity 5
|
2 |
|
Poisoncoat Jewel【2】
Rarity 4
|
2 |
|
Potential Jewel【2】
Rarity 4
|
2 |
|
Precise Jewel II【2】
Rarity 4
|
2 |
|
Quickswitch Jewel II【2】
Rarity 4
|
2 |
|
Razor Sharp Jewel II【2】
Rarity 4
|
2 |
|
Refresh Jewel【2】
Rarity 4
|
2 |
|
Sharp Jewel II【2】
Rarity 4
|
2 |
|
Shield Jewel II【2】
Rarity 4
|
2 |
|
Sleep Jewel II【2】
Rarity 4
|
2 |
|
Sonorous Jewel【2】
Rarity 4
|
2 |
|
Stream Jewel II【2】
Rarity 4
|
2 |
|
Trueshot Jewel II【2】
Rarity 4
|
2 |
|
Venom Jewel II【2】
Rarity 4
|
2 |
|
Artillery Jewel III【3】
Rarity 5
|
3 |
|
Attack Jewel III【3】
Rarity 5
|
3 |
|
Bandolier Jewel III【3】
Rarity 5
|
3 |
|
Bandolier/Blaze Jwl【3】
Rarity 7
|
3 |
|
Bandolier/Bolt Jwl【3】
Rarity 7
|
3 |
|
Bandolier/Dragon Jwl【3】
Rarity 7
|
3 |
|
Bandolier/Frost Jwl【3】
Rarity 7
|
3 |
|
Bandolier/Ironwall Jwl【3】
Rarity 7
|
3 |
|
Bandolier/Precise Jwl【3】
Rarity 7
|
3 |
|
Bandolier/Stream Jwl【3】
Rarity 7
|
3 |
|
Blast Jewel III【3】
Rarity 5
|
3 |
|
Blaze Jewel III【3】
Rarity 5
|
3 |
|
Blaze/Bandolier Jwl【3】
Rarity 6
|
3 |
|
Blaze/Crit Elem Jwl【3】
Rarity 6
|
3 |
|
Blaze/Enhancer Jwl【3】
Rarity 6
|
3 |
|
Blaze/Focus Jewel【3】
Rarity 6
|
3 |
|
Blaze/Guardian Jewel【3】
Rarity 6
|
3 |
|
Blaze/Handicraft Jwl【3】
Rarity 6
|
3 |
|
Blaze/Ironwall Jwl【3】
Rarity 6
|
3 |
|
Blaze/KO Jewel【3】
Rarity 6
|
3 |
|
Blaze/Opener Jewel【3】
Rarity 6
|
3 |
|
Blaze/Precise Jewel【3】
Rarity 6
|
3 |
|
Blaze/Quickswitch Jwl【3】
Rarity 6
|
3 |
|
Blaze/Rzr Sharp Jwl【3】
Rarity 6
|
3 |
|
Blaze/Shield Jewel【3】
Rarity 6
|
3 |
|
Blunt Jewel III【3】
Rarity 5
|
3 |
|
Bolt Jewel III【3】
Rarity 5
|
3 |
|
Bolt/Bandolier Jwl【3】
Rarity 6
|
3 |
|
Bolt/Crit Elem Jwl【3】
Rarity 6
|
3 |
|
Bolt/Enhancer Jwl【3】
Rarity 6
|
3 |
|
Bolt/Focus Jewel【3】
Rarity 6
|
3 |
|
Bolt/Guardian Jwl【3】
Rarity 6
|
3 |
|
Bolt/Handicraft Jwl【3】
Rarity 6
|
3 |
|
Bolt/Ironwall Jewel【3】
Rarity 6
|
3 |
|
Bolt/KO Jewel【3】
Rarity 6
|
3 |
|
Bolt/Opener Jewel【3】
Rarity 6
|
3 |
|
Bolt/Precise Jewel【3】
Rarity 6
|
3 |
|
Bolt/Quickswitch Jwl【3】
Rarity 6
|
3 |
|
Bolt/Rzr Sharp Jwl【3】
Rarity 6
|
3 |
|
Bolt/Shield Jewel【3】
Rarity 6
|
3 |
|
Chain Jewel【3】
Rarity 5
|
3 |
|
Challenger Jewel【3】
Rarity 5
|
3 |
|
Charge Jewel III【3】
Rarity 5
|
3 |
|
Charge Up/Attack Jwl【3】
Rarity 5
|
3 |
|
Charge Up/Draw Jwl【3】
Rarity 5
|
3 |
|
Charge Up/Expert Jwl【3】
Rarity 5
|
3 |
|
Charge Up/Handicraft Jwl【3】
Rarity 5
|
3 |
|
Charge Up/KO Jewel【3】
Rarity 5
|
3 |
|
Charge/Handicraft Jwl【3】
Rarity 7
|
3 |
|
Charge/KO Jewel【3】
Rarity 7
|
3 |
|
Counterattack Jewel【3】
Rarity 5
|
3 |
|
Crit Elem Jwl III【3】
Rarity 5
|
3 |
|
Crit Elem/Blaze Jwl【3】
Rarity 7
|
3 |
|
Crit Elem/Bolt Jwl【3】
Rarity 7
|
3 |
|
Crit Elem/Dragon Jwl【3】
Rarity 7
|
3 |
|
Crit Elem/Frost Jwl【3】
Rarity 7
|
3 |
|
Crit Elem/Handicraft Jwl【3】
Rarity 5
|
3 |
|
Crit Elem/Ironwall Jwl【3】
Rarity 5
|
3 |
|
Crit Elem/KO Jewel【3】
Rarity 5
|
3 |
|
Crit Elem/Stream Jwl【3】
Rarity 7
|
3 |
|
Crit Element/Precise Jwl【3】
Rarity 5
|
3 |
|
Crit Stat Jwl III【3】
Rarity 5
|
3 |
|
Crit Stat/Handicraft Jwl【3】
Rarity 6
|
3 |
|
Crit Stat/Ironwall Jwl【3】
Rarity 6
|
3 |
|
Crit Stat/Precise Jwl【3】
Rarity 6
|
3 |
|
Crit Status/KO Jwl【3】
Rarity 6
|
3 |
|
Critical Jewel III【3】
Rarity 5
|
3 |
|
Dragon Jewel III【3】
Rarity 5
|
3 |
|
Dragon/Bandolier Jwl【3】
Rarity 6
|
3 |
|
Dragon/Crit Elem Jwl【3】
Rarity 6
|
3 |
|
Dragon/Enhancer Jwl【3】
Rarity 6
|
3 |
|
Dragon/Focus Jewel【3】
Rarity 6
|
3 |
|
Dragon/Guardian Jwl【3】
Rarity 6
|
3 |
|
Dragon/Handicraft Jwl【3】
Rarity 6
|
3 |
|
Dragon/Ironwall Jwl【3】
Rarity 6
|
3 |
|
Dragon/KO Jewel【3】
Rarity 6
|
3 |
|
Dragon/Opener Jewel【3】
Rarity 6
|
3 |
|
Dragon/Precise Jewel【3】
Rarity 6
|
3 |
|
Dragon/Quickswitch Jwl【3】
Rarity 6
|
3 |
|
Dragon/Rzr Sharp Jwl【3】
Rarity 6
|
3 |
|
Dragon/Shield Jewel【3】
Rarity 6
|
3 |
|
Drain Jewel III【3】
Rarity 5
|
3 |
|
Draw Jewel III【3】
Rarity 5
|
3 |
|
Enhancer Jewel III【3】
Rarity 5
|
3 |
|
Enhancer/Blaze Jewel【3】
Rarity 7
|
3 |
|
Enhancer/Bolt Jewel【3】
Rarity 7
|
3 |
|
Enhancer/Dragon Jwl【3】
Rarity 7
|
3 |
|
Enhancer/Frost Jwl【3】
Rarity 7
|
3 |
|
Enhancer/Handicraft Jwl【3】
Rarity 7
|
3 |
|
Enhancer/Stream Jwl【3】
Rarity 7
|
3 |
|
Expert Jewel III【3】
Rarity 5
|
3 |
|
Flayer Jewel【3】
Rarity 5
|
3 |
|
Flight/Attack Jwl【3】
Rarity 5
|
3 |
|
Flight/Draw Jewel【3】
Rarity 5
|
3 |
|
Flight/Expert Jewel【3】
Rarity 5
|
3 |
|
Flight/Handicraft Jwl【3】
Rarity 5
|
3 |
|
Focus Jewel III【3】
Rarity 5
|
3 |
|
Focus/Blaze Jewel【3】
Rarity 7
|
3 |
|
Focus/Bolt Jwl【3】
Rarity 7
|
3 |
|
Focus/Dragon Jewel【3】
Rarity 7
|
3 |
|
Focus/Frost Jewel【3】
Rarity 7
|
3 |
|
Focus/Handicraft Jewel【3】
Rarity 7
|
3 |
|
Focus/KO Jewel【3】
Rarity 7
|
3 |
|
Focus/Precise Jewel【3】
Rarity 7
|
3 |
|
Focus/Stream Jewel【3】
Rarity 7
|
3 |
|
Foray Jewel【3】
Rarity 5
|
3 |
|
Forceshot Jewel【3】
Rarity 5
|
3 |
|
Frost Jewel III【3】
Rarity 5
|
3 |
|
Frost/Bandolier Jwl【3】
Rarity 6
|
3 |
|
Frost/Crit Elem Jwl【3】
Rarity 6
|
3 |
|
Frost/Enhancer Jwl【3】
Rarity 6
|
3 |
|
Frost/Focus Jewel【3】
Rarity 6
|
3 |
|
Frost/Guardian Jwl【3】
Rarity 6
|
3 |
|
Frost/Handicraft Jwl【3】
Rarity 6
|
3 |
|
Frost/Ironwall Jwl【3】
Rarity 6
|
3 |
|
Frost/KO Jewel【3】
Rarity 6
|
3 |
|
Frost/Opener Jewel【3】
Rarity 6
|
3 |
|
Frost/Precise Jewel【3】
Rarity 6
|
3 |
|
Frost/Quickswitch Jwl【3】
Rarity 6
|
3 |
|
Frost/Rzr Sharp Jwl【3】
Rarity 6
|
3 |
|
Frost/Shield Jewel【3】
Rarity 6
|
3 |
|
Gambit Jewel III【3】
Rarity 5
|
3 |
|
Gambit/Handicraft Jwl【3】
Rarity 7
|
3 |
|
Gambit/Ironwall Jwl【3】
Rarity 7
|
3 |
|
Gambit/KO Jewel【3】
Rarity 7
|
3 |
|
Grinder/Attack Jewel【3】
Rarity 5
|
3 |
|
Grinder/Draw Jewel【3】
Rarity 5
|
3 |
|
Grinder/Expert Jewel【3】
Rarity 5
|
3 |
|
Grinder/Handicraft Jwl【3】
Rarity 5
|
3 |
|
Grinder/Ironwall Jewel【3】
Rarity 5
|
3 |
|
Grinder/KO Jewel【3】
Rarity 5
|
3 |
|
Guardian Jewel III【3】
Rarity 5
|
3 |
|
Guardian/Blaze Jwl【3】
Rarity 7
|
3 |
|
Guardian/Bolt Jwl【3】
Rarity 7
|
3 |
|
Guardian/Dragon Jwl【3】
Rarity 7
|
3 |
|
Guardian/Frost Jwl【3】
Rarity 7
|
3 |
|
Guardian/Handicraft Jwl【3】
Rarity 7
|
3 |
|
Guardian/Ironwall Jwl【3】
Rarity 7
|
3 |
|
Guardian/Stream Jwl【3】
Rarity 7
|
3 |
|
Handicraft Jwl III【3】
Rarity 5
|
3 |
|
Ironwall Jewel III【3】
Rarity 5
|
3 |
|
KO Jewel III【3】
Rarity 5
|
3 |
|
Magazine/Attack Jwl【3】
Rarity 5
|
3 |
|
Magazine/Draw Jwl【3】
Rarity 5
|
3 |
|
Magazine/Expert Jwl【3】
Rarity 5
|
3 |
|
Magazine/Handicraft Jwl【3】
Rarity 5
|
3 |
|
Magazine/Ironwall Jwl【3】
Rarity 5
|
3 |
|
Mastery Jewel【3】
Rarity 5
|
3 |
|
Mind's Eye Jwl III【3】
Rarity 5
|
3 |
|
Opener Jewel III【3】
Rarity 5
|
3 |
|
Opener/Blaze Jewel【3】
Rarity 7
|
3 |
|
Opener/Bolt Jewel【3】
Rarity 7
|
3 |
|
Opener/Dragon Jewel【3】
Rarity 7
|
3 |
|
Opener/Frost Jewel【3】
Rarity 7
|
3 |
|
Opener/Ironwall Jwl【3】
Rarity 7
|
3 |
|
Opener/Precise Jewel【3】
Rarity 7
|
3 |
|
Opener/Stream Jwl【3】
Rarity 7
|
3 |
|
Paracoat Jewel【3】
Rarity 5
|
3 |
|
Paralyzer Jwl III【3】
Rarity 5
|
3 |
|
Pierce Jewel【3】
Rarity 5
|
3 |
|
Poison/Attack Jewel【3】
Rarity 6
|
3 |
|
Poison/Draw Jewel【3】
Rarity 6
|
3 |
|
Poison/Expert Jwl【3】
Rarity 6
|
3 |
|
Poison/Handicraft Jwl【3】
Rarity 6
|
3 |
|
Poison/Ironwall Jwl【3】
Rarity 6
|
3 |
|
Poison/KO Jewel【3】
Rarity 6
|
3 |
|
Poison/Precise Jwl【3】
Rarity 6
|
3 |
|
Precise Jewel III【3】
Rarity 5
|
3 |
|
Quickswitch Jewel III【3】
Rarity 5
|
3 |
|
Quickswitch/Blaze Jwl【3】
Rarity 7
|
3 |
|
Quickswitch/Bolt Jwl【3】
Rarity 7
|
3 |
|
Quickswitch/Dragon Jwl【3】
Rarity 7
|
3 |
|
Quickswitch/Frost Jwl【3】
Rarity 7
|
3 |
|
Quickswitch/Handicraft Jwl【3】
Rarity 7
|
3 |
|
Quickswitch/Ironwall Jwl【3】
Rarity 7
|
3 |
|
Quickswitch/KO Jwl【3】
Rarity 7
|
3 |
|
Quickswitch/Stream Jwl【3】
Rarity 7
|
3 |
|
Razor Sharp/KO Jwl【3】
Rarity 7
|
3 |
|
Rzr Sharp Jwl III【3】
Rarity 5
|
3 |
|
Rzr Sharp/Blaze Jwl【3】
Rarity 7
|
3 |
|
Rzr Sharp/Bolt Jwl【3】
Rarity 7
|
3 |
|
Rzr Sharp/Dragon Jwl【3】
Rarity 7
|
3 |
|
Rzr Sharp/Frost Jwl【3】
Rarity 7
|
3 |
|
Rzr Sharp/Handicraft Jwl【3】
Rarity 7
|
3 |
|
Rzr Sharp/Ironwall Jwl【3】
Rarity 7
|
3 |
|
Rzr Sharp/Stream Jwl【3】
Rarity 7
|
3 |
|
Salvo Jewel【3】
Rarity 5
|
3 |
|
Sharp Jewel III【3】
Rarity 5
|
3 |
|
Shield Jewel III【3】
Rarity 5
|
3 |
|
Shield/Blaze Jewel【3】
Rarity 6
|
3 |
|
Shield/Bolt Jewel【3】
Rarity 6
|
3 |
|
Shield/Dragon Jwl【3】
Rarity 6
|
3 |
|
Shield/Frost Jewel【3】
Rarity 6
|
3 |
|
Shield/Handicraft Jwl【3】
Rarity 6
|
3 |
|
Shield/Ironwall Jwl【3】
Rarity 6
|
3 |
|
Shield/Stream Jewel【3】
Rarity 6
|
3 |
|
Sleep Jewel III【3】
Rarity 5
|
3 |
|
Sleepcoat Jewel【3】
Rarity 5
|
3 |
|
Sonorous/Attack Jwl【3】
Rarity 5
|
3 |
|
Sonorous/Draw Jwl【3】
Rarity 5
|
3 |
|
Sonorous/Expert Jwl【3】
Rarity 5
|
3 |
|
Sonorous/Handicraft Jwl【3】
Rarity 5
|
3 |
|
Sonorous/KO Jewel【3】
Rarity 5
|
3 |
|
Spread Jewel【3】
Rarity 5
|
3 |
|
Stream Jewel III【3】
Rarity 5
|
3 |
|
Stream/Bandolier Jwl【3】
Rarity 6
|
3 |
|
Stream/Crit Elem Jwl【3】
Rarity 6
|
3 |
|
Stream/Enhancer Jwl【3】
Rarity 6
|
3 |
|
Stream/Focus Jewel【3】
Rarity 6
|
3 |
|
Stream/Guardian Jwl【3】
Rarity 6
|
3 |
|
Stream/Handicraft Jwl【3】
Rarity 6
|
3 |
|
Stream/Ironwall Jwl【3】
Rarity 6
|
3 |
|
Stream/KO Jewel【3】
Rarity 6
|
3 |
|
Stream/Opener Jwl【3】
Rarity 6
|
3 |
|
Stream/Precise Jewel【3】
Rarity 6
|
3 |
|
Stream/Quickswitch Jwl【3】
Rarity 6
|
3 |
|
Stream/Rzr Sharp Jwl【3】
Rarity 6
|
3 |
|
Stream/Shield Jewel【3】
Rarity 6
|
3 |
|
Tenderizer Jewel【3】
Rarity 5
|
3 |
|
Throttle Jewel【3】
Rarity 5
|
3 |
|
Venom Jewel III【3】
Rarity 5
|
3 |
|


 Weapons
 Armor Sets
 Monsters
 Builds
 Story Walkthrough
 Artian Weapons
 Maps and Locations
 Items and Materials
 Tips and Tricks
 Game Mechanics
 Endemic Life
 Skills
 Decorations
 Talismans
 Characters
 Quests
 Palico
 Trophies
 Cosmetics
 Furniture
 Festivals
 News and Game Info
 Message Boards


![Monster Hunter Stories 3 Review [First Impressions] | Simply Rejuvenating](https://img.game8.co/4438641/2a31b7702bd70e78ec8efd24661dacda.jpeg/show)


![Monster Hunter Stories 3 Review [First Impressions] | Simply Rejuvenating](https://img.game8.co/4438641/2a31b7702bd70e78ec8efd24661dacda.jpeg/thumb)


