Sword & Shield Weapon Guide and Best Combos
★ Arkveld Gamma Armor | MH Stories 3 Collab
☆ Version 1.041: Sororal α Armor | Shatterseal
★ How to Unlock Proof of a Hero Quest
☆ Omega Planetes | Savage Omega | Builds vs Omega
★ Armor Set Search updated for Ver 1.041
☆ HR50+ Builds | Tier List | Weapon Guides
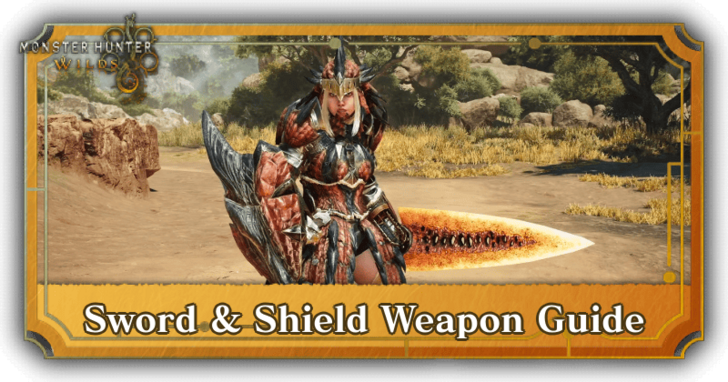
Monster Hunter Wilds' Sword & Shield (SnS) is a versatile weapon that can attack quickly, guard, and use items while unsheathed. See all the new moves for the Sword & Shield, its mechanics, controls, best combos, advanced tips, and how good it is!
| Sword & Shield Guides | ||
|---|---|---|
| Weapon Guide | Builds | Tree |
List of Contents
Sword & Shield Balance Adjustment
Sword & Shield Update Ver. 1.021
| Sword and Shield Changes |
|---|
| ・(Buff) Counter Slash raw damage has been increased. |
The Sword & Shield received a little update in Update Ver. 1.021 on August 13, 2025 (UTC), increasing the raw damage of Counter Slash.
Sword & Shield Mechanics
| List of Sword & Shield Mechanics |
|---|
|
|
A Balanced Beginner Friendly Weapon
At base, the Sword & Shield is a fast and strong weapon that has good mobility, as well as the ability to guard if needed. It also can inflict both Severing and Blunt damage, further expanding its capabilities.
Access to good evasive movement, blocking, and both Severing and Blunt damage makes this weapon extremely versatile. It's perfect for newer players to experiment with, to help find what playstyle suits them best.
Stun Monsters with Shield Bash
The Shield, while normally for guarding, can also be used in attacks to stun monsters if you hit them on the head. Look to do this in between your combos so that you can knock down a monster and get free attacks off.
Land Multiple Hits for Elemental Damage
| Charged Chop Input |
|---|
| |
| Charged Chop Input |
|---|
| |
| Charged Chop Input |
|---|
| |
The Sword & Shield is an agile weapon, capable of landing lots of hits that can quickly rack up Elemental Damage. Moves like the Charged Chop are comprised of several quick hits that excel when paired with lots of Elemental Attack.
Switch Between Attacking and Guarding
Certain moves, like the Rising Slash, can be executed while guarding, allowing the Sword & Shield the flexibility to stay on the defensive and choose when it wants to attack.
Use Items Without Sheathing
The unique feature of a Sword & Shield is that you can use items without sheathing your weapon first! This means you can quickly use an item and go back on the offensive straight away.
This is also extremely useful in multiplayer since you can take on a more supportive role, being able to assist your team at a moment's notice!
List of All Items and Materials
Sword & Shield Controls
Basic Controls
| Action | |
|---|---|
| Chop | |
| Lateral Slash | |
| Advancing Slash | |
| Guard | (Hold) |
| Guard Slash | |
| Sliding Swipe | |
| Use Item | |
| Action | |
|---|---|
| Chop | |
| Lateral Slash | |
| Advancing Slash | |
| Guard | (Hold) |
| Guard Slash | |
| Sliding Swipe | |
| Use Item | |
| Action | |
|---|---|
| Chop | |
| Lateral Slash | |
| Advancing Slash | |
| Guard | (Hold) |
| Guard Slash | |
| Sliding Swipe | |
| Use Item | |
Combo Actions
| Action | |
|---|---|
| Round Slash | |
| Charged Chop | |
| Shield Attack | |
| Backstep ▼ Perfect Rush | |
| Charged Slash ▼ Jumping Slash | ▼ |
| Charged Slash ▼ Falling Bash | ▼ |
| Action | |
|---|---|
| Round Slash | |
| Charged Chop | |
| Shield Bash | |
| Backstep ▼ Perfect Rush | |
| Charged Slash ▼ Jumping Slash | ▼ |
| Charged Slash ▼ Falling Bash | ▼ |
| Action | |
|---|---|
| Round Slash | |
| Charged Chop | |
| Shield Bash | |
| Backstep ▼ Perfect Rush | |
| Charged Slash ▼ Jumping Slash | ▼ |
| Charged Slash ▼ Falling Bash | ▼ |
All these actions must be performed during a combo.
Best Sword & Shield Combos
| List of Sword & Shield Combos |
|---|
|
|
Spinning Reaper and Charged Chop Combo
| Combo Input |
|---|
| Combo Input |
|---|
| Combo Input |
|---|
The Lateral Slash string into a Spinning Reaper is a quick but powerful combo that can do a burst of damage. For slightly longer windows, you can also add the new Charged Chop at the end, as it's a solid move with good damage.
Shield Bash Combo
| Combo Input |
|---|
(Hold) |
| Combo Input |
|---|
(Tilt the Left Stick Forwards) |
| Combo Input |
|---|
(Tilt the Left Stick Forwards) |
The Shield Attack Combo strings together three consecutive shield bashes to deliver a large amount of stun damage when used against a monster's head. A few uses of this combo will be enough to knock any monster down.
You can chain these together to force a stun by canceling out of the third Shield Bash's recovery time with a Guard Slash, chained into another set of Shield Bashes.
Perfect Rush Combo
| Combo Input |
|---|
(Hold S) |
| Combo Input |
|---|
(Tilt the Left Stick Backwards) |
| Combo Input |
|---|
(Tilt the Left Stick Backwards) |
Note: This combo is only accessible after a basic attack input.
The Perfect Rush remains the Sword & Shield's most damaging attack. But to maximize its damage, you need to time the inputs to the combo to get the highest possible damage.
After the initial Backstep and Leaping Slash, the hunter will flash red for a brief moment. Wait until right after they flash brightest, then hit the input for the next attack. Repeat this for the next few attacks, until the Scaling Slash. Then, the combo can end in either a Falling Bash, Falling Slash or Plunging Thrust.
Mixed Attack Combo
| Combo Input |
|---|
| Combo Input |
|---|
| Combo Input |
|---|
This is a combo that mixes together two Chop and two Lateral Slash inputs for a very fast four-hit attack, that can be spammed for lots of hits in a brief duration.
This is because you can go directly back into the Chop attacks after the Lateral Slash attacks, allowing for a quick loop that can be repeated as much as the situation allows.
Sword & Shield Advanced Tips
| Sword & Shield Tips and Tricks |
|---|
|
|
Versatile Damage Options
While its combos are relatively simple, the Sword & Shield has access to several types of attacks and damage options that give it lots of flexibility on the field. Good game sense will drastically improve handling of this weapon.
For example, it can chain a lot of its quick sword attacks to quickly rack up Elemental Damage, or make use of the shield attacks to inflict stun damage alongside strong raw hits.
Reposition With Advancing or Sliding Swipe
To squeeze out more damage, players can opt to open combos with Advancing Slash instead of just walking up. The Sliding Swipe is also a good tool for dealing damage and repositioning around monsters.
Shield Bashes Use No Sharpness
Using the Shield to attack actually does not drain Sharpness from the weapon, allowing you to have less Sharpening downtime by weaving in Shield Bashes during your fights.
Dodge Attacks with Backstep
Since the Sword & Shield's blocks are weaker than other weapons, you should look to use Backstep to dodge enemy attacks. This move has a lot of invincibility frames but requires some practice for beginners to perfectly time it.
Use Perfect Guards to Negate Attacks
Although the Sword & Shield have a lighter Shield, it is now capable of a Perfect Guard, achieved right by blocking right before an attack hits.
Triggering a Perfect Guard is indicated by a flash of white, and the attack's damage will be nullified with no knockback and very little Stamina consumption. This makes the Perfect Guard a very powerful defensive tool.
Perfect Guard to Trigger Clash
The Sword & Shield is also capable of executing the new Clash mechanic when Perfect Guarding certain monster attacks.
This will put the hunter and the monster in a brief struggle, during which you can spam the attack buttons to land some hits on it and knock it back when winning the clash.
Focus Strike has Two Follow-Ups
With the introduction of the Focus Strike, the Sword & Shield got two more tools to use as its Focus Strike can follow-up into two different attacks.
Based on their input, the hunter can perform either the Falling Slash, an attack similar to the Plunging Thrust with lots of hits, or the Upswing Bash, which can combo into the Falling Bash for more stun damage.
How to Use Focus Mode and Focus Strike
How Good is the Sword & Shield?
Tier List Ranking
| Weapon Ranking | ||
|---|---|---|
| Damage Type | Entry Barrier | Difficulty to Master |
| Low | ★★★☆☆ | |
| Pros and Cons | ||
|
|
||
Entry Barrier pertains to how easy it is to learn the weapon from scratch, while Difficulty to Master is a rating on how difficult it is to perfectly execute the weapon mechanics.
The Sword & Shield is a versatile weapon that excels in both offense and defense, capable of constant attacks while defending itself with Perfect Guard and ability to evade very quickly.
It has access to both Sever and Blunt damage, allowing it to stun and cut tails, and also retains Perfect Rush as a powerful damage option on downed monsters.
It's easy to learn as there are no strict combos, but mastery over the Sword & Shield will rely more on game skill. Knowing when to use each of its various attacks and maneuvers is what will improve its effectiveness on field.
Monster Hunter Wilds Related Guides

All Weapon Guides
| All Weapon Tutorials | |||||
|---|---|---|---|---|---|
 Great Sword Great Sword |
 Long Sword Long Sword |
 Sword & Shield Sword & Shield |
|||
 Dual Blades Dual Blades |
 Hammer Hammer |
 Hunting Horn Hunting Horn |
|||
 Lance Lance |
 Gunlance Gunlance |
 Switch Axe Switch Axe |
|||
 Charge Blade Charge Blade |
 Insect Glaive Insect Glaive |
 Light Bowgun Light Bowgun |
|||
 Heavy Bowgun Heavy Bowgun |
 Bow Bow |
||||
All Weapon Trees
| All Weapon Trees | |||||
|---|---|---|---|---|---|
 Great Sword Great Sword |
 Long Sword Long Sword |
 Sword & Shield Sword & Shield |
|||
 Dual Blades Dual Blades |
 Hammer Hammer |
 Hunting Horn Hunting Horn |
|||
 Lance Lance |
 Gunlance Gunlance |
 Switch Axe Switch Axe |
|||
 Charge Blade Charge Blade |
 Insect Glaive Insect Glaive |
 Kinsects Kinsects |
|||
 Light Bowgun Light Bowgun |
 Heavy Bowgun Heavy Bowgun |
 Bow Bow |
|||
Comment
PC combo actions has a PlayStation circle button on it for falling bash
Author
Sword & Shield Weapon Guide and Best Combos
improvement survey
03/2026
improving Game8's site?

Your answers will help us to improve our website.
Note: Please be sure not to enter any kind of personal information into your response.

We hope you continue to make use of Game8.
Premium Articles
Rankings
Gaming News
Popular Games

Genshin Impact Walkthrough & Guides Wiki

Honkai: Star Rail Walkthrough & Guides Wiki

Umamusume: Pretty Derby Walkthrough & Guides Wiki

Pokemon Pokopia Walkthrough & Guides Wiki

Resident Evil Requiem (RE9) Walkthrough & Guides Wiki

Monster Hunter Wilds Walkthrough & Guides Wiki

Wuthering Waves Walkthrough & Guides Wiki

Arknights: Endfield Walkthrough & Guides Wiki

Pokemon FireRed and LeafGreen (FRLG) Walkthrough & Guides Wiki

Pokemon TCG Pocket (PTCGP) Strategies & Guides Wiki
Recommended Games

Diablo 4: Vessel of Hatred Walkthrough & Guides Wiki

Fire Emblem Heroes (FEH) Walkthrough & Guides Wiki

Yu-Gi-Oh! Master Duel Walkthrough & Guides Wiki

Super Smash Bros. Ultimate Walkthrough & Guides Wiki

Pokemon Brilliant Diamond and Shining Pearl (BDSP) Walkthrough & Guides Wiki

Elden Ring Shadow of the Erdtree Walkthrough & Guides Wiki

Monster Hunter World Walkthrough & Guides Wiki

The Legend of Zelda: Tears of the Kingdom Walkthrough & Guides Wiki

Persona 3 Reload Walkthrough & Guides Wiki

Cyberpunk 2077: Ultimate Edition Walkthrough & Guides Wiki
All rights reserved
©CAPCOM
The copyrights of videos of games used in our content and other intellectual property rights belong to the provider of the game.
The contents we provide on this site were created personally by members of the Game8 editorial department.
We refuse the right to reuse or repost content taken without our permission such as data or images to other sites.


![Everwind Review [Early Access] | The Shaky First Step to A Very Long Journey](https://img.game8.co/4440226/ab079b1153298a042633dd1ef51e878e.png/thumb)

![Monster Hunter Stories 3 Review [First Impressions] | Simply Rejuvenating](https://img.game8.co/4438641/2a31b7702bd70e78ec8efd24661dacda.jpeg/thumb)


PS5 -- if open wound, in focused mode, hit R1 at the wound (will stab the spot), then follow up with Triangle button. Will destroy wound. Also, is highly effective at melting down mobs and even stun locking them.