Secondary Weapons
★ Arkveld Gamma Armor | MH Stories 3 Collab
☆ Version 1.041: Sororal α Armor | Shatterseal
★ How to Unlock Proof of a Hero Quest
☆ Omega Planetes | Savage Omega | Builds vs Omega
★ Armor Set Search updated for Ver 1.041
☆ HR50+ Builds | Tier List | Weapon Guides
Consider weapons like Bowguns and weapons that synergize with armor skills when choosing your secondary weapon in Monster Hunter Wilds. Learn what makes for a useful secondary weapon and which secondary weapons to bring per weapon type!
| Weapon Guides | ||
|---|---|---|
| Weapon Tier List | List of All Weapons | Beginner Weapons |
| Secondary Weapons | Weapon Combinations | Weapons Quiz |
List of Contents
Secondary Weapons
|
|
Bowguns Work With any Primary Weapon
| Light Bowgun | Heavy Bowgun |
|---|---|
Either the Light Bowgun or Heavy Bowgun is an excellent choice for a secondary weapon. The Light Bowgun is ideal for players who prefer quick weapon switching and a high rate of fire, while the Heavy Bowgun, though slower, delivers massive firepower and defense.
The Light Bowgun excels at medium-range combat, while the Heavy Bowgun delivers long-range firepower, making both ideal for targeting flying monsters and hard-to-reach areas that melee weapons struggle with.
Additionally, both can be used while riding the Seikret, further enhancing their versatility in battle.
Useful When Equipped With Demon or Armor Ammo
Both weapons also excel in a supportive role, especially when using Demon Ammo to boost raw damage or Armor Ammo to increase defense — making them invaluable in multiplayer lobbies.
Secondary Weapons That Share Recommended Armor Skills
| Sample Weapon Combination | |
|---|---|
|
|
|
If you're unsure which secondary weapon suits you, consider choosing one that synergizes with your current build’s Armor Skills.
For example, pairing Dual Blades and Sword and Shield works well because both skills can maximize the same armor skills such as Burst, Antivirus, and Coalescence.
Same Weapons With Different Elemental Attributes
| Same Weapon Type Combination | |
|---|---|
|
|
|
Another option is to bring the same weapon type for both your primary and secondary weapons but have the secondary weapon use a different elemental attribute.
For example, you can equip two Dual Blades—one with a fire attribute and the other with water—allowing you to exploit a monster's weakness to both elements.
Weapons With Different Damage Types
| Different Damage Type Combination | |
|---|---|
|
|
|
Pairing weapons with different damage types is another way to choose secondary weapons. For example, pairing Great Sword with Hammer gives you access to booth Sever and Blunt damage types. This lets you knock monsters out while also giving you the ability to cut off their tails.
Of course, when doing this, you must still consider armor skill synergy to make sure that your Armor Skills work with both weapons.
Secondary Weapons for All Weapons
Secondary Weapon Per Weapon
| Main Weapon | Secondary | Reason |
|---|---|---|
 Hammer Hammer |
 Hunting Horn Hunting Horn |
A dual blunt weapon like the Hammer and Hunting Horn increase chances for Knock Outs especially with a maximum level Slugger Weapon Skill. |
 Bow Bow |
 Dual Blades Dual Blades |
The Bow and Dual Blades are a synergized pair as both weapons compliment what the other lacks in range and damage output, especially in dealing with aerial monsters. |
 Gunlance Gunlance |
 Charge Blade Charge Blade |
Both weapons excel in close-range combat, and their unique attack modes create an explosive playstyle that keeps constant pressure on the target. |
 Long Sword Long Sword |
 Sword and Shield Sword and Shield |
The quick item use and support potential of the Sword and Shield can complement the Long Sword’s counter-heavy playstyle, letting you heal or buff without losing momentum. |
 Great Sword Great Sword |
Hammer |
The Hammer can stun enemies, creating openings for the Great Sword’s True Charge Attack. This combo also adds versatility, giving you both blunt and cutting damage for different hunts. |
| Hunting Horn |
Long Sword |
A Hunting Horn Works well with the Long Sword which it can provide additional buffs to, and is especially invaluable to a Long Sword with Power Prolonger. |
| Charge Blade |
 Lance Lance |
Since a Charge Blade now relies on Perfect Blocks to activate Savage Axe, pairing it with another Guard weapon like the Lance allows you to counter attack quicker. |
| Sword and Shield |
 Insect Glaive Insect Glaive |
Having an Insect Glaive alongside a Sword and Shield makes up for the latter’s limited reach, allowing for better aerial mobility and extended attacks. |
| Lance |
Gunlance |
These weapons complement each other’s defensive strengths. The Lance offers stronger defense, while the Gunlance balances it out with firepower. |
| Insect Glaive |
 Heavy Bowgun Heavy Bowgun |
The Insect Glaive and Heavy Bowgun complement each other by balancing mobility and firepower. The Insect Glaive provides aerial agility and close-range pressure, while the Heavy Bowgun delivers high-damage ranged attacks. |
| Heavy Bowgun |
 Light Bowgun Light Bowgun |
Pairing both Bowguns together allows for a wider Ammo selection, where the Light Bowgun can act as the supporting fire to the Heavy Bowgun's high damage output. |
| Dual Blades |
Insect Glaive |
A very fluid and speedy combo which can still accommodate the Dual Blades' reach limitations with the Insect Glaive's Aerial attacks, further enhanced by Power Prolonger. |
| Light Bowgun |
Dual Blades |
A solid pair for continuous status effect and elemental blows, with both weapons able to dish out a heavy rate of attacks, suitable for players who like an offensive support playstyle. |
 Switch Axe Switch Axe |
Charge Blade |
The Rapid Morph skill on both weapons allow them to deal the highest damage possible at a relatively quicker pace. Their similar mechanisms also generate seamless adaptability in combat. |
Weapons Guide: All Weapon Types Explained
How to Switch Weapons
Press the Right D-Pad on Your Controller
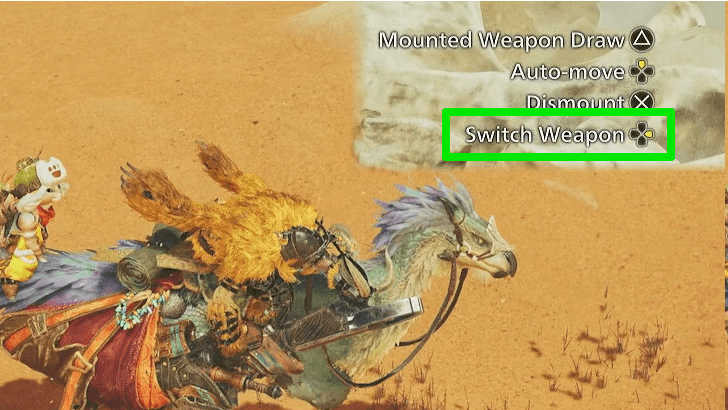
Press the Right D-Pad on your controller to Switch Weapons and Mount a Seikret at the same time. You can also do this while already riding the Seikret!
How to Change and Switch Weapons
Monster Hunter Wilds Related Guides
Monster Hunter Wilds Walkthrough Wiki
 Weapons
 Armor Sets
 Monsters
 Builds
 Story Walkthrough
 Artian Weapons
 Maps and Locations
 Items and Materials
 Tips and Tricks
 Game Mechanics
 Endemic Life
 Skills
 Decorations
 Talismans
 Characters
 Quests
 Palico
 Trophies
 Cosmetics
 Furniture
 Festivals
 News and Game Info
 Message Boards
Recommended Guides
 State of the Meta
 Best Weapons Tier List
 Weapon Combos
 Best Items to Bring
 Armor Set Search
 Endgame Guide
 Unchangeable Features and Missables
 Best Skills
 Best Beginner Weapons
 Easter Eggs and Secrets
 Respawn Timers
 Is MH Wilds Too Easy?
 Best Meals and Food Effects
 Best Status Effect
 List of All Bugged Skills
 Best Co-op Strategies
 Weapon Popularity Tier List
 How to Prepare for Title Update 1
 Weapon Changes from the Beta
 Weapon Changes from Rise and World
 List of All DLC and Prices
 Talisman Rating Tool
 Best Talismans
 Armor Transcending Guide
Comment
Author

Secondary Weapons
Premium Articles
Rankings
- We could not find the message board you were looking for.
Gaming News


![Monster Hunter Stories 3 Review [First Impressions] | Simply Rejuvenating](https://img.game8.co/4438641/2a31b7702bd70e78ec8efd24661dacda.jpeg/thumb)
Popular Games

Genshin Impact Walkthrough & Guides Wiki
Honkai: Star Rail Walkthrough & Guides Wiki
Umamusume: Pretty Derby Walkthrough & Guides Wiki
Pokemon Pokopia Walkthrough & Guides Wiki
Resident Evil Requiem (RE9) Walkthrough & Guides Wiki
Monster Hunter Wilds Walkthrough & Guides Wiki
Wuthering Waves Walkthrough & Guides Wiki
Arknights: Endfield Walkthrough & Guides Wiki
Pokemon FireRed and LeafGreen (FRLG) Walkthrough & Guides Wiki
Pokemon TCG Pocket (PTCGP) Strategies & Guides Wiki


Recommended Games
Diablo 4: Vessel of Hatred Walkthrough & Guides Wiki
Cyberpunk 2077: Ultimate Edition Walkthrough & Guides Wiki
Fire Emblem Heroes (FEH) Walkthrough & Guides Wiki
Yu-Gi-Oh! Master Duel Walkthrough & Guides Wiki
Super Smash Bros. Ultimate Walkthrough & Guides Wiki
Pokemon Brilliant Diamond and Shining Pearl (BDSP) Walkthrough & Guides Wiki
Elden Ring Shadow of the Erdtree Walkthrough & Guides Wiki
Monster Hunter World Walkthrough & Guides Wiki
The Legend of Zelda: Tears of the Kingdom Walkthrough & Guides Wiki
Persona 3 Reload Walkthrough & Guides Wiki


All rights reserved
©CAPCOM
The copyrights of videos of games used in our content and other intellectual property rights belong to the provider of the game.
The contents we provide on this site were created personally by members of the Game8 editorial department.
We refuse the right to reuse or repost content taken without our permission such as data or images to other sites.