Seikret Mount Features and Abilities
★ Arkveld Gamma Armor | MH Stories 3 Collab
☆ Version 1.041: Sororal α Armor | Shatterseal
★ How to Unlock Proof of a Hero Quest
☆ Omega Planetes | Savage Omega | Builds vs Omega
★ Armor Set Search updated for Ver 1.041
☆ HR50+ Builds | Tier List | Weapon Guides
The Seikret is a mount in Monster Hunter Wilds. See all of the controls, the Seikret's features and abilities, tips and tricks, and recommended Seikret settings here!
| All Seikret Guides | ||
|---|---|---|
| Seikret Guide |
How to Customize Your Seikret | Seikret Decorations |
List of Contents
Seikret Mount Features and Abilities
| Seikret Features |
|---|
|
|
Auto-Move
| |
| |
When mounted on a Seikret, you can toggle Auto-Move, which will have the Seikret automatically follow the best route towards a quest objective or a map marker.
While on Auto-Move, Seikrets will go over obstacles and jump off cliffs. While moving, you can aim your Slinger or ranged weapon to initiate combat without sacrificing mobility!
Revert to Manual Movement
| |
| |
While using Auto-Move, you can deactivate it by pressing the Down Directional Button on your controller, the Q Key on PC, or simply by veering off-course, allowing you to manually control the Seikret.
After a certain amount of time without movement, the Seikret will automatically go back to Auto-Move and make its way to the map objective.
Dismounting Attack
When pursuing a target while riding a Seikret, you can unleash a dismounting attack to preemptively strike while dismounting. Using a dismounting attack can also cause you to mount the target monster!
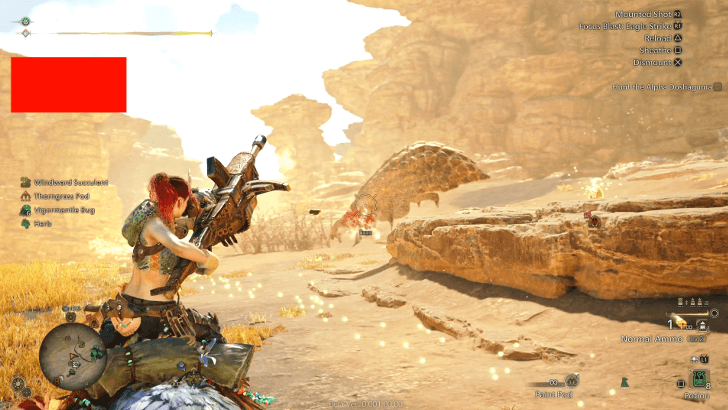
Mounted Aim
| |
| |
| |
You can aim your Slinger or ranged weapon while riding a Seikret by adjusting your aim with the Right Stick on a controller or the Mouse on PC.
To use the Slinger, your ranged weapon must be holstered before aiming, while for a ranged weapon, you need to unsheathe it first. Both can be fired using the same assigned button.
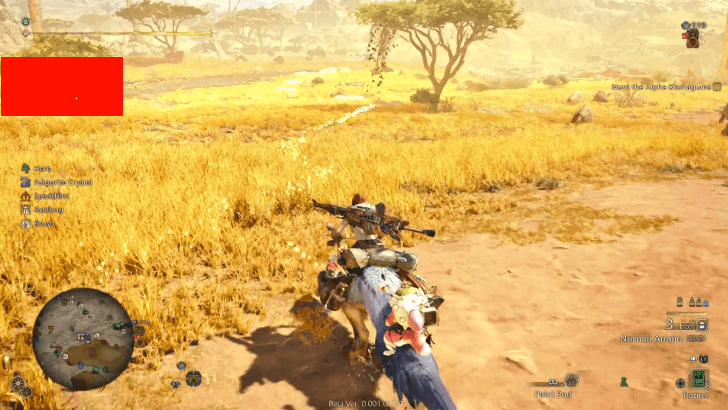
Switch Weapons
| |
Most weapons in Monster Hunter Wilds are a little too large for your backpack to carry. Thankfully, your trusty Seikret carries a much larger bag that can fit them.
Simply press the Right Directional Button on your controller, or the X Key for PC while mounted on your Seikret to swap to your Secondary Weapon. When you press the same buttons while dismounted, you will automatically call your Seikret and mount it before switching your weapon.
Collect Items With the Slinger
| |
| |
| |
You can collect items with your Slinger while riding a Seikret if they're out of reach. First, activate your Slinger Aim, then press the Circle or B Button on your controller, or the F Key on PC.
Alternatively, you can pick up items manually by guiding your Seikret close enough to pass by the resource without using the Slinger.
Glide Mid-Air
| |
| |
| |
Seikrets can glide by jumping off a cliff and holding down the R2 or RT Button on your controller, or the Z Key for PC. While gliding, you can still switch weapons for added flexibility.
Obtain Supply Items
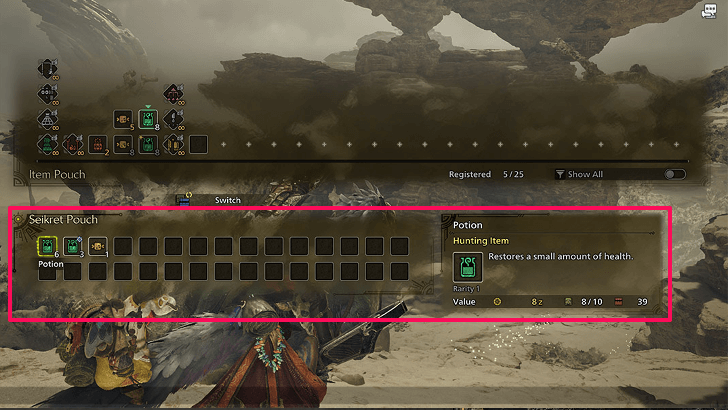
Supply Items will automatically be delivered to a Seikret's Pouch which you can access at any time by pressing the Left Directional Button on your Controller, or the N Key for PC while riding a Seikret. This is useful in repleneshing your health consumables, so be sure to check them once you run out!
Seikret Tips and Tricks
| Seikret Tips and Tricks |
|---|
|
|
Mount When Knocked Down
| |
| [/align] |
Call your Seikret when knocked down to quickly regain your footing on the battlefield. While it may take some time to reach you depending on your location, it helps you reposition safely by minimizing the threat of taking another attack from a rampaging monster.
Sharpen and Use Items While Mounted
When in battle, you may find yourself in need of a potion or sharpening your blade, the latter of which will require you to stand still, rendering you vulnerable to enemy attacks.
Thankfully, you can do all of these while mounted on a Seikret. This way, you can disengage from an enemy while drinking a potion or maintaining your gear!
Follow the Scoutfly Trail
Seikrets have an incredibly keen sense of smell, visualized in-game as a sparkling trail known as Scoutflies. During exploration, follow the Scoutfiles to reach your quest objective!
When on Auto-Move, your Seikret will automatically follow these Scoutflies and find the best and quickest route to your destination.
Seikrets Slow Down When Aiming
One thing to note is that Seikrets slow down whenever you enter Focused Mode using your ranged weapon to help steady your aim. However, this doesn't apply when you aim your Slinger.
Remember this when fighting dangerous monsters out in the field! Know when to disengage and sprint out of the way, then aim when threats die down.
Drift on Sharp Turns
Seikrets can drift when at full speed by either pressing the R2 or RT Button on controller, or the Z Key for PC. Toggling the left analog stick hard left or right will also produce the same effect on controllers.
Use this mechanic when dealing with sharp turns, especially when running from foes too powerful to take on!
Seikret Recommended Settings
List of Recommended Seikret Settings
| Recommended Game Settings | |
|---|---|
| Seikret Auto-Explore | OFF |
| Recommended Control Settings | |
| Call Seikret Controls | Type 3 |
| Call Seikret Controls (Radial Menu) | Manual Movement |
| Seikret Manual Controls | Type 2 |
The default Seikret controls in Monster Hunter Wilds enable automatic movement, which can make precise control difficult on a Seikret. We recommend adjusting your Seikret settings to the options mentioned above for more intuitive handling, allowing you greater freedom to steer as needed.
Seikret Mount Controls
List of All Seikret Controls
Unmounted Controls
| Command | Input |
|---|---|
| Mount (when near a Seikret) Call Seikret (Auto-Move) | |
| Call Seikret (Manual Movement) | |
| Call Seikret and Switch Weapons |
| Command | Input |
|---|---|
| Mount (when near a Seikret) Call Seikret (Auto-Move) | |
| Call Seikret (Manual Movement) | |
| Call Seikret and Switch Weapons |
| Command | Input |
|---|---|
| Mount (when near a Seikret) Call Seikret (Auto-Move) | |
| Call Seikret (Manual Movement) | |
| Call Seikret and Switch Weapons |
Mounted Controls
| Command | Input |
|---|---|
| Auto-Move | |
| Manual Movement | |
| Access Supply Items | |
| Switch Weapons | |
| Aim Slinger (ranged weapon not drawn) Aim Weapon (ranged weapon drawn) | |
| (Tap) Increase Speed (Hold) Sprint | |
| (Tap) Decrease Speed (Hold) Brake/Drift (while aiming) Fire Slinger/Weapon (while airborne) Glide | |
| Mounted Attack/Ready Weapon | |
| Dismounting Attack | |
| Sheath Weapon/Use Equipped Item | |
| Dismount |
What is a Seikret?
A Trusty Mount That Aids in Exploration

A Seikret is a mountable bird-like creature that supports the Hunter's terrain traversal, and acts as a secondary companion apart from your Palico. While it offers strategic support in battle, it does not actively attack enemies like the Palamute in Monster Hunter Rise.
Seikrets are Customizable

Seikrets can be customized to your liking once you unlock Nona’s services at Kunafa, Windward Plains by progressing through the Main Missions. You can personalize your Seikret with Decorations, pendants, feather colors, and even a custom name.
Monster Hunter Wilds Related Guides
All Game Mechanics Guides
Comment
Author

Seikret Mount Features and Abilities
Premium Articles

Rankings
Gaming News


![Monster Hunter Stories 3 Review [First Impressions] | Simply Rejuvenating](https://img.game8.co/4438641/2a31b7702bd70e78ec8efd24661dacda.jpeg/thumb)
Popular Games

Genshin Impact Walkthrough & Guides Wiki
Umamusume: Pretty Derby Walkthrough & Guides Wiki
Pokemon Pokopia Walkthrough & Guides Wiki
Honkai: Star Rail Walkthrough & Guides Wiki
Monster Hunter Stories 3: Twisted Reflection Walkthrough & Guides Wiki
Arknights: Endfield Walkthrough & Guides Wiki
Wuthering Waves Walkthrough & Guides Wiki
Zenless Zone Zero Walkthrough & Guides Wiki
Pokemon TCG Pocket (PTCGP) Strategies & Guides Wiki
Monster Hunter Wilds Walkthrough & Guides Wiki


Recommended Games
Diablo 4: Vessel of Hatred Walkthrough & Guides Wiki
Cyberpunk 2077: Ultimate Edition Walkthrough & Guides Wiki
Fire Emblem Heroes (FEH) Walkthrough & Guides Wiki
Yu-Gi-Oh! Master Duel Walkthrough & Guides Wiki
Super Smash Bros. Ultimate Walkthrough & Guides Wiki
Pokemon Brilliant Diamond and Shining Pearl (BDSP) Walkthrough & Guides Wiki
Elden Ring Shadow of the Erdtree Walkthrough & Guides Wiki
Monster Hunter World Walkthrough & Guides Wiki
The Legend of Zelda: Tears of the Kingdom Walkthrough & Guides Wiki
Persona 3 Reload Walkthrough & Guides Wiki


All rights reserved
©CAPCOM
The copyrights of videos of games used in our content and other intellectual property rights belong to the provider of the game.
The contents we provide on this site were created personally by members of the Game8 editorial department.
We refuse the right to reuse or repost content taken without our permission such as data or images to other sites.