This survey will take about 1 minute.
Your answers will help us to improve our website.
Monster Hunter Wilds
Hunting Horn Weapon Guide and Best Combos
★ Arkveld Gamma Armor | MH Stories 3 Collab
☆ Version 1.041: Sororal α Armor | Shatterseal
★ How to Unlock Proof of a Hero Quest
☆ Omega Planetes | Savage Omega | Builds vs Omega
★ Armor Set Search updated for Ver 1.041
☆ HR50+ Builds | Tier List | Weapon Guides
The Hunting Horn is a song-playing blunt weapon that mixes concussive hits and rhythmic melodies to support oneself and allies in Monster Hunter Wilds. See all the new moves for the Hunting Horn, its mechanics, controls, best ammo, advanced tips, and how good it is!
| Hunting Horn Guides | ||
|---|---|---|
| Weapon Guide | Builds | Tree |
List of Contents
Hunting Horn Balance Adjustment
Hunting Horn Update Ver 1.021
| Hunting Horn Changes |
|---|
|
・(Buff) Added armor properties to Hilt Stab, preventing the user from being knocked back by monster attacks. ・(Buff) Hilt Stab can now be chained into from Focus Strike: Reverb, Echo Bubble, Special Performance, Encore, or evading. ・(Buff) Echo Bubble can now be chained into from Offset Melody, Resounding Melody, or Encore. ・(Fixed) Fixed an issue that caused the finisher attack Focus Strike: Reverb to be difficult to connect. |
The Hunting Horn received some weapon changes for Update Ver. 1.021 on August 13, 2025 (UTC), notably an improvement to the Hilt Stab and Echo Bubble moves.
Hunting Horn Mechanics
| How to Use Hunting Horn |
|---|
|
|
Build Preset Songs with Notes
PC
PS5
XBOX
| Input | Note |
|---|---|
| | |
| | |
| |
| Input | Note |
|---|---|
| | |
| | |
| |
| Input | Note |
|---|---|
| | |
| | |
| |
The core mechanic that the Hunting Horn uses is its ability to play notes with each of their attacks on the meter found below the Sharpness meter. Each Hunting Horn has their own set of notes, meaning every Hunting Horn is composed of different songs you can play during the hunt!
Note colors will differ per Hunting Horn but their input is the same; paying attention to the note shape of the 3 different Note types will make it much easier for you to read songs.
Hunting Horn Songs and Effects
Compose Melodies for Different Buffs
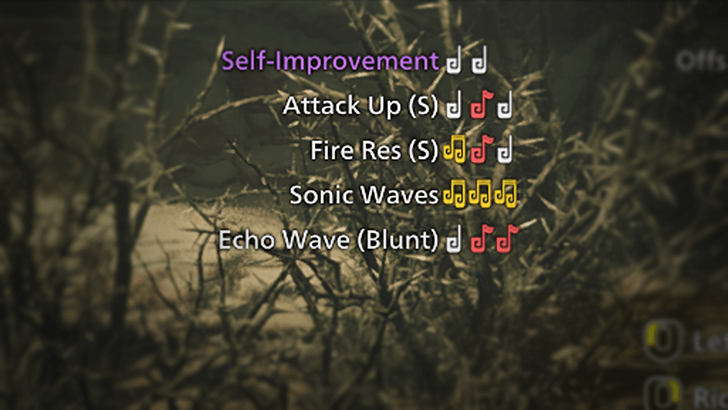
After understanding how to play notes and stack them up on the meter. Lining up and combining different notes will allow you to perform distinctive songs that provide buffs to you and your allies.
The only universal buff that each Hunting Horn has is the Self Improvement buff, where you get increased movement speed and an innate Mind's Eye.
For reference, you can see the melodies your Hunting Horn can play by checking the top right portion of your screen. Each song has its respective notes that you need to play in order.
Use Perform, Performance Beat, and Encore
PC
PS5
XBOX
| Input | Note |
|---|---|
| Perform | Performs an attack and plays the song lined up to activate the buffs associated with it. |
| Input | Note |
|---|---|
| Perform | Performs an attack and plays the song lined up to activate the buffs associated with it. |
| Input | Note |
|---|---|
| Perform | Performs an attack and plays the song lined up to activate the buffs associated with it. |
After lining up to a total of three songs, you can then perform the songs to apply the buffs to you and your allies. You can find your lined-up songs on the right side of your Note Meter. Depending on what move you used last and your directional input, the attack that comes with the performance also changes!
How to Use Performance Beat and Encore
PC
PS5
XBOX
| Move Input | Use |
|---|---|
| Performance Beat | Used as a perfect input for increased damage when you play the next song on the meter in a performance. Time this as soon as the song starts. |
| Encore | Use this if you want to perform only one song (or the last song) for one more performance with increased buffs. |
While performing, you can use either Performance Beat or Encore to buff your songs! Performance Beat is best used as a perfect input button to the start of your songs on your meter, while encore is best used as an additional buff to existing songs (hence its name).
Extend Overhead Smash with Follow-up
PC
PS5
Xbox
| Input | Action |
|---|---|
| Adds a quick additional slam |
| Input | Action |
|---|---|
| Adds a quick additional slam |
| Input | Action |
|---|---|
| Adds a quick additional slam |
To further improve Hunting Horn's punishment on topples and dodged attacks, its Wilds iteration extends the Overhead Smash by repeating the same input. This follow-up attack lets your hunter spin quickly before smashing the Hunting Horn down.
While basic, it can be transitioned into different moves instead of defaulting to a Backwards Strike afterward like with past titles. This leads to more combo paths, additional safety, all the while incentivizing on-the-fly decision-making and creativity.
Use Echo Bubbles for Buffs and Damage
PC
PS5
Xbox
| Input | Action |
|---|---|
| Performs a unique attack or buff depending on the Hunting Horn. |
| Input | Action |
|---|---|
| Performs a unique attack or buff depending on the Hunting Horn. |
| Input | Action |
|---|---|
| | Performs a unique attack or buff depending on the Hunting Horn. |
The Echo Bubble is a powerful move that surrounds a Hunter with a field that grants buffs to hunters and produces damage to any monster within it when the Hunting Horn is swung. Each Echo Bubble lasts for 1 minute after deployment.
Attacking with the horn will also cause these bubbles to deal damage, making them a very effective DPS move against stationary targets.
As an additional note to consider, you can input up to 3 notes of your choosing to prepare for a melody while your Hunter is dancing! Furthermore, you can get up to 3 Echo Bubbles in total.
Echo Bubbles Can Be Made After Focus Strike
As of Title Update 2, Echo Bubbles are automatically created at the end of a perfectly-timed Focus Strike: Reverb. An additional input can also be made at the timing of the Echo Bubble, when the hunter lands from the jump at the end of the animation.
Creating an Echo Bubble after a Focus Strike: Reverb can be cancelled by holding R2 (PS5), RT (Xbox), or R key (PC) by the end of the Focus Strike action.
Save and Use Special Performances
| Special Performance Melody | Melody Effect |
|---|---|
| Offset Melody | Performs an Offset Attack. This is a very useful counter move against monster attacks, causing knockdowns when successful. |
| Resounding Melody | Performs a very powerful piercing attack that goes through a monster, dealing multiple damage hits. This is an ideal damage dealer during openings in-between monster attacks and when the monster is toppled. |
| Melody of Life | A powerful Special Performance that greatly restores health to you and other allies in the vicinity. Note that this does not deal any damage. |
Special Performances are new additions to a Hunting Horn's melodies. What separates them from other songs is that they are very powerful melodies that have a unique position in the song queue for playing.
Once they are prepared, they will not disappear from your queue until used and will not interrupt the sequence of any other song!
Playing them only requires inputting the prescribed Special Performance input, meaning that you can use them on demand. You do not have to play them during a performance!
How to Use Special Performances
PC
PS5
Xbox
| Input | Action |
|---|---|
| Performs a unique attack or buff depending on the Hunting Horn. |
| Input | Action |
|---|---|
| Performs a unique attack or buff depending on the Hunting Horn. |
| Input | Action |
|---|---|
| Performs a unique attack or buff depending on the Hunting Horn. |
Special Performances are played in the same way as any other Hunting Horn song; you must build up the notes first, then play by following the above input for Special Performance!
Prepare 5-6 Notes with Focus Strike: Reverb
The Hunting Horn's new Focus Strike: Reverb is an attack that, upon hitting a wound, lets you prepare 5 notes in succession within a guitar solo animation. As of Title Update 2, 1 more additional note can be added at the end of the Focus Strike's jump animation (once the hunter lands from a perfectly-timed play).
The best way to input these notes is by pressing them in beat with the guitar solo. Successfully inputting all 5 notes adds an extra attack at the end along with an Echo Bubble.
Using this attack on a wound successfully will potentially interrupt the monster's attack. During the guitar solo, you also have hyper armor, reducing the damage you receive and preventing you from being knocked back during this time.
How to Use Focus Mode and Focus Strike
Hunting Horn Controls
Basic Controls
PC
PS5
Xbox
| | |
|---|---|
| | |
| | |
| | |
| | |
| | |
| Perform | |
| Performance Beat | After Performing |
| Encore | After Performing |
| Echo Bubble | |
| Special Performance | |
| Focus Strike: Reverb |
| | |
|---|---|
| | |
| | |
| | |
| | |
| | |
| Perform | |
| Performance Beat | After Performing |
| Encore | After Performing |
| Echo Bubble | |
| Special Performance | |
| Focus Strike: Reverb |
| | |
|---|---|
| | |
| | |
| | |
| | |
| | |
| Perform | |
| Performance Beat | After Performing |
| Encore | After Performing |
| Echo Bubble | |
| Special Performance | |
| Focus Strike: Reverb |
Notes with '+1' mean that they allow 1 additional note of your choice as an additional input.
Hunting Horn Best Combos
| Basic Hunting Horn Combos |
|---|
|
|
| Advanced Hunting Horn Combos |
|
|
| Combos laid out in the following sections are mainly based around the melody list of the Hope Horn. It can serve as a guide until you start getting used to sight reading inputs from other Hunting Horns with different note sequences.
Note that melody list inputs vary and it will be indicated if a combo follows a specific Hunting Horn's moveset. |
Quick Hit Combos
PC
PS5
Xbox
| Combo Input |
|---|
| ( Forward Smash → Right Swing or Flourish |
| Combo Input |
|---|
| ( Forward Smash → Right Swing or Flourish |
| Combo Input |
|---|
| ( Forward Smash → Right Swing or Flourish |
If you are facing a monster known for its speed and relatively quick attacks that leave little-to-no windows to punish, use this 2-3 second combo for sneaking in some damage.
Completing this combo with Flourish's 2nd note as Note 2 will also give you the song Echo Wave (Blunt). This can be performed immediately after or saved for later use.
Fast Echo Wave Topple Combo
PC
PS5
Xbox
| Combo Input |
|---|
| ( Echo Bubble ▶︎ Input Echo Wave (Blunt) → Perform ▶︎ Encore |
| Combo Input |
|---|
| ( Echo Bubble ▶︎ Input Echo Wave (Blunt) → Perform ▶︎ Encore |
| Combo Input |
|---|
| ( Echo Bubble ▶︎ Input Echo Wave (Blunt) → Perform ▶︎ Encore |
Inputs following Echo Bubbles (with '▶︎') means to input them during Echo Bubble setup.
This 7-second combo is potentially your strongest and fastest option against toppled monsters, using only 1 Echo Bubble and Echo Wave.
It is best that you have the full buff (purple level) of Self Improvement applied to maximize the damage of this combo. This can be prepared beforehand while you are on your Seikret or on foot with Left Swing into Hilt Stab.
10-Second Version with an Extra Echo Wave
A stronger version of this combo involves basically adding a second Echo Wave into the song line up. Just like Self Improvement, this can be prepared before you make use of the above combo.
Fast Offset Melody Buildup Combo
PC
PS5
Xbox
| Combo Input |
|---|
| ( Echo Bubble ▶︎ Input 1st 3 Notes of Offset Melody → Left Swing → Special Performance |
| Combo Input |
|---|
| ( Echo Bubble ▶︎ Input 1st 3 Notes of Offset Melody → Left Swing → Special Performance |
| Combo Input |
|---|
| ( Echo Bubble ▶︎ Input 1st 3 Notes of Offset Melody → Left Swing → Special Performance |
Inputs following Echo Bubbles (with '▶︎') means to input them during Echo Bubble setup.
This the fastest buildup combo for preparing Special Performance Offset Melody via shortcut with Echo Bubble. With this combo, you should be able to have Offset Melody ready within 7 seconds.
High Damage Offset Melody Buildup Combo
PC
PS5
Xbox
| Combo Input |
|---|
| ( Overhead Smash ▶︎ Input Note 2 → Overhead Smash Follow Up → Hilt Stab (Note 1) → Special Performance |
| Combo Input |
|---|
| ( Overhead Smash ▶︎ Input Note 2 → Overhead Smash Follow Up → Hilt Stab (Note 1) → Special Performance |
| Combo Input |
|---|
| ( Overhead Smash ▶︎ Input Note 2 → Overhead Smash Follow Up → Hilt Stab (Note 1) → Special Performance |
Input '▶︎' means to input it during Overhead Smash's 2nd hit.
This is the go-to 8 second high-damage combo if you do not plan to use an Echo Bubble. Take advantage of Overhead Smash's 2-note input, add Overhead Smash Folllow Up, then go for a Hilt Stab for a fast note-stack for preparing Offset Melody.
Basic Topple and Punish Combo
PC
PS5
Xbox
| Combo Input |
|---|
| ( Overhead Smash → Overhead Smash Follow Up |
| Combo Input |
|---|
| ( Overhead Smash → Overhead Smash Follow Up |
| Combo Input |
|---|
| ( Overhead Smash → Overhead Smash Follow Up |
This is repeatable 4-second combo for punishing monsters and hitting them while toppled quickly, offering more damage than repeatedly using other regular swings.
3-Song Echo Wave Combo
PC
PS5
XBOX
| Combo Input |
|---|
| ( 3x Echo Bubble → Perform → 2x Performance Beat → Encore |
| Combo Input |
|---|
| ( 3x Echo Bubble → Perform → 2x Performance Beat → Encore |
| Combo Input |
|---|
| ( 3x Echo Bubble → Perform → 2x Performance Beat → Encore |
Inputs following Echo Bubbles (with '▶︎') means to input them during Echo Bubble setup.
This is a 18 second-long combo setup that focuses on setting up 3 Echo Bubbles and unleashing Echo Wave as fast as possible.
While this is a high damage combo, you may only find this combo most effective in niche cases where you are able to hold down a monster for 18 seconds (such as extending a 10-second topple with a trap).
After having used up all 3 Echo Bubbles, your best combo rotation to synergize with it would be use note-stacking moves such as Stab Hilt and Flourish to quickly keep repeating Echo Wave songs within these bubbles.
Echo Bubble into Focus Strike Reverb Combo
PC
PS5
Xbox
| Combo Input |
|---|
| ( Echo Bubble → Focus Strike: Reverb |
| Combo Input |
|---|
| ( Echo Bubble → Focus Strike: Reverb |
| Combo Input |
|---|
| ( Echo Bubble → Focus Strike: Reverb |
This is a good combo for stacking up to 8 notes quickly, with 3 coming from the Echo Bubble and 5 coming from Focus Strike: Reverb on hitting a wound. You can then follow this up with an extra note to finish your 3-song queue and activate Perform form a lineup of buffs or Echo Waves!
Echo Bubble into Resounding Melody Combo
PC
PS5
Xbox
| Combo Input |
|---|
| ( Echo Bubble → Resounding Melody |
| Combo Input |
|---|
| ( Echo Bubble → Resounding Melody |
| Combo Input |
|---|
| ( Echo Bubble → Resounding Melody |
This is a good combo for Hunting Horns that have the Resounding Melody Special Performance (such as Resounding Galahad). You get 3 notes first from Echo Bubble and then finally stack the last 1 note with an attack to complete the 4 notes required for the Special Performance.
Focus Strike Reverb into Resounding Melody Combo
PC
PS5
Xbox
| Combo Input |
|---|
| ( Focus Strike: Reverb → Resounding Melody |
| Combo Input |
|---|
| ( Focus Strike: Reverb → Resounding Melody |
| Combo Input |
|---|
| ( Focus Strike: Reverb → Resounding Melody |
This is an optimal and safe combo for using the Resounding Melody, since it allows for a setup with a temporary stun on the monster on using a Focus Strike on a wound. Within the 5 note stacking of Focus Strike: Reverb, input the 4 required notes for the Resounding Melody then activate Special Performance.
Hunting Horn Advanced Tips
| Advanced Tips for Hunting Horn |
|---|
|
|
Maximize Flourish and Overhead Smash
Flourish and Overhead Smash are double swings that allow you to sneak in one extra note input of your choice on their second attack. When the Hunting Horn is swung for its second attack, press whatever note you want and it should appear on the Note Meter.
As an additional tip, you can cancel the first instance of the attack by dodging If you feel like you are about to get hit by the monster!
Unsheathe Forward Smash into Another Note
PC
PS5
XBOX
| Input |
|---|
| While sheathed, Forward Smash (sheathed) ▶︎ Right Swing or Backwards Strike |
| Input |
|---|
| While sheathed, Forward Forward Smash (sheathed) ▶︎ Right Swing or Backwards Strike |
| Input |
|---|
| While sheathed, Forward Forward Smash (sheathed) ▶︎ Right Swing or Backwards Strike |
When unsheathing the Hunting Horn with Forward Smash, you can cancel it near the beginning of its animation to any of the 2 moves Right Swing and Backwards Strike, allowing you to start off with a different note than the single non-flag notehead. This is useful for getting the first input of specific songs quickly.
Use Hilt Stabs for Fast Note Stacking
While the Hilt Stab deals miniscule amounts of damage, it more than makes up for the utility it provides during a hunt! A long-time user of Hunting Horn makes use of this underrated move in a variety of ways:
- Play any notes in a fast manner as an extension.
- Helps to line yourself up to monsters when out of position.
- Used to unconventionally sever monster parts since it deals slashing damage.
Sample Note Stack Combo
PC
PS5
Xbox
| Combo Input |
|---|
| ( Forward Smash → Hilt Stab (Note 1) → Flourish (Note 2) |
| Combo Input |
|---|
| (Forward Forward Smash → Hilt Stab (Note 1) → Flourish (Note 2) |
| Combo Input |
|---|
| (Forward Forward Smash → Hilt Stab (Note 1) → Flourish (Note 2) |
Inputs with: '▶︎' means while in transition to Flourish's second attack.
You can efficiently stack up your notes by using this combo with Hilt Stab and Flourish, being able to build up enough for Self Improvement and Echo Wave (Blunt) in under 5 seconds.
This move doesn't exactly offer a high damage output, but it is one fast approach to getting your offensive songs out.
Always Keep Self Improvement Active
As a general rule while playing Hunting Horn, make it a habit to always keep Self Improvement active. Self-Improvement at the 2nd level (purple) boosts damage of each of your hunting horn attacks by around 20%.
For the most part, it should be in your best interest to integrate Left Swing or Hilt Stab between your combos to actively line up Self Improvement!
Always Use Echo Bubbles
Echo Bubbles, in addition to allowing you to store 3 notes immediately when used, will also significantly boost the Hunting Horn's overall DPS potential since they deal damage on nearly every Hunting Horn action.
With well-placed Echo Bubbles, each of your attacks will constantly have added damage to the monster, and this is magnified by other buffs such as Self-Improvement and Attack Up. Using these bubbles offensively is best paired with Echo Waves.
Being in Echo Bubbles also give you increased Evasion and Movement Speed, putting you and your allies in a good defensive position as a bonus.
Always Have Special Performance Ready
Special Performance melodies can be prepared and stored for later use anytime. It will also not interfere with the sequence of notes you prepare with standard melodies; you only have to trigger its input like any regular attack.
Having it prepared beforehand will allow you to use it quickly in crucial situations. For example, having an Offset Melody will come in handy when you plan to counter a monster's attack for a knockdown.
Offset Melody Counter Timing
The timing for Offset Melody is ready to release once your character finishes getting into a stance. You can hold this stance for a long while before releasing it at an oncoming monster attack.
Forward Input Perform is the Fastest
Above inputs are performed after using an Echo Bubble.
Of all of the directional Perform inputs you can do on the Hunting Horn, forward directional input Perform is the fastest in a combo and is the 2nd fastest outside of one by a small margin (no input directional input Perform being the next).
It is best to use the forward directional input Perform in nearly all cases due to its speed. Its other directional variants may be used in more niche cases such as repositioning early in anticipation of an attack.
Other Weapons Do Not Work with Echo Bubble
Swapping to another weapon to try and combo with the Echo Bubble will not proc the bubble's damage effect. Thus, making use of the Hunting Horn is necessary for fully using the Echo Bubble's offensive capabilities.
Swapping out your Hunting Horn, however, does not reduce the lifespan of your Echo Bubble (it's still 1 minute long). So you can still use its defensive effects as an advantage.
Performance Beat Perfect Input Timing
Above is our video on Perfect Input timing. Unmute the video to listen to the beat of the metronome!
To get the perfect input timing of Performance Beat, you will need to time it with the start of a song. The first song is always the hardest to perfect due to it starting a bit on off-timing, but the rest will be easy to follow.
For the above video using the Hope Horn, input timing for Performance Beat seemed to follow a tempo of 90 BPM immediately at the start of the first song. Perfect timing is at the start of every bar (the 1st beat after the 4th). Alternatively, you can pay attention to the sound of the horn.
Hitting Performance Beat on time with the start of a Hunting Horn song will boost the damage of your attack during that instance. Depending on how many songs you will play, you can perfect input Performance Beat up to 3 times.
Play Notes while Riding a Seikret
You can play notes one-by-one while riding a Seikret by doing a Riding Attack with the corresponding note button! This will allow you to prepare notes in advance before fighting a monster if you are travelling via Seikret.
Notes can also be played while jumping or via Dismount Attack in the same manner, giving you more ways to get a head start in setting up a song list.
Seikret Mount Features and Abilities
Combo 2 Horns with All Melodies Extended
In the video above, we activated Gramklang's buffs first, then switched to Resounding Galahad and activated All Melodies Extended.
Active Hunting Horns buffs from both your primary and secondary slots can be extended with All Melodies Extended by 20 seconds on each perform including Encore which repeats all songs in the queue. So far, All Melodies Extended can be found in the Veldian Sibilus weapons tree which includes the highly-recommended Resounding Galahad.
This can potentially make your Hunting Horn buffs infinite so as long as All Melodies Extended is played repeatedly. Extension times stack, so 3 successive plays of this melody with Encore gives a total of 2 minute melody extension. This is great for pairing with damage and healing buffs such as the Affinity/Recovery Speed melody provided by the Kummerklang line (Gore Magala).
Make these buffs much easier to manage by adding in Horn Maestro (make sure to add them to each Hunting Horn) which greatly increases melody duration, Echo Bubble duration and size, and increased healing chance from Health Recovery songs.
Prepared Songs are Saved on Weapon Switch
Switching out your Hunting Horn to another weapon will preserve its prepared song queue but not its notes on the Note Meter. Take note of this if you want to perform songs as soon as you dismount your Seikret.
How Good is the Hunting Horn?
Tier List Ranking
| Weapon Ranking | ||
|---|---|---|
| Damage Type | Entry Barrier | Difficulty to Master |
| High | ★★★★★ | |
| Pros and Cons | ||
| |
||
Entry Barrier pertains to how easy it is to learn the weapon from scratch, while Difficulty to Master is a rating on how difficult it is to perfectly execute the weapon mechanics.
The Hunting Horn is currently ranked as a B Tier weapon. This is mainly due to its difficulties for dealing damage, but it is still a great weapon due to its high stun potential, above-average, Echo Bubble combos, and great support capabilities through its songs.
It struggles for a higher tier placement due to its highly demanding mechanical skill requirement. It can take a while to memorize Hunting Horn notes, especially when your swinging to a new song list another horn type.
Great Support and Damage
The Hunting Horn is unique blunt damage weapon that excels the most in a support and buff-oriented playstyle. Depending on the horn you use, you can give you and yourself some very useful buffs.
This an awesome weapon to have for a well-coordinated team and can still reliably hold its own even in solo hunts due to its access to high damage with moves such as Echo Bubble and Offset Melody, and songs such as Self Improvement and Echo Wave.
Mechanically Demanding
The Hunting Horn is, however, highly mechanical and dependent on buffs, making it one of the weapons with the highest skill ceiling in the game.
You will need to split your concentration between queuing your melodies and attacking the monster, and your only defensive option is still dodging and Offset Melody.
Monster Hunter Wilds Related Guides
All Weapon Guides
| All Weapon Tutorials | |||||
|---|---|---|---|---|---|
 Great Sword Great Sword |
 Long Sword Long Sword |
 Sword & Shield Sword & Shield |
|||
 Dual Blades Dual Blades |
 Hammer Hammer |
 Hunting Horn Hunting Horn |
|||
 Lance Lance |
 Gunlance Gunlance |
 Switch Axe Switch Axe |
|||
 Charge Blade Charge Blade |
 Insect Glaive Insect Glaive |
 Light Bowgun Light Bowgun |
|||
 Heavy Bowgun Heavy Bowgun |
 Bow Bow |
||||
All Weapon Trees
| All Weapon Trees | |||||
|---|---|---|---|---|---|
 Great Sword Great Sword |
 Long Sword Long Sword |
 Sword & Shield Sword & Shield |
|||
 Dual Blades Dual Blades |
 Hammer Hammer |
 Hunting Horn Hunting Horn |
|||
 Lance Lance |
 Gunlance Gunlance |
 Switch Axe Switch Axe |
|||
 Charge Blade Charge Blade |
 Insect Glaive Insect Glaive |
 Kinsects Kinsects |
|||
 Light Bowgun Light Bowgun |
 Heavy Bowgun Heavy Bowgun |
 Bow Bow |
|||
Comment
Author

Hunting Horn Weapon Guide and Best Combos
Please participate in our site
improvement survey
03/2026
improvement survey
03/2026
Would you assist in
improving Game8's site?
improving Game8's site?

×
We are listening to our users' valuable opinions and discussing how to act on them.
The information collected through this survey will be used for the purpose of improving our services. In addition, the information will only be disclosed a part of a statistic in a format that will not allow identification of personal information.
Begin Survey
Not Now
×
Please rate each item regarding Game8.co's Advertisements.
Amount of Ads
Very Dissatisfied
Somewhat Dissatisfied
Fine
Somewhat Satisfied
Highly Satisfied
Placement of Ads
Timing of Ad Display
Ad Loading Speed
Safeness of Ads
Content of Ads
×
Please rate each item regarding Game8.co's Quality of Articles.
Amount of information
Very Dissatisfied
Somewhat Dissatisfied
Fine
Somewhat Satisfied
Highly Satisfied
Frequency of updates
Speed of new information
Accuracy of articles
Understandibility of articles
Readability of sentences
×
Please rate each item regarding Game8.co's Usability of the Site.
Ease of finding information
Very Dissatisfied
Somewhat Dissatisfied
Fine
Somewhat Satisfied
Highly Satisfied
Loading Speed
Use of Color
Font Size
Visibility of Images
Easy to Understand Layout
×
Please rate each item regarding Game8.co's Message Boards, Comments.
Ease of Writing
Very Dissatisfied
Somewhat Dissatisfied
Fine
Somewhat Satisfied
Highly Satisfied
Readability
Ease in Finding Information
Comment Quality
Comment Quantity
Admin Response
×
Please rate each item regarding Game8.co's Site's new design.
Please rate our site's new design
Very Dissatisfied
Somewhat Dissatisfied
Fine
Somewhat Satisfied
Highly Satisfied
Do you think that the website's design change makes the site easier to use?
Has the new design made it easier for you to find information on the site?
Has the new design improved the overall visual appeal of the site?
How would you rate your overall satisfaction with the new design of the site?
×
How likely are you to recommend Game8 to someone you know?
Very Unlikely
0
1
2
3
4
5
6
7
8
9
10
Very Likely
If you have other opinions regarding potential improvement to the website, please share them with us. We would appreciate your honest opinion.
Note: This is a free response section, so you can proceed without entering anything.
Note: Please be sure not to enter any kind of personal information into your response.
Note: Please be sure not to enter any kind of personal information into your response.
×
Thank You
×
Thank you for participating in our survey! Your answers will help us to improve the quality of our website and services.
We hope you continue to make use of Game8.
We hope you continue to make use of Game8.
Close
Premium Articles

Rankings
- We could not find the message board you were looking for.
Gaming News


![Everwind Review [Early Access] | The Shaky First Step to A Very Long Journey](https://img.game8.co/4440226/ab079b1153298a042633dd1ef51e878e.png/thumb)

![Monster Hunter Stories 3 Review [First Impressions] | Simply Rejuvenating](https://img.game8.co/4438641/2a31b7702bd70e78ec8efd24661dacda.jpeg/thumb)
Popular Games

Genshin Impact Walkthrough & Guides Wiki
Honkai: Star Rail Walkthrough & Guides Wiki
Umamusume: Pretty Derby Walkthrough & Guides Wiki
Pokemon Pokopia Walkthrough & Guides Wiki
Resident Evil Requiem (RE9) Walkthrough & Guides Wiki
Monster Hunter Wilds Walkthrough & Guides Wiki
Wuthering Waves Walkthrough & Guides Wiki
Arknights: Endfield Walkthrough & Guides Wiki
Pokemon FireRed and LeafGreen (FRLG) Walkthrough & Guides Wiki
Pokemon TCG Pocket (PTCGP) Strategies & Guides Wiki


Recommended Games
Diablo 4: Vessel of Hatred Walkthrough & Guides Wiki
Fire Emblem Heroes (FEH) Walkthrough & Guides Wiki
Yu-Gi-Oh! Master Duel Walkthrough & Guides Wiki
Super Smash Bros. Ultimate Walkthrough & Guides Wiki
Pokemon Brilliant Diamond and Shining Pearl (BDSP) Walkthrough & Guides Wiki
Elden Ring Shadow of the Erdtree Walkthrough & Guides Wiki
Monster Hunter World Walkthrough & Guides Wiki
The Legend of Zelda: Tears of the Kingdom Walkthrough & Guides Wiki
Persona 3 Reload Walkthrough & Guides Wiki
Cyberpunk 2077: Ultimate Edition Walkthrough & Guides Wiki


All rights reserved
©CAPCOM
The copyrights of videos of games used in our content and other intellectual property rights belong to the provider of the game.
The contents we provide on this site were created personally by members of the Game8 editorial department.
We refuse the right to reuse or repost content taken without our permission such as data or images to other sites.