 Amstrigian
 Bitterbug
 Black Windrustler
 Curioshell Crab
 Dark Hornet
 Dung Beetle
 Emperor Hopper
 Flashbug
 Flashflies
 Giant Vigorwasp
 Godbug
 Hymstrigian
 Landlight Shrimp
 Nothpecker
 Pallbug
 Paratoad
 Quatreflies
 Rufflizard
 Sandstar
 Smokeshroud Gekko
 Thunderbug
 Tracktail Lizard
 Vigormantle Bug
 Vigorwasp
 Wedge Beetle
 Wiggly Litchi
 Windrustler
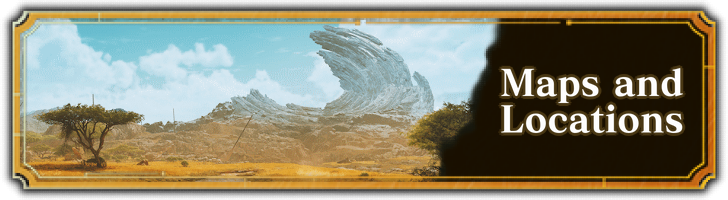
This survey will take about 1 minute.
Your answers will help us to improve our website.
Monster Hunter Wilds
Windward Plains Camps and Map Guide
★ Arkveld Gamma Armor | MH Stories 3 Collab
☆ Version 1.041: Sororal α Armor | Shatterseal
★ How to Unlock Proof of a Hero Quest
☆ Omega Planetes | Savage Omega | Builds vs Omega
★ Armor Set Search updated for Ver 1.041
☆ HR50+ Builds | Tier List | Weapon Guides
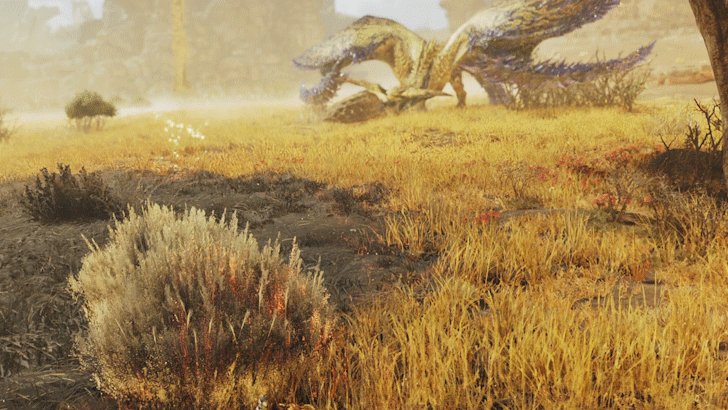
Windward Plains is one of the locales you explore in Monster Hunter Wilds. See a map of the Windward Plains and all its camps, how to get to this location, and the monsters, endemic life, and quests you encounter here.
List of Contents
Windward Plains Pop-Up Camps
All Pop-Up Camps
| Camp & Cost | Location and Details |
|---|---|
|
Area 3: South
(50 Guild Pts.) |
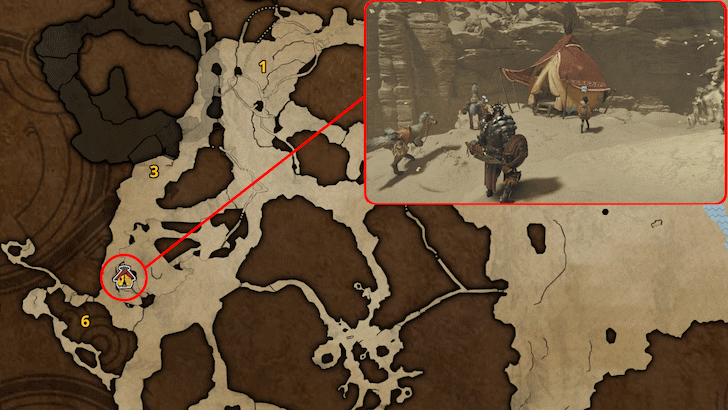 Use the nearby Wedge Beatle or climb the geode towards the south to reach this camp. Security: Insecure |
|
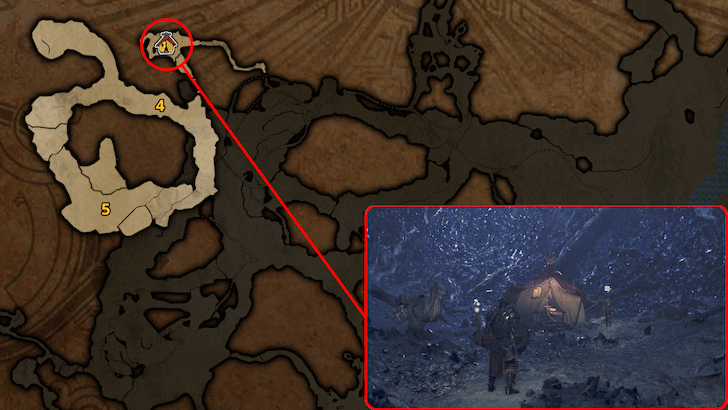
Area 4: West
(75 Guild Pts.) |
 Climb the roots north of Area 3 and continue the path to reach this camp site thats near five environmental traps which you can use against a monster. Security: Dangerous |
|
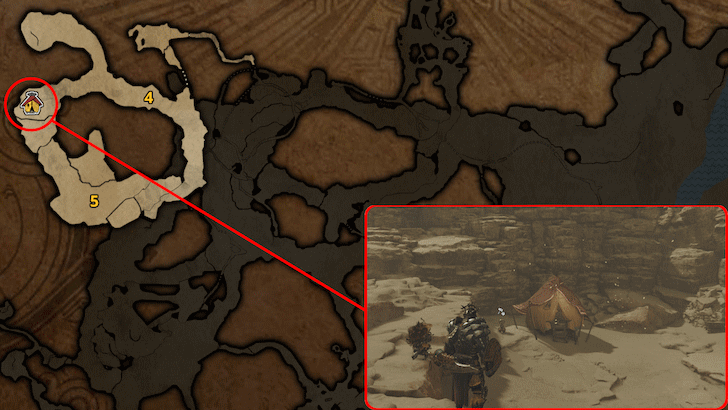
Area 4: Mineral Cave
(25 Guild Pts.) |
 Use your Seikret to traverse the narrow paths to reach this camp inside a large geode. Security: Safe |
|
Area 6: Valley Hideaway
(25 Guild Pts.) |
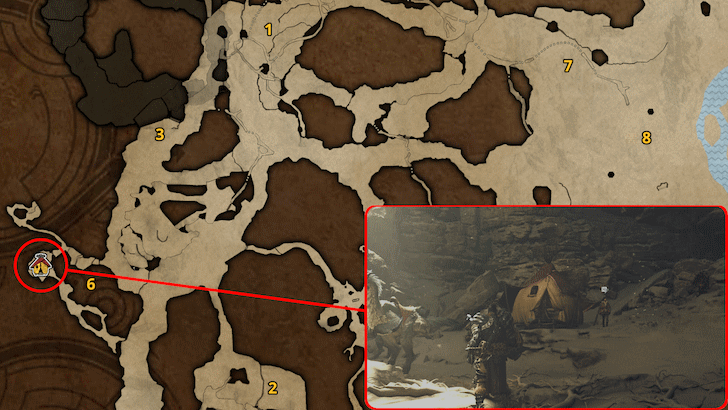 Climb the tall network of roots in Area 6. Security: Safe |
|
Area 8: Southeast
(75 Guild Pts.) |
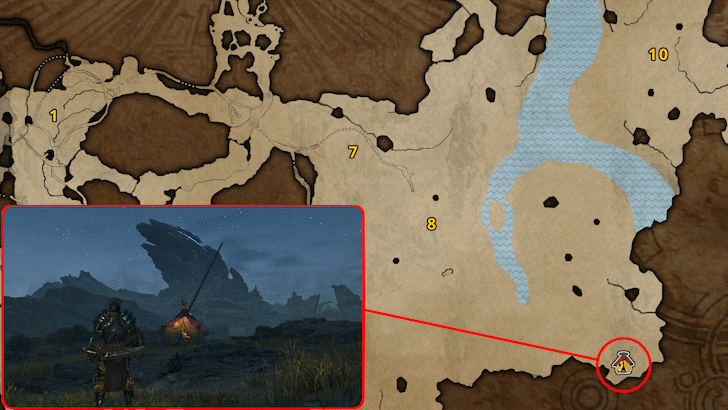 Found at the Southeast corner of Area 8. Useful for periodically gathering Honey. Security: Dangerous |
|
Area 8: Southwest
(75 Guild Pts.) |
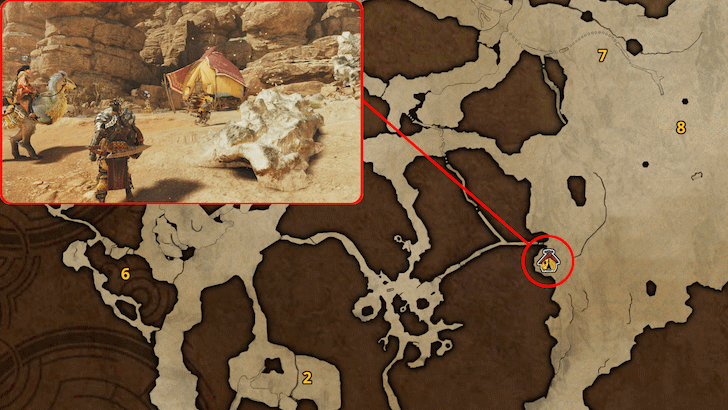 You'll find this camp at the east exit of Kunafa, Windsong Village. Security: Dangerous |
|
Area 9: Lookout Hill
(50 Guild Pts.) |
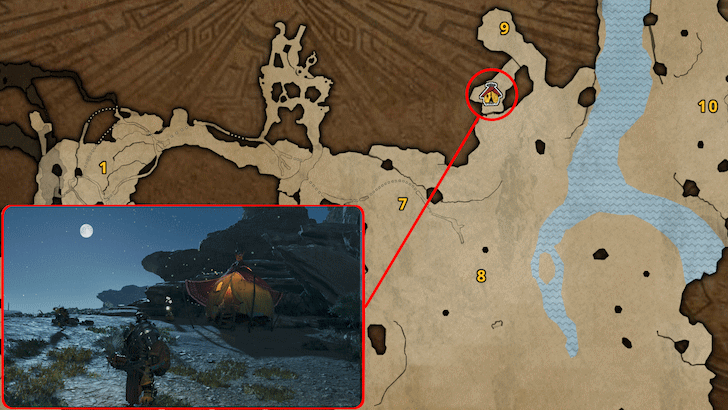 Found on top of the hill west of the river. Useful for periodically gathering Bones and Ores. Security: Insecure |
|
Area 10: Southeast
(75 Guild Pts.) |
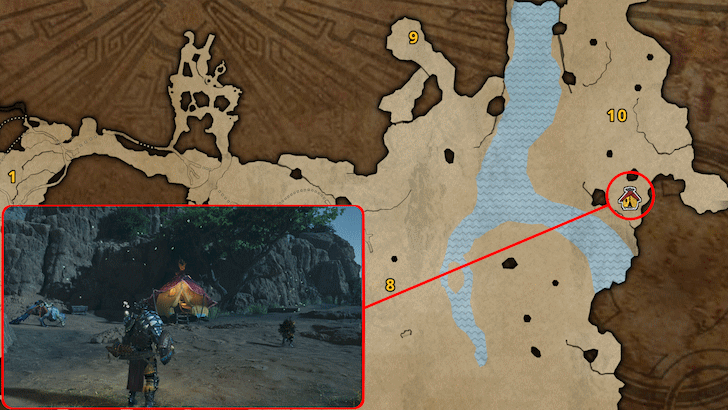 A camp found east of the river. Useful for periodically gathering Bones and Dung. Security: Dangerous |
|
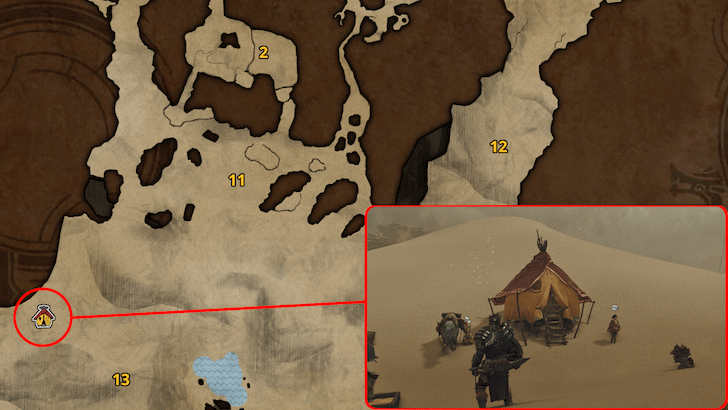
Area 13: Oasis
(75 Guild Pts.) |
 A camp beside the oasis. Best for gathering Honey and Bitterbug, and getting Points. Security: Dangerous |
|
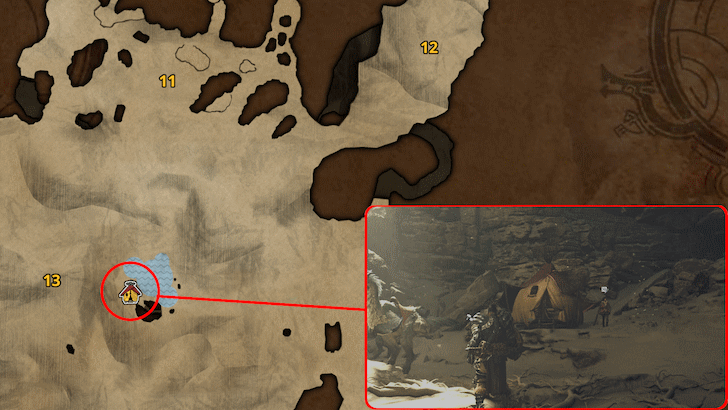
Area 13: West
(50 Guild Pts.) |
 Hidden behind the sand dunes to the southwest corner of the map. A safer alternative to the Oasis camp. Security: Insecure |
|
Area 14: Groundwater Vein
(25 Guild Pts.) |
 Accessed near the Oasis or Area 16 Northwest camp, this underground camp is great for farming Points and reaching the lower levels of this locale. Security: Safe |
|
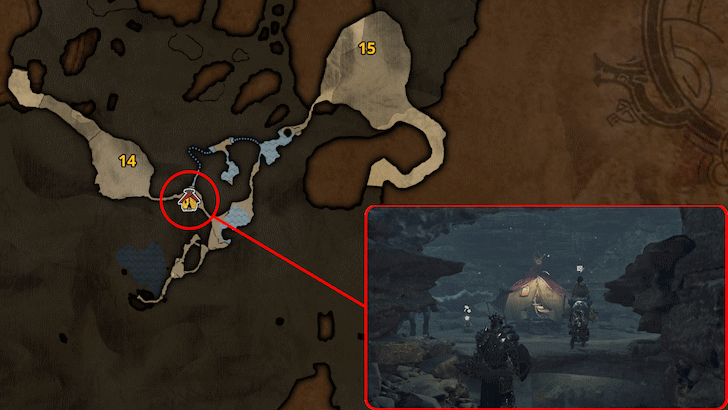
Area 16: Northwest
(50 Guild Pts.) |
 A camp found in the open to easily access the southern desert area. Security: Insecure |
|
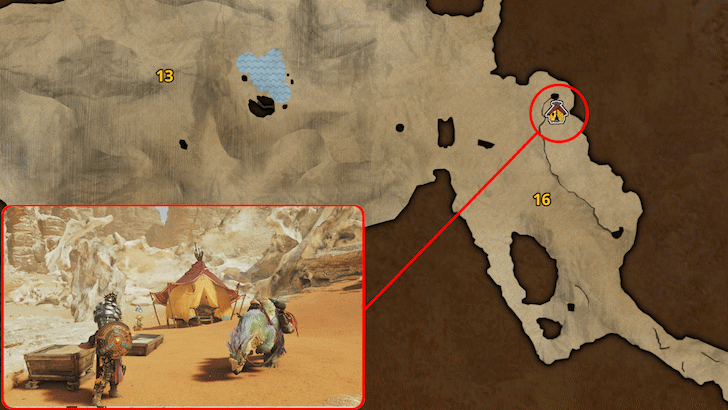
Area 16: Bone Desert
(50 Guild Pts.) |
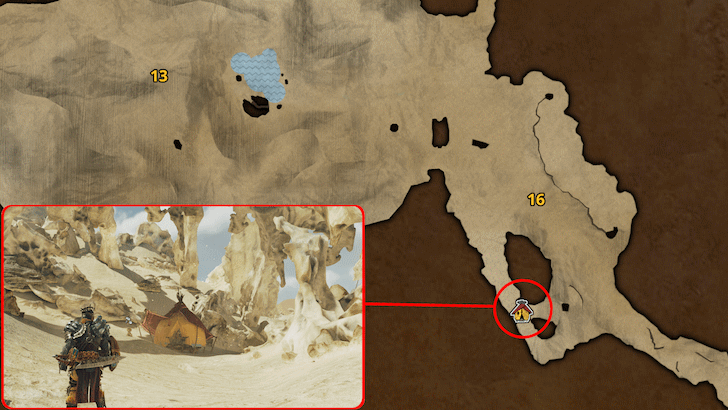 A camp spot found beneath the large bones to the south. Useful for gathering Godbugs, Adamant Seed, various Ores, and to easily access the secluded Area 17. Security: Insecure |
Windward Plains Map
Interactive Map
※ To search for a specific item or material, press the magnifying glass icon on the bottom right. Select from the dropdown button to see other levels and areas.
Windward Plains Farming Routes
Ore and Bone Farming Route
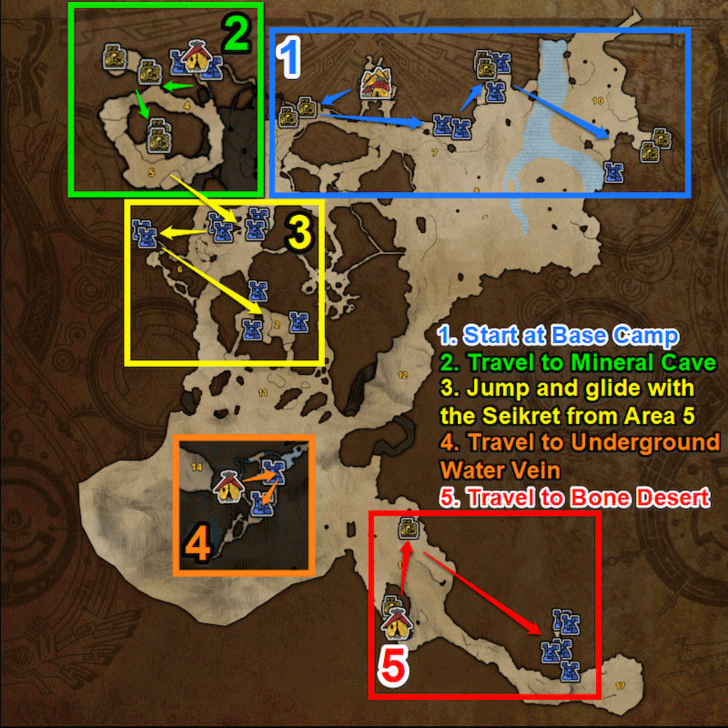
There are 23 Mining Outcrops and 12 Bonepiles in the Windward Plains. Follow these steps to efficiently collect all of these spots:
- Start at the Plains Base Camp and and grab the two Bone Piles southwest and collect the rest of the Area 8, 9, and 10 nodes.
- Fast travel to the Mineral Cave Pop-Up Camp and get all the Area 4 and 5 nodes.
- While riding your Seikret, jump down the Area 5 cliff and press the Seikret's "Slow Down" button to glide to the platform in Area 3 and get all the Area 3, 6, and 2 nodes.
- Fast travel to the Underground Water Vein Pop-Up Camp and grab the two ore veins there.
- Fast travel to the Bone Desert Pop-Up Camp and get the Bonepiles nearby. Then proceed to climb the mountain in Area 17 and mine all the Mining Outcrops.
Remember to use the Geologist skill to maximize the yield of your farming runs and do them while there are Bonepile or Mining Outcrop Upsurges.
Minable Ores
| Low Rank | High Rank |
|---|---|
|
・ Iron Ore ・ Machalite Ore ・ Earth Crystal |
・ Earth Crystal ・ Lightcrystal ・ Carbalite Ore ・ Novacrystal (Very Rare) |
Gatherable Bones
| Low Rank | High Rank |
|---|---|
|
・ Mystery Bone ・ Sturdy Bone |
・ Sturdy Bone ・ Quality Bone ・ Dragonbone Relic (Very Rare) |
Windward Plains Secret Areas and Shortcuts
Area 3 Mining Platform
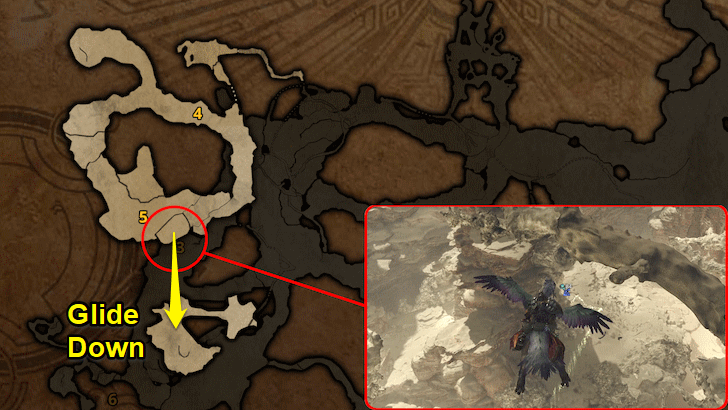
Though not entirely a secret, this platform in Area 3 is the only area in the Windward Plains that you cannot reach automatically with the Seikret. If you set any item as a waypoint in the platform, the Seikret will guide you to the Area 5 ledge. From here, drop down and use your Seikret to glide and reach the area.
This platform has a multitude of Ore Outcrops, Adamant Seeds, Dragonstrike Nuts, Dragonfell Berries, and Fulgurite Crystals.
Windward Plains Environment and Weather
Environmental Traps
| Trap | Details |
|---|---|
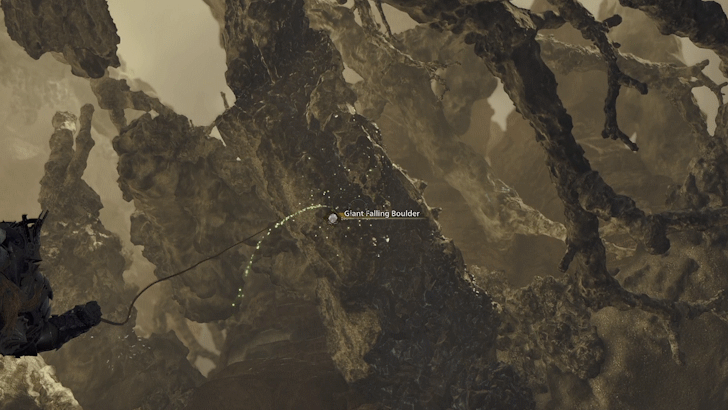 |
Large boulders that could fall at any moment. Hit them with your Slinger to make them dorp and hit what lurk underneath. |
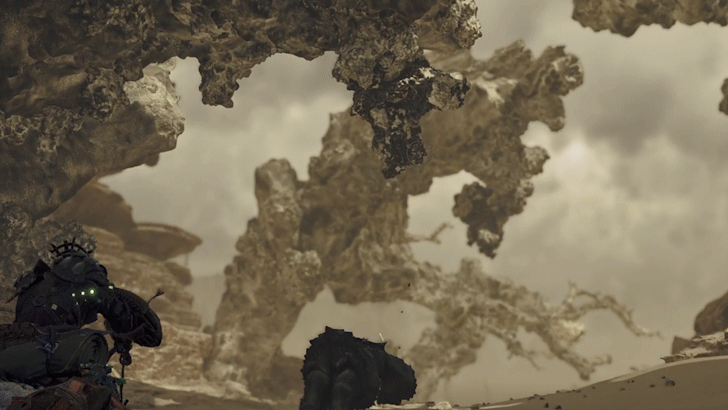 |
Boulders that could fall at any moment. Use your Slinger to drop them onto unsuspecting targets. |
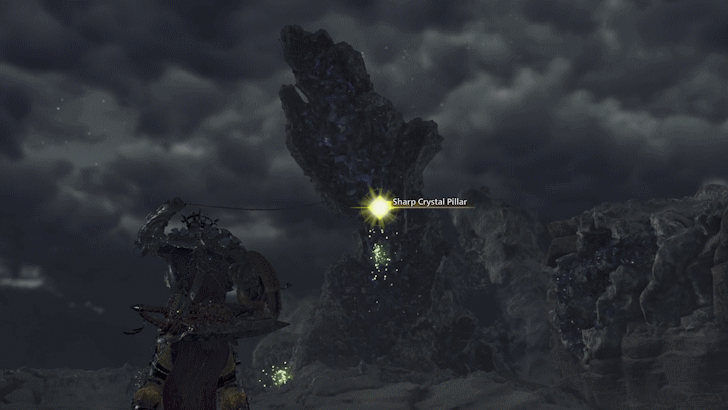 |
A jagged peak of keen fulgurite crystal. Crumbles on impact, collapsing atop anything caught beneath. |
 |
A brittle cliffside made of fulgurite. A strong impact will bring it down, revealing sharp crystalline thorns in its place. |
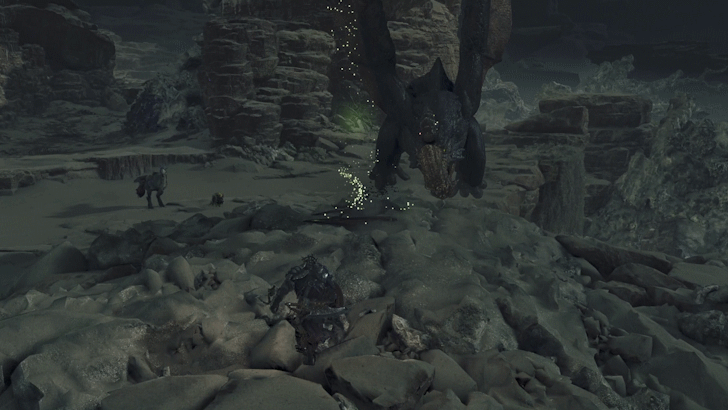
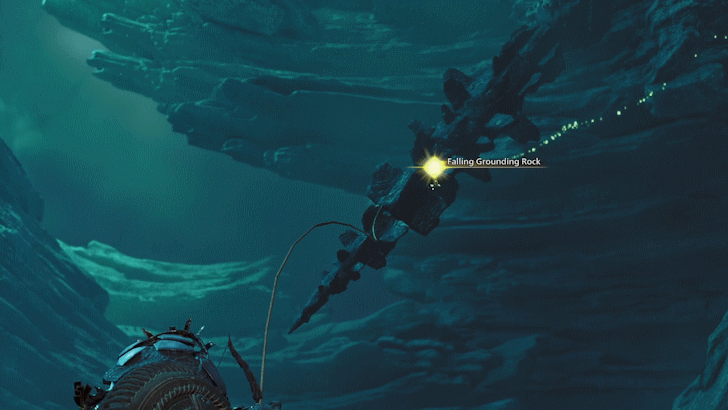 |
A grounding rock protrusion; easily felled when struck. The fallen fragments repel electricity, and can be used as Slinger ammunition. |
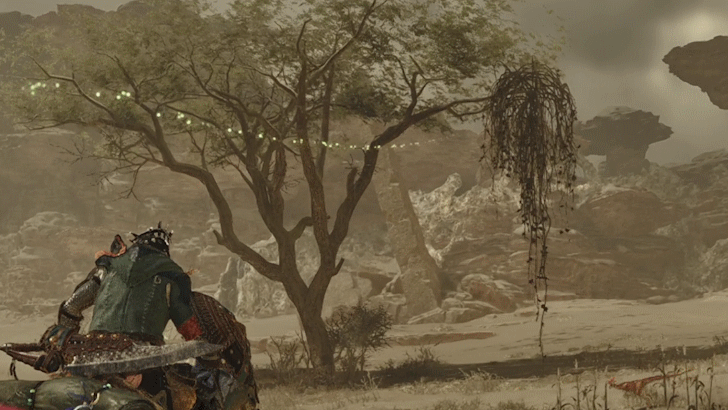 |
An enormous mass of overgrown vines. They'll fall when struck, and monsters caught underneath will temporarily be unable to move. |
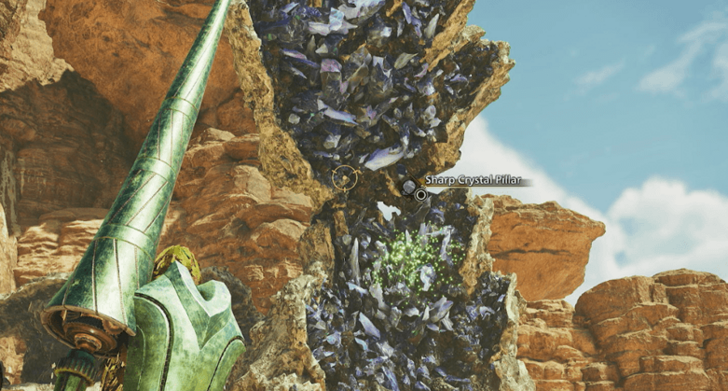 |
A brittle outcropping of fulgurite. A strong impact will bring it down, revealing sharp crystalline thorns at its place. |
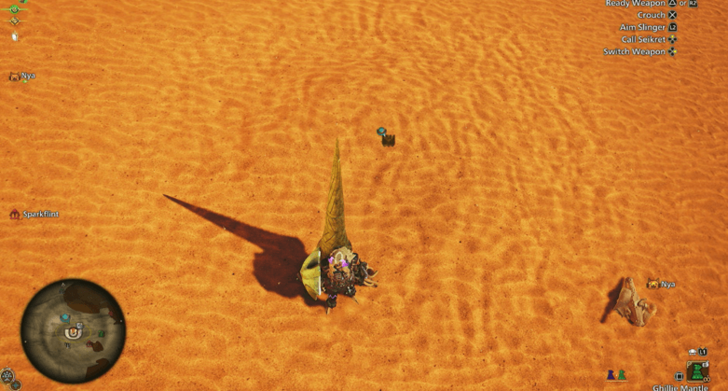 |
A trap laid by a Balahara to snare prey. Large monsters that draw too close are caught in its flow and dragged underground. |
Other Environmental Interactables
| Trap | Details |
|---|---|
 |
An area covered in tall grass that can conceal a crouching hunter from sight. |
 |
A large rock pillar that intercepts lightning strikes, affording protection to the surrounding area. |
Windward Plains NPCs and Special Locations
Kunafa, Windsong Village NPCs
 |
|
| NPC | Function |
|---|---|
 Kilama Kilama
|
Item Trader Item trader found in Kunafa at the Windward Plains. Accepts a variety of items in exchange for useful materials. |
 Murtabak Murtabak
|
Material Retrieval Material Retriever NPC who gathers items passively. |
 Nona Nona
|
Seikret Customization NPC Allows you to customize your Seikret mount. |
 Old Nana Old Nana
|
Y'sai and Nona's Mother Mother of Y'sai and Nona who welcomes the Astrum unit to their home. |
 Y'sai Y'sai
|
Meal Invitation Will occasionally invite you to meals for powerful stat bonuses. |
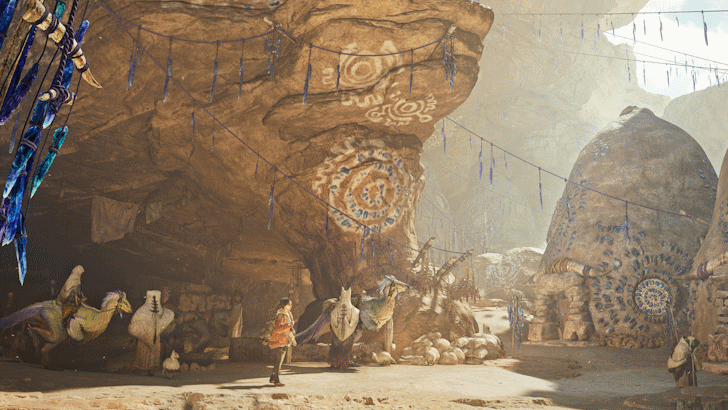
Kunafa, Windsong Village is home to the Sandfolk, a tribe of livestock farmers found at the center of the Windward Plains. Most notably, this is the only location you can access the Seikret Customization by interacting with Nona.
Kunafa, Windsong Village Guide
Windward Plains Items
Crafting Materials
Ores and Bones
|
|
|
|
|
|
Special Items
List of All Items and Materials
Windward Plains Trader Info
Trader Info
| Map Icon | Items to Farm |
|---|---|
| Windward Succulent Normally gives Windward Aloe, but on rare occasions can give Fine Windward Aloe. |
|
| Great Windward Succulent This node will only appear during an emergence event. Will give Great Windward Aloe. |
|
| Fulgurite Crystal Normally gives Fulgurite Shards, but on rare occasions can give Pure Fulgurite. |
|
| Fulgurite Vein This node will only appear during an emergence event. Will give Thundering Fulgurite. |
|
| Sandpepper Normally gives Sandpepper, but during Plenty weather can give Fiery Sandpepper. |
|
Kilama is the main trader in the Windward Plains found inside the Windsong Village. Their wares will change every day, but you can always check in with Nata in the Base Camp of any locale you are currently in. Filter your map to the items listed above to get the appropriate items for trading.
Kilama's Wares
| Trade Items | Item Recieved | Trade Limit |
|---|---|---|
| 4 | ||
| 2 | ||
| 4 | ||
| 2 | ||
| 2 | ||
| 2 | ||
| 2 | ||
| 5 | ||
| 5 | ||
| 1 | ||
| 1 | ||
| 1 | ||
| 3 | ||
| 4 | ||
| 2 | ||
| 2 | ||
| 4 | ||
| 5 | ||
| 5 | ||
| 3 | ||
| 1 | ||
| 1 | ||
| 1 | ||
| 1 | ||
| 2 |
Windward Plains Material Retrieval
Yield Based on Weather Conditions
| Item | Yield On Plenty | Yield On Fallow |
|---|---|---|
|
|

|

|
|
|
|
|
|
|
|

|
|
|
|
|
|
|
|
|
|
|
|
|
|
|

|
|
|
|
|
|
|
|
|
|
The number of stars determine the likelihood of getting the item given the weather conditions.
Murtabak's Special Items List
| Special Items | ||
|---|---|---|
|
|
|
|
Murtabak is the primary gatherer for the Windward Plains. They will automatically gather as much as 16 items while you are off hunting.Their yield will depend on the weather and elemental conditions of the region. You can also check with Nata as the Intermediary to claim these items.
Material Retrieval Guide: How to Unlock the Farm
Windward Plains Monsters
Large Monsters
 Arkveld Arkveld
|
 Rey Dau Rey Dau
|
 Balahara Balahara
|
 Doshaguma Doshaguma
|
 Chatacabra Chatacabra
|
 Quematrice Quematrice
|
 Gypceros Gypceros
|
 Rathian Rathian
|
Small Monsters
 Ceratonoth Ceratonoth
|
 Dalthydon Dalthydon
|
 Bulaqchi Bulaqchi
|
 Gajios Gajios
|
 Baunos Baunos
|
 Talioth Talioth
|
Windward Plains Endemic Life
List of Endemic Life
List of Aquatic Life
 Goldenfish Goldenfish
|
 Gravid Bowfin Gravid Bowfin
|
 Platinumfish Platinumfish
|
 Sushifish Sushifish
|
 Virid Bowfin Virid Bowfin
|
 Whetfish Whetfish
|
Windward Plains Quests
List of Main and Optional Quests
| ✔️ | Quest | Quest Type | Quest Details |
|---|---|---|---|
| Slimy Situation | Assignments |
Objectives Hunt the Chatacabra
Time: Daytime State: Fallow |
|
| Hot on Their Tails | Assignments |
Objectives Hunt the Quematrice
Time: Daytime State: Fallow |
|
| Pinnacle of the Pack | Assignments |
Objectives Hunt the Alpha Doshaguma
Time: Daytime State: Sandtide |
|
| Balahara of the Sandsea | Assignments |
Objectives Hunt the Balahara
Time: Daytime State: Fallow |
|
| A Merciless Glare | Assignments |
Objectives Hunt the Rey Dau
Time: Daytime State: Sandtide |
|
| Awaking From a Dream | Assignments |
Objectives Slay the Arkveld
Time: Daytime State: Sandtide |
|
| Roaring Rey Dau | Assignments |
Objectives Slay the Rey Dau
Time: Daytime State: Sandtide |
|
| A Silent Flash | Event |
Objectives Hunt the Arch-tempered Rey Dau
Time: Morning State: Sandtide |
|
| Careening Out of Control | Event | Objectives Hunt the Balahara | |
| When Do Quematrice Sing? | Event |
Objectives Hunt the Quematrice
Time: Morning State: Plenty |
|
| Like a Fire Hidden by Sand | Event |
Objectives Hunt the Rathian
Time: Nighttime State: Plenty |
|
| Sand-Scarred Soul | Event |
Objectives Hunt the Doshaguma
Time: Late Night State: Fallow |
|
| Tongue-Tied | Event |
Objectives Hunt the Tempered Chatacabra
Time: Morning State: Fallow |
|
| Stalking Supper | Event |
Objectives Hunt the Quematrice
Time: Evening State: Plenty |
|
| The Shining Storm Rages | Free Challenge |
Objectives Slay the Arch-tempered Rey Dau
Time: Morning State: Sandtide |
|
| Fire Starter | Optional |
Objectives Hunt the Quematrice
Time: Daytime State: Fallow |
|
| When the Dust Settles | Optional |
Objectives Hunt the Rey Dau
Time: Daytime State: Sandtide |
|
| Buggin' in the Desert | Optional |
Objectives Slay 12 Bulaqchi
Time: Daytime State: Fallow |
|
| The Desert is Demanding | Optional |
Objectives Slay 8 Talioth
Time: Daytime State: Fallow |
|
| A Vow to Remain | Optional |
Objectives Slay 8 Talioth
Time: Daytime State: Fallow |
|
| The Desert Knows Not the Sea | Optional |
Objectives Hunt the Balahara
Time: Evening State: Fallow |
|
| Buggin' in the Scarlet Forest | Optional |
Objectives Slay 8 Vespoid
Time: Daytime State: Fallow |
|
| A Sharp Sort | Optional |
Objectives Slay 8 Piragill
Time: Daytime State: Fallow |
|
| Beware the Chatacabra | Optional |
Objectives Hunt the Chatacabra
Time: Daytime State: Fallow |
|
| Time to Exorcise | Optional |
Objectives Slay 12 Bulaqchi
Time: Daytime State: Fallow |
|
| A Leviathan's Temper | Optional |
Objectives Hunt the Tempered Balahara
Time: Evening State: Plenty |
|
| Continuing Conflict | Optional |
Objectives Hunt all target monsters
Time: Daytime State: Plenty |
|
| Chains of Life | Optional |
Objectives Hunt the Arkveld
Time: Daytime State: Sandtide |
|
| Sand Sea Surges | Optional |
Objectives Hunt the Balahara
Time: Evening State: Fallow |
|
| Sultan of the Sand | Optional |
Objectives Hunt the Rey Dau
Time: Daytime State: Sandtide |
|
| Rath-from-Above,Go! | Optional |
Objectives Hunt the Quematrice
Time: Daytime State: Fallow |
|
| The Pursued and the Pursuer | Optional |
Objectives Hunt the Quematrice
Time: Daytime State: Plenty |
|
| A Futile Fight | Optional |
Objectives Hunt the Chatacabra
Time: Daytime State: Plenty |
Windward Plains Overview and Unlock Condition
Locale General Information
| Windward Plains Overview | |
|---|---|
 |
|
| Areas | 17 |
| Pop-Up Camps | 13 |
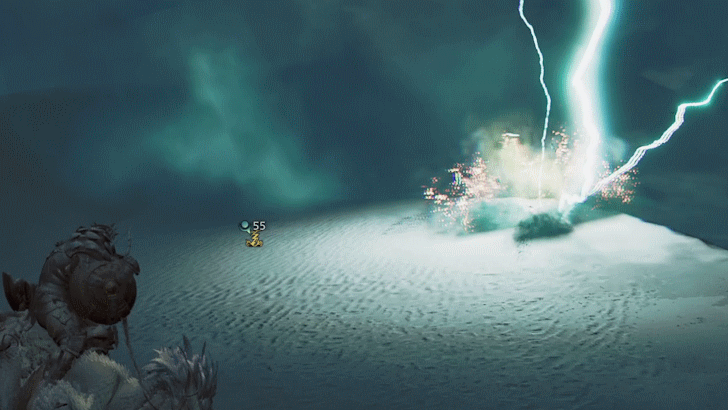
| Inclemency | Sandtide |
| Local Settlement | Kunafa, Windsong Village |
The Windward Plains features vast deserts and savannas and is exposed to the Sandtide that sweeps the location in a thick sandstrom that causes frequent lightning strikes. Sheltering in the center of the location is the village of Kunafa, which is populated by the Sandfolk.
Finish the Prolugue
The Windward Plains is where the story starts in Monster Hunter Wilds. You can start freely exploring this location by completing the prologue cutscenes and defeating the Chatacabra.
Monster Hunter Wilds Related Guides
Location Guides
| All Locations | |
|---|---|
| Windward Plains | Scarlet Forest |
| Oilwell Basin | Iceshard Cliffs |
| Ruins of Wyveria | - |
Settlement Guides
| Settlements | |
|---|---|
| Kunafa, Windsong Village | Wudwud Hideout |
| Azuz, the Everforge | Sild, the Keepers' Vigil |
Special Area Guides
| Special Areas | |
|---|---|
| Suja, Peaks of Accord | Wounded Hollow |
| Rimechain Peak | Dragontorch Shrine |
Other Location Guides
| Other Location Guides | |
|---|---|
| All Pop-Up Camp Locations | All Bonepile Locations |
| All Mining Outcrop Locations | Training Area Location and Features |
Author

Windward Plains Camps and Map Guide
Please participate in our site
improvement survey
03/2026
improvement survey
03/2026
Would you assist in
improving Game8's site?
improving Game8's site?

×
We are listening to our users' valuable opinions and discussing how to act on them.
The information collected through this survey will be used for the purpose of improving our services. In addition, the information will only be disclosed a part of a statistic in a format that will not allow identification of personal information.
Begin Survey
Not Now
×
Please rate each item regarding Game8.co's Advertisements.
Amount of Ads
Very Dissatisfied
Somewhat Dissatisfied
Fine
Somewhat Satisfied
Highly Satisfied
Placement of Ads
Timing of Ad Display
Ad Loading Speed
Safeness of Ads
Content of Ads
×
Please rate each item regarding Game8.co's Quality of Articles.
Amount of information
Very Dissatisfied
Somewhat Dissatisfied
Fine
Somewhat Satisfied
Highly Satisfied
Frequency of updates
Speed of new information
Accuracy of articles
Understandibility of articles
Readability of sentences
×
Please rate each item regarding Game8.co's Usability of the Site.
Ease of finding information
Very Dissatisfied
Somewhat Dissatisfied
Fine
Somewhat Satisfied
Highly Satisfied
Loading Speed
Use of Color
Font Size
Visibility of Images
Easy to Understand Layout
×
Please rate each item regarding Game8.co's Message Boards, Comments.
Ease of Writing
Very Dissatisfied
Somewhat Dissatisfied
Fine
Somewhat Satisfied
Highly Satisfied
Readability
Ease in Finding Information
Comment Quality
Comment Quantity
Admin Response
×
Please rate each item regarding Game8.co's Site's new design.
Please rate our site's new design
Very Dissatisfied
Somewhat Dissatisfied
Fine
Somewhat Satisfied
Highly Satisfied
Do you think that the website's design change makes the site easier to use?
Has the new design made it easier for you to find information on the site?
Has the new design improved the overall visual appeal of the site?
How would you rate your overall satisfaction with the new design of the site?
×
How likely are you to recommend Game8 to someone you know?
Very Unlikely
0
1
2
3
4
5
6
7
8
9
10
Very Likely
If you have other opinions regarding potential improvement to the website, please share them with us. We would appreciate your honest opinion.
Note: This is a free response section, so you can proceed without entering anything.
Note: Please be sure not to enter any kind of personal information into your response.
Note: Please be sure not to enter any kind of personal information into your response.
×
Thank You
×
Thank you for participating in our survey! Your answers will help us to improve the quality of our website and services.
We hope you continue to make use of Game8.
We hope you continue to make use of Game8.
Close
Premium Articles

Rankings
Gaming News


Popular Games

Genshin Impact Walkthrough & Guides Wiki
Honkai: Star Rail Walkthrough & Guides Wiki
Umamusume: Pretty Derby Walkthrough & Guides Wiki
Pokemon Pokopia Walkthrough & Guides Wiki
Resident Evil Requiem (RE9) Walkthrough & Guides Wiki
Monster Hunter Wilds Walkthrough & Guides Wiki
Wuthering Waves Walkthrough & Guides Wiki
Arknights: Endfield Walkthrough & Guides Wiki
Pokemon FireRed and LeafGreen (FRLG) Walkthrough & Guides Wiki
Pokemon TCG Pocket (PTCGP) Strategies & Guides Wiki


Recommended Games
Diablo 4: Vessel of Hatred Walkthrough & Guides Wiki
Fire Emblem Heroes (FEH) Walkthrough & Guides Wiki
Yu-Gi-Oh! Master Duel Walkthrough & Guides Wiki
Super Smash Bros. Ultimate Walkthrough & Guides Wiki
Pokemon Brilliant Diamond and Shining Pearl (BDSP) Walkthrough & Guides Wiki
Elden Ring Shadow of the Erdtree Walkthrough & Guides Wiki
Monster Hunter World Walkthrough & Guides Wiki
The Legend of Zelda: Tears of the Kingdom Walkthrough & Guides Wiki
Persona 3 Reload Walkthrough & Guides Wiki
Cyberpunk 2077: Ultimate Edition Walkthrough & Guides Wiki


All rights reserved
©CAPCOM
The copyrights of videos of games used in our content and other intellectual property rights belong to the provider of the game.
The contents we provide on this site were created personally by members of the Game8 editorial department.
We refuse the right to reuse or repost content taken without our permission such as data or images to other sites.
Thank you both for pointing out this inconsistency! The page has been updated to show 13 Pop-Up Camps, with the addition of one in Area 16. We appreciate the help!