How to Set Up Pop-up Camps and Best Locations
★ Arkveld Gamma Armor | MH Stories 3 Collab
☆ Version 1.041: Sororal α Armor | Shatterseal
★ How to Unlock Proof of a Hero Quest
☆ Omega Planetes | Savage Omega | Builds vs Omega
★ Armor Set Search updated for Ver 1.041
☆ HR50+ Builds | Tier List | Weapon Guides

Pop-up Camps allow you to refill items and change equipment on the field in Monster Hunter Wilds. See how to set them up, how to find the campsites, the best camp locations, and what to do when they get destroyed.
| Related Guides | |
|---|---|
| All Pop-Up Camp Locations | Best Pop-up Camp Locations |
List of Contents
Best Pop-Up Camp Locations
| Best Pop Up Camps Per Region | |||||
|---|---|---|---|---|---|
| Windward Plains | Scarlet Forest | Oilwell Basin | |||
| Iceshard Cliff | Ruins of Wyveria | ||||
Best Pop-Up Camps in Windward Plains
| Best Pop-up Camps in Windward Plains |
|---|
|
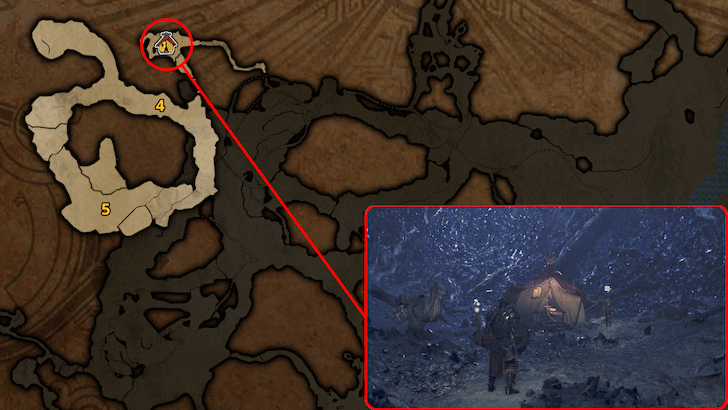
・Area 4: Mineral Cave ・Area 14: Groundwater Vein ・Area 9: Lookout Hill ・Area 16: Bone Desert ・Area 3: South |
Camps 2 and 11 Are Great Safe Camps
| Pop Up Camps |
|---|
 |
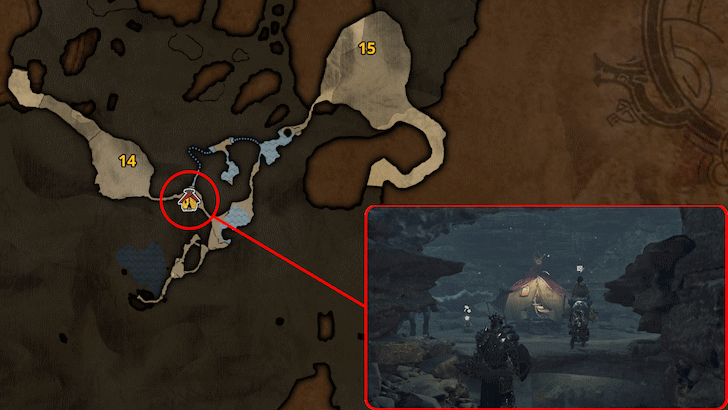 |
If you want a pop-up camp that is generally safe and won't be destroyed, camps 2 (Area 4: Mineral Cave) and 11 (Area 14: Groundwater Vein) are great choices as they're safe camps that will always be available to teleport to.
Camp 7 is a Good General Purpose Camp
| Pop Up Camps |
|---|
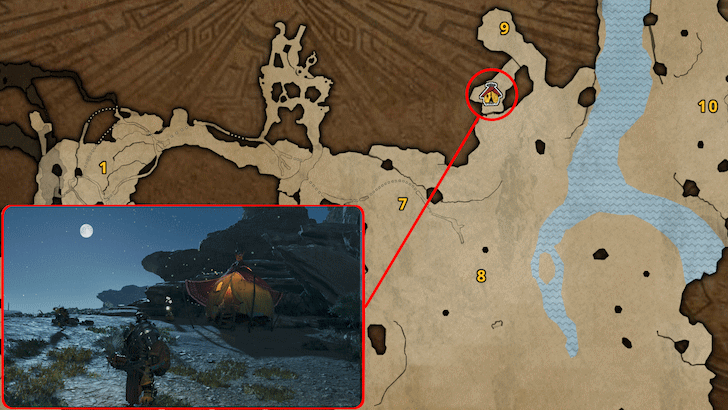 |
For a pop-up camp that is close to multiple important resources and monster spawns, camp 7 (Area 9: Lookout Hill) is another good campsite. It is close to the Windward Plains' large open area, and is the only Insecure campsite in the area, making it last longer than the other nearby camps in Dangerous areas
Not only that, but it is also close to important resources such as mining outcrops, Nightflower Pollen to the east, and Honey to the south.
Camp 12 is Great When Farming Rey Dau and Arkveld
| Pop Up Camps |
|---|
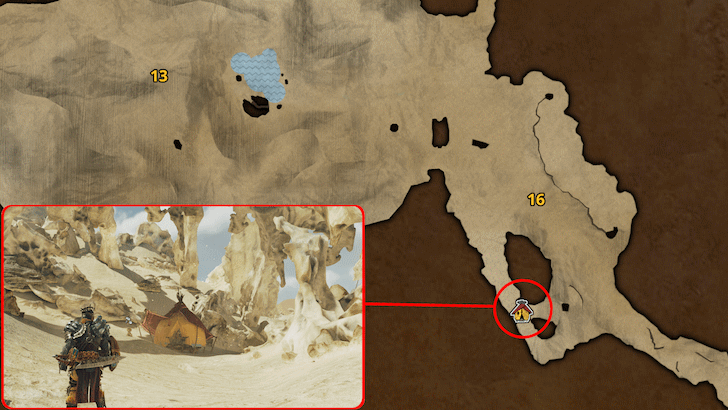 |
Camp 12 (Area 16: Bone Desert) is a great campsite if you are farming Rey Dau or Arkveld as both of them fly to the nearby Area 17 when they are weak. They also sometimes land in Area 16 before heading to 17.
This makes it the perfect camp for Fast Travel, as this can help you arrive at their resting spots quickly.
Camp 1 for Mandragora Farming
| Pop Up Camps |
|---|
 |
Lastly, there's camp 1 (Area 3: South), which is a great camp for farming the map's two Mandragora spots. Additionally, this camp is also right beside the second Nightflower Pollen source.
Windward Plains Map and Location Guide
Best Pop-Up Camps in Scarlet Forest
| Best Pop-up Camps in Scarlet Forest |
|---|
|
・Area 8: Underground Lake ・Area 16: Hidden Waterfall ・Area 18: Treetop Hill ・Area 18: West ・Area 17: Great Lake Shore |
Camp 3 For Farming Mineral Veins
| Pop Up Camps |
|---|
 |
Camp 3 ( Area 8: Underground Lake) is an ideal pop-up camp to setup as it's surrounded by mineral veins. This is a great way to quickly get some ore. Simply fast travel to this camp and harvest everything then exit.
Camp 9 for Honey
| Pop Up Camps |
|---|
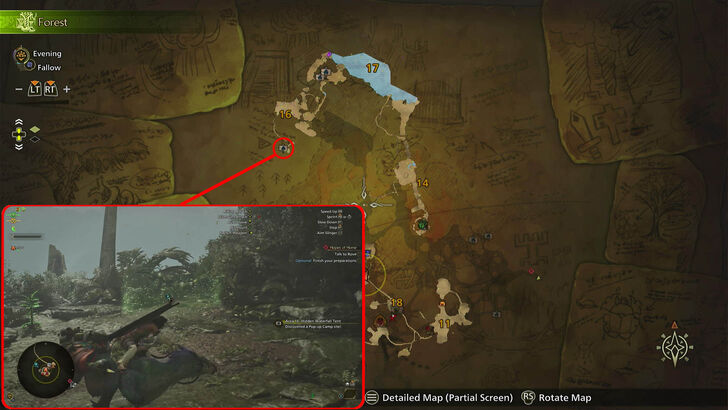 |
Camp 9 (Area 16: Hidden Waterfall) is a great place to teleport if you're in need of some honey instead. Honey can be used to enhance the effects of your consumables and enhance them to the next tier by combining it via crafting. This makes Honey extremely valuable and having a healthy stock will never hurt.
Camp 11 and 12 for Easy Travels
| Pop Up Camps |
|---|
 |
 |
Camps 11 (Area 18: Treetop Hill) and 12(Area 18: West) are also great Pop-Up camps to get up due to their locations being far from the base camp. Having these camps up will allow you to have areas you can fast travel to without spending a long time walking through the forest.
Camp 10 Is Good When Farming Uth Duna
| Pop Up Camps |
|---|
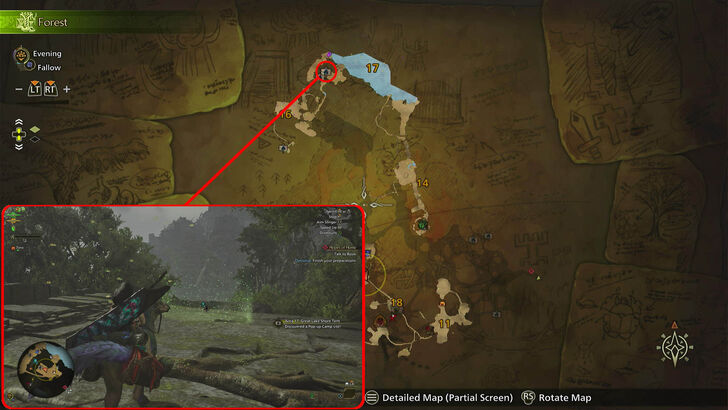 |
Camp 10 (Area 17: Great Lake Shore) may be an Insecure camp, but it is a very useful one as it is right beside the Great Lake, the area where Uth Duna goes to rest when it becomes weak.
Scarlet Forest Map and Location Guide
Best Pop-Up Camps in Oilwell Basin
| Best Pop-up Camps in Oilwell Basin |
|---|
|
・Area 13: Limestone Cavern ・Area 14: Mining Cave ・Area 2: Canyon Divide ・Area 12: Crimson Rivulet ・Area 9: Middle Strata South |
Camp 6 Has Several Mineral Veins
| Pop Up Camps |
|---|
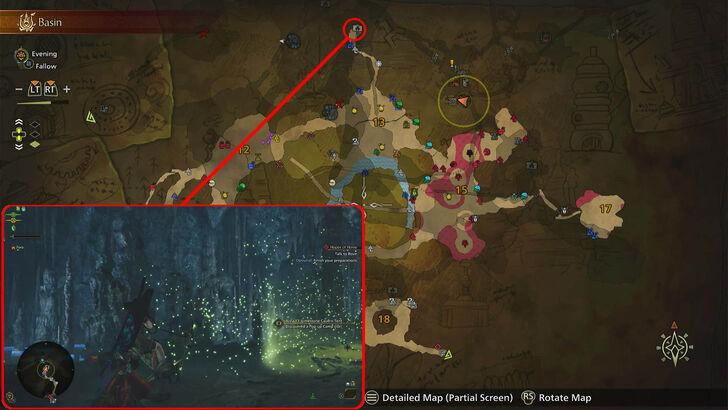 |
If you want an easy time farming ores in the Oilwell Basin, setting up a camp in camp 6 (Area 13: Limestone Cavern) will help easily as you can just fast travel to this camp and harvest the mineral nodes in this section of the map.
Camp 7 Is a Camp That's Far From the Base Camp
| Pop Up Camps |
|---|
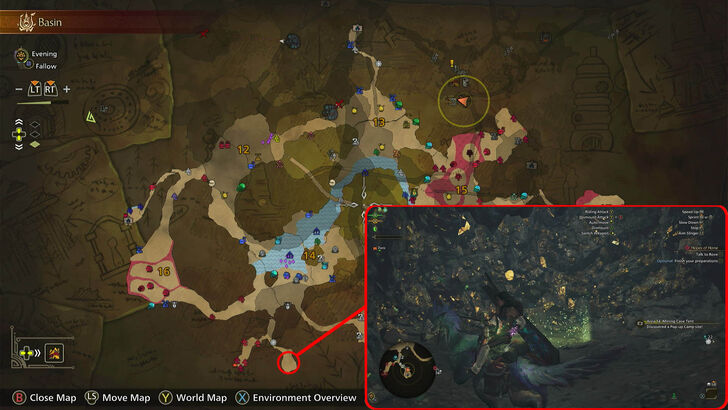 |
If you want a camp that you can travel to that will cover a lot of distance, camp 7 (Area 14: Mining Cave) is an ideal spot to set up camp. It's one of the camps that's farthest from the base camp so you can easily set this as a checkpoint for areas that will take a long time to reach from the base.
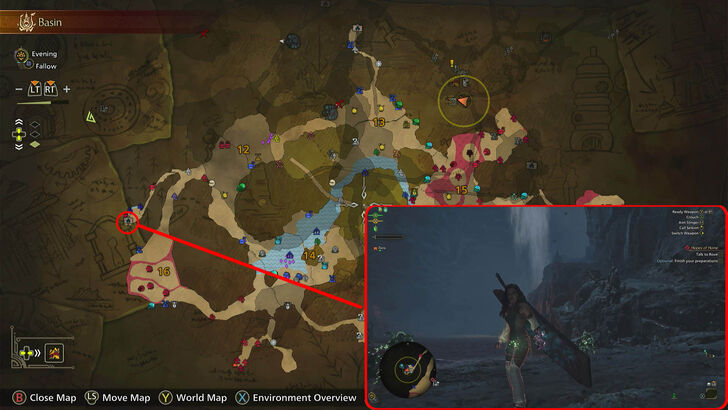
Camp 1 and 5 Are Great Safe Camps
| Pop Up Camps |
|---|
 |
 |
Camp 1 (Area 2: Canyon Divide) and 5 (Area 12: Crimson Rivulet) are two Safe camp locations located near areas that monsters like the Gravios frequent. As such, they make for great permanent fast travel points.
Camp 4 is Near the Map's Center
| Pop Up Camps |
|---|
 |
Camp 4 (Area 9: Middle Strata South) is located close to the center of the Oilwell Basin's second layer, making it a good all-purpose Fast Travel point.
If you're not sure which camp to Fast Travel to when chasing a monster, going to this camp will get you to where you need to go, be it above or below.
Oilwell Basin Map and Location Guide
Best Pop-Up Camps in Iceshard Cliff
| Best Pop-up Camps in Iceshard Cliff |
|---|
|
・Area 7: Watchtower ・Area 18: Sinkhole ・Area 20: Ancient Room ・Area 19: Floating Rock Wall ・Area 1: Icy Shore |
Camps 3 and 5 Have Multiple Mineral Veins
| Pop Up Camps |
|---|
 |
 |
If you want to farm ores, camps 3 (Area 7: Watchtower) and 5 (Area 18: Sinkhole) have multiple mineral veins that you can quickly farm while in the area. Be sure to set these camps up if you wish to have a nice gathering spot you can visit every now and then for some extra materials.
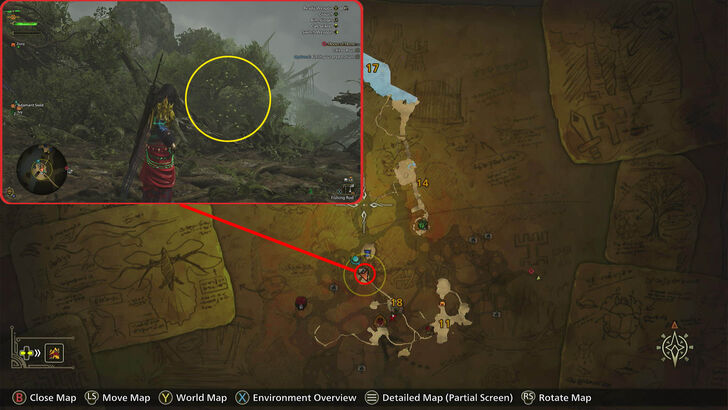
Camp 7 is a Great Fishing Spot
| Pop Up Camps |
|---|
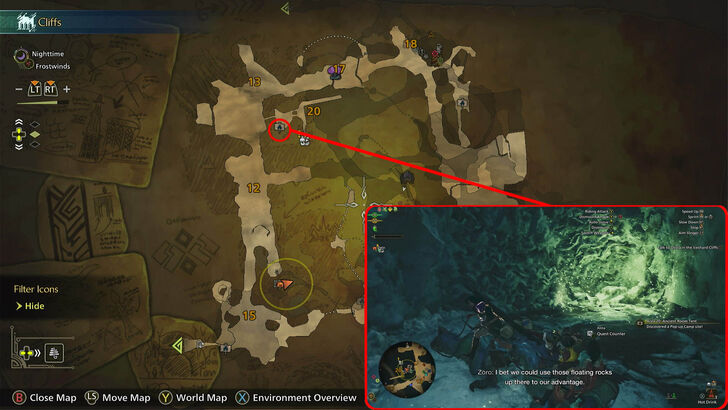 |
If fishing is your main goal then camp 7 (Area 20: Ancient Room) is an ideal spot to set up camp to. It's a safe camp that you can spend a decent amount of time to get some materials from the marine life in the area.
Camp 6 is for Farming Gore Magala
| Pop Up Camps |
|---|
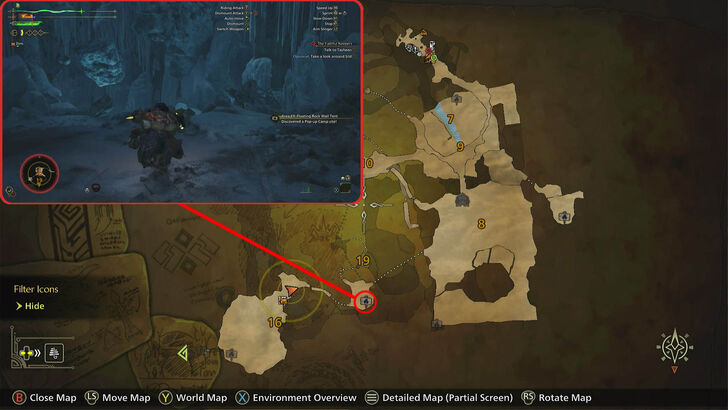 |
Camp 6 (Area 19: Floating Rock Wall) is perfect for when you need to farm Gore Magala, as it is located near where he usually spawns. As this campsite is also Safe, you don't have to worry about Gore Magala finding and destroying it.
Camp 1 is the Only Lower Layer Camp
| Pop Up Camps |
|---|
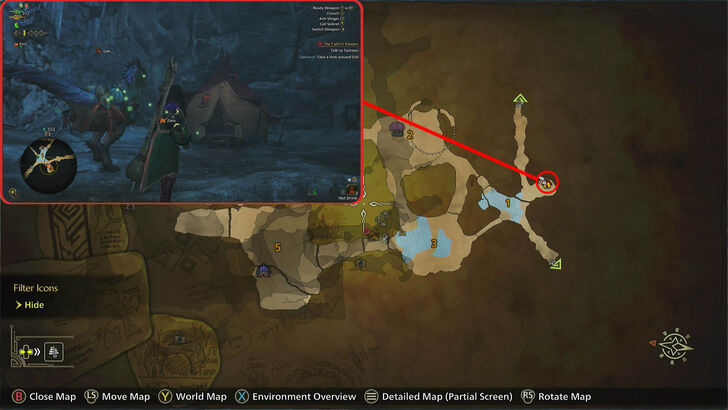 |
Camp 1 (Area 1: Icy Shore) is the only camp located in the map's lowermost layer, making it an important Fast Travel point when chasing a monster that heads there, like the Nerscylla.
Iceshard Cliffs Map and Location Guide
Best Pop-Up Camps in Ruins of Wyveria
| Best Pop-up Camps in Ruins of Wyveria |
|---|
|
・Area 8: Gap in Rubble ・Area 13: Hidden Cave ・Area 6: Secluded Ruins ・Area 6: Southeast ・Area 9: Entangled Canopy |
Camp 5 Has Several Bone Piles for Harvesting
| Pop Up Camps |
|---|
 |
Camp 5 (Area 8: Gap in Rubble) is a decent spot to farm bone piles. Fast travel to this camp and gather the bone piles in the area to stock up on bone materials for crafting.
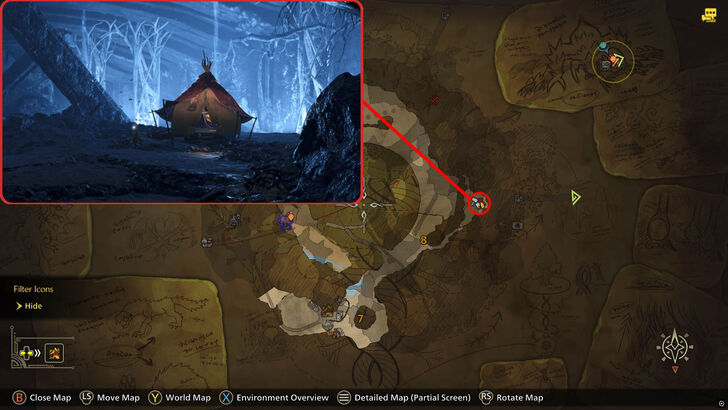
Camp 7 is the Farthest Camp from the Base Camp
| Pop Up Camps |
|---|
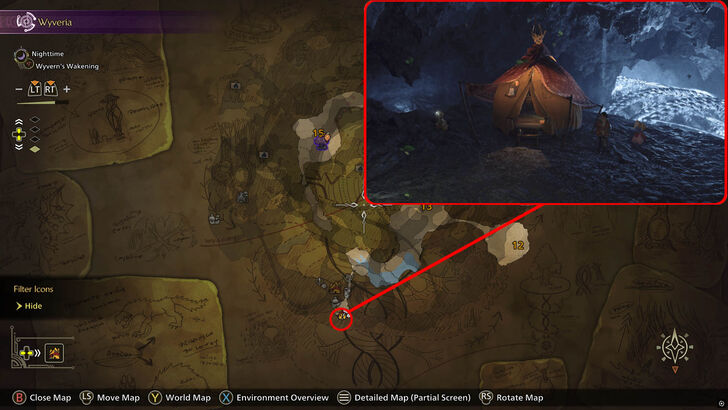 |
If you want to quickly travel to the opposite ends of the Ruins, camp 7 (Area 13: Hidden Cave) is the best camp to fast travel to so be sure to have this camp up to quickly navigate the ruins.
Ruins of Wyveria Map and Location Guide
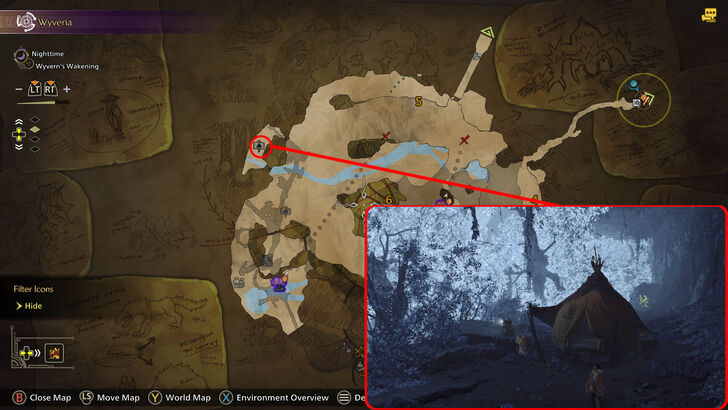
Camps 2 and 4 Are Great Upper Layer Camps
| Pop Up Camps |
|---|
 |
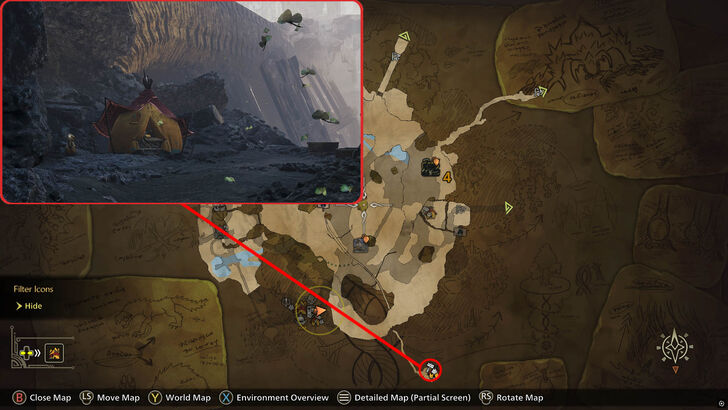 |
Camps 2 (Area 6: Secluded Ruins) and 4 (Area 6: Southeast) are both great Safe campsites located in the map's Upper Layer. Additionally, they are located on opposite ends of the second layer, giving you quick access to the area no matter where the monster you are hunting decides to go.
Camp 6 for General Map Traversal
| Pop Up Camps |
|---|
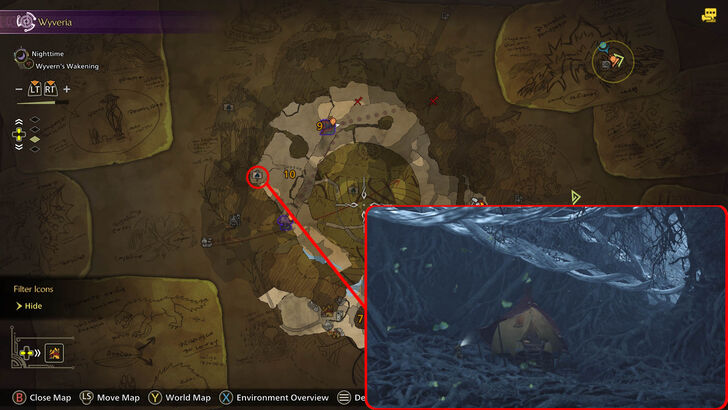 |
For general map traversal, camp 6 (Area 9: Entangled Canopy) is the best, as its exit connects to both the second and third layer, making it great if you just plan to roam around Wyveria's lower areas.
Ruins of Wyveria Map and Location Guide
How to Set Up Pop-up Camps
| Steps on to Set up Pop-up Camps |
|---|
|
|
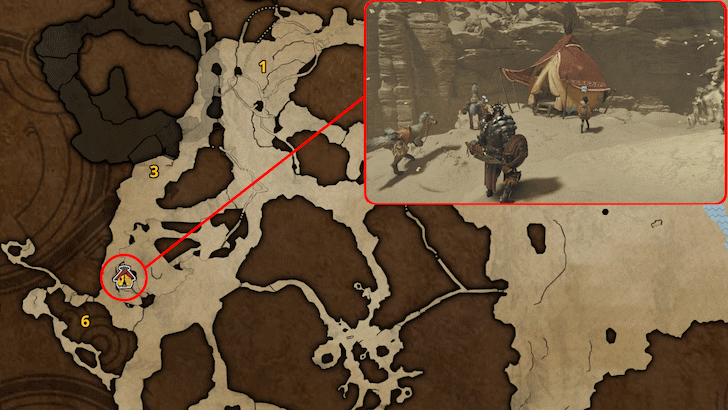
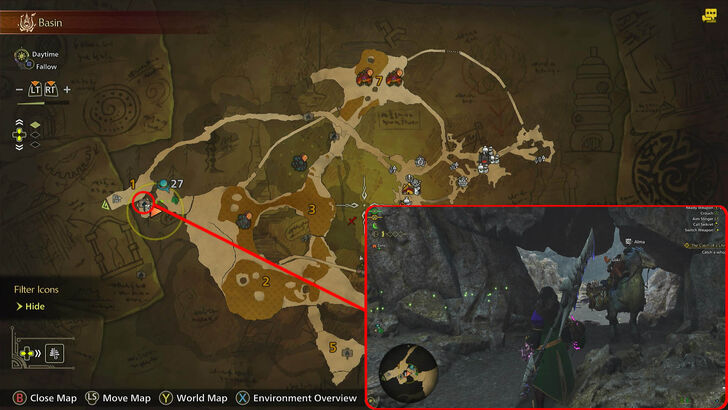
Find a Possible Camp Location
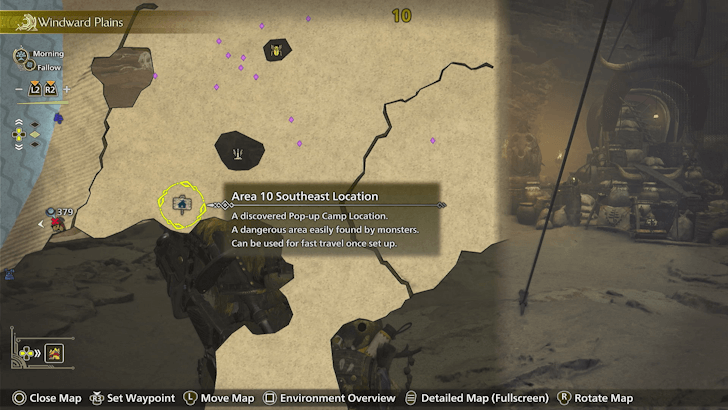
You must first find a possible Pop-up Camp location. These locations are marked on the map by a wooden sign with a tent on it, and are usually located at the edges of the map.
Once you locate a Pop-up Camp location, set a waypoint on it and make your way there on your Seikret.
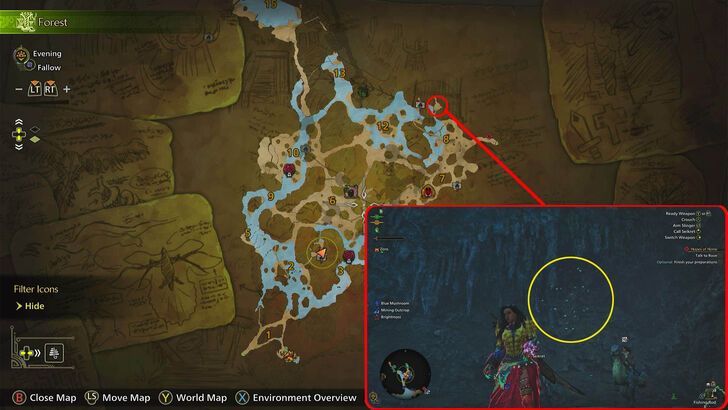
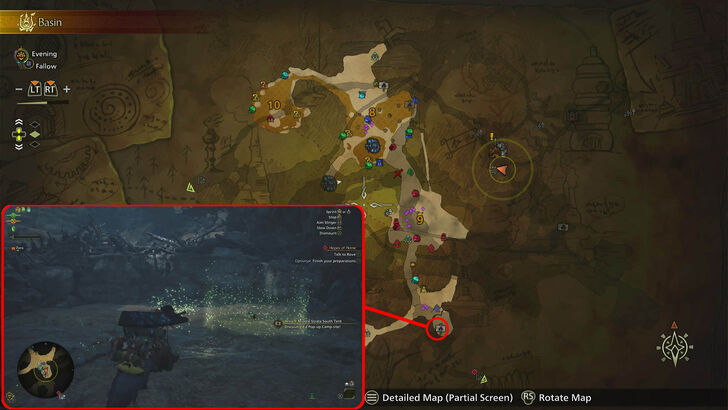
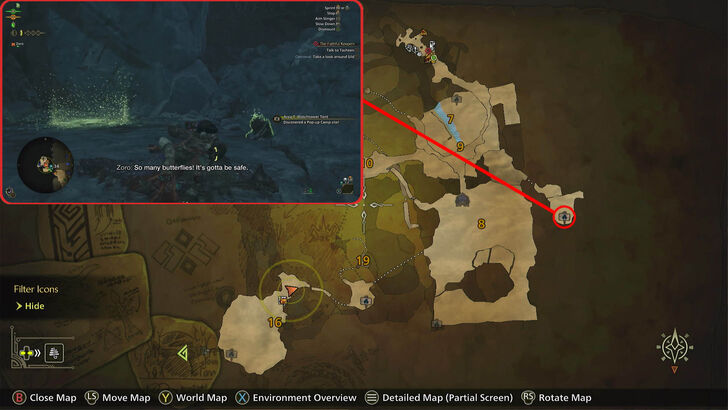
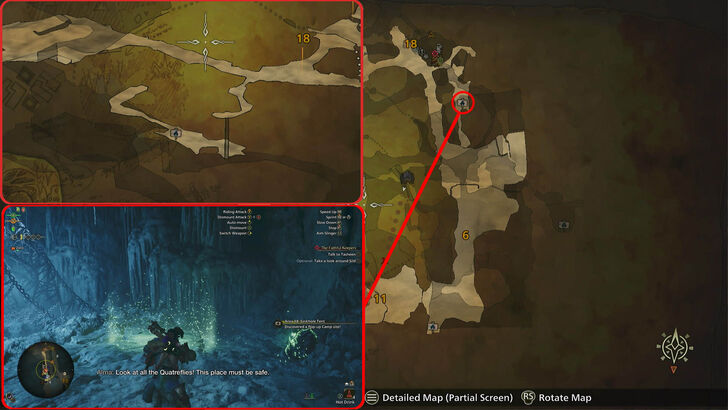
Pop-up Camp Locations Have Butterflies Near Them
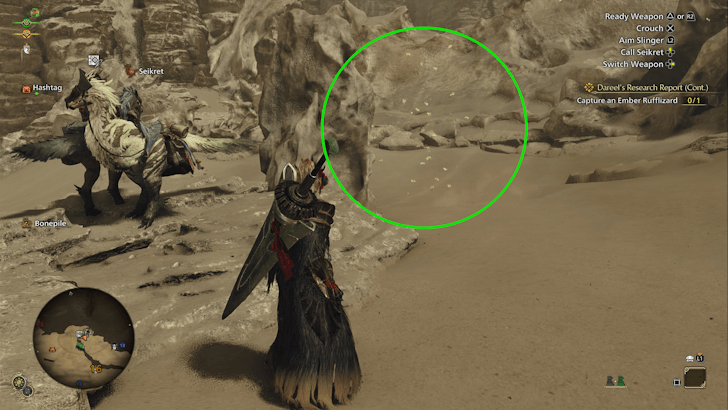
You will know that you have arrived in the correct location when you find a group of butterflies flying around the area. Your Camping Kit item will also light up when near a Pop-up Camp location.
Pay the Set Up Price
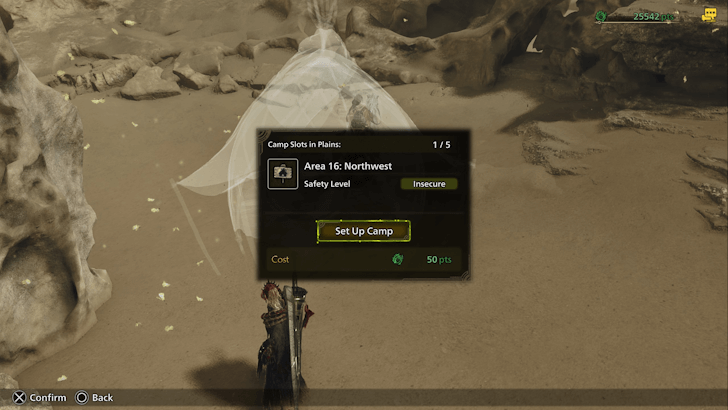
When you arrive at a Pop-up Camp location, use a Camping Kit to establish a Pop-up Camp, which costs Guild Points.
Note that you can only set up a maximum of 5 Pop-up Camps in each locale. You will need to demolish previously built Pop-up Camps if you want to build more.
Pop-up Camp Cost Depends on Safety Level
| Safety Level | Guild Point Cost |
|---|---|
| Safe | 25 Guild Points |
| Insecure | 50 Guild Points |
| Dangerous | 75 Guild Points |
The price to set up a Pop-up Camp varies, depending on the location's safety. More dangerous areas require more Guild Points to establish a Pop-up Camp.
Pop-up Camps Can Get Destroyed
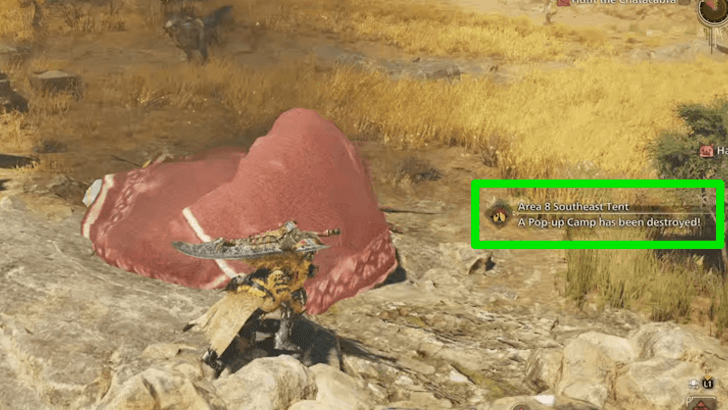
Pop-up Camps have three safety levels: Safe, Insecure, and Dangerous. A Safe camp are unlikely to be attacked, an Insecure camp has a chance to be destroyed, and a Dangerous camp is at high risk of being destroyed.
Title Update 3 changes monster behavior so that they no longer actively seek out Pop-up Camps. This should generally increase the uptime of established Pop-up Camps.
How to Repair Destroyed Pop-up Camps
Pay the Fee at Support Desk
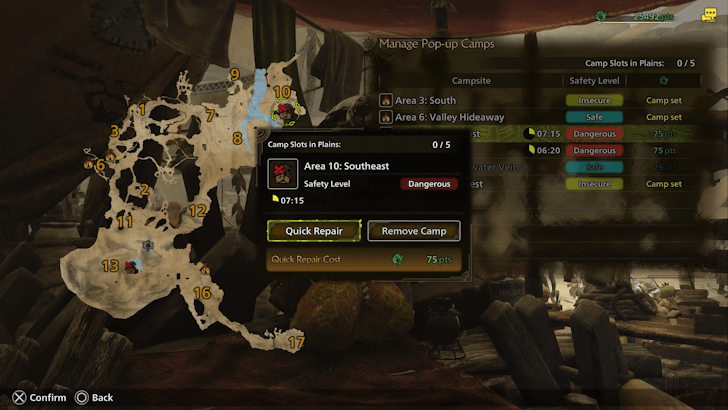
Pop-up Camps can be repaired quickly by paying Guild Points at the Support Desk or to the Pop-up Camp Meowster. The repair cost is the same as the setup cost.
Wait For the Repairs
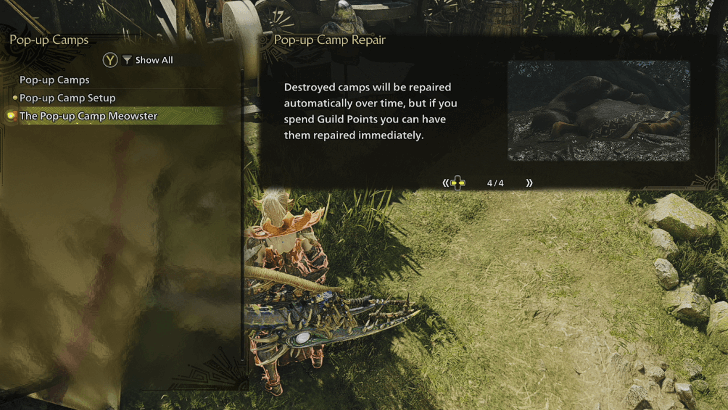
If you don't have the Guild Points to repair a Pop-up Camp, or you want to save up, you can instead wait for the Pop-up Camp to be automatically repaired after a while. This repair is free, but does make the camp unusable for the time being.
Pop-Up Camp Details
Base Camps in the Field
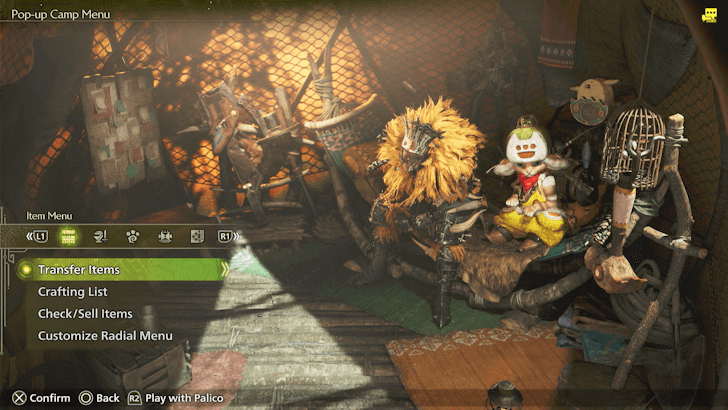
Pop-up Camps contain all of the features that the Base Camp tent has. This includes refilling items, changing your equipment, cooking meals, and more.
You can also fast travel to them, letting hunters traverse the map easily. Take note that monsters can also destroy them, so make sure that it's built out of harm's way!
Maximum of Five Pop-Up Camps

While there are several locations to set up pop-up camps, hunters can only have 5 pop-up camps set up!
Take note that monsters can destroy pop-up camps depending on the Safety Level of an area.
Pop-up Camps Are Customizable
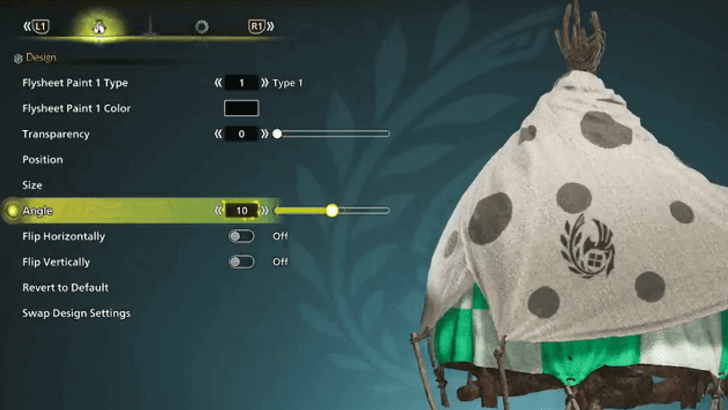
Hunters can decorate and customize Pop-Up Camps too. Several customization settings are available such as colors and patterns of the camp, several chair types, and even background music that plays when you arrive on that specific camp!
Manage Pop-Up Camps in Base Camp
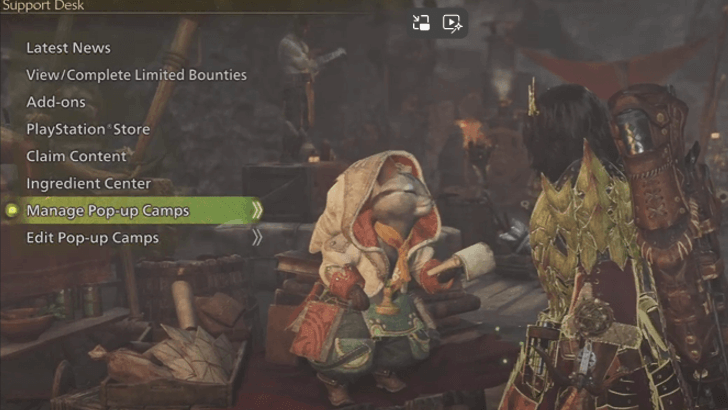
Hunters can manage pop-up camps from all locales via the Support Desk Palico, Hazel.
By talking to her, hunters can quickly fix or remove camps to free up Camp Slots, check all camps from other locales, and know the safety level per locale to gauge which camp is prone to being destroyed by monsters.
Monster Hunter Wilds Related Guides

All Game Mechanics Guides
Comment
Author

How to Set Up Pop-up Camps and Best Locations
Premium Articles

Rankings
Gaming News


![Monster Hunter Stories 3 Review [First Impressions] | Simply Rejuvenating](https://img.game8.co/4438641/2a31b7702bd70e78ec8efd24661dacda.jpeg/thumb)
Popular Games

Genshin Impact Walkthrough & Guides Wiki
Honkai: Star Rail Walkthrough & Guides Wiki
Umamusume: Pretty Derby Walkthrough & Guides Wiki
Pokemon Pokopia Walkthrough & Guides Wiki
Resident Evil Requiem (RE9) Walkthrough & Guides Wiki
Monster Hunter Wilds Walkthrough & Guides Wiki
Wuthering Waves Walkthrough & Guides Wiki
Arknights: Endfield Walkthrough & Guides Wiki
Pokemon FireRed and LeafGreen (FRLG) Walkthrough & Guides Wiki
Pokemon TCG Pocket (PTCGP) Strategies & Guides Wiki


Recommended Games
Diablo 4: Vessel of Hatred Walkthrough & Guides Wiki
Cyberpunk 2077: Ultimate Edition Walkthrough & Guides Wiki
Fire Emblem Heroes (FEH) Walkthrough & Guides Wiki
Yu-Gi-Oh! Master Duel Walkthrough & Guides Wiki
Super Smash Bros. Ultimate Walkthrough & Guides Wiki
Pokemon Brilliant Diamond and Shining Pearl (BDSP) Walkthrough & Guides Wiki
Elden Ring Shadow of the Erdtree Walkthrough & Guides Wiki
Monster Hunter World Walkthrough & Guides Wiki
The Legend of Zelda: Tears of the Kingdom Walkthrough & Guides Wiki
Persona 3 Reload Walkthrough & Guides Wiki


All rights reserved
©CAPCOM
The copyrights of videos of games used in our content and other intellectual property rights belong to the provider of the game.
The contents we provide on this site were created personally by members of the Game8 editorial department.
We refuse the right to reuse or repost content taken without our permission such as data or images to other sites.