Long Sword Weapon Guide and Best Combos
★ Arkveld Gamma Armor | MH Stories 3 Collab
☆ Version 1.041: Sororal α Armor | Shatterseal
★ How to Unlock Proof of a Hero Quest
☆ Omega Planetes | Savage Omega | Builds vs Omega
★ Armor Set Search updated for Ver 1.041
☆ HR50+ Builds | Tier List | Weapon Guides
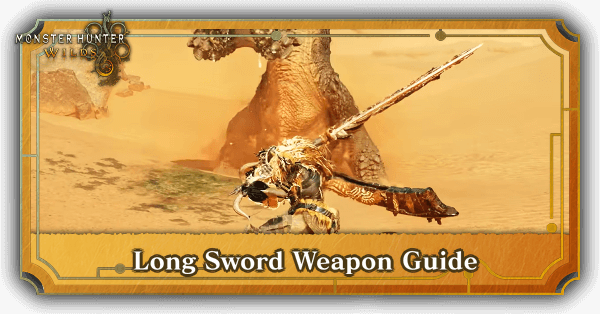
The Long Sword is a fluid weapon that chains together combos and counterattacks in Monster Hunter Wilds. See all the new moves for the Long Sword, its mechanics, controls, best combos, advanced tips, and how good it is!
| Long Sword Guides | ||
|---|---|---|
| Weapon Guide | Builds | Tree |
List of Contents
Long Sword Balance Adjustment
Long Sword Update Ver. 1.021
| Long Sword Changes |
|---|
| ・(Buff) Reduced the delay between input and action when chaining into Iai Spirit Slash from Special Sheathe. Additionally, slightly extended the window for performing the Iai Spirit Slash. |
The Long Sword received some updates in Update Ver. 1.021 on August 13, 2025 (UTC).
Long Sword Mechanics
| Long Sword Mechanics |
|---|
|
|
A Three-Stage Gauge
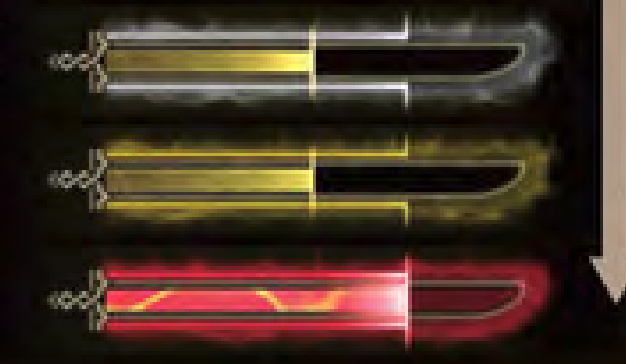
The Long Sword's main mechanic is the Spirit Gauge. This gauge fills up by using regular attacks, which will then be consumed to use Spirit Blade moves. Successfully using the Spirit Blade’s finishing combo- called Spirit Roundslash- will allow you to increase the gauge's level. Leveling this gauge up to stage three turns the icon into red.
Gauge Levels Damage Increase
| None | x1.00 |
|---|---|
| White | x1.02 |
| Yellow | x1.04 |
| Red | x1.1 |
A Transforming Moveset
A new addition to the Longsword are a set of attacks called Crimson Moves. This new set of moves can only be used while the hunter has a red spirit gauge. These moves are stronger variants of your regular moves and will automatically input as soon as you enter red spirit gauge.
In Monster Hunter Wilds, the Long Sword’s red spirit gauge does not run out by performing attacks. Instead, the spirit gauge gradually drains with time. With that in mind, it is advised to use Crimson Moves first before fully draining your Spirit Gauge by using the Spirit Helm Break.
Release and Unleash
In Monster Hunter Wilds, the Long Sword can now perform the Spirit Charge action by pressing and holding R2. Fully charging this move makes the hunter go straight into the Spirit Roundslash, leveling up your gauge instantly. This sets up Crimson Moves perfectly, as it is now easier to reach the red spirit gauge.
A Destructive Final Blow
The Spirit Helm Breaker combines flash and damage, perfectly reflecting the Long Sword. In Monster Hunter Wilds, the Long Sword is given a new move to follow up Spirit Helm Breaker called Spirit Release Slash. Pressing R2 after Spirit Helm Breaker will execute the Spirit Release Slash.
Adaptability at its Finest
The Long Sword features moves that provide I-Frames to the player. Perfectly timing these moves provides perfect defense and perfect offense. If executed properly, the player will receive no damage, fill up the Spirit Gauge, and deal damage.
An added feature also gives the player to cancel Spirit Helm Breaker by sheathing your weapon mid-air. This prevents the player from wasting his Spirit Gauge if it will not guarantee a hit.
With high damage coupled with a limitless potential for defense, the Long Sword offers adaptability in any given situation.
Long Sword Controls and Moves
Basic Controls
| Action | |
|---|---|
| Regular Atttack | |
| Thrust Attack | |
| Downward Slash | |
| Action | |
|---|---|
| Regular Atttack | |
| Thrust Attack | |
| Downward Slash | |
| Action | |
|---|---|
| Regular Atttack | |
| Thrust Attack | |
| Downward Slash | |
Actions that Use the Spirit Gauge
| Action | |
|---|---|
| Spirit Slash | |
| Directional Spirit Slash | |
| Spirit Thrust | |
| Spirit Thrust → Spirit Helm Breaker | When the Spirit Gauge is White or Higher |
| Spirit Thrust → Spirit Helm Breaker → Spirit Release Slash | When the Spirit Gauge is Red |
| Action | |
|---|---|
| Spirit Slash | |
| Directional Spirit Slash | |
| Spirit Thrust | |
| Spirit Thrust → Spirit Helm Breaker | When the Spirit Gauge is White or Higher |
| Spirit Thrust → Spirit Helm Breaker → Spirit Release Slash | When the Spirit Gauge is Red |
| Action | |
|---|---|
| Spirit Slash | |
| Directional Spirit Slash | |
| Spirit Thrust | |
| Spirit Thrust → Spirit Helm Breaker | |
| Spirit Thrust → Spirit Helm Breaker → Spirit Release Slash | When the Spirit Gauge is Red |
Other Advanced Actions
| Action | |
|---|---|
| Foresight Slash ↓ Foresight Whirl Slash | After a successful Foresight Slash, |
| Special Sheathe | After attacking, |
| Iai Slash | After Special Sheathe, |
| Iai Spirit Slash | When the Spirit Gauge is White or Higher |
| Action | |
|---|---|
| Foresight Slash ↓ Foresight Whirl Slash | After a successful Foresight Slash, |
| Special Sheathe | After attacking, |
| Iai Slash | After Special Sheathe, |
| Iai Spirit Slash | After Special Sheathe, |
| Action | |
|---|---|
| Foresight Slash ↓ Foresight Whirl Slash | After a successful Foresight Slash, |
| Special Sheathe | After attacking, |
| Iai Slash | After Special Sheathe, |
| Iai Spirit Slash | After Special Sheathe, |
Spirit Gauge Explained
| Actions that Increase Spirit Gauge Level | |
|---|---|
| Foresight Slash ↓ Foresight Whirl Slash | After a successful Foresight Slash, |
| Spirit Blade Slash I → II → III → Spirit Roundslash | After attacking, |
| Charge, then Release for Spirit Roundslash | |
| Special Sheathe → Iai Spirit Slash | After attacking, |
| Actions that Increase Spirit Gauge Level | |
|---|---|
| Foresight Slash ↓ Foresight Whirl Slash | After a successful Foresight Slash, |
| Spirit Blade Slash I → II → III → Spirit Roundslash | |
| Charge, then Release for Spirit Roundslash | |
| Special Sheathe → Iai Spirit Slash | After attacking, |
The Spirit Gauge is a Long Sword mechanic indicated by a color-changing bar that fills up as you land the above attacks and combos.
Long Sword Best Combos
| Long Sword Tips |
|---|
Zero Spirit Gauge Setup Combo
| Combo Input |
|---|
| |
| Combo Input |
|---|
| |
| Combo Input- |
|---|
| |
This is a great opener to start hunts against unaware monsters. You can start the fight by filling your spirit gauge using Spirit Charge then going straight to roundhouse slash.
This sequence instantly grants one gauge level, setting you up for an Iai Counter against the monster’s roar. Successfully countering the roar is crucial, as it allows you to unlock Spirit Blade III, offseting the roar stun while allowing you to level your gauge again.
From here, transition into another Roundhouse Slash, quickly reaching a red gauge to kick off the hunt with maximum power.
Crimson Slash Combo Loops (Red Spirit Gauge)
| Combo Input |
|---|
| Once Spirit Gauge is Red |
| Combo Input |
|---|
| Once Spirit Gauge is Red |
| Combo Input |
|---|
| Once Spirit Gauge is Red |
This is a combo string that can be done by looping Crimson Slash and Rising Slash. You can use this if you're unable to find an opening, or if you want to try and create one against an active or enraged monster. It's a safe string that you can quickly cancel into Foresight Whirl Slash. It has a decent amount of DPS that can be used whenever you feel unsure what the monster will do next.
| Combo Input |
|---|
| Once Spirit Gauge is Red |
| Combo Input |
|---|
| Once Spirit Gauge is Red |
| Combo Input |
|---|
| Once Spirit Gauge is Red |
Another combo can be by done by looping Crimson Slash and Spirit Blade I while the hunter is in Red Spirit Gauge. This combo can dish out more damage but is a bit slower when trying to transition into a counter move due to its longer attack animations. This is best used before unleashing Spirit Helm Breaker when the monster is down.
Spirit Unleash Combos
Spirit Unleash is the Long Sword's strongest move and there are multiple ways to get to the red gauge then using it to deal tons of damage. Below are some combo transitions that you can use to build up your meter and use Spirit Unleash.
Although the meta has shifted to use Crimson Slash Combo Loops, this move is still very powerful and can be used when the Red Spirit Gauge is nearing its end.
Spirit Charge to Helm Breaker
| Combo Input |
|---|
| Combo Input |
|---|
| Combo Input |
|---|
This is your bread and butter spirit charge builder. This is a great gauge builder and combo to use against docile, tired, or monsters that have different targets as it does not rely on counter hits. The spirit charge slash skips the first three spirit blade moves to immediately transition to spirit roundslash and into a faster Spirit Unleash combo.
Foresight Slash to Helm Breaker
| Combo Input |
|---|
| Combo Input |
|---|
| |
| Combo Input |
|---|
A reactive counter that allows you to transition to spirit roundslash on hit. This effectively gives one gauge level on a successful dodge and counter hit. You can then immediately push the combo to Helm Breaker then eventually to Spirit Unleash. Or you can also save the red bar and reposition to use Spirit Thrust on a safer position.
Iai Spirit Slash to Helm Breaker
| Combo Input |
|---|
| Combo Input |
|---|
| Combo Input |
|---|
This relies on the Iai counter to instantly get the next gauge level while also allowing the hunter to immediately transition to Helm Breaker. This allows you to head straight to Spirit Unleash after a counter which can be more effective against aggressive monsters.
Long Sword Advanced Tips
| Long Sword Tips |
|---|
Crimson Slash Loops
In Monster Hunter Wilds, the new crimson slash loop combo is the king when it comes to the Long Sword's damage output. This combo provides very high DPS, even higher than Spirit Helm Breaker and Spirit Release Slash. Maximize your red gauge by doing this combo in a loop.
Special Sheathe After Spirit Helm Breaker
Instead of performing Spirit Release after a Spirit Helm Breaker, you can instead use Special Sheathe. You can then use the Iai Spirit Slash to counter an attack or to get back to red gauge immediately.
Fade Slash Can Transition to Spirit Blade III
Using the Fade Slash as part of your combos can speed up the process of filling up your spirit gauge. This increased gain in gauge can then be used to transition to Spirit Blade III to level up your gauge faster.
Focus Strike Can Transition to Spirit Blade III
The Focus Strike mechanic is a great way to get a free Spirit Gauge level. However, what is commonly missed is the Focus Strike's ability to transition into Spirit Blade III. This means that if you can trigger a Focus Strike on a wound, you can do a second set of combo going to Spirit Blade Roundhouse and get 2 Spirit Gauge levels for a shorter period of time.
Focus Strike Gives 1 Gauge Level Per Wound
Whenever you use your focus Strike, you would see your Spirit Gauge level increasing by 1. However, this is due to the fact that you're able to consume 1 wound on your Focus Strike. How this works is if your Focus Strike consumes a wound, it would actually get 1 gauge level which means that if you're able to use Focus Strike on an enemy section with multiple wounds, you can gain 2 or more gauges in one go!
Use Rising Slash to Set Up Foresight Slash
Using thrusts as a way to set up Foresight Slash can make parrying easier. Thrusts have long active combo frames, meaning that once you use thrust, you can wait for approximately 2-3 seconds before transitioning it into a Foresight Slash.
Simulate Perfect Counters via Barrel Bombs
Plant Barrel Bombs to simulate a perfect counter by using Iai Spirit Slash. While this may require a frame perfect input, learning how to execute this mechanic will help you get to red gauge quickly.
You Can Delay Spirit Unleash's Input for Armor Frames
Spirit Unleash can be used right after a successful Spirit Helm Breaker. But a healthy habit you can develop is to avoid using Spirit Unleash immediately after your Helm Breaker. Check the monster's pattern and if you're about to get hit by a monster's attack, you can delay Spirit Unleash then use it as the monster's hit is about to hit you to activate its armor frames.
In addition, this also activates an offensive skill called Counterstrike. You will still take damage but this will let you execute Spirit Unleash uninterrupted and receive the attack buff from Counterstrike.
Cancel Spirit Helm Breaker by Sheathing Mid-air
If you find yourself in an unfavorable position to perform the Spirit Helm Breaker, you can cancel it by pressing Square on PS4/5 or X in Xbox. This will cause your weapon to sheathe mid-air, cancelling Spirit Helm Breaker.
Perform Special Sheathe Faster After Successful Iai Spirit Slash
| Special Sheathe Speed | |
|---|---|
Successful Iai Spirit Slash |
Unsuccessful Iai Spirit Slash |
If you perform a successful Iai Spirit Slash, you can perform Special Sheathe faster by avoiding the Spirit Charge animation. This can be useful for monsters that attack in quick intervals.
How Good is the Long Sword?
Tier List Ranking
| Weapon Ranking | ||
|---|---|---|
| Damage Type | Entry Barrier | Difficulty to Master |
| Low | ★★★★★ | |
| Weaknesses and Strengths | ||
|
|
||
Entry Barrier pertains to how easy it is to learn the weapon from scratch, while Difficulty to Master is a rating on how difficult it is to perfectly execute the weapon mechanics.
The Long Sword together with its high burst damage and strong mobility and evasiveness makes it one of the most appealing weapons for beginners and veterans alike. It is an easy to pick up weapon especially with the newly added Spirit Charge move to make building up your gauge much easier but it has also gained new moves such as Spirit Unleash to add a new layer of complexity to the weapon.
It's still the easy to play but hard to master weapon in the game and to truly master it, a full understanding of monster patterns, I-frames, and gauge management is still crucial. Don't hesitate to pick up the Long Sword if the idea of an untouchable playstyle with high DPS is your liking!
Monster Hunter Wilds Related Guides

All Weapon Guides
| All Weapon Tutorials | |||||
|---|---|---|---|---|---|
 Great Sword Great Sword |
 Long Sword Long Sword |
 Sword & Shield Sword & Shield |
|||
 Dual Blades Dual Blades |
 Hammer Hammer |
 Hunting Horn Hunting Horn |
|||
 Lance Lance |
 Gunlance Gunlance |
 Switch Axe Switch Axe |
|||
 Charge Blade Charge Blade |
 Insect Glaive Insect Glaive |
 Light Bowgun Light Bowgun |
|||
 Heavy Bowgun Heavy Bowgun |
 Bow Bow |
||||
All Weapon Trees
| All Weapon Trees | |||||
|---|---|---|---|---|---|
 Great Sword Great Sword |
 Long Sword Long Sword |
 Sword & Shield Sword & Shield |
|||
 Dual Blades Dual Blades |
 Hammer Hammer |
 Hunting Horn Hunting Horn |
|||
 Lance Lance |
 Gunlance Gunlance |
 Switch Axe Switch Axe |
|||
 Charge Blade Charge Blade |
 Insect Glaive Insect Glaive |
 Kinsects Kinsects |
|||
 Light Bowgun Light Bowgun |
 Heavy Bowgun Heavy Bowgun |
 Bow Bow |
|||
Comment
Hello! The Zero Spirit Gauge Setup Combo assumes a hunting scenario where Iai Spirit Slash is used to counter a monster’s roar (ideally toward an unaware monster), as Spirit Blade III only becomes available through a successful counter. Hope this helps!
Author
Long Sword Weapon Guide and Best Combos
improvement survey
03/2026
improving Game8's site?

Your answers will help us to improve our website.
Note: Please be sure not to enter any kind of personal information into your response.

We hope you continue to make use of Game8.
Premium Articles
Rankings
Gaming News
Popular Games

Genshin Impact Walkthrough & Guides Wiki

Honkai: Star Rail Walkthrough & Guides Wiki

Umamusume: Pretty Derby Walkthrough & Guides Wiki

Pokemon Pokopia Walkthrough & Guides Wiki

Resident Evil Requiem (RE9) Walkthrough & Guides Wiki

Monster Hunter Wilds Walkthrough & Guides Wiki

Wuthering Waves Walkthrough & Guides Wiki

Arknights: Endfield Walkthrough & Guides Wiki

Pokemon FireRed and LeafGreen (FRLG) Walkthrough & Guides Wiki

Pokemon TCG Pocket (PTCGP) Strategies & Guides Wiki
Recommended Games

Diablo 4: Vessel of Hatred Walkthrough & Guides Wiki

Fire Emblem Heroes (FEH) Walkthrough & Guides Wiki

Yu-Gi-Oh! Master Duel Walkthrough & Guides Wiki

Super Smash Bros. Ultimate Walkthrough & Guides Wiki

Pokemon Brilliant Diamond and Shining Pearl (BDSP) Walkthrough & Guides Wiki

Elden Ring Shadow of the Erdtree Walkthrough & Guides Wiki

Monster Hunter World Walkthrough & Guides Wiki

The Legend of Zelda: Tears of the Kingdom Walkthrough & Guides Wiki

Persona 3 Reload Walkthrough & Guides Wiki

Cyberpunk 2077: Ultimate Edition Walkthrough & Guides Wiki
All rights reserved
©CAPCOM
The copyrights of videos of games used in our content and other intellectual property rights belong to the provider of the game.
The contents we provide on this site were created personally by members of the Game8 editorial department.
We refuse the right to reuse or repost content taken without our permission such as data or images to other sites.


![Everwind Review [Early Access] | The Shaky First Step to A Very Long Journey](https://img.game8.co/4440226/ab079b1153298a042633dd1ef51e878e.png/thumb)

![Monster Hunter Stories 3 Review [First Impressions] | Simply Rejuvenating](https://img.game8.co/4438641/2a31b7702bd70e78ec8efd24661dacda.jpeg/thumb)


the comparison in sheath speed between succesful or not iai slash does not show enough of the animation