Training Area Location and Features
★ Arkveld Gamma Armor | MH Stories 3 Collab
☆ Version 1.041: Sororal α Armor | Shatterseal
★ How to Unlock Proof of a Hero Quest
☆ Omega Planetes | Savage Omega | Builds vs Omega
★ Armor Set Search updated for Ver 1.041
☆ HR50+ Builds | Tier List | Weapon Guides

You can access the Training Area located in the Base Camp to learn each weapon's moveset. Learn more about how to unlock the training area and all its features in this guide!
List of Contents
Training Area Location
Northern Section of the Base Camp
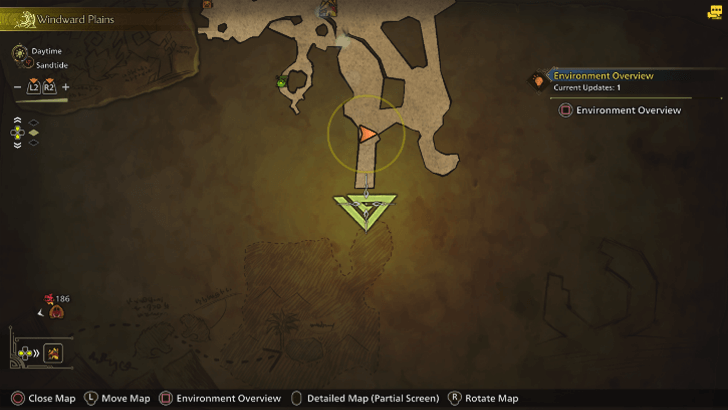
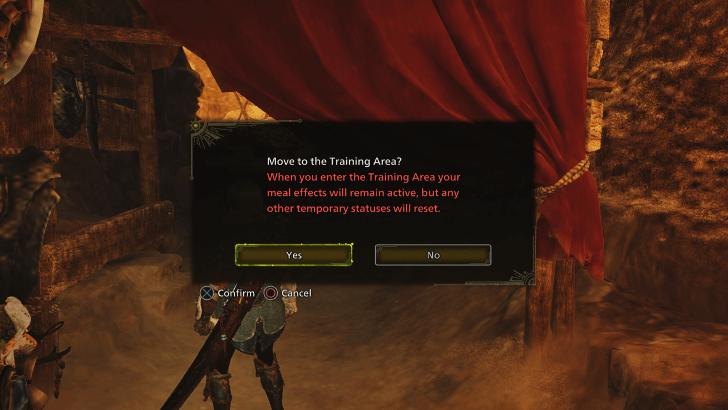
The Training Area is located in the northern area of the Base Camp. Go to the location of the Training Area near the bottom and press the button when prompted to enter.
Defeat Doshaguma Alpha to Unlock the Training Area
After defeating Chutacabra and completing the introductory chapter of the game, players will have the opportunity to explore the Windward Plains freely.
At this time, players will also be asked to defeat Doshaguma Alpha. Once Doshaguma Alpha is defeated, the previously inaccessible training area can be entered.
Doshaguma Monster Guide and How to Beat
Training Area Features
A Place To Train With Weapons

The training area is a great place for a hunter to familiarize themselves with their chosen weapon. Hunters can practice weapon combos on the High Purrformance Barrel Puncher without being disturbed.
A makeshift camp can be accessed within the training area similar to a pop-up camp. If the hunter wishes to change their equipped weapon and armor, they can do so in the makeshift camp.
Which Weapon is Right for You?
Similar From the Training Barrel in the Tutorial
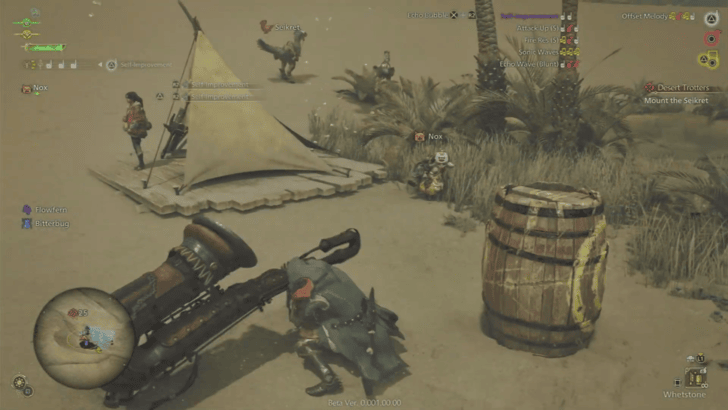
The High Purrformance Barrel Puncher functions similarly to the Training Barrel in the Tutorial, as it serves the same purpose as a practice target.
However, the target in the training area is a better option to practice on because it has access to multiple settings that the player can change to their liking.
Training Area Settings
| High Purrformance Barrel Puncher Settings | ||
|---|---|---|
| Hide Settings | Can be swapped between soft and hard, allowing the player to choose the target's hitzone values. | |
| Wound Settings | Determines whether the target dummy can be wounded like a normal monster. Can be set to on to always inflict a wound, or off to disable the target's wound status. | |
| Select Mode | The dummy can be set to periodically perform melee attacks, ranged attacks, or a mix of both. Leave this on standby if you don't want the dummy to attack. | |
| Smash Pattern | Determines the damage reaction of the fighter when hit by the attack of the dummy. Dummy attacks can be guarded unless the option is set to Strong. | |
| Orientation | Specifies the direction the dummy will face. | |
| Natural Recovery Settings | Allows the hunter to naturally regain lost HP. | |
Inside the training area, players can talk to Luke, the training area meownager, to change the settings on the High Purrformance Barrel Puncher.
Hunters can test their weapons by changing the hide, wound, smash pattern, and other settings. Don't be afraid to experiment with the other settings in order to have a better idea of the possible combat situations!
Monster Hunter Related Guides
Location Guides
| All Locations | |
|---|---|
| Windward Plains | Scarlet Forest |
| Oilwell Basin | Iceshard Cliffs |
| Ruins of Wyveria | - |
Settlement Guides
| Settlements | |
|---|---|
| Kunafa, Windsong Village | Wudwud Hideout |
| Azuz, the Everforge | Sild, the Keepers' Vigil |
Special Area Guides
| Special Areas | |
|---|---|
| Suja, Peaks of Accord | Wounded Hollow |
| Rimechain Peak | Dragontorch Shrine |
Other Location Guides
| Other Location Guides | |
|---|---|
| All Pop-Up Camp Locations | All Bonepile Locations |
| All Mining Outcrop Locations | Training Area Location and Features |
Comment
Author

Training Area Location and Features
Premium Articles

Rankings
Gaming News

![Monster Hunter Stories 3 Review [First Impressions] | Simply Rejuvenating](https://img.game8.co/4438641/2a31b7702bd70e78ec8efd24661dacda.jpeg/show)


![Monster Hunter Stories 3 Review [First Impressions] | Simply Rejuvenating](https://img.game8.co/4438641/2a31b7702bd70e78ec8efd24661dacda.jpeg/thumb)
Popular Games

Genshin Impact Walkthrough & Guides Wiki
Honkai: Star Rail Walkthrough & Guides Wiki
Umamusume: Pretty Derby Walkthrough & Guides Wiki
Pokemon Pokopia Walkthrough & Guides Wiki
Resident Evil Requiem (RE9) Walkthrough & Guides Wiki
Monster Hunter Wilds Walkthrough & Guides Wiki
Wuthering Waves Walkthrough & Guides Wiki
Arknights: Endfield Walkthrough & Guides Wiki
Pokemon FireRed and LeafGreen (FRLG) Walkthrough & Guides Wiki
Pokemon TCG Pocket (PTCGP) Strategies & Guides Wiki


Recommended Games
Diablo 4: Vessel of Hatred Walkthrough & Guides Wiki
Cyberpunk 2077: Ultimate Edition Walkthrough & Guides Wiki
Fire Emblem Heroes (FEH) Walkthrough & Guides Wiki
Yu-Gi-Oh! Master Duel Walkthrough & Guides Wiki
Super Smash Bros. Ultimate Walkthrough & Guides Wiki
Pokemon Brilliant Diamond and Shining Pearl (BDSP) Walkthrough & Guides Wiki
Elden Ring Shadow of the Erdtree Walkthrough & Guides Wiki
Monster Hunter World Walkthrough & Guides Wiki
The Legend of Zelda: Tears of the Kingdom Walkthrough & Guides Wiki
Persona 3 Reload Walkthrough & Guides Wiki


All rights reserved
©CAPCOM
The copyrights of videos of games used in our content and other intellectual property rights belong to the provider of the game.
The contents we provide on this site were created personally by members of the Game8 editorial department.
We refuse the right to reuse or repost content taken without our permission such as data or images to other sites.