Best Skills
★ Arkveld Gamma Armor | MH Stories 3 Collab
☆ Version 1.041: Sororal α Armor | Shatterseal
★ How to Unlock Proof of a Hero Quest
☆ Omega Planetes | Savage Omega | Builds vs Omega
★ Armor Set Search updated for Ver 1.041
☆ HR50+ Builds | Tier List | Weapon Guides
This lists all of the best skills to equip in Monster Hunter Wilds. Read on to learn the best skills which includes the best offensive weapon skills, best offensive armor skills, the best comfort skills, and best skills for each weapons.
List of Contents
Best Weapon Skills
Best General Weapon Skills
| Skills | Effect |
|---|---|
|
(★★★) |
Increases the damage of critical hits. |
|
(★★) |
Increases abnormal status effects (paralysis, poison, sleep, blast) when landing critical hits. |
|
(★★) |
Increases affinity. |
|
(★★) |
Prevents your weapon from losing sharpness during critical hits. |
|
(★★) |
Extends the weapon sharpness gauge. However, it will not increase the gauge past its maximum. |
|
(★★) |
Increases abnormal status effects (paralysis, poison, sleep, blast) when landing critical hits. |
|
(★★) |
Prevents your weapon from losing sharpness. |
|
(★) |
Weapon sharpness does not decrease for a set time after sharpening. |
|
(★) |
Increases attack power. |
|
(★) |
Increases the fill rate for weapons with gauges and the charge rate for weapons with charge attacks.
Most of the weapons now benefit from the fast charge gain and time. |
These are generally the best weapon skills you can slot in for most weapons in the game. These are skills that will greatly benefit your build no matter the circumstances (except for sharpness skills for ranged weapons).
Equip Skills That Synergizes With Your Build and Weapon
While these are the best overall skills, that does not mean that you will just slot in these skills to your weapons when they are ready. Be sure to consider how your current weapon and build works.
Critical Status and Critical Boost for example, are great skills but will not function if your weapon have low affinity or low elemental/status values.
Best Armor Skills
Best Offensive Armor Skills
| Skills | Effect |
|---|---|
|
(★★★) |
Continuously landing hits gradually increases attack and elemental attack. (Amount increased depends on weapon.) |
|
(★★★) |
Increases attack power and affinity when large monsters become enraged. |
|
(★★★) |
Increases the affinity of attacks that exploit a monster's weak points and wounds. |
|
(★★) |
Once infected, makes it easier to overcome the Frenzy and increases affinity if cured.
Jumps to (★★★) When equipping the Gore Magala set. |
|
(★★) |
Temporarily increases attack power after executing a perfectly-timed evade just as a monster attacks. |
|
(★★) |
Temporarily increases attack power after being knocked back. |
|
(★★) |
Increases affinity if stamina is kept full for a period of time. |
|
(★★) |
Temporarily increases affinity and reduces stamina depletion when certain conditions are met. |
|
(★★) |
Increases attack when you have recoverable damage (the red portion of your Health Gauge). |
|
(★★) |
Temporarily increases elemental attack power and status effects after recovering from blights or abnormal status.
Essential for Elemental Builds |
|
(★) |
Makes it easier to inflict wounds. Upon inflicting enough damage, also deals additional non-elemental damage, |
|
(★) |
Makes it easier to break large monster parts, and increases damage dealt when destroying a wound with a Focus Strike. |
These are our recommended skills when you are looking to optimize your build damage-wise. Generally, you will have to revolve your offense on specific skills, but these skills can be considered foundational for most builds' damage!
Best Comfort Armor Skills
| Skills | Effect |
|---|---|
|
(★★★) |
Grants protection from large monsters' roars. |
|
(★★★) |
Reduces stamina depletion when evading, blocking, or doing certain other actions. |
|
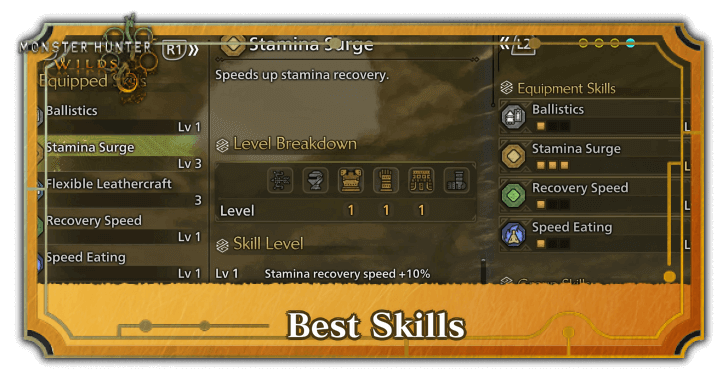
(★★) |
Speeds up stamina recovery. |
|
(★★) |
Extends the invulnerability period when evading. |
|
(★★) |
Increases evade distance. |
|
(★★) |
Has a predetermined chance of reducing the damage you take. |
|
(★★) |
Increases the amount recovered when restoring health. |
|
(★★) |
Grants protection against environmental damage, such as from heat or cold. |
|
(★) |
Attack and defense increase as time passes while on a quest. (The maximum is reached after 30 minutes.) |
|
(★) |
Increases meat-eating and item-consumption speed. |
|
(★) |
Gives you a predetermined chance of consuming a food or drink item for free. |
|
(★) |
Prevents knockbacks and other reactions to small damage. |
These are our recommended skills if you're looking for skills that would provide an increased ease-of-use and survivability during hunts. They are very easy to slot in and are great skills to include to your build if you find empty slots and wish to make your hunts smoother.
Best Skills Per Weapon
| Jump to a Weapon! | |||
|---|---|---|---|
|
|
|
|
|
|
|
|
|
|
|
|
|
|
|
|
|
|
||
Great Sword
Best Damage Skills
| Best Skills | Explanation |
|---|---|
|
Weakness Exploit ★★★ |
As you will be attacking a monster's weak spot anyway, getting Weakness Exploit is a must, as it increases your Affinity when attacking a monster's weak point. |
|
Agitator ★★★ |
Agitator can give up to 20 Attack and 15% Affinity whenever your target is enraged. While this may seem situational, monsters become enraged more easily in High Rank, making this a great late game skill. |
|
Maximum Might ★★★ |
Thanks to the Great Sword's stationary combos, you will be able to activate Maximum Might even if you need to expend Stamina do evade or block enemy attacks. Synergizes well with Second Wind, but is not necessary. |
|
Counterstrike ★★★ |
Thanks to the Great Sword's Tackle, you will be able to activate this skill and get up to 25 Raw Attack by using the Tackle's Hyper Armor to counter enemy attacks, especially those that can knock you back. |
|
Critical Boost ★★ |
A great source of damage amplification if you have a high Affinity build. Do not take this skill if you cannot reliably crit. |
|
Partbreaker ★★ |
Lets you break monster parts more easily while also increasing the damage you deal to Wounds when using Focus Strike. |
|
Flayer ★★ |
This skill allows you to create wounds more easily, which synergizes well with Weakness Exploit and the Arkveld Armor Set Bonus Decimator. |
|
Critical Draw ★★ |
Grants up to a 100% affinity on draw attacks, and is great for hit-and-run tactics, but is outshined by how fast you can perform a True Charged Slash in Monster Hunter Wilds. |
|
Offensive Guard ★★ |
Thanks to the Perfect Block and the new Power Clash mechanic, Offensive Guard is a viable skill to use. |
|
Attack Boost ★ |
This skill improves your attack by both giving a percentage increase as well as a flat increase in attack, making it good for the Great Sword's hard hitting attacks. |
|
Critical Element ★ |
Increases your Elemental damage whenever you crit, and is great if you have high Affinity. The downside is that Elemental damage is not ideal for Great Swords thanks to their slow attack animations, leading to reduced instances of Elemental damage. |
|
Elemental Attack ★ |
Use the Elemental Attack skills to raise a specific Elemental damage. Best used with Critical Element. |
|
Latent Power ★ |
Latent Power's additional Affinity and reduction to Stamina consumption makes it great as both a Damage skill and a Comfort skill. Sadly, running this skill is redundant if you already have high Affinity or Stamina Surge, which do not have a strict activation requirement compared to Latent Power. |
Best Comfort Skills
| Best Skills | Explanation |
|---|---|
|
Focus ★★★ |
Makes the Great Sword's charge attacks charge faster, making it a must-have skill for any Great Sword build. |
|
Decimator ★★ |
This skill heals you whenever you destroy wounds, which reduces the downtime caused by healing. This in turn allows you to attack more often. |
|
Constitution ★★ |
Lowers your Stamina consumption when blocking or evading, making it perfect for Great Sword survivability. |
|
Guard ★★ |
As blocking attacks is now encouraged on the Great Sword, having this skill lets you block attacks more, allowing you to stay close to the monster for counter-attacks. |
|
Handicraft ★ |
Consider slotting this skill in either to get your weapon's sharpness to the next level, or when you need to increase the length of your current Sharpness bar to prevent constant sharpening. |
|
Shock Absorber ★ |
Useful especially in multiplayer as it will prevent your attacks from getting interrupted by your teammate's attacks. |
|
Quick Sheathe ★ |
Lets you sheath your weapon quickly, which is great for when you need to relocate or dodge large monster attacks. |
|
Speed Sharpening ★ |
Reduces your sharpening animation, allowing you to get back in the fight faster. |
| Great Sword Articles | |
|---|---|
| Great Sword Weapon Guide | Great Sword Builds |
Long Sword
Best Damage Skills
| Best Skills | Explanation |
|---|---|
|
Agitator ★★★ |
Turn the monster's rage in your favor by empowering yourself through this skill. Very handy when climbing up towards the higher ranks! |
|
Weakness Exploit ★★★ |
With the revamped wound mechanic, damaging monster wounds is more important than ever. Always max this when possible! |
|
Critical Boost ★★★ |
Synergizes with the affinity given by the two skills above. Always use with high levels of affinity to see positive results! |
|
Critical Draw ★★★ |
Critical Draw makes the Long Sword's Iai Slashes hit stronger. Since these moves are considered draw moves, this makes the Long Sword's counter attack deadlier! |
|
Critical Eye ★★ |
This skill increases your damage output by giving your weapon more affinity. Although still a good skill, the increase in affinity is very small compared to other affinity skills. |
|
Adrenaline Rush ★★ |
An incredible skill that increases your attack power after executing a perfect dodge. This one is for the Long Sword masters! |
|
Flayer ★★ |
Easily inflict wounds by using this skill. Use in combination with Weakness Exploit to maximize Long Sword damage! |
|
Attack Boost ★★ |
Increase the Long Sword's base damage with this skill. While still a good way to bump up damage, the damage values you get from this skill is not massive. It can be outsourced from other better skills. |
|
Peak Performance ★★ |
Take advantage of the Long Sword's invincibility frames to avoid taking damage. Use this skill while maintining full health to boost damage! |
|
Punishing Draw ★ |
Adding a bit of stun in draw attacks may eventually result to a toppled monster. This gives enough time to perform a full combo! |
|
Power Prolonger ★ |
This skill prolongs the duration of Spirit Gauge. It may come handy in risky situations! |
Best Comfort Skills
| Best Skills | Explanation |
|---|---|
|
Quick Sheathe ★★★ |
This skill lets you use draw attacks quickly. Handy for using a quick thrust to use Special Sheathe for a counter attack! |
|
Evade Window ★★★ |
This skill increases the invincibility frames of Special Sheathe follow-ups. Getting this skill lessens the tight timing required for parrying! |
|
Earplugs ★★ |
Prevent a monster's roar from interrupting your combo- a real comfort that will allow you to keep on the offensive! |
|
Focus ★★ |
Focus makes it easier for you to build up your Spirit Gauge, leading to less hits but more gauge! |
|
Handicraft ★ |
Allows you to extend the weapon's sharpness gauge. This allows you to keep attacking with full potency! |
|
Speed Sharpening ★ |
Reduces a cycle for sharpening. This allows quick recovery to continue the fight! |
| Long Sword Articles | |
|---|---|
| Long Sword Weapon Guide | Long Sword Builds |
Sword & Shield
Best Damage Skills
| Best Skills | Explanation |
|---|---|
|
Weakness Exploit ★★★ |
Even though it is slightly nerfed in Wilds, Weakness Exploit remains one of the most efficient ways to stack Affinity, which the Sword & Shield can take good advantage of. |
|
Element Attack ★★★ |
With its quick attacks, Elemental Attack skills of the proper type will massively benefit Elemental Sword & Shield builds. |
|
Critical Element ★★★ |
This skill grants more Elemental damage on Critical Hits, further boosting the Elemental Sword & Shield playstyle. |
|
Offensive Guard ★★ |
With the new Perfect Guard Sword & Shield has, Offensive Guard can provide a respectable Attack boost when properly guarding against enemy attacks. |
|
Burst ★★ |
Burst works excellently for the Sword & Shield, but note that it requires constant attacking to maintain its uptime. |
|
Attack Boost ★ |
This skill increases Attack, increasing the Sword & Shield's raw power across all its combos. But for damage, there are better Skills to slot in over this one, so prioritize them first. |
|
Critical Boost ★ |
This skill doubles down the power of Critical Hits by increasing the damage they deal. While the Sword & Shield does like to build Affinity, it also prefers Elemental damage, which cannot crit. |
|
Critical Eye ★ |
This skill grants flat Affinity, which the weapon appreciates. There are, however, more efficient sources of Affinity to draw from. |
Best Comfort Skills
| Best Skills | Explanation |
|---|---|
|
Protective Polish ★★★ |
Protective Polish is a recommended Sharpness management skill, as Sword & Shield are a fast-hitting weapon that lands a lot of hits. |
|
Handicraft ★★★ |
In the same vein, Handicraft is a great option for increasing the available Sharpness to use, or even hitting the next level of Sharpness. |
|
Razor Sharp ★★ |
Razor Sharp is an alternative skill for managing Sharpness, but is chance-based and can be inconsistent. |
|
Master's Touch ★★ |
Similarly, Master's Touch is another chance-based Sharpness-related skill that works best for high Affinity builds. |
|
Evade Extender ★★ |
The Sword & Shield tends to rely on dodging more to stay safe, and Evade Extender helps improve the distance of dodging. |
|
Handicraft ★ |
Handicraft extends the Sharpness bar, helping some weapons with Sharpness issues feel better to use. |
|
Guard ★ |
While the ideal form of blocking for this weapon is through Perfect Guard, running Guard can help shore its defenses up on non-Perfect blocks. |
| Sword & Shield Articles | |
|---|---|
| Sword & Shield Weapon Guide | Sword & Shield Builds |
Dual Blades
Best Damage Skills
| Best Skills | Explanation |
|---|---|
|
Burst ★★★ |
For most builds, this skill greatly boosts the DPS of the Dual Blades, especially since they can easily activate this with just a few moves. |
|
Element Attack ★★★ |
Boosts the elemental damage of your weapon. Be sure to max out this skill to get the most out of its potential. How Does Elemental Damage Work? |
|
Critical Element ★★★ |
For elemental builds, this skill contributes greatly to the damage dealt to a monster. |
|
Critical Eye ★★ |
Aim for 100% affinity to amplify the Dual Blade's base damage efficiently! |
|
Agitator ★★ |
Provides more damage and affinity, allowing the Dual Blades to grow stronger even in difficult situations. |
|
Weakness Exploit ★★ |
The Dual Blade's playstyle requires targeting weakspots to inflict optimal damage, so having this skill provides a significant boost to your DPS. Always max out this skill whenever possible. |
|
Latent Power ★★ |
Increases your affinity and reduces stamina consumption. The perfect match for solving most of the Dual Blade's problems! |
|
Peak Performance ★★ |
Gives an attack boost whenever you have full health. Great for the Dual Blades who tends to dodge all the time! |
|
Adrenaline Rush ★ |
Activates whenever your perfect dodge to provide an attack boost. Great for the Dual Blades as they tend to dodge most of the time. |
|
Mind's Eye ★ |
A skill that benefits against hard monsters as it prevents your attacks from being deflected. Great for the Dual Blades as they can easily lose sharpness. |
|
Resentment ★ |
Provides an attack boost when you have red health. Rarely gets activated since the Dual Blades focuses on dodging but can work in tight situations. |
|
Attack Boost ★ |
This skill increases the Dual Blade's physical damage values. Not the most ideal damage boost since the Dual Blades is more efficient with elemental damage. |
|
Critical Boost ★ |
Further amplifies critical hit damage. Keep in mind that this only increases your physical damage which is something that the Dual Blades lack. |
Best Comfort Skills
| Best Skills | Explanation |
|---|---|
|
Marathon Runner ★★★ |
One of the staple skills for the Dual Blades. This lets you stay in Demon Mode much longer than you normally would! |
|
Constitution ★★★ |
The perfect skill for perfect dodges! This allows the Dual Blades to perform more dodges before their stamina depletes. |
|
Stamina Surge ★★★ |
Speeds up your stamina regeneration. Perfect for the Dual Blades to enable their most powerful combos faster. |
|
Razor Sharp ★★★ |
Prevents your weapon from losing sharpness. This skill can help solve the high sharpness loss of the Dual Blades. |
|
Handicraft ★★★ |
Boosts your total sharpness! Try to max this out as much as possible. |
|
Protective Polish ★★ |
Prevents sharpness loss for a fixed duration after sharpening. Great for the Dual Blades to unleash all their moves right after using a whetstone. |
|
Master's Touch ★★ |
For crit builds, this skill is a must-have as it prevents your weapon from losing sharpness on critical hits. Keep in mind that this may be difficult to slot in due to it being a Weapon skill. |
|
Speed Sharpening ★★ |
Reduces a cycle for sharpening with each level. Useful for getting your sharpness level up mid-fight. |
|
Focus ★★ |
Speeds up the fill rate of your Demon Gauge from your attacks in Demon Mode. A skill that is now compatible with any Dual Blades player. |
|
Evade Extender ★★ |
Extends the length of your dodges which includes your dashes in Demon Mode. Beware not to take too many levels as the Dual Blades have a short range. |
|
Evade Window ★ |
Boosts the I-frames for all your dodges. Only effective on 3 or max skill levels. |
| Dual Blades Articles | |
|---|---|
| Dual Blades Weapon Guide | Dual Blades Builds |
Hammer
Best Damage Skills
| Best Skills | Explanation |
|---|---|
|
Weakness Exploit ★★★ |
Since the Hammer will mostly be dealing damage to the head, a Monster's prime weak spot; When paired with Flayer, the Hammer's damage will be lethal. Always invest in this skill whenever possible! |
|
Agitator ★★★ |
As simple as it gets, the more Attack your Hammer has, the quicker the Monster goes down! Since Monsters will always be enraged, its value in attack and affinity will always be beneficial during the hunt. |
|
Critical Boost ★★★ |
Further amplifies critical hit damage. Make sure to have high affinity first before equipping! |
|
Flayer ★★ |
The Hammer may sometimes struggle to apply wounds since it will try to focus on the Head. However, looking to exploit other Weakspots with Flayer will still be strong! |
|
Partbreaker ★★ |
Partbreaker allows you to break monster parts easily and lets you deal more damage upon destroying Wounds. Pair it with Flayer to exploit Monster wounds!. |
|
Critical Status ★★ |
Surprisingly, the Hammer in Wilds attacks multiple times since the new Overhead Smash combo is a quick three-hit combo that can transition to Mighty Charge. Due to this change of pace, Critical Status allows quick Status build-up, making Status Hammers much stronger! |
|
Maximum Might ★ |
While unconventional, Maximum Might can work for the Hammer since its main Overhead Smash combo does not consume stamina, giving you a sizable amount of Affinity. However, this will limit your use of Charge attacks and Charging Sway if not paired with Second Wind! |
|
Slugger ★ |
Slugger, while it may seem like a no-brainer since Hammers go for KOs, will only reward you 1-2 extra topples at best. It would be better to invest in damage over the Slugger! |
|
Charge Master ★ |
The new combo of the Hammer means you will be less likely to use your Charges, meaning that Charge Master cannot gain its full value. However, Mighty Charge hits for three strikes, meaning it can easily help stack Status build up. Only get it as a supplement to Element or Status builds. |
Best Comfort Skills
| Best Skills | Explanation |
|---|---|
|
Focus ★★★ |
With the new Mighty Charge, Focus will allow you to be quick with damage application. With Focus, you can sneak a Mighty Charge slam on certain attacks and breaking wounds! |
|
Marathon Runner ★★★ |
Having Marathon Runner allows you to hold your charge and use Charging Sway to set up for a Mighty Charge. Overall, this Stamina skill is the best for Hammer. |
|
Constitution ★★ |
Constitution works best for the Hammer when using Charging Sway, but most of the Hammer's kit will not be able to be applied to it. Do not go out of your way to get this skill. |
|
Evade Window | Evade Extender ★★ |
Enhances the dodge properties of Charging Sway of the Hammer, adding more distance and I-frames! |
|
Stamina Surge ★ |
For the most part, the Hammer will not have a lot of downtime to make full use of Stamina Surge. Only slot this skill in whenever possible or when using Second Wind. |
|
Flinch Free ★ |
Mostly just useful for multiplayer since most of the Hammer's moves have Super Armor! |
|
Stamina Thief ★ |
While Hammers can apply Exhaust whenever they hit the monster's head, this skill is rarely useful as it will waste a spot for better Weapon Skills. Only get this if you have extra slots! |
| Hammer Articles | |
|---|---|
| Hammer Weapon Guide | Hammer Builds |
Hunting Horn
Best Damage Skills
| Best Skills | Explanation |
|---|---|
|
Agitator ★★★ |
Increases damage and affinity in the presence of an enraged monster. This becomes very useful as you start entering from the middle of Low Rank to until the endgame of High Rank since monsters are frequently enraged. |
|
Flayer ★★★ |
Makes it easier to deal wounds and adds non-elemental damage on hitting wounds. This is useful for the Hunting Horn which gets a lot of damage and utility out of using Focus Strike: Reverb. |
|
Critical Status ★★★ |
Increases abnormal status effects against monsters when landing critical hits. This is ideal for boosting the status buildup of status element weapons such as Blast and Poison. |
|
Critical Element ★★★ |
Increases elemental damage on critical hits. This is the ideal damage skill for boosting Hunting Horns with elemental attacks such as Fire and Thunder. |
|
Burst ★★★ |
Increases your raw and elemental attack after successive hits. This fits the Hunting Horn's Echo Bubble damage and performances with multi-hit attacks. |
|
Critical Boost ★★ |
Increases the critical damage of your attacks, making at a great skill to have for when you have high affinity. |
|
Antivirus ★★ |
Increases affinity when being cured of Frenzy. This is best used at full level 3 with 2 piece Gore Magala to get Black Eclipse, granting you a temporary increase affinity increase up to 15%. |
|
Maximum Might ★★ |
Increases affinity when your stamina gauge is full. This gives you a pretty good amount of affinty increase for a few levels, ranging from 10-30%. It is great for the Hunting Horn since most of the time you do not consume stamina at all when performing. |
|
Weakness Exploit ★★ |
Grants increased affinity to the Hunting Horn upon it hitting a wound. Other than precisely attacking wounds, this is useful to increase your damage out of Focus Strikes. |
|
Ambush ★★ |
Significantly increases the damage you deal temporarily after using a Sneak Attack on a monster. This is useful to take advantage of the temporary attack bonus early on. |
|
Critical Eye ★ |
Increases the Hunting Horn's chance to deal critical damage. This skill is still very useful early on when you don't have alternatives, but it starts falling off at higher levels — being overshadowed by other affinity-boosting skills like Agitator, Maximum Might, and Antivirus towards the endgame. |
|
Attack Boost ★ |
Increases the Hunting Horn's true raw damage by a flat amount, and has a percentage increase at higher levels. This skill is great early on, but starts falling off due to its cost and the entry of other conditional skills that give more flat damage easier like Burst and Agitator in combination with affinity, effectively making them cheaper than fully stacking Attack Boost. |
|
Latent Power ★ |
Grants temporary increased affinity and reduced stamina consumption after meeting certain conditions. This is useful in the middle stages of Low Rank for gaining a temporary affinity boost, but it takes a while to activate compared to other conditional skills. |
Best Comfort Skills
| Best Skills | Explanation |
|---|---|
|
Horn Maestro ★★★ |
Increases Melody Effect durations and increases the chance of greater healing from Melody Effects. This greaty increases the time of Self Improvement and other useful songs such as Earplugs and Attack Up. |
|
Evade Window ★★★ |
Very useful for the Hunting Horn since your core defense with the weapon is through dodges. This increases your dodge I-frames. |
|
Handicraft ★★★ |
Increases the maximum sharpness of your Hunting Horn, ensuring that it sustains the multiplied damage you deal when your weapon is at top condition. |
|
Evade Extender ★★ |
Increases the distance of your dodge. This is ideal for repositioning quickly or getting out of the way of large attacks. |
|
Slugger ★★ |
A useful skill to have for dealing more knockout damage to monsters and quickly sending them to topples. This is great for the Hunting Horn since it deals blunt damage. |
|
Earplugs ★ |
Useful for preventing you from being interruped by roars especially during performaces. This is useful early on until you have gotten used to rolling through roars or have an Earplugs song on your horn. |
|
Stamina Surge ★ |
Useful for increasing the speed of stamina recovery. This makes it easier for you to get your stamina back after dodges and sprints. It can also be combined with Maximum Might to ensure the buff reactivates quickly. |
|
Constitution ★ |
A useful skill for reducing flat chunks of stamina consumption from actions like dodges. |
|
Stamina Thief ★ |
Increases the exhaust buildup of the Hunting Horn against a monster, making it easier for them to grow tired and stop attacking for a while. |
|
Free Meal ★ |
A useful skill to have early on especially when it is at a high level. Gives you a chance to consume items for free. |
|
Stun Resistance ★ |
Can help prevent you from being stunned after an attack. Full level prevents you from being stunned. |
| Hunting Horn Articles | |
|---|---|
| Hunting Horn Weapon Guide | Hunting Horn Builds |
Lance
Best Damage Skills
| Best Skills | Explanation |
|---|---|
|
Attack Boost ★★★ |
Increasing the Lance's base attack is one of the most efficient ways to increase its DPS. |
|
Weakness Exploit ★★★ |
Since the Lance will always be in front of the monster, targeting wounds would be easy. This amkes Weakness Exploit a great skill to have for the Lance! |
|
Offensive Guard ★★★ |
Grants percentage attack boost when successfully using a perfectly timed guard against an enemy attack, which a Lance player can do, especially with Perfect Guard. |
|
Critical Boost ★★★ |
Amplified critical strike damage. Works well with Weakness Exploit and the Lance's ability to hit wounds with ease. |
|
Critical Eye ★★★ |
Increasing Affinity is an efficient way to increase DPS for Lances due to their effectiveness at hitting weak spots. |
|
Element Attack ★★ |
Lance can also be a great elemental damage weapon beacuse of its capability to deal multiple and consistent hits. |
|
Burst ★★ |
The Lance can also deal multiple hits which can activate Burst immediately. Use this for a free boost in damage! |
|
Slugger ★ |
Lance now have access to moves that deal blunt damage mostly from shield attacks. It is now easier than ever to weave these moves in, so Slugger could be a supplementary skill to consider. |
Best Comfort Skills
| Best Skills | Explanation |
|---|---|
|
Master's Touch ★★★ |
Every time a critical strike hits, this skill prevents your weapon from losing sharpness. This is an ideal skill for most high affinity builds and for weapons with manageable sharpness. |
|
Evade Extender ★★ |
Increases the evade distance of Lance's unsheathed hops. Only slot this in if you want more mobility with the weapon, but this will mostly be ignored if you're playing with counterattacks. |
|
Guard ★★★ |
Improves the Lance's guarding capability. Getting at least 3 ranks to this skill is recommended. |
|
Speed Sharpening ★ |
Reduces a cycle for sharpening with each level. |
|
Evade Window ★ |
Increases the evade distance of Lance's unsheathed hops. Only slot this in if you want more mobility with the weapon. |
| Lance Articles | |
|---|---|
| Lance Weapon Guide | Lance Builds |
Gunlance
Best Damage Skills
| Best Skills | Explanation |
|---|---|
|
Artillery ★★★ |
Artillery affects the Gunlance's Shelling and Wyvernfire, two of its biggest sources of damage. Getting this Skill is a must to improve your damage output. |
|
Agitator ★★★ |
Provides Attack and Affinity whenever the monsters is enraged, which will happen quickly when you are hunting High Rank monsters. That makes this skill worth investing in. |
|
Burst ★★★ |
Burst is a great source of additional damage as your Gunlance combos can quickly stack this Skill's bonus damage. |
|
Load Shells ★★★ |
Gives your Gunlance additional Shells while also making your reloads faster. |
|
Offensive Guard ★★ |
With the Perfect Block and the new Power Clash mechanic, partnered with the Gunlance's huge Shield, Offensive Guard is very easy to activate, giving you even more bonus Attack. |
|
Partbreaker ★★ |
Lets you break monster parts more easily, which synergizes well with how easily Gunlances can break parts. |
|
Resentment ★★ |
Provides Attack whenever you have red HP, which happens whenever you block with your shield. |
|
Flayer ★ |
This skill allows you to create wounds more easily, which synergizes well with Shelling and Wyrmstakes. |
|
Blast Attack ★ |
Use the Blast Attack skill if you are using a Blast Gunlance as it will help with increasing Blast buildup. |
Best Comfort Skills
| Best Skills | Explanation |
|---|---|
|
Evade Extender ★★★ |
Makes your evasions longer, including your backstep and sidestep. This removes the need to sheathe your weapon to move around and dodge monster attacks. |
|
Guard Up ★★★ |
A perfect skill that complements Perfect Block. Guard Up is a great comfort skill, as it allows you to perform Perfect Blocks on normally unblockable attacks. |
|
Guard ★★★ |
Complements the Gunlance's shield, allowing you to block more attacks without worrying too much about your stamina. |
|
Decimator ★★ |
This skill heals you whenever you destroy wounds, which reduces the downtime caused by healing. This in turn allows you to attack more often. |
|
Handicraft ★★ |
Very helpful, especially when you are close to getting to the next level of sharpness on your Gunlance. |
|
Divine Blessing ★ |
A useful skill that can help mitigate damage that you fail to block. Not a must, but can help in higher difficulty hunts. |
|
Shock Absorber ★ |
Useful especially in multiplayer as it will prevent your attacks from affecting your teammates and vice versa. |
| Gunlance Articles | |
|---|---|
| Gunlance Weapon Guide | Gunlance Builds |
Switch Axe
Best Damage Skills
| Best Skills | Explanation |
|---|---|
|
Burst ★★★ |
Activate this skill with ease, thanks to the Switch Axe's continuous combos. This will help further improve the weapon's already-impressive DPS. |
| Element Attack ★★★ |
Switch Axes are also capable of dealing elemental damage |
|
Weakness Exploit ★★★ |
A great skill to use when targeting wounds in MHWilds. |
|
Attack Boost ★★★ |
Focusing on this skill increases attack values, which can contribute greatly to DPS! |
|
Focus ★★ |
Having Focus decreases the charging time until you reach your Amped Mode, so you can deal Phial damage quicker! |
|
Critical Eye ★★ |
Increases the general Affinity of your weapon to make it easier for you to deal critical hits. |
|
Critical Boost ★★ |
Increases the damage multiplier of your critical hits, so you deal generally higher DPS! |
Best Comfort Skills
| Best Skills | Explanation |
|---|---|
|
Rapid Morph ★★★ |
A Switch Axe build is not complete without this skill. Rapid Morph speeds up morph speed and damage. This will let you combos more efficiently, which will contribute significantly to your DPS! |
|
Evade Extender ★★★ |
More distance covered per dodge means you can easily get out of harms way or move to a better position faster to hit enemy weakspots. |
|
Protective Polish ★★★ |
Switch Axe combos depletes sharpness fast. Always consider maxing this skill out to keep your sharpness high! |
|
Speed Sharpening ★★ |
Reduces a cycle for sharpening with each level. Synergizes well with the Protective Polish skill. |
|
Power Prolonger ★ |
Makes the Amped State of your Switch Axe last longer, so you can deal more phial damage while in Sword Mode for a longer time. |
|
Evade Window ★ |
Longer invincibility frames greatly improves the Switch Axe's survivability but with the counterattacks and offsets in Wilds, it may not be as effective as back then. The optimal level for this skill is 3, so only slot it in whenever you have the chance! |
|
Handicraft ★ |
Increases sharpness. Slot this skill in only when necessary! |
| Switch Axe Articles | |
|---|---|
| Switch Axe Weapon Guide | Switch Axe Builds |
Charge Blade
Best Damage Skills
| Best Skills | Explanation |
|---|---|
|
Agitator ★★★ |
Increases the damage of the Charge Blade when the monster is enraged. This is the best skill to have since it gives a large amount of combined raw damage and affinity at higher levels. It also activates often due to monsters later in the game being frequently enraged. |
|
Offensive Guard ★★★ |
Gives a temporary percentage increase to your attack damage after a perfectly-timed guard. This goes will with the Charge Blade's style of using Perfect Guard. |
|
Artillery ★★★ |
Significantly increases the raw damage done by phial attacks, increasing the overall DPS of your Element Discharge attacks. This is great to have when you often dish out phial explosions with Element Discharge attacks. |
|
Burst ★★★ |
Increases your raw and elemental attack after successive hits. This is great for the Charge Blade's Savage Axe. |
|
Flayer ★★★ |
Makes it easier to deal wounds and adds non-elemental damage on hitting wounds. This is great for the Charge Blade to get more opportunities with activating Savage Axe via Focus Strike. |
|
Critical Status ★★★ |
Increases abnormal status effects against monsters when landing critical hits. This is ideal for boosting the status buildup of status element weapons such as Blast and Paralysis. |
|
Critical Element ★★★ |
Increases elemental damage on critical hits. This is the ideal damage skill for boosting Hunting Horns with elemental attacks such as Fire and Thunder. |
|
Maximum Might ★★ |
Grants an affinity boost when your stamina is full. This is a great skill to have early on since it's more efficient than Critical Eye, giving more affinity at lower levels. You also do not use stamina in your combos (such as in continuous Element Discharges in Axe Mode), giving you a lot of uptime on its use before you decide to run or dodge. |
|
Antivirus ★★ |
Increases affinity when being cured of Frenzy. This is best used at full level 3 with 2 piece Gore Magala to get Black Eclipse, granting you a temporary increase affinity increase up to 15%. |
|
Weakness Exploit ★★ |
The Charge Blade gets a set increased affinity when dealing damage to wounds. It's a great skill to have when you're doing precision attacks against wounds, especially when using Savage Axe. |
|
Critical Eye ★★ |
Grants affinity to your weapon, increasing the chances that it will deal critical damage. This is great for the Charge Blade since it deals multi-hit attacks. The skill can be sustained for the Charge Blade up to earlier in High Rank, where you'll get more efficient use of other affinity skills like Antivirus, Maximum Might, and Agitator. |
|
Ambush ★★ |
Significantly increases the damage you deal temporarily after using a Sneak Attack on a monster. This is useful to get a big raw damage boost at the start of a fight or when doing another Sneak Attack later on in the hunt. |
|
Latent Power ★ |
Grants temporary increased affinity and reduced stamina consumption after meeting certain conditions. This is useful starting at the middle of Low Rank as an efficient alternative to Critical Eye, but takes time to activate compared to other conditional skills later on. |
|
Attack Boost ★ |
Directly increases the raw damage dealt by the Charge Blade. It's very useful early one when you do not have any other alternatives, but can be swapped out with other more efficient skills later in game like Agitator. |
Best Comfort Skills
| Best Skills | Explanation |
|---|---|
|
Load Shells ★★★ |
Increases phial charge speed, and at max level, fills 5 phials with a yellow charge. This speeds up the damage delivery of the weapon, allowing a potentially fast 5-phial SAED. |
|
Rapid Morph ★★★ |
Increases the animation speed of your Morph Attacks, making transitions into your different modes easier. Note that Guard Point windows will be shorter in this case due to the animation speed up. |
|
Handicraft ★★★ |
Increases the maximum sharpness of your Charge Blade. This is useful for maintaining sharpness, especially during Savage Axe attacks which use up a lot of sharpness per hit. |
|
Guard ★★ |
Reduces stamina consumption and knockback on being hit during a guard. Dependency on this skill can be lessened by mastering Perfect Guards and Guard Points. |
|
Guard Up ★★ |
Gives you the ability to block unblockable attacks with the Charge Blade |
|
Evade Window ★★ |
Grants you more dodge I-frames, making it easier to dodge through attacks especially during Axe Mode. |
|
Evade Extender ★★ |
Increases the distance of your dodge. This is ideal for repositioning quickly or getting out of the way of large attacks. |
|
Power Prolonger ★★ |
Increases the duration of your powered-up Charge Blade modes such as Element Boost and Savage Axe. |
|
Free Meal ★ |
A useful skill to have when it is at a high level. Gives you a chance to consume items for free. |
|
Stun Resistance ★ |
Can help prevent you from being stunned after an attack. Full level prevents you from being stunned. |
|
Earplugs ★ |
At a high level, prevents you from being interruped by large monster roars. This is helpful for protecting you from interruption during high-commitment attacks such as SAED. |
| Charge Blade Articles | |
|---|---|
| Charge Blade Weapon Guide | Charge Blade Builds |
Insect Glaive
Best Damage Skills
| Best Skills | Explanation |
|---|---|
|
Burst ★★★ |
For most builds, this skill greatly boosts the DPS of the Insect Glaive, especially since they can easily activate this with just a few moves. |
|
Critical Element ★★★ |
For elemental builds, this skill contributes greatly to the damage dealt to a monster. |
|
Element Attack ★★★ |
Boosts the elemental damage of your weapon. Be sure to max out this skill to get the most out of its potential. How Does Elemental Damage Work? |
|
Airborne ★★ |
For the Insect Glaive, this skill boosts the damage of all your aerial attacks. Try to put this on whenever you can! |
|
Critical Eye ★★ |
Aim for 100% affinity to amplify the Insect Glaive's base damage efficiently! |
|
Latent Power ★★ |
Increases your affinity and reduces stamina consumption. The perfect match for solving most of the Insect Glaive's problems! |
|
Foray ★★ |
Increases your affinity and reduces stamina consumption. The perfect match for solving most of the Insect Glaive's problems! |
|
Critical Boost ★★ |
Further amplifies critical hit damage. Make sure to have high affinity first before equipping! |
|
Attack Boost ★★ |
This skill increases your physical damage values. Great damage boost option for the Insect Glaive. |
|
Weakness Exploit ★★ |
The Insect Glaive's playstyle allows you to target difficult-to-reach weakspots, so having this skill provides a significant boost to your DPS. Max out this skill whenever possible. |
|
Peak Performance ★★ |
Gives an attack boost whenever you have full health. Great for the Insect Glaives who use recovery Kinsects! |
|
Agitator ★★ |
Provides more damage and affinity, allowing the Dual Blades to grow stronger even in difficult situations. |
|
Critical Element ★★ |
For elemental builds, this skill contributes greatly to the damage dealt to a monster. |
|
Mind's Eye ★ |
A skill that benefits against hard monsters as it prevents your attacks from being deflected. Great for melee weapons that can easily lose sharpness. |
|
Resentment ★ |
Provides an attack boost when you have red health. Rarely gets activated since the Dual Blades focuses on dodging but can work in tight situations. |
Best Comfort Skills
| Best Skills | Explanation |
|---|---|
|
Power Prolonger ★★★ |
One of the staple skills for the Insect Glaive. This extends the duration of all your Extracts! |
|
Constitution ★★★ |
The perfect skill for aerial combat! This allows the Insect Glaive to perform more vaults and aerial combos before their stamina depletes. |
|
Focus ★★★ |
Speeds up the charge rate of your charge attacks. A skill that is now compatible with the Insect Glaive due to their new Descending Slash. |
|
Razor Sharp ★★ |
Prevents your weapon from losing sharpness. This skill can help solve the high sharpness loss of the Insect Glaive. |
|
Master's Touch ★★ |
For crit builds, this skill is a must-have as it prevents your weapon from losing sharpness on critical hits. |
|
Protective Polish ★★ |
Prevents sharpness loss for a fixed duration after sharpening. Great for the Insect Glaive to unleash all their moves right after using a whetstone. |
|
Evade Extender ★★ |
Extends the length of your dodges which includes your aerial vaults. This is great for improving your repositioning mid-air. |
|
Speed Sharpening ★ |
Reduces a cycle for sharpening with each level. Useful for getting your sharpness level up mid-fight. |
|
Evade Window ★ |
Boosts the I-frames for all your dodges, including aerial vaults. Only effective on 3 or max skill levels. |
|
Jump Master ★ |
Prevents knockbacks while jumping! Not that useful due to your Extracts already providing knockback negation in the first place. |
| Insect Glaive Articles | |
|---|---|
| Insect Glaive Weapon Guide | Insect Glaive Builds |
Bow
Best Damage Skills
| Best Skills | Explanation |
|---|---|
|
Element Attack ★★★ |
The Bow is at its most powerful when built as an Elemental weapon, and so the appropriate Element Attack skill is mandatory for boosting damage. |
|
Weakness Exploit ★★★ |
Weakness Exploit grants large amounts of Affinity when hitting weak spots, which Bow can take advantage of with its constant attacks and Tracer arrows. |
|
Critical Element ★★★ |
This is an excellent skill for pushing Elemental damage even further, as it increases Elemental damage when you land a Crit. |
|
Burst ★★ |
Burst is a skill that is easy for Bow to trigger with its multi-hit shots. Just note that it requires constant offense for the best returns. |
|
Spread/Power Shots ★★ |
This skill increases the strength of the Bow's strongest shots, the Power Volleys. Definitely consider this after the essential skills for more damage. |
|
Critical Boost ★ |
The Bow is a weapon that likes to stack Affinity, and this skill increases the damage of Critical Hits. Note that it does not affect Elemental damage, however. |
|
Attack Boost ★ |
This skill increases Attack, which amps the base damage output of all the Bow's attacks. It prefers Elemental damage more, so add skills that boost that first before this. |
|
Critical Eye ★ |
This skill grants flat Affinity, and shines when used with other Affinity-granting skills to push the Bow's damage further. There are more efficient skills for Affinity that should be prioritized, however. |
Best Comfort Skills
| Best Skills | Explanation |
|---|---|
|
Constitution ★★★ |
Constitution works double-duty as both a Comfort and a Damage skill, as reducing the Stamina needed to fire arrows leads to more attacks. |
|
Stamina Surge ★★★ |
Similarly, Stamina Surge helps increase damage by regenerating stamina quicker to allow for more attacks, or for evading. |
|
Evade Extender ★★ |
Increases the distance covered when Dodging or using Charging Sidestep, allowing for easier evasion of attacks. |
|
Evade Window ★ |
Increases the duration of Invincibility Frames when dodging, adding more safety when evading. |
|
Marathon Runner ★ |
Decreases the Stamina needed to sprint and charge shots. That being said, Bow often skips charging with its combos, so use only as needed. |
| Bow Articles | |
|---|---|
| Bow Weapon Guide | Best Bow Builds and Armor |
Light Bowgun
Best Damage Skills
| Best Skills | Explanation |
|---|---|
|
Burst ★★★ |
With Pierce and Elemental ammo taking over the meta, their multi-hit properties consistently exploit Burst's massive damage boost with each volley. Furthermore, Burst Boost allows it to stay active at all times. |
|
Maximum Might ★★★ |
Since the LBG only uses stamina whenever they are dodging, Maximum Might will always remain active. This means that its massive Affinity boost will always benefit you throughout the hunt, escalating DPS! |
|
Tetrad Shot ★★★ |
With Tetrad Shot, your fourth or sixth shot will receive a damage boost. Naturally, you will always aim to settle your ammunition capacity to either 4 or 6 to maximize the amount of damage you can deal before reloading, meaning it makes you deal more damage by simply doing what an LBG is supposed to do. |
|
Foray ★★ |
The LBG is the best weapon at inflicting Status Ailments, meaning that Foray's significant damage boosts will remain active most of the time. With Foray, you can choose when to deal the optimal damage by inflicting either Poison or Paralysis. Remember to pair Poison Duration Up if you will design your build around this! |
|
Ammo Type Shots ★★ |
As a hunter, you will naturally gravitate and build towards a specific base ammo type. These skills allow you to increase the overall damage of an ammo type of your choosing like how a Powder modifier does! |
|
Opening Shot ★★ |
Opening Shot not only increases the damage of the first shot of your magazine, but it also allows you to reload significantly faster. |
|
Critical Boost ★★ |
Amplifies critical damage, synergizing perfectly with Weakness Exploit. Furthermore, LBGs are known for their continuous hits, meaning there is a higher chance of landing criticals! |
|
Weakness Exploit ★★ |
A proper LBG player will always aim for the weak spots of Monsters to better their damage output, so having Weakness Exploit for increased critical chance is a given! |
|
Critical Element ★★ |
LBGs often incorporate elemental damage into their kits as they have multiple ammunition types to cover their bases. With Critical Element, your Elemental ammo can hit criticals! |
|
Flayer ★★ |
The LBGs job during hunts is to open up wounds in places the Blademasters cannot reach. With Flayer, it allows you to stack Wounds easily for WEX and gives you a huge payoff with your Focus Shot. |
|
Critical Status ★ |
LBGs are one of the few weapons that can exploit Status Effects, so having Critical Status opens up building avenues! This skill can be situational, so slot this skill in wisely. |
|
Artillery ★ |
With the recent nerfs to Sticky, Artillery's value for the LBGplummeted down. However, if you still plan on using Sticky ammo, Artillery is a must-have and will be the sole reason the build works. |
Best Comfort Skills
| Best Skills | Explanation |
|---|---|
|
Evade Extender | Evade Window ★★★ |
Enhances the dodge properties of all of the LBG's quick dashes, adding more distance and I-frames! |
|
Constitution ★★ |
With Constitution, all of the dashes you do will consume less Stamina, allowing you to have more options after dodging Monster attacks. This is exceptionally the case if you are using Maximum Might! |
|
Stamina Surge ★★ |
Stamina Surge allows you to quickly rejuvenate your Stamina after dodging, meaning it will always stay capped. However, this skill is situational and should only be used if you plan on having full stamina at all times like when using Maximum Might, all of the dashes you do will consume less Stamina, allowing you to have more options after dodging Monster attacks. This is exceptionally |
|
Ballistics ★ |
Ballistics helps extend your critical distance, allowing you to hit optimal damage from far away. |
| Light Bowgun Articles | |
|---|---|
| Light Bowgun Weapon Guide | Light Bowgun Builds |
Heavy Bowgun
Best Damage Skills
| Best Skills | Explanation |
|---|---|
|
Maximum Might ★★★ |
Maximum Might is a great source of Affinity on the Heavy Bowgun, especially since you don't expend as much Stamina as other weapons. |
|
Agitator ★★★ |
Agitator gives attack and Affinity whenever the monster is enraged. This is a great skill to have especially in the High Rank quests where monsters become enraged more easily. |
|
Burst ★★★ |
Provides a stacking damage buff the more you attack enemies. Thanks to how Spread Ammo and Pierce Ammo, this can be stacked to maximum using only one bullet, and can be maintained as long as you attack. |
|
Weakness Exploit ★★★ |
As you will be aiming for a monster's weak spot anyway, getting Weakness Exploit is a must, increasing your effective damage by increasing your Affinity when attacking a monster's weak point. |
|
Critical Boost ★★ |
A great source of damage amplification if you have a high Affinity build. Do not take this skill if you cannot reliably crit. |
|
Special Ammo Boost ★★ |
Increases the power of your Special Ammo like Wyvernheart or Wyvernpierce, making them hit even harder. |
|
Ballistics ★★ |
Increases your ammo's Critical Distance, letting you deal maximum damage from even further. |
|
Tetrad Shot ★★ |
A great skill that works well with Ammos that have a high magazine capacity, as it increases the strength of every fourth shot. |
|
Opening Shot ★★ |
Empowers the first shot after every reload. Perfect for magazines with low capacity. |
|
Critical Element ★ |
Increases your Elemental damage whenever you crit, and is great if you have high Affinity. Only useful if you are running an Elemental Bowgun build, and can be overshadowed by other Ammo types like Cluster and Spread. |
|
Elemental Attack ★ |
Use the Elemental Attack skill to raise a specific Elemental damage. Best used with Critical Element. |
Best Comfort Skills
| Best Skills | Explanation |
|---|---|
|
Evade Extender ★★★ |
Makes your evasions longer, removing the need to sheathe your weapon to move around and dodge monster attacks. |
|
Stamina Surge ★★ |
Increases your Stamina Recovery, making it perfect for when you need to dodge often. Works well with Maximum Might. |
|
Constitution ★★ |
Lowers your Stamina consumption when dodging or blocking, allowing you to do either of them more often. |
|
Divine Blessing ★ |
A useful skill that can help mitigate damage that you fail to block. Not a must, but can help in higher difficulty hunts. |
|
Guard ★ |
Thanks to the Heavy Bowgun's Auto-Block, having this skill lets you block attacks more, which is useful if the monster has multi-hit attacks. |
| Heavy Bowgun Articles | |
|---|---|
| Heavy Bowgun Weapon Guide | Heavy Bowgun Builds |
Monster Hunter Wilds Related Guides

Monster Hunter Wilds Walkthrough Wiki
 Weapons
 Armor Sets
 Monsters
 Builds
 Story Walkthrough
 Artian Weapons
 Maps and Locations
 Items and Materials
 Tips and Tricks
 Game Mechanics
 Endemic Life
 Skills
 Decorations
 Talismans
 Characters
 Quests
 Palico
 Trophies
 Cosmetics
 Furniture
 Festivals
 News and Game Info
 Message Boards
Recommended Guides
 State of the Meta
 Best Weapons Tier List
 Secondary Weapons
 Weapon Combos
 Best Items to Bring
 Armor Set Search
 Endgame Guide
 Unchangeable Features and Missables
 Best Beginner Weapons
 Easter Eggs and Secrets
 Respawn Timers
 Is MH Wilds Too Easy?
 Best Meals and Food Effects
 Best Status Effect
 List of All Bugged Skills
 Best Co-op Strategies
 Weapon Popularity Tier List
 How to Prepare for Title Update 1
 Weapon Changes from the Beta
 Weapon Changes from Rise and World
 List of All DLC and Prices
 Talisman Rating Tool
 Best Talismans
 Armor Transcending Guide
Author

Premium Articles
Rankings
Gaming News


![Monster Hunter Stories 3 Review [First Impressions] | Simply Rejuvenating](https://img.game8.co/4438641/2a31b7702bd70e78ec8efd24661dacda.jpeg/thumb)
Popular Games

Genshin Impact Walkthrough & Guides Wiki
Honkai: Star Rail Walkthrough & Guides Wiki
Umamusume: Pretty Derby Walkthrough & Guides Wiki
Pokemon Pokopia Walkthrough & Guides Wiki
Resident Evil Requiem (RE9) Walkthrough & Guides Wiki
Monster Hunter Wilds Walkthrough & Guides Wiki
Wuthering Waves Walkthrough & Guides Wiki
Arknights: Endfield Walkthrough & Guides Wiki
Pokemon FireRed and LeafGreen (FRLG) Walkthrough & Guides Wiki
Pokemon TCG Pocket (PTCGP) Strategies & Guides Wiki


Recommended Games
Diablo 4: Vessel of Hatred Walkthrough & Guides Wiki
Cyberpunk 2077: Ultimate Edition Walkthrough & Guides Wiki
Fire Emblem Heroes (FEH) Walkthrough & Guides Wiki
Yu-Gi-Oh! Master Duel Walkthrough & Guides Wiki
Super Smash Bros. Ultimate Walkthrough & Guides Wiki
Pokemon Brilliant Diamond and Shining Pearl (BDSP) Walkthrough & Guides Wiki
Elden Ring Shadow of the Erdtree Walkthrough & Guides Wiki
Monster Hunter World Walkthrough & Guides Wiki
The Legend of Zelda: Tears of the Kingdom Walkthrough & Guides Wiki
Persona 3 Reload Walkthrough & Guides Wiki


All rights reserved
©CAPCOM
The copyrights of videos of games used in our content and other intellectual property rights belong to the provider of the game.
The contents we provide on this site were created personally by members of the Game8 editorial department.
We refuse the right to reuse or repost content taken without our permission such as data or images to other sites.
Can someone PLEASE explain to me why Adaptability gets 3 stars & is placed at the top of the Comfort Skills section??? Level 1 is basically useless as long as you find one of the MANY Heat/Coldmantle bugs around the map (or just down a Cool/Hot Drink). Level 2 is only slightly better, seeing as it does at least have a small amount of unique utility by preventing the very rare instances of environmental damage (only ones I'm aware of are lava floors & thorny bushes). What am I missing here??