Bow Weapon Guide and Best Combos
★ Arkveld Gamma Armor | MH Stories 3 Collab
☆ Version 1.041: Sororal α Armor | Shatterseal
★ How to Unlock Proof of a Hero Quest
☆ Omega Planetes | Savage Omega | Builds vs Omega
★ Armor Set Search updated for Ver 1.041
☆ HR50+ Builds | Tier List | Weapon Guides
The Bow is a versatile ranged weapon, effective at both close and long distances while offering high mobility in Monster Hunter Wilds. See all the new moves for the Bow, its mechanics, controls, best combos, advanced tips, and how good it is!
| Bow Guides | ||
|---|---|---|
| Weapon Guide | Builds | Tree |
List of Contents
Bow Balance Adjustment
Bow Updates in Version 1.021
| Bow Changes (Version 1.021) |
|---|
| ・(Fixed) Fixed an issue where the arrows from an Arc Shot would disappear if the attack hit the top of the area. |
A bug with the Arc Shot has been fixed in Version 1.021 which released on August 12, 2025.
Bow Mechanics
| List of All Bow Mechanics |
|---|
|
|
Ranged Weapon That Relies on Stamina
Monster Hunter Wilds' Bow is the only one of the three ranged weapons that consumes stamina to fire arrows at monsters in combat. Different attacks will cost different amounts of stamina, with stronger ones often taking more.
Can Fire Different Types of Arrows
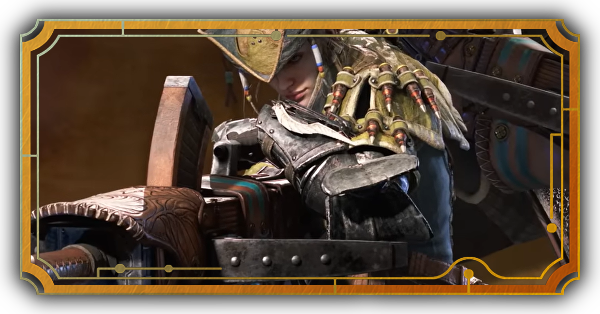
The Bow can aim and fire several different types of attacks based on what input the player uses, such as spread shots, piercing arrows, exploding tracers, and Arc Shots.
It also has access to the Dragon Piercer, an attack that pierces the length of a monster for continuous damage, and the Thousand Dragons, a powerful, but very close-range volley that can deal a burst of damage.
Can Use Spread Shots Up Close
If forced into close quarters, the Bow can use this to its advantage by releasing Spread Shots, which fire a fan of arrows that can do significant damage at close range.
The Thousand Dragons, alongside Quick Shots, Power Shots, and Power Volleys all work excellently when fighting a monster up close.
Charges Its Attacks to Power Up
The Bow also has a charging mechanic that empowers its attacks. Charging attacks will drain your stamina, but will be more powerful than their non-charged inputs.
For example, Normal and Power Shots increase in arrow count and damage with Charge level, while charging the Arc Shot increases its AoE and duration.
Manage and Use the Trick Arrow Gauge
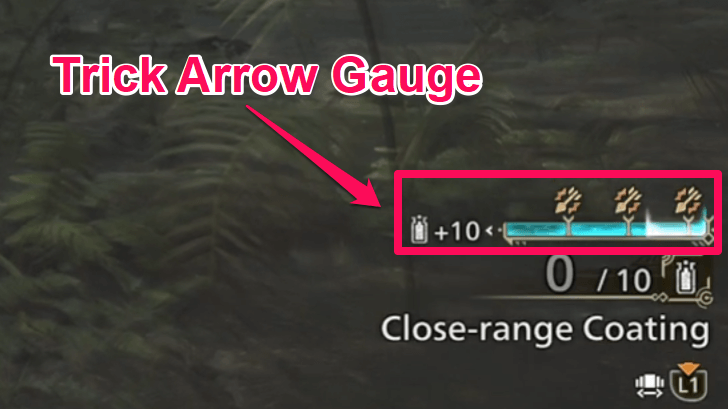
The Trick Arrow Gauge is an additional resource gauge for the Bow, and is spent to load Tracers and coatings. Landing attacks or performing Discerning Dodge will fill the gauge. Loading a Tracer or coating will consume the gauge.
This modifies the Bow's play pattern into a cycle of filling the Trick Arrow Gauge, then spending it to use coatings or unleash Tracers for more damage.
Track Monsters With Tracers
| Tracer Input |
|---|
Hold |
| Tracer Input |
|---|
Hold |
| Tracer Input |
|---|
Hold |
Using the Ready Tracer move will replace the next shot with an arrow that lodges itself into a monster, and it causes subsequent arrows to home in on it. These arrows will do boosted damage when hitting their target.
Use this to improve your damage, and also to focus your attacks on a specific part of the monster as arrows will prioritze where the Tracer has landed.
Apply Coatings for Various Effects
| Coating | Effect |
|---|---|
| Power | Increases arrow damage |
| Close-Range | Reduces arrow range but increases their damage |
| Pierce | Allows arrow to pierce and hit multiple times |
| Poison | Arrows inflict Poison Buildup |
| Paralysis | Arrows inflict Paralysis Buildup |
| Sleep | Arrows inflict Sleep Buildup |
| Blast | Arrows inflict Blastblight Buildup |
| Exhaust | Arrows inflict Stun Damage and Exhaust Buildup |
Coatings are an important aspect of the bow that can increase damage or apply status effects depending on the coating used. Each Bow can only use specific coatings, meaning that not all will be available for use somtimes.
Unlike previous games, coatings are no longer items that you need to craft and store in your pouch. Instead, it uses one bar of the Trick Arrow Gauge to refill your selected coating, applying it to your next few arrows.
Focus Strike Homes in on Wounds
| Focus Strike Input |
|---|
| Focus Strike Input |
|---|
| Focus Strike Input |
|---|
Using the Bow's Focus Strike will make a special reticle appear. This reticle will automatically lock-on to wounds and Tracers one by one, and will fire guided arrows at them when the input is released.
The Focus Strike can be charged for more arrows, and if it hits a wound, the Hunter will follow up with a Dragon Piercer.
How to Use Focus Mode and Focus Strike
Bow Controls
Basic Bow Controls
| Action | |
|---|---|
| Charge ▼ Shoot | ▼ (Release) |
| Aim / Focus | |
| Quick Shot | |
| Power Shot ▼ Power Volley | During Combo ▼ |
| Arc Shot | |
| Charging Sidestep ▼ Flying Swallow Shot | |
| Dragon Piercer | |
| Quick Dragon Piercer | During Combo |
| Thousand Dragons | |
| Select Coating | |
| Apply Coating | |
| Ready Tracer | |
| Focus Fire: Hailstorm | |
Bow Best Combos
| Bow Combos |
|---|
|
|
Dash Dancing Combo
| Combo Input |
|---|
While Aiming, |
| Combo Input |
|---|
While Aiming, |
| Combo Input |
|---|
While Aiming, |
Dash Dancing remains one of the strongest ways to play the Bow in Monster Hunter Wilds, allowing you to repeatedly fire a Charged Shot, Power Shot, and Power Volley for repeated bursts of damage in a very short while.
Do note however, that this combo is also the Bow's most stamina-intensive due to its spammable nature. Careful management or dodging is required to not get caught without Stamina to evade an attack.
Tracer Dash Dance Combo
| Combo Input |
|---|
Hold |
| Combo Input |
|---|
Hold |
| Combo Input |
|---|
Hold |
Players can opt to use a Tracer Arrow to have their shots home in from a distance, allowing them to effectively use attacks like the Power Volley at further range than normal.
This can also be combined with Dash Dancing to essentially Dash Dance from range, as an option for when close-range combat isn't ideal.
Low Stamina Cost Combo
| Combo Input |
|---|
Hold |
| Combo Input |
|---|
Hold |
| Combo Input |
|---|
Hold |
For situations wherein Stamina is low, the above combo still allows for damage output while minimizing Stamina consumption by using regular shots.
Open with a Tracer Arrow to boost the damage of the following shots, and end the combo by popping it with a quick Focus Fire: Hailstorm.
Trick Arrow Gauge Refill Combo
| Combo Input |
|---|
Hold Each Shot Briefly |
| Combo Input |
|---|
Hold Each Shot Briefly |
| Combo Input |
|---|
Hold Each Shot Briefly |
Holding your regular shots for a bit, as if to charge them, will refill the Trick Arrow gauge. As such, firing a few strings of Normal Shots and delaying each shot slightly will quickly fill up the Trick Arrow Gauge.
Note, however, that the most efficient way to restore the Trick Arrow Gauge is through using Discerning Dodge, or by laying down an Arc Shot when the monster is immobile.
Bow Advanced Tips
| Bow Tips and Tricks |
|---|
|
|
Take Note of Critical Distance
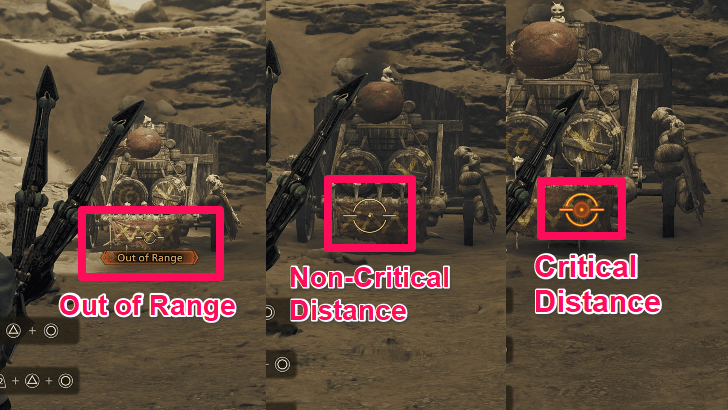
Critical Distance is the effective range from your target where you deal the most damage. You can determine you're at Critical Distance when the reticle glows orange when aiming, but this can change depending on the Coating you've applied.
If the reticle isn't orange, it means that you're out of range and will do less damage to the monster with your arrows.
Critical Distance isn't an Indicator of Max Damage
Even if the reticle is orange, you may not be maximizing the damage of your attacks. For example, if you're using Power Shot or Thousand Dragons, you will want to be up close to the monster so that all your arrows hit, even if the reticle is orange when you're further away.
Manage Stamina With Skills and Buffs
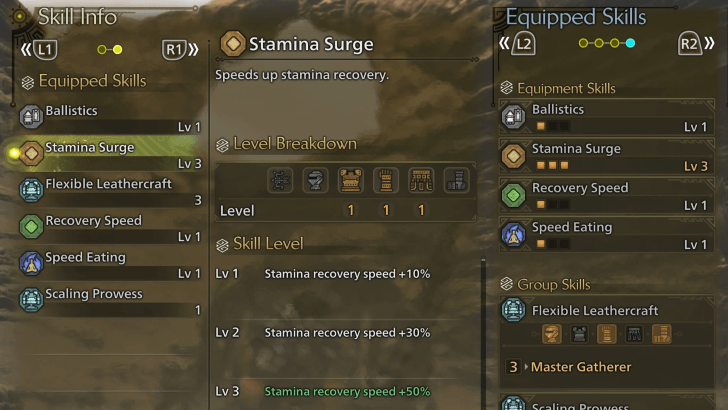
Mastering Stamina management is crucial when wielding a Bow, as rapidly firing arrows and constantly dashing around can quickly drain your stamina if you're not careful.
Make use of skills and external buffs, like Stamina Surge, or the Black Belt Meal, to mitigate your Stamina consumption and regain it faster.
How to Restore and Increase Stamina
Use Dragon Piercer or Thousand Dragons on Low Stamina
When you're low on Stamina but have a window to do damage, consider ending your combo with either Dragon Piercer or Thousand Dragons, as these can be fired so long as you have any amount of Stamina remaining.
Thousand Dragons is effective as an up-close attack, while Dragon Piercer works best when aiming down the monster's body or across it.
Dash to Charge Attacks
Instead of standing still and attacking, it's recommended to use a Charging Sidestep to increase your Bow's Charge Levels. This helps you constantly reposition and swiftly charge your attacks at the same time.
Just be mindful of your Stamina when doing this since you can quickly get exhausted and get hit by an attack if you're not careful.
Dodge Perfectly to Regain Trick Arrow Gauge
Using Charging Sidestep right before an attack hits you will cause the hunter to perform Discerning Dodge, which is an evasive move that fills up one segment of the Trick Arrow Gauge.
This is by far the fastest way to get Trick Arrow Gauge for coatings and Tracers, and the move itself provides lots of invincibility frames to keep you safe. It can also restore Stamina, upping its usefulness even more.
Arc Shots Apply Tracers and Stun
A new mechanic added to Arc Shots in this game is that it will now apply Tracers onto a target. You can use this as an opener or when a monster is staying still to detonate multiple Tracers with a Focus Fire: Hailstorm.
They also still stack up stun damage, and if used enough on a monster's head, will cause them to get knocked over for a brief period. Additionally, they are great for restoring the Trick Arrow Gauge.
Mount Monsters With the Bow
All weapons have the ability to mount, including the bow. Players can take advantage of this by attacking off a Seikret dismount, or attacking after jumping off a ledge.
These can both lead to mounts, which can in turn lead to avenues of opportunity for more attacks as you can inflict Wounds on monsters while mounted.
How Good Is the Bow?
Tier List Ranking
| Weapon Ranking | ||
|---|---|---|
| Damage Type | Entry Barrier | Difficulty to Master |
| Medium | ★★★★☆ | |
| Pros and Cons | ||
|
|
||
Entry Barrier pertains to how easy it is to learn the weapon from scratch, while Difficulty to Master is a rating on how difficult it is to perfectly execute the weapon mechanics.
The bow is an SS Tier weapon in Monster Hunter: Wilds. Its ability to remain at a safe range, and consistently output damage while remaining mobile with its Charging Sidestep makes it very safe and easy to learn.
It has little damage downtime when played correctly, allowing for constant offense with its considerable damage output when using Power Shots. Discerning Dodge is also an excellent defensive skill, providing safety in combat.
However, many of its actions require Stamina to perform, and the new Trick Arrow Gauge is another resource to manage. Learning to maximize the Bow's damage will come from juggling both of these resources in tandem.
Monster Hunter Wilds Related Guides
All Weapon Guides
| All Weapon Tutorials | |||||
|---|---|---|---|---|---|
 Great Sword Great Sword |
 Long Sword Long Sword |
 Sword & Shield Sword & Shield |
|||
 Dual Blades Dual Blades |
 Hammer Hammer |
 Hunting Horn Hunting Horn |
|||
 Lance Lance |
 Gunlance Gunlance |
 Switch Axe Switch Axe |
|||
 Charge Blade Charge Blade |
 Insect Glaive Insect Glaive |
 Light Bowgun Light Bowgun |
|||
 Heavy Bowgun Heavy Bowgun |
 Bow Bow |
||||
All Weapon Trees
| All Weapon Trees | |||||
|---|---|---|---|---|---|
 Great Sword Great Sword |
 Long Sword Long Sword |
 Sword & Shield Sword & Shield |
|||
 Dual Blades Dual Blades |
 Hammer Hammer |
 Hunting Horn Hunting Horn |
|||
 Lance Lance |
 Gunlance Gunlance |
 Switch Axe Switch Axe |
|||
 Charge Blade Charge Blade |
 Insect Glaive Insect Glaive |
 Kinsects Kinsects |
|||
 Light Bowgun Light Bowgun |
 Heavy Bowgun Heavy Bowgun |
 Bow Bow |
|||
Comment
Thank you so much for having the pc controls listed. It’s been shockingly hard to find them.
Author

Bow Weapon Guide and Best Combos
Premium Articles

Rankings
- We could not find the message board you were looking for.
Gaming News


![Monster Hunter Stories 3 Review [First Impressions] | Simply Rejuvenating](https://img.game8.co/4438641/2a31b7702bd70e78ec8efd24661dacda.jpeg/thumb)
Popular Games

Genshin Impact Walkthrough & Guides Wiki
Honkai: Star Rail Walkthrough & Guides Wiki
Umamusume: Pretty Derby Walkthrough & Guides Wiki
Pokemon Pokopia Walkthrough & Guides Wiki
Resident Evil Requiem (RE9) Walkthrough & Guides Wiki
Monster Hunter Wilds Walkthrough & Guides Wiki
Wuthering Waves Walkthrough & Guides Wiki
Arknights: Endfield Walkthrough & Guides Wiki
Pokemon FireRed and LeafGreen (FRLG) Walkthrough & Guides Wiki
Pokemon TCG Pocket (PTCGP) Strategies & Guides Wiki


Recommended Games
Diablo 4: Vessel of Hatred Walkthrough & Guides Wiki
Cyberpunk 2077: Ultimate Edition Walkthrough & Guides Wiki
Fire Emblem Heroes (FEH) Walkthrough & Guides Wiki
Yu-Gi-Oh! Master Duel Walkthrough & Guides Wiki
Super Smash Bros. Ultimate Walkthrough & Guides Wiki
Pokemon Brilliant Diamond and Shining Pearl (BDSP) Walkthrough & Guides Wiki
Elden Ring Shadow of the Erdtree Walkthrough & Guides Wiki
Monster Hunter World Walkthrough & Guides Wiki
The Legend of Zelda: Tears of the Kingdom Walkthrough & Guides Wiki
Persona 3 Reload Walkthrough & Guides Wiki


All rights reserved
©CAPCOM
The copyrights of videos of games used in our content and other intellectual property rights belong to the provider of the game.
The contents we provide on this site were created personally by members of the Game8 editorial department.
We refuse the right to reuse or repost content taken without our permission such as data or images to other sites.
Thousand dragons is quite hard to aim against real monsters, as you'd need to fire it point blank. Firing it at a tracer does improve the range, but it's also destroying the tracer on the first hit by ANY of the 10 arrows. Realistically, your best shot is to wait till the monster is down, place a tracer on a wound and then fire a thousand dragons point-blank into the tracer so that all arrows get the full +100% damage boost of the tracer. Dragon piercer on the other hand is much easier.