Light Bowgun Weapon Guide and Best Combos
★ Arkveld Gamma Armor | MH Stories 3 Collab
☆ Version 1.041: Sororal α Armor | Shatterseal
★ How to Unlock Proof of a Hero Quest
☆ Omega Planetes | Savage Omega | Builds vs Omega
★ Armor Set Search updated for Ver 1.041
☆ HR50+ Builds | Tier List | Weapon Guides
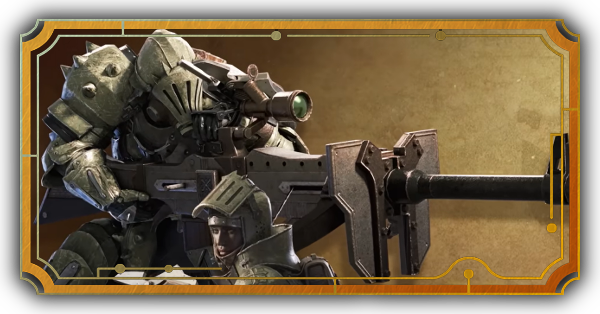
The Light Bowgun is a highly mobile weapon that has access to quick shots and evasion in Monster Hunter Wilds. See all the new moves for the Light Bowgun, its mechanics, controls, best ammo, advanced tips, and how good it is!
| Light Bowgun Guides | ||
|---|---|---|
| Weapon Guide | Builds | Tree |
List of Contents
Light Bowgun Balance Adjustment
Light Bowgun Update in Version 1.021
| Light Bowgun Changes (Version 1.021) |
|---|
|
・(Buff) Adhesive Ammo and Wyvernblast raw damage have been increased. ・(Buff) Increased the recovery speed of the Rapid Fire Gauge when using Exhaust Ammo, Poison Ammo, Paralysis Ammo, or Sleep Ammo. ・(Buff) The reload speed for Adhesive Ammo and Focus Blast: Eagle Strike has been increased. ・(Buff) The raw damage and elemental scaling for Flaming Ammo, Water Ammo, Thunder Ammo, Freeze Ammo, and Dragon Ammo have been slightly increased. ・(Buff) The amount of Rapid Fire Gauge consumed while using Dragon Ammo in Rapid Fire Mode has been decreased. ・(Buff) The amount of Rapid Fire Gauge recovered while using Pierce Ammo has been increased. ・(Fixed) Fixed an issue where only one projectile out of the multiple projectiles fired with the light bowgun's Spread Ammo would receive the scaling from the Ballistics skill. |
The Light Bowgun has received multiple damage and QoL buffs in Version 1.021 which released on August 12, 2025. An issue with Spread Ammo not scaling properly with the Ballistics skill has also been fixed.
Light Bowgun Mechanics
| Light Bowgun Mechanics |
|---|
|
|
Highly Mobile Mid-Range Weapon
The Light Bowgun is an easy-to-use mid-range weapon that can shoot different ammo types. It is also very mobile, allowing you to dodge monsters while fighting quickly.
As a note, since this is a ranged weapon, it's recommended to aim for body parts that melee teammates cannot reach, like wings for example.
Use Rapid Fire to Attack in Quick Succession
| Combo Input |
|---|
| Combo Input |
|---|
| Combo Input |
|---|
The Light Bowgun's Rapid Fire Mode, which lets you fire off shots in quick succession, makes a return. However, it now has a gauge that you must fill before being able to use it again. To recharge the gauge, you must swap back to Standard Mode and either hit an enemy or wait for it to recharge.
Shoot While Strafing With Burst Step
| Combo Input |
|---|
| Combo Input |
|---|
| Combo Input |
|---|
While in Rapid Fire Mode, you can access the Burst Step, which is a move that allows you to dodge in a desired direction while shooting. The reticle will remain in the same spot you are aiming at, essentially tracking your position for ease of use.
Learn Each Ammo's Critical Range
| Ammo | Distance |
|---|---|
| Normal | Medium |
| Spread | Short |
| Pierce | Long |
Depending on what type of ammo you are using, your weapon's effective range will change. For example, if you are using Spread Ammo, you must move closer to the monster to maximize your damage output. To increase Critical Range, get the Ballistics skill and have more leniency for positioning.
You Can See the Critical Distance on Your Crosshair
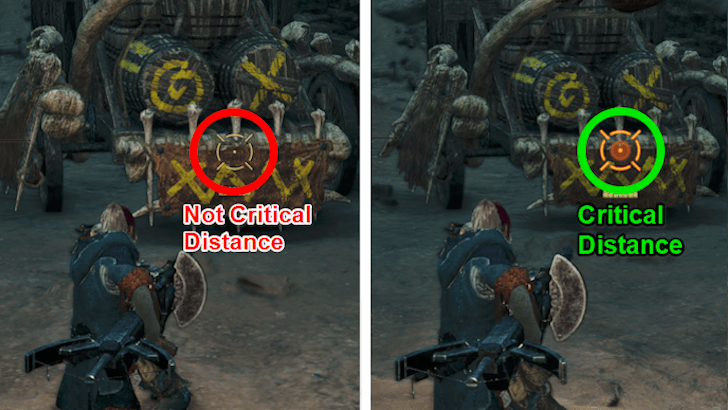
You can tell if you are within Critical Distance when the reticle glows orange while you are aiming down your sights in Focus Mode.
Do Chaser Shots After Firing
| Action |
|---|
| Action |
|---|
| Action |
|---|
After firing initial bullets, you can perform a Chaser Shot to shoot an empowered shot by pressing the Circle button after firing a shot. However, you will be stuck in place during this animation, so only use it when you have enough time! This will also increase the Rapid Fire Gauge's recovery rate if the attack hits.
Use Eagle Strike Shot to Pop Wounds
| Action |
|---|
| Action |
|---|
| Action |
|---|
Whenever a Monster has a wound, use Focus Blast: Eagle Strike Shot to break a monster's wound. If you hold down R1, you can charge the shot to increase the damage and range of the explosion, which is especially useful when there are multiple wounds on the Monster.
Normal, Pierce and Spread Ammo Are Unlimited
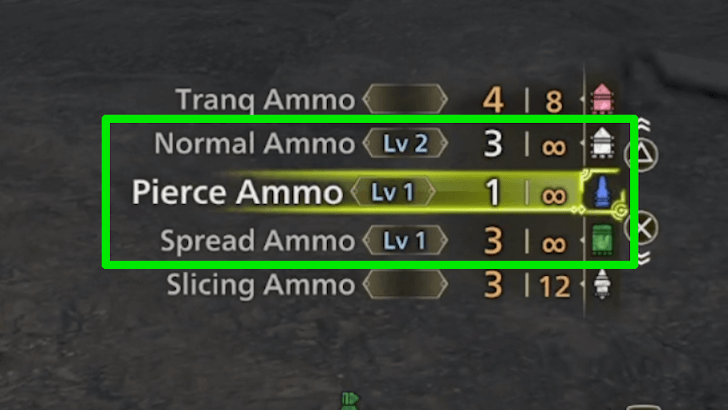
You now have access to an unlimited amount of Normal, Pierce, and Spread Ammo, with the Ammo's level dictated by the Light Bowgun you have equipped.
Choose Your Special Ammunition
| Special Ammo | Description |
|---|---|
| Wyvernblast | Place a mine that detonates whenever attacked from any source. Best used to provide additional DPS when the Monster is toppled over or predicting their attack. |
| Adhesive Ammo | Load a magazine that shoots ammunition that sticks to a Monster and explodes at the end. Shooting at it will increase the damage it deals upon explosion! Best used to set up after a Monster's attack for increased damage. |
The Light Bowgun now has multiple Special Ammo that you can choose from depending on the hunt and your preference. However, keep in mind that Special Ammo now only has one use before going on cooldown, so only use it at opportune moments!
Light Bowgun Controls
Standard Mode Controls
| Action | |
|---|---|
| Fire | |
| Aim / Focus ▼ Focus Blast: Eagle Strike Shot | ▼ |
| Reload | |
| Energy Mode On / Off | |
| Special Ammo | |
| Select Ammo | |
| Action | |
|---|---|
| Fire | |
| Aim / Focus ▼ Focus Blast: Eagle Strike Shot | ▼ |
| Reload | |
| Energy Mode On / Off | |
| Special Ammo | |
| Select Ammo | |
| Action | |
|---|---|
| Fire | |
| Aim / Focus ▼ Focus Blast: Eagle Strike Shot | ▼ |
| Reload | |
| Energy Mode On / Off | |
| Special Ammo | |
| Select Ammo | |
Rapid Fire Mode Controls
| Action | |
|---|---|
| Fire | |
| Aim / Focus | |
| Energy Mode On / Off | |
| Rapid Chaser Shot | (After firing) |
| Burst Step | |
| Action | |
|---|---|
| Fire | |
| Aim / Focus | |
| Energy Mode On / Off | |
| Rapid Chaser Shot | (After firing) |
| Burst Step | |
| Action | |
|---|---|
| Fire | |
| Aim / Focus | |
| Energy Mode On / Off | |
| Rapid Chaser Shot | (After firing) |
| Burst Step | |
Light Bowgun Best Ammo Type Tier List
Ammo Tier List
| Tier | Ammo |
|---|---|
Note: This list will still be updated upon further testing, so please stay tuned!
Generally, the LBG (Light Bowgun) brings out the full potential of elemental and status. The area-of-effect quality of life changes to the buff, and recovery ammo bumps it to higher tiers.
With the recent developments of the game, Pierce ammo is currently the best base ammo type due to it having the same reload speed and recoil of Normal, but with the additional benefit of piercing through Monsters.
While Spread is strong damage-wise, it currently is overshadowed by both Normal and Pierce due to its recoil and slow reloads! The ammunition changes for crafting and damage have negatively affected explosive ammo, so Sticky is currently the worst ammo type to use.
Elemental Ammo is the Best Ammo Type
The elemental ammunition is the best ammo type for a Light Bowgun with both the Base and Rapid Fire modes since it has been buffed and shares some of the same properties as Spread. However, Dragon Ammunition does not share these sentiments due to its low ammo capacitiy and extended reloads, hence its place in B Tier.
Elemental ammunition will deal optimal damage when used to target a monster's weakness. The Light Bowgun is known for its emphasis on preparation, so it is only natural that it brings out the full potential of Elemental ammo.
Do note that you will sometimes have to check what part a Monster is elementally weak to. For example, Gore Magala is only weak to Fire in its Wingclaws or when its Antennae gets revealed, meaning you will have to know when and where you can optimally use Elemental Ammo!
Pierce is the Best Base Ammo
The best ammunition for general use is currently Pierce ammo for both Base and Rapid Fire Mode due to its lack of recoil reminiscent of Normal ammo and damage capabilities like Spread ammo.
Not only does Pierce have no recoil, it can easily be manuevered as it acts like Normal Ammo in terms of being nimble. Furthermore, it quickly restores your Rapid Fire Mode due to its multi-hit.
Light Bowgun Advanced Tips
| Light Bowgun Advanced Tips |
|---|
|
|
Cancel Your Burst Steps
Cancelling your Burst Steps will result in a marginally increased DPS since you be able to empty your ammunition faster than doing it the traditional way. Generally, you would do this in a side-to-side pattern to focus all your damage on a single point.
However, this may be challenging to do since it requires you to press multiple buttons in unison. To make the process easier, you only need to do one instance of Burst Step. After that, hold the Focus Mode and Fire button, then press the dodge button.
Doing these tips correctly will allow you to quickly do consecutive Burst Steps. However, do keep in mind that you still need to time when the animation has stopped or you will do an accidental reload!
Chaser Shots Fill Rapid Fire Meter Quicker
Your Rapid Fire meter will quickly diminish since it is the optimal way of dealing damage for LBGs. To replenish the Rapid Fire meter fast, prioritize using chaser shots as they provide increased meter recovery compared to basic shots, nly needing about 9 Chaser shots to fill it back up.
As an additional tip, it is best to practice fully filling the meter up before using it again to have better uptime for the mode. Doing so allows the LBG to maximize its damage capabilities!
Reload After Rapid Fire Chaser Animation
While the game does not specify this, you can use a quick reload after your Hunter finishes the recoil animation of a Chaser in Rapid-Fire mode. This saves you time since you can recover from the animation quicker, especially if you want to deal optimal damage during topples.
However, you cannot reload by repeatedly spamming the fire button. Instead, press the assigned reload button to perform the quick recovery reload.
Properly Use Special Ammunition
Generally, the Wyvernblast has two practical uses for the LBG. Defensively, you can set the Wyvernblast while repositioning so the enemy will inevitably hit it. Offensively, you can position it near a weak point you want to shoot after knocking down a monster to proc explosions with each shot.
The best way to use the Wyvernblast is to predict where a monster will be after its attack and the repositioning before the initial explosion. Doing so will put the monster in the appropriate position for the resulting explosions with each shot.
Customize Your Ammo Loadout
The Light Bowgun is known for its ability to use a diverse set of ammunition, making use of elemental damage and quickly applying status effects. It would be in your best interest to plan and adjust your ammo loadout depending on the monster's weaknesses!
For example, Rey Dau has a notable weakness to the Ice element. In this case, it would be best to bring Freeze Ammo to deal the most optimal damage to it!
Craft Ammo Mid-battle
While the base ammunitions are unlimited, there is a set limit of elemental and status ammo you can bring. Bring the necessary materials in your Inventory and use the ammunition loadout you did and craft ammunition one by one, allowing you to quickly stock up on ammo you need while in the heat of battle!
If you prefer to craft ammunition in one go, there is an option for that while customizing your radial menu. However, it is recommended to craft ammunition one by one so you can have better control over the amount of ammo you wish to craft. Doing so lets you avoid overcrafting, wherein you will waste 1-2 ammo yet still consume the required materials.
As an additional note, it is recommended to keep your Item Use Control settings to that of Type 1 so that you can quickly craft multiple instances of your desired ammo!
How to Use and Customize the Radial Menu
Mount Using Jumping Reload
Unlike melee weapons, the LBG rarely gets the option to mount monsters as they steer clear from the monster as much as possible. However, you can mount and topple over a monster by hitting it with a Jumping Reload!
Readying Jump and Jumping Reload Can Stun
You can use the Readying Jump and Jumping Reload to stun a monster. While unconventional and is often a rare occurrence, you can use this to set up an opening for massive damage!
How Good is the Light Bowgun?
Tier List Ranking
| Weapon Ranking | ||
|---|---|---|
| Damage Type | Entry Barrier | Difficulty to Master |
| Low | ★☆☆☆☆ | |
| Weaknesses and Strengths | ||
|
|
||
Entry Barrier pertains to how easy it is to learn the weapon from scratch, while Difficulty to Master is a rating on how difficult it is to perfectly execute the weapon mechanics.
The Light Bowgun is a nimble ranged weapon. With access to the new Rapid Fire Mode, you get to dish out a barrage of hits from medium range while weaving in small dashes for mobility. The basic strategy of the Light Bowgun is to hone in on a monster's weak points using either the base or elemental ammunition with rapid fire and then using Focus Shot: Eagle Strike Shot to destroy multiple wounds.
This weapon is recommended for beginners because its mobility allows any hunter to safely deal good damage. Its complexity, however, lies in the preparation phase. You will have to create specific ammo and equipment load-outs depending on hunts to bring out the full potential of this weapon!
The Light Bowgun has consistent damage with Pierce ammunition, the ability to quicken its shots with consecutive Burst Steps, and the prowess to fully utilize Elemental Ammunition make it a formidable weapon. However it has no defensive capabilities apart from its dodges, thus cementing its spot in A-tier!
Monster Hunter Wilds Related Guides
All Weapon Guides
| All Weapon Tutorials | |||||
|---|---|---|---|---|---|
 Great Sword Great Sword |
 Long Sword Long Sword |
 Sword & Shield Sword & Shield |
|||
 Dual Blades Dual Blades |
 Hammer Hammer |
 Hunting Horn Hunting Horn |
|||
 Lance Lance |
 Gunlance Gunlance |
 Switch Axe Switch Axe |
|||
 Charge Blade Charge Blade |
 Insect Glaive Insect Glaive |
 Light Bowgun Light Bowgun |
|||
 Heavy Bowgun Heavy Bowgun |
 Bow Bow |
||||
All Weapon Trees
| All Weapon Trees | |||||
|---|---|---|---|---|---|
 Great Sword Great Sword |
 Long Sword Long Sword |
 Sword & Shield Sword & Shield |
|||
 Dual Blades Dual Blades |
 Hammer Hammer |
 Hunting Horn Hunting Horn |
|||
 Lance Lance |
 Gunlance Gunlance |
 Switch Axe Switch Axe |
|||
 Charge Blade Charge Blade |
 Insect Glaive Insect Glaive |
 Kinsects Kinsects |
|||
 Light Bowgun Light Bowgun |
 Heavy Bowgun Heavy Bowgun |
 Bow Bow |
|||
Comment
Author

Light Bowgun Weapon Guide and Best Combos
Premium Articles

Rankings
Gaming News


![Monster Hunter Stories 3 Review [First Impressions] | Simply Rejuvenating](https://img.game8.co/4438641/2a31b7702bd70e78ec8efd24661dacda.jpeg/thumb)
Popular Games

Genshin Impact Walkthrough & Guides Wiki
Honkai: Star Rail Walkthrough & Guides Wiki
Umamusume: Pretty Derby Walkthrough & Guides Wiki
Pokemon Pokopia Walkthrough & Guides Wiki
Resident Evil Requiem (RE9) Walkthrough & Guides Wiki
Monster Hunter Wilds Walkthrough & Guides Wiki
Wuthering Waves Walkthrough & Guides Wiki
Arknights: Endfield Walkthrough & Guides Wiki
Pokemon FireRed and LeafGreen (FRLG) Walkthrough & Guides Wiki
Pokemon TCG Pocket (PTCGP) Strategies & Guides Wiki


Recommended Games
Diablo 4: Vessel of Hatred Walkthrough & Guides Wiki
Cyberpunk 2077: Ultimate Edition Walkthrough & Guides Wiki
Fire Emblem Heroes (FEH) Walkthrough & Guides Wiki
Yu-Gi-Oh! Master Duel Walkthrough & Guides Wiki
Super Smash Bros. Ultimate Walkthrough & Guides Wiki
Pokemon Brilliant Diamond and Shining Pearl (BDSP) Walkthrough & Guides Wiki
Elden Ring Shadow of the Erdtree Walkthrough & Guides Wiki
Monster Hunter World Walkthrough & Guides Wiki
The Legend of Zelda: Tears of the Kingdom Walkthrough & Guides Wiki
Persona 3 Reload Walkthrough & Guides Wiki


All rights reserved
©CAPCOM
The copyrights of videos of games used in our content and other intellectual property rights belong to the provider of the game.
The contents we provide on this site were created personally by members of the Game8 editorial department.
We refuse the right to reuse or repost content taken without our permission such as data or images to other sites.