What can you do as a free member?

Member benefits illustration

Create your free account today and unlock all our premium features and tools to enhance your gaming experience.

Member benefits illustration

Create your free account today and save articles to your watchlist and get notified when they're updated with new information.

Member benefits illustration

Create your free account today and save your favorite games for quick access later, synced across all your devices.

Member benefits illustration

By creating a Game8 account and logging in, you'll receive instant notifications when someone replies to your posts.

Comment rating feature illustration

By creating a Game8 account and logging in, you can make use of convenient features in the comments section, such as rating and sorting comments.

Premium archive feature illustration

By creating a Game8 account and logging in, you can access Premium articles that are exclusively available to members.

Site Interface

Guest
Free Member
Article Watchlist
Game Bookmarks
Cross-device Sync
Light/Dark Theme Toggle
User Profiles
Direct Feedback
Comment Rating

Game Tools

Guest
Free Member
Interactive Map Access
Interactive Map Pins
Interactive Map Comments
Interactive Map Pins Cross-Device
Check List
Event Choice Checker
Deck Builder Cross-Device
Message Board Notification
Message Board Cross-Device
Build Planner
Stat Calculator
Diagnostic Tool
Weapon/Armor Wishlist

Want more information?Learn more

Monster Hunter Wilds

Bandolier/Ironwall Jwl [3] Skill and How to Get

Add to Watchlist

The Bandolier/Ironwall Jwl [3] is a Weapon Decoration in Monster Hunter Wilds. Learn how to get the Bandolier/Ironwall Jwl [3] and its skill effects.

Bandolier/Ironwall Jwl [3] Skill

Bandolier/Ironwall Jwl【3】Bandolier/Ironwall Jwl【3】
Rarity
7
Skill
Increases the affinity of bowgun ammo/coatings from the fourth shot and attack of the fourth and sixth shots.
Guard Icon Guard Lv 1

Reduces knockbacks and stamina depletion when guarding.

How to Get Bandolier/Ironwall Jwl [3]

Obtain From Orbs

Orb Type Obtainable
✔️

How to Farm Decorations

How to Equip Decorations

Access the Change Equipment Menu
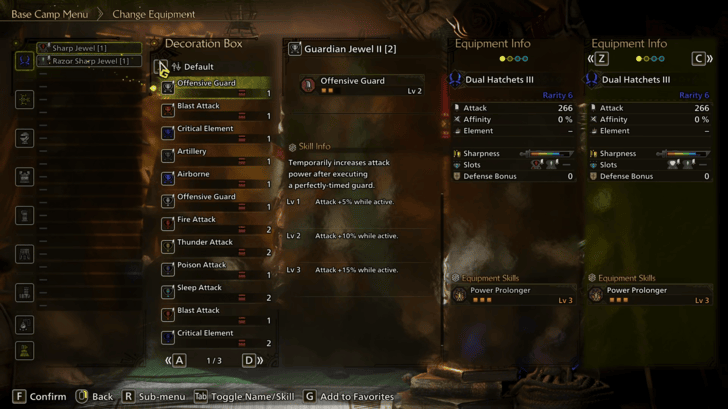
Access the Change Equipment Menu

You can equip Decorations by going to the Smithy or your Tent and then selecting "Change Equipment" in the menu.

Select a piece of equipment that has an available Decoration slot and then hit Right on the D-Pad (D Key on the keyboard) to select from your available Decorations.

How to Equip Decorations

Monster Hunter Wilds Related Guides

Decorations

List of All Decorations

Decorations
Armor Decorations Weapon Decorations

All 3-Slot Weapon Decorations

List of Decorations
Artillery Jewel III【3】Artillery Jewel III【3】 Attack Jewel III【3】Attack Jewel III【3】 Bandolier Jewel III【3】Bandolier Jewel III【3】
Bandolier/Blaze Jwl【3】Bandolier/Blaze Jwl【3】 Bandolier/Bolt Jwl【3】Bandolier/Bolt Jwl【3】 Bandolier/Dragon Jwl【3】Bandolier/Dragon Jwl【3】
Bandolier/Frost Jwl【3】Bandolier/Frost Jwl【3】 Bandolier/Ironwall Jwl【3】Bandolier/Ironwall Jwl【3】 Bandolier/Precise Jwl【3】Bandolier/Precise Jwl【3】
Bandolier/Stream Jwl【3】Bandolier/Stream Jwl【3】 Blast Jewel III【3】Blast Jewel III【3】 Blaze Jewel III【3】Blaze Jewel III【3】
Blaze/Bandolier Jwl【3】Blaze/Bandolier Jwl【3】 Blaze/Crit Elem Jwl【3】Blaze/Crit Elem Jwl【3】 Blaze/Enhancer Jwl【3】Blaze/Enhancer Jwl【3】
Blaze/Focus Jewel【3】Blaze/Focus Jewel【3】 Blaze/Guardian Jewel【3】Blaze/Guardian Jewel【3】 Blaze/Handicraft Jwl【3】Blaze/Handicraft Jwl【3】
Blaze/Ironwall Jwl【3】Blaze/Ironwall Jwl【3】 Blaze/KO Jewel【3】Blaze/KO Jewel【3】 Blaze/Opener Jewel【3】Blaze/Opener Jewel【3】
Blaze/Precise Jewel【3】Blaze/Precise Jewel【3】 Blaze/Quickswitch Jwl【3】Blaze/Quickswitch Jwl【3】 Blaze/Rzr Sharp Jwl【3】Blaze/Rzr Sharp Jwl【3】
Blaze/Shield Jewel【3】Blaze/Shield Jewel【3】 Blunt Jewel III【3】Blunt Jewel III【3】 Bolt Jewel III【3】Bolt Jewel III【3】
Bolt/Bandolier Jwl【3】Bolt/Bandolier Jwl【3】 Bolt/Crit Elem Jwl【3】Bolt/Crit Elem Jwl【3】 Bolt/Enhancer Jwl【3】Bolt/Enhancer Jwl【3】
Bolt/Focus Jewel【3】Bolt/Focus Jewel【3】 Bolt/Guardian Jwl【3】Bolt/Guardian Jwl【3】 Bolt/Handicraft Jwl【3】Bolt/Handicraft Jwl【3】
Bolt/Ironwall Jewel【3】Bolt/Ironwall Jewel【3】 Bolt/KO Jewel【3】Bolt/KO Jewel【3】 Bolt/Opener Jewel【3】Bolt/Opener Jewel【3】
Bolt/Precise Jewel【3】Bolt/Precise Jewel【3】 Bolt/Quickswitch Jwl【3】Bolt/Quickswitch Jwl【3】 Bolt/Rzr Sharp Jwl【3】Bolt/Rzr Sharp Jwl【3】
Bolt/Shield Jewel【3】Bolt/Shield Jewel【3】 Charge Jewel III【3】Charge Jewel III【3】 Charge Up/Attack Jwl【3】Charge Up/Attack Jwl【3】
Charge Up/Draw Jwl【3】Charge Up/Draw Jwl【3】 Charge Up/Expert Jwl【3】Charge Up/Expert Jwl【3】 Charge Up/Handicraft Jwl【3】Charge Up/Handicraft Jwl【3】
Charge Up/KO Jewel【3】Charge Up/KO Jewel【3】 Charge/Handicraft Jwl【3】Charge/Handicraft Jwl【3】 Charge/KO Jewel【3】Charge/KO Jewel【3】
Crit Elem Jwl III【3】Crit Elem Jwl III【3】 Crit Elem/Blaze Jwl【3】Crit Elem/Blaze Jwl【3】 Crit Elem/Bolt Jwl【3】Crit Elem/Bolt Jwl【3】
Crit Elem/Dragon Jwl【3】Crit Elem/Dragon Jwl【3】 Crit Elem/Frost Jwl【3】Crit Elem/Frost Jwl【3】 Crit Elem/Handicraft Jwl【3】Crit Elem/Handicraft Jwl【3】
Crit Elem/Ironwall Jwl【3】Crit Elem/Ironwall Jwl【3】 Crit Elem/KO Jewel【3】Crit Elem/KO Jewel【3】 Crit Elem/Stream Jwl【3】Crit Elem/Stream Jwl【3】
Crit Element/Precise Jwl【3】Crit Element/Precise Jwl【3】 Crit Stat Jwl III【3】Crit Stat Jwl III【3】 Crit Stat/Handicraft Jwl【3】Crit Stat/Handicraft Jwl【3】
Crit Stat/Ironwall Jwl【3】Crit Stat/Ironwall Jwl【3】 Crit Stat/Precise Jwl【3】Crit Stat/Precise Jwl【3】 Crit Status/KO Jwl【3】Crit Status/KO Jwl【3】
Critical Jewel III【3】Critical Jewel III【3】 Dragon Jewel III【3】Dragon Jewel III【3】 Dragon/Bandolier Jwl【3】Dragon/Bandolier Jwl【3】
Dragon/Crit Elem Jwl【3】Dragon/Crit Elem Jwl【3】 Dragon/Enhancer Jwl【3】Dragon/Enhancer Jwl【3】 Dragon/Focus Jewel【3】Dragon/Focus Jewel【3】
Dragon/Guardian Jwl【3】Dragon/Guardian Jwl【3】 Dragon/Handicraft Jwl【3】Dragon/Handicraft Jwl【3】 Dragon/Ironwall Jwl【3】Dragon/Ironwall Jwl【3】
Dragon/KO Jewel【3】Dragon/KO Jewel【3】 Dragon/Opener Jewel【3】Dragon/Opener Jewel【3】 Dragon/Precise Jewel【3】Dragon/Precise Jewel【3】
Dragon/Quickswitch Jwl【3】Dragon/Quickswitch Jwl【3】 Dragon/Rzr Sharp Jwl【3】Dragon/Rzr Sharp Jwl【3】 Dragon/Shield Jewel【3】Dragon/Shield Jewel【3】
Drain Jewel III【3】Drain Jewel III【3】 Draw Jewel III【3】Draw Jewel III【3】 Enhancer Jewel III【3】Enhancer Jewel III【3】
Enhancer/Blaze Jewel【3】Enhancer/Blaze Jewel【3】 Enhancer/Bolt Jewel【3】Enhancer/Bolt Jewel【3】 Enhancer/Dragon Jwl【3】Enhancer/Dragon Jwl【3】
Enhancer/Frost Jwl【3】Enhancer/Frost Jwl【3】 Enhancer/Handicraft Jwl【3】Enhancer/Handicraft Jwl【3】 Enhancer/Stream Jwl【3】Enhancer/Stream Jwl【3】
Expert Jewel III【3】Expert Jewel III【3】 Flight/Attack Jwl【3】Flight/Attack Jwl【3】 Flight/Draw Jewel【3】Flight/Draw Jewel【3】
Flight/Expert Jewel【3】Flight/Expert Jewel【3】 Flight/Handicraft Jwl【3】Flight/Handicraft Jwl【3】 Focus Jewel III【3】Focus Jewel III【3】
Focus/Blaze Jewel【3】Focus/Blaze Jewel【3】 Focus/Bolt Jwl【3】Focus/Bolt Jwl【3】 Focus/Dragon Jewel【3】Focus/Dragon Jewel【3】
Focus/Frost Jewel【3】Focus/Frost Jewel【3】 Focus/Handicraft Jewel【3】Focus/Handicraft Jewel【3】 Focus/KO Jewel【3】Focus/KO Jewel【3】
Focus/Precise Jewel【3】Focus/Precise Jewel【3】 Focus/Stream Jewel【3】Focus/Stream Jewel【3】 Forceshot Jewel【3】Forceshot Jewel【3】
Frost Jewel III【3】Frost Jewel III【3】 Frost/Bandolier Jwl【3】Frost/Bandolier Jwl【3】 Frost/Crit Elem Jwl【3】Frost/Crit Elem Jwl【3】
Frost/Enhancer Jwl【3】Frost/Enhancer Jwl【3】 Frost/Focus Jewel【3】Frost/Focus Jewel【3】 Frost/Guardian Jwl【3】Frost/Guardian Jwl【3】
Frost/Handicraft Jwl【3】Frost/Handicraft Jwl【3】 Frost/Ironwall Jwl【3】Frost/Ironwall Jwl【3】 Frost/KO Jewel【3】Frost/KO Jewel【3】
Frost/Opener Jewel【3】Frost/Opener Jewel【3】 Frost/Precise Jewel【3】Frost/Precise Jewel【3】 Frost/Quickswitch Jwl【3】Frost/Quickswitch Jwl【3】
Frost/Rzr Sharp Jwl【3】Frost/Rzr Sharp Jwl【3】 Frost/Shield Jewel【3】Frost/Shield Jewel【3】 Gambit Jewel III【3】Gambit Jewel III【3】
Gambit/Handicraft Jwl【3】Gambit/Handicraft Jwl【3】 Gambit/Ironwall Jwl【3】Gambit/Ironwall Jwl【3】 Gambit/KO Jewel【3】Gambit/KO Jewel【3】
Grinder/Attack Jewel【3】Grinder/Attack Jewel【3】 Grinder/Draw Jewel【3】Grinder/Draw Jewel【3】 Grinder/Expert Jewel【3】Grinder/Expert Jewel【3】
Grinder/Handicraft Jwl【3】Grinder/Handicraft Jwl【3】 Grinder/Ironwall Jewel【3】Grinder/Ironwall Jewel【3】 Grinder/KO Jewel【3】Grinder/KO Jewel【3】
Guardian Jewel III【3】Guardian Jewel III【3】 Guardian/Blaze Jwl【3】Guardian/Blaze Jwl【3】 Guardian/Bolt Jwl【3】Guardian/Bolt Jwl【3】
Guardian/Dragon Jwl【3】Guardian/Dragon Jwl【3】 Guardian/Frost Jwl【3】Guardian/Frost Jwl【3】 Guardian/Handicraft Jwl【3】Guardian/Handicraft Jwl【3】
Guardian/Ironwall Jwl【3】Guardian/Ironwall Jwl【3】 Guardian/Stream Jwl【3】Guardian/Stream Jwl【3】 Handicraft Jwl III【3】Handicraft Jwl III【3】
Ironwall Jewel III【3】Ironwall Jewel III【3】 KO Jewel III【3】KO Jewel III【3】 Magazine/Attack Jwl【3】Magazine/Attack Jwl【3】
Magazine/Draw Jwl【3】Magazine/Draw Jwl【3】 Magazine/Expert Jwl【3】Magazine/Expert Jwl【3】 Magazine/Handicraft Jwl【3】Magazine/Handicraft Jwl【3】
Magazine/Ironwall Jwl【3】Magazine/Ironwall Jwl【3】 Mastery Jewel【3】Mastery Jewel【3】 MindMind's Eye Jwl III【3】
Opener Jewel III【3】Opener Jewel III【3】 Opener/Blaze Jewel【3】Opener/Blaze Jewel【3】 Opener/Bolt Jewel【3】Opener/Bolt Jewel【3】
Opener/Dragon Jewel【3】Opener/Dragon Jewel【3】 Opener/Frost Jewel【3】Opener/Frost Jewel【3】 Opener/Ironwall Jwl【3】Opener/Ironwall Jwl【3】
Opener/Precise Jewel【3】Opener/Precise Jewel【3】 Opener/Stream Jwl【3】Opener/Stream Jwl【3】 Paracoat Jewel【3】Paracoat Jewel【3】
Paralyzer Jwl III【3】Paralyzer Jwl III【3】 Pierce Jewel【3】Pierce Jewel【3】 Poison/Attack Jewel【3】Poison/Attack Jewel【3】
Poison/Draw Jewel【3】Poison/Draw Jewel【3】 Poison/Expert Jwl【3】Poison/Expert Jwl【3】 Poison/Handicraft Jwl【3】Poison/Handicraft Jwl【3】
Poison/Ironwall Jwl【3】Poison/Ironwall Jwl【3】 Poison/KO Jewel【3】Poison/KO Jewel【3】 Poison/Precise Jwl【3】Poison/Precise Jwl【3】
Precise Jewel III【3】Precise Jewel III【3】 Quickswitch Jewel III【3】Quickswitch Jewel III【3】 Quickswitch/Blaze Jwl【3】Quickswitch/Blaze Jwl【3】
Quickswitch/Bolt Jwl【3】Quickswitch/Bolt Jwl【3】 Quickswitch/Dragon Jwl【3】Quickswitch/Dragon Jwl【3】 Quickswitch/Frost Jwl【3】Quickswitch/Frost Jwl【3】
Quickswitch/Handicraft Jwl【3】Quickswitch/Handicraft Jwl【3】 Quickswitch/Ironwall Jwl【3】Quickswitch/Ironwall Jwl【3】 Quickswitch/KO Jwl【3】Quickswitch/KO Jwl【3】
Quickswitch/Stream Jwl【3】Quickswitch/Stream Jwl【3】 Razor Sharp/KO Jwl【3】Razor Sharp/KO Jwl【3】 Rzr Sharp Jwl III【3】Rzr Sharp Jwl III【3】
Rzr Sharp/Blaze Jwl【3】Rzr Sharp/Blaze Jwl【3】 Rzr Sharp/Bolt Jwl【3】Rzr Sharp/Bolt Jwl【3】 Rzr Sharp/Dragon Jwl【3】Rzr Sharp/Dragon Jwl【3】
Rzr Sharp/Frost Jwl【3】Rzr Sharp/Frost Jwl【3】 Rzr Sharp/Handicraft Jwl【3】Rzr Sharp/Handicraft Jwl【3】 Rzr Sharp/Ironwall Jwl【3】Rzr Sharp/Ironwall Jwl【3】
Rzr Sharp/Stream Jwl【3】Rzr Sharp/Stream Jwl【3】 Salvo Jewel【3】Salvo Jewel【3】 Sharp Jewel III【3】Sharp Jewel III【3】
Shield Jewel III【3】Shield Jewel III【3】 Shield/Blaze Jewel【3】Shield/Blaze Jewel【3】 Shield/Bolt Jewel【3】Shield/Bolt Jewel【3】
Shield/Dragon Jwl【3】Shield/Dragon Jwl【3】 Shield/Frost Jewel【3】Shield/Frost Jewel【3】 Shield/Handicraft Jwl【3】Shield/Handicraft Jwl【3】
Shield/Ironwall Jwl【3】Shield/Ironwall Jwl【3】 Shield/Stream Jewel【3】Shield/Stream Jewel【3】 Sleep Jewel III【3】Sleep Jewel III【3】
Sleepcoat Jewel【3】Sleepcoat Jewel【3】 Sonorous/Attack Jwl【3】Sonorous/Attack Jwl【3】 Sonorous/Draw Jwl【3】Sonorous/Draw Jwl【3】
Sonorous/Expert Jwl【3】Sonorous/Expert Jwl【3】 Sonorous/Handicraft Jwl【3】Sonorous/Handicraft Jwl【3】 Sonorous/KO Jewel【3】Sonorous/KO Jewel【3】
Spread Jewel【3】Spread Jewel【3】 Stream Jewel III【3】Stream Jewel III【3】 Stream/Bandolier Jwl【3】Stream/Bandolier Jwl【3】
Stream/Crit Elem Jwl【3】Stream/Crit Elem Jwl【3】 Stream/Enhancer Jwl【3】Stream/Enhancer Jwl【3】 Stream/Focus Jewel【3】Stream/Focus Jewel【3】
Stream/Guardian Jwl【3】Stream/Guardian Jwl【3】 Stream/Handicraft Jwl【3】Stream/Handicraft Jwl【3】 Stream/Ironwall Jwl【3】Stream/Ironwall Jwl【3】
Stream/KO Jewel【3】Stream/KO Jewel【3】 Stream/Opener Jwl【3】Stream/Opener Jwl【3】 Stream/Precise Jewel【3】Stream/Precise Jewel【3】
Stream/Quickswitch Jwl【3】Stream/Quickswitch Jwl【3】 Stream/Rzr Sharp Jwl【3】Stream/Rzr Sharp Jwl【3】 Stream/Shield Jewel【3】Stream/Shield Jewel【3】
Venom Jewel III【3】Venom Jewel III【3】

Author

    Please participate in our site
    improvement survey
    12/2025
    Would you assist in
    improving Game8's site?
    ×
    This survey will take about 1 minute.
    Your answers will help us to improve our website.
    We are listening to our users' valuable opinions and discussing how to act on them.
    The information collected through this survey will be used for the purpose of improving our services. In addition, the information will only be disclosed a part of a statistic in a format that will not allow identification of personal information.
    Begin Survey

    All rights reserved

    Guide Index