An Introduction to Indoor Archaeology Quest Guide
✉ Send your thoughts in our Genshin 6.4 Patch Survey!
★ Exclusive: Dive back in time with the Meta History
◆ Hot: Version 6.4, Luna 5 Codes
◆ Builds: Varka, Flins, Skirk, Escoffier
◆ Events: Travelers' Tales, He Who Caught the Wind
◆ Future: Linnea, Version 6.5 Luna VI

An Introduction to Indoor Archaeology is the second quest of the Golden Slumber chain in Sumeru for Genshin Impact. See how to unlock the An Introduction to Indoor Archaeology World Quest, how to investigate The Mausoleum of the King Deshret in this guide!
List of Contents
How to Unlock An Introduction to Indoor Archaeology
Finish Golden Slumber: Lost in the Sand Subquest

An Introduction to Indoor Archaeology automatically unlocks after you finish the Lost in the Sand sub-quest in Golden Slumbers.
An Introduction to Indoor Archaeology Quest Walkthrough
Go to the Oasis

Go to the quest marker leading to the Oasis to rest and set up camp with the group. Follow and talk to Jebrael up to a cliff near a stone tablet after setting up the camp. Go back once done to rest up.
Go to the Khemenu Temple

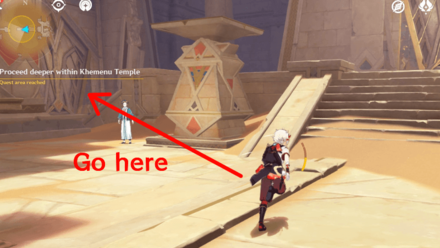
Move northwest to get to the Khemenu Temple. Head inside, proceed to the door and let Benben open up the door.
Proceed Deeper to the Khemenu Temple

You need to unlock and follow two Primal Embers back to the door to open it up and proceed to the next area. You can find them below if you go inside the left and right doors.
Note that you can unlock the Primal Embers on any order and decide which door you want to get into first.
How to Get the Primal Ember on the Left Door
| How to Get the Primal Ember on the Left Door | |
|---|---|
| 1 |  Go to the door near Tirzad. Head down until you reach the room. |
| 2 |  Kill the enemy to activate the Primal Ember (blue floating orb). |
| 3 |  Just like a Seelie, follow the Primal Ember up until it reaches the Primal Torch (giant fire pit) to light it up. |
How to Get the Primal Ember on the Right Door
| How to Get the Primal Ember on the Right Door | |
|---|---|
| 1 |  Go to the door near Jebrael. Head down until you reach the room. |
| 2 |  Get the Forged Primal Light to activate the Primal Ember (blue floating orb). |
| 3 |  Just like a Seelie, follow the Primal Ember up until it reaches the Primal Torch (giant fire pit) to light it up. |
Explore the Lower Level of Khemenu Temple

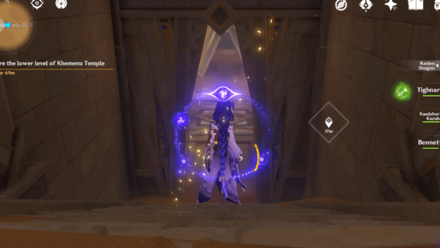
Advance to the lower floor and head inside to the furthest room. You can activate a Teleport Waypoint on the room before that. You might need it later, so it's best to activate it right away.
Try to Unlock the Rooms Located Deep Within

Go to the nearby rooms to get the Primal Embers to open up a door with an elevator leading down below. Be careful with disappearing platforms called Illusory Keystones when you head to the rooms, as you might fall off to your death.
You can also do this in any order and still unlock the door and the elevator.
How to Get the Primal Ember on the Left Room
| How to Get the Primal Ember on the Left Room | |
|---|---|
| 1 |  Go to the door where Benben and Jeht are standing. Follow the quest marker until you reach the big room with hourglasses. |
| 2 |  Activate the Primal Sandglass challenge to show all the Four-Leaf Sigils and get to the Primal Ember quickly. You have the choice to finish the challenge or proceed to the next objective immediately. |
| 3 |  Follow the Primal Ember until it reaches the Primal Torch in the main room to light it up. |
How to Get the Primal Ember on the Right Room
| How to Get the Primal Ember on the Right Room | |
|---|---|
| 1 |  Go to the opposite path away from Benben and Jeht to find Jebrael standing in the corridor. Follow the quest marker until you reach a room with a ship. |
| 2 |  Get the Forged Primal Light above near a Dendroculus. Use the Four-Leaf Sigil to traverse quickly. |
| 3 |  Go to the deck of the ship with the Forged Primal Light to activate the Primal Ember. |
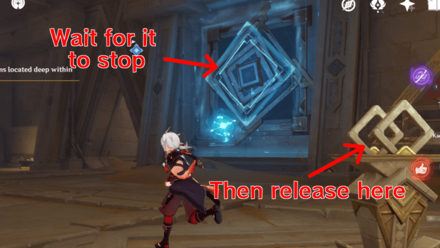
| 4 |  Activate the Illusory Keystone to head down further and follow the Primal Ember. Release it from the stone once the Large Fan Blade turns off so it won't get pushed by the wind. |
| 5 |  Follow the Primal Ember until it reaches the Primal Torch in the main room to light it up. |
Enter the Room Located Deep Within

Once all the Primal Torches are lit up, use the elevator to head down. Go near the Mural to finish the quest and get the rewards.
You can also get a Sacred Seal: Sunrise on the right side before proceeding to the next sub-quest.
The Secret of Al-Ahmar Quest Guide ▶
An Introduction to Indoor Archaeology Information
Sub-Quest of Golden Slumber

This quest is a sub-quest to complete the Desert quest chain under Golden Slumber. You'll need to clear all quests to unlock all ruins and exploration abilities in the Desert area of Sumeru!
Golden Slumber World Quest Chain Guide
An Introduction to Indoor Archaeology Rewards
Total Quest Rewards
| Quest Rewards | ||
|---|---|---|
|
|
|
|
|
|
||
Genshin Impact Related Guides

Other Golden Slumber Quest Guides
| Golden Slumber World Quest Guides | ||
|---|---|---|
| Lost in the Sands | An Introduction to Indoor Archaeology | The Secret of Al-Ahmar |
| Dreams Beneath the Searing Sand | ||
Comment
Author
An Introduction to Indoor Archaeology Quest Guide
improvement survey
03/2026
improving Game8's site?

Your answers will help us to improve our website.
Note: Please be sure not to enter any kind of personal information into your response.

We hope you continue to make use of Game8.
Rankings
Gaming News
Popular Games

Genshin Impact Walkthrough & Guides Wiki

Honkai: Star Rail Walkthrough & Guides Wiki

Umamusume: Pretty Derby Walkthrough & Guides Wiki

Pokemon Pokopia Walkthrough & Guides Wiki

Resident Evil Requiem (RE9) Walkthrough & Guides Wiki

Monster Hunter Wilds Walkthrough & Guides Wiki

Wuthering Waves Walkthrough & Guides Wiki

Arknights: Endfield Walkthrough & Guides Wiki

Pokemon FireRed and LeafGreen (FRLG) Walkthrough & Guides Wiki

Pokemon TCG Pocket (PTCGP) Strategies & Guides Wiki
Recommended Games

Diablo 4: Vessel of Hatred Walkthrough & Guides Wiki

Fire Emblem Heroes (FEH) Walkthrough & Guides Wiki

Yu-Gi-Oh! Master Duel Walkthrough & Guides Wiki

Super Smash Bros. Ultimate Walkthrough & Guides Wiki

Pokemon Brilliant Diamond and Shining Pearl (BDSP) Walkthrough & Guides Wiki

Elden Ring Shadow of the Erdtree Walkthrough & Guides Wiki

Monster Hunter World Walkthrough & Guides Wiki

The Legend of Zelda: Tears of the Kingdom Walkthrough & Guides Wiki

Persona 3 Reload Walkthrough & Guides Wiki

Cyberpunk 2077: Ultimate Edition Walkthrough & Guides Wiki
All rights reserved
Copyright© 2012-2024 HoYoverse — COGNOSPHERE. All Rights Reserved.
The copyrights of videos of games used in our content and other intellectual property rights belong to the provider of the game.
The contents we provide on this site were created personally by members of the Game8 editorial department.
We refuse the right to reuse or repost content taken without our permission such as data or images to other sites.


